Cub Cadet ST 228 ST 228 Operator's Manual
Cub Cadet ST 228 Manual
 |
View all Cub Cadet ST 228 manuals
Add to My Manuals
Save this manual to your list of manuals |
Cub Cadet ST 228 manual content summary:
- Cub Cadet ST 228 | ST 228 Operator's Manual - Page 1
English - Page 1 ST228 2-Cycle Trimmer Operator's Manual Read and understand all instruction, warning and danger labels on the unit. Quick Instructions to Assemble Trimmers For complete instructions, refer to the Assembly Instructions section of this manual. Place the shield onto the mount bracket - Cub Cadet ST 228 | ST 228 Operator's Manual - Page 2
OF CONTENTS Service Information 2 Rules for Safe Operation 2 Know Your Unit 3 Assembly Instructions 3 Oil and Fuel Information 4 Starting/Stopping Instructions 4 Operating Instructions 4 Maintenance and Repair Instructions 5 Cleaning and Storage 6 Optional Accessory 6 Troubleshooting Chart - Cub Cadet ST 228 | ST 228 Operator's Manual - Page 3
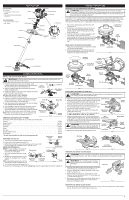
must first be removed from the trimmer unit. To safely attach the brush cutter to the unit follow these instructions: 1. Remove the cutting head on the ground or on a work bench. Primary Hole Guide Recess Fig. 3 90˚ Edging Hole (Trimmer Only) 1. Turn knob counterclockwise to loosen (Fig. 5). - Cub Cadet ST 228 | ST 228 Operator's Manual - Page 4
17 Support Fitting Fig. 18 Fig. 19 OIL AND FUEL INFORMATION OIL AND FUEL MIXING INSTRUCTIONS Old fresh fuel mix explained in the operator's manual • Use the fuel additive STA-BIL® the table for specific gas and oil mixing ratios. UNLEADED GAS 2 CYCLE OIL 1 GALLON US (3.8 LITERS) 2.6 FL. OZ. (77 - Cub Cadet ST 228 | ST 228 Operator's Manual - Page 5
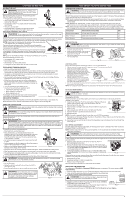
while swinging the upper part of your body from INSTRUCTIONS MAINTENANCE SCHEDULE WARNING: To prevent serious injury, never perform maintenance or repairs with unit running. Always service 31) Fig. 30 Eyelet Trimmer Line Fig. 31 4. Start speed should solve most engine problems. If not and all of - Cub Cadet ST 228 | ST 228 Operator's Manual - Page 6
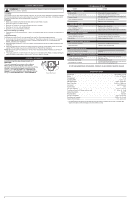
for any loose or damaged parts. Repair or replace damaged parts and tighten loose screws, improperly mixed fuel Fouled spark plug TROUBLESHOOTING ACTION Fill fuel tank with properly REQUIRED, CONTACT AN AUTHORIZED SERVICE DEALER. SPECIFICATIONS* Engine Type Air-Cooled, 2-Cycle Stroke 1.10 in. - Cub Cadet ST 228 | ST 228 Operator's Manual - Page 7
, warning and danger labels on the unit. Instructions rapides pour le montage des taille-bordures Pour des instructions plus détaillées, veuillez consulter les Instructions de montage du manuel. 50:1 Placez l'écran de protection sur le support de montage. Vissez fermement les 4 vis de l'écran - Cub Cadet ST 228 | ST 228 Operator's Manual - Page 8
TECHNIQUE TABLE DES MATIÈRES Service technique 8 Consignes de sécurit 8 Familiarisez-vous avec votre appareil 9 Instructions de montage 9 Informations sur l'huile et le carburant 10 Instructions de démarrage et arrêt 10 Instructions d'Utilisation 11 Instructions d'entretien et réparations 11 - Cub Cadet ST 228 | ST 228 Operator's Manual - Page 9
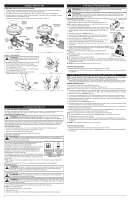
(3) L'accessoire de coupe Écran de la lame INSTRUCTIONS DE MONTAGE INSTALLER L'ECRAN DE PROTECTION DE LA ACCESSOIRE DE COUPE OU AUTRE Renfoncement-guide REMARQUE : Pour faciliter l'installation ou po•lb, 27 - 28 pi•lb, 37 -38 N•m. Support du protecteur • Si vous n'avez pas de clé dynamométrique - Cub Cadet ST 228 | ST 228 Operator's Manual - Page 10
lectrique ou de mise en MARCHE de la perceuse (I) jusqu'à ce que le moteur démarre. SI CHAUD... Le moteur est déjà chaud, retournez à l'étape 7. INSTRUCTIONS D'ARRÊT 1. Relâchez la manette des gaz. Laissez le moteur se refroidir au ralenti. 2. Appuyez sur la commande Marche/Arrêt et maintenez-la en - Cub Cadet ST 228 | ST 228 Operator's Manual - Page 11
la vis de ralenti comme suit: Fig. 33 1. Démarrez le moteur et laissez-le tourner à haut régime pendant une minute pour se réchauffer. Voir les Instructions de démarrage et d'arrêt. 2. Relâchez la manette des gaz et laissez le moteur tourner au ralenti. Si le moteur s'arrête, insérez un - Cub Cadet ST 228 | ST 228 Operator's Manual - Page 12
INSTRUCTIONS D'ENTRETIEN ET RÉPARATIONS REMPLACEMENT DE LA BOUGIE Utilisez une bougie ref. concessionnaire agréé Bougie encrassée Remplacez ou nettoyez-la ARRÊTS DE MOTEUR TANDIS QU'EN SERVICE La protection de survitesse de moteur s'est engagée Permettez au moteur de refroidir pendant 10 - Cub Cadet ST 228 | ST 228 Operator's Manual - Page 13
ST228 Recortadora de 2 Tiempos Manual del Operador Read and understand all instruction, warning and danger labels on the unit. Instrucciones Rápidas para Ensamblar Recortadoras Para las instrucciones completas, consulte la sección Instrucciones de Ensamblaje de este manual debajo de la parte de la - Cub Cadet ST 228 | ST 228 Operator's Manual - Page 14
manijas. • Mantenga las manos, la cara y los pies alejados de todas las partes en movimiento. No toque ni trate de parar el accesorio de corte cuando esté motor y anulará la garantía. • INDICADOR DE ACEITE Consulte el manual del operador para obtener información acerca del tipo correcto de aceite. - Cub Cadet ST 228 | ST 228 Operator's Manual - Page 15
CONOZCA SU UNIDAD APLICACIONES Como recortadora; • Corte de césped y hierbas delgadas • Recorte de bordes • Recorte decorativo alrededor de árboles, cercos, etc. HERRAMIENTAS NECESARIAS: • Destornillador de cabeza plana o T-20 • Casquillo de 10 mm (3/8 pulgadas) Silenciador Traba del regulador - Cub Cadet ST 228 | ST 228 Operator's Manual - Page 16
de carga antes de arrancar el motor. 16 INSTRUCCIONES DE ARRANQUE Y APAGADO INSTRUCTIONS DE DÉMARRAGE ADVERTENCIA: Use esta unidad sólo en un área exterior bien eléctrico opcional en la parte trasera de la unidad. Consulte la sección de Operación del manual del operador del Arrancador Eléctrico - Cub Cadet ST 228 | ST 228 Operator's Manual - Page 17
del motor puede ser ajustada. Puede tener acceso Tornillo de ajuste de mínima al tornillo de ajuste de mínima a través de un orificio en la parte superior de la cubierta del motor (Fig. 33). NOTA: Los ajustes realizados sin cuidado pueden dañar seriamente su unidad. Los ajustes del carburador deben - Cub Cadet ST 228 | ST 228 Operator's Manual - Page 18
limpie los electrodos. El motor podría dañarse si penetran pequeñas partículas en el cilindro. 3. Cambie las bujías que estén rajadas, las especificaciones contenidas en este manual se basan en la información más reciente disponible en el momento de impresión del manual. Nos reservamos el derecho - Cub Cadet ST 228 | ST 228 Operator's Manual - Page 19
NOTES 19 - Cub Cadet ST 228 | ST 228 Operator's Manual - Page 20
NOTES 20 - Cub Cadet ST 228 | ST 228 Operator's Manual - Page 21
NOTES 21 - Cub Cadet ST 228 | ST 228 Operator's Manual - Page 22
NOTES 22 - Cub Cadet ST 228 | ST 228 Operator's Manual - Page 23
NOTES 23 - Cub Cadet ST 228 | ST 228 Operator's Manual - Page 24
manual will void your warranty as to any resulting damage. This warranty is limited to ninety (90) days from the date of original retail purchase for any Cub Cadet product that is used for rental or commercial purposes, or any other income-producing purpose. HOW TO OBTAIN SERVICE: Warranty service
-
 1
1 -
 2
2 -
 3
3 -
 4
4 -
 5
5 -
 6
6 -
 7
7 -
8
-
9
-
10
-
11
-
12
-
13
-
14
-
15
-
16
-
17
-
18
-
19
-
20
-
21
-
22
-
23
-
24
 |
 |

769-07532 P01
05/12
Quick Instructions to
Replace Trimmer Line
For complete instructions,
refer to
Line Installation
section of this manual.
Quick Instructions
to Start Engine
For complete instructions, refer to
Starting/ Stopping Instructions
section
of this manual.
Quick Instructions to
Assemble Trimmers
For complete instructions, refer to the
Assembly Instructions
section of this
manual.
Rotate the bump knob
clockwise until all line is
inside the cutting head.
Using a flat-head screwdriver,
insert the tip into the line dimple,
just under the exposed portion of
the line, and pull all the line out.
Align the arrows on the
bump knob with the
spool cover eyelets.
Using 16 ft. of 0.095 in. line; push both
ends through the holes in the bump knob
until they protrude through the eyelets.
Hold the spool cover, turn the bump
knob clockwise to wind the line around
the spool until about 5 in. is protruding
from each side of the cutting head.
Start the unit and bump the cutting
head on the ground until the
desired cutting length is achieved.
Pull the line until approximately
8 ft. is visible on each side.
IMPORTANT: READ OPERATOR’S MANUAL THOROUGHLY AND FOLLOW THE SAFE OPERATION PRACTICES WHILE OPERATING THE UNIT.
Read and understand all instruction, warning and danger labels on the unit.
Mix thoroughly in a separate fuel can:
– 2.6 fl. oz. of 2-cycle engine oil
– 1 gallon of unleaded gasoline
Place the unit on a
level surface.
Fill
fuel tank.
NOTE:
Do not mix directly in the
engine fuel tank.
Remove the cap and spacer
from the boom. Push the
bottom add-on into the
coupler. Turn the knob
clockwise to tighten.
1 Gallon
2.6 oz
50:1
Press primer bulb 10 times.
Move choke lever to
Position 1
.
Continue to squeeze
throttle control and
move the choke
lever to
Position 3
.
Move choke lever to
Position 2
.
Pull the rope
5 times.
Continue squeezing the
throttle control and run engine
for additional 60 seconds to
complete warm up.
Pull starter rope 3 to 5 times.
Making sure to keep throttle
squeezed, run engine for
30-60 seconds to warm up.
Crouch in starting
position.
DIDN’T START?
Repeat these instructions.
If engine still fails to start,
refer to the operator’s
manual for additional
starting and troubleshooting
information
5 X
Place the
shield
onto the
mount bracket
.
Securely screw the
4
shield screws
through
the holes on the mount bracket and into the
shield. Make sure the screws are tightened
equally.
PRESS
the lockout in;
SQUEEZE
and
HOLD
throttle
control for
ALL
further steps.
Remove the screws and bottom clamp. Place
the D-handle over the shaft housing and onto
the bottom clamp. Move it a minimum of 6 inches
(15.24 cm) from the end of the shaft grip.
If pre-installed, loosen the screws just enough
to move it. Tighten the clamp screws evenly
until handle is secure.
Min. 6"
Español — Page 13
English — Page 1
Français — Page 7
ST228
2-Cycle Trimmer
Operator’s Manual
NEED HELP?
CALL 1–877-282-8684 IN U.S. OR 1–800–668–1238 IN CANADA