Cub Cadet ZT1 42 Operation Manual
Cub Cadet ZT1 42 Manual
 |
View all Cub Cadet ZT1 42 manuals
Add to My Manuals
Save this manual to your list of manuals |
Cub Cadet ZT1 42 manual content summary:
- Cub Cadet ZT1 42 | Operation Manual - Page 1
authorized service dealer. MODEL NUMBER SERIAL NUMBER Table of Contents Important Safe Operation Practices 2 Assembly 7 Operation 10 Service and Maintenance 16 Troubleshooting 24 Parts/Warranty See Separate Supplement WARNING Read and follow all safety rules and instructions in this manual - Cub Cadet ZT1 42 | Operation Manual - Page 2
instruction. 5. If situations occur which are not covered in this manual, use care and good judgment. Contact your customer service be caught in moving parts. Never operate this tractor change the stability of the tractor. Always follow the attachment manufacturer's instructions. 16. Stop the blade - Cub Cadet ZT1 42 | Operation Manual - Page 3
minutes before attempting any service. 22. Never run Do not make sudden changes in speed or direction , even with the blade(s) shut off. They and equipment. Clean up oil or fuel spillage and the instructions and safe operation practices in this manual and included as part of this manual to measure - Cub Cadet ZT1 42 | Operation Manual - Page 4
speed of the engine. 3. Tractor blades are sharp. Wrap the blade or wear gloves, and use extra caution when servicing them. 4. Tractors with hydraulic pumps, hoses or motors; and/or diesel injections systems have fluid systems under pressure. Fluid escaping under pressure may have sufficient force - Cub Cadet ZT1 42 | Operation Manual - Page 5
/or blade spindle contact can crush or injury body parts. - Cub Cadet ZT1 42 | Operation Manual - Page 6
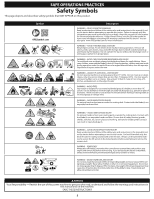
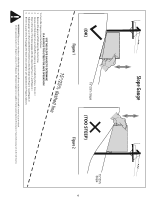
Slope Gauge 6 (OK) 15°/25% Slope (TOO STEEP) Figure 1 Figure 2 15°/25% dashed line USE THIS SLOPE GAUGE TO DETERMINE IF A SLOPE IS TOO STEEP FOR SAFE OPERATION! To check the slope, proceed as follows: 1. Remove this page and fold along the dashed line. 2. Locate a vertical object on or behind - Cub Cadet ZT1 42 | Operation Manual - Page 7
ASSEMBLY Note: This Operator's Manual covers several models. Tractor features may vary by model. Not all features in this manual are applicable to all tractor models and the tractor depicted may differ from yours. Note: All references in this manual to the left or right side and front or back of - Cub Cadet ZT1 42 | Operation Manual - Page 8
Setting Front Gauge Wheels." 46"/50"/54"/60" Deck Models 1. The chute is shipped attached and with of the deck and are not designed to support the weight of the cutting deck. 1. section for deck leveling information and instructions. 4. Place deck lift lever section of this manual for more detail - Cub Cadet ZT1 42 | Operation Manual - Page 9
battery terminal to help protect it from corrosion. See Figure 12. Note: If the battery is put into service after date shown on top/side of battery, charge the battery as instructed in the Product Care section, prior to operating. Battery Maintenance • The battery is filled with battery acid and - Cub Cadet ZT1 42 | Operation Manual - Page 10
Manual covers several models. Tractor features may vary by model. Not all features in this manual are applicable to all tractor models and instructions. 7 2 Deck Height Index If equipped with a deck lift handle: Each height index notch corresponds to approximately a 1⁄2" (12.7mm) change in - Cub Cadet ZT1 42 | Operation Manual - Page 11
oil service minder interval will occur every 50 hours. Before the interval expires, change the engine oil as instructed in the Engine Operator's Manual Low Oil Note: The low oil speed, throttle should remain in high speed while operating blades. 13 Choke Control (If equipped) The choke control - Cub Cadet ZT1 42 | Operation Manual - Page 12
manual for regularly scheduled service to Practice Operation for further instructions. Control Levers Moved Outward & its slow and fast positions on models with a separate choke control. oil pressure light come on, immediately stop the engine. Have the tractor inspected by your authorized service - Cub Cadet ZT1 42 | Operation Manual - Page 13
tractor at approximately throttle and at less than full speed in both forward and reverse. Carefully practice maneuvering the tractor using the instructions in the following section "Driving the Tractor." Practice until you are confident that you can safely operate the tractor. Driving the Tractor - Cub Cadet ZT1 42 | Operation Manual - Page 14
OPERATION Driving the Tractor In Reverse WARNING Always look behind and down on both sides of the tractor before backing up. Always look behind while traveling in the reverse direction. Mowing in reverse is not recommended. 1. Slowly and evenly move both lapbar drive control levers rearward. The - Cub Cadet ZT1 42 | Operation Manual - Page 15
sticks, stones, wire or other objects that can be thrown by the rotating blades. Note: Do not engage the mower deck when lowered in grass. Premature wear strip. • To prevent rutting or grooving of the turf, if possible, change the direction that the strips are mowed by approximately 45° for the next - Cub Cadet ZT1 42 | Operation Manual - Page 16
, Axle and Fans # Check/Add/Change Transmission Fluid as needed Check Air Filter for Dirty, Loose or Damaged Parts Check Engine Oil Level Clean Battery Terminals Grease All Lubrication Points Check Engine Intake Screen/Clean as Needed Check Blades/Sharpen or Replace as Needed Check - Cub Cadet ZT1 42 | Operation Manual - Page 17
SERVICE AND MAINTENANCE Note: This Operator's Manual covers several models. Tractor features may vary by • model. Not all features in this manual are applicable to all tractor models For Clarity Figure 30 Fuel leaks/spills, oil leaks/spills and excess lubrication can also become collections sites - Cub Cadet ZT1 42 | Operation Manual - Page 18
with floor panel removed. On some models, the floor panel can be removed for maintenance, service and cleaning. To remove the floor oil filter (d), and refill the engine with new oil as instructed in the Engine Operator's Manual. Note: Place an absorbent towel beneath the oil filter to keep oil - Cub Cadet ZT1 42 | Operation Manual - Page 19
to prevent deterioration. Changing the Transmission Oil & Filter (If Equipped) b. Using a fuel stabilizer for storage between 30 and 90 days: Note: Refer to maintenance schedule chart located in this manual for proper service intervals. To change the transmission oil: 1. Remove the cap - Cub Cadet ZT1 42 | Operation Manual - Page 20
SERVICE AND MAINTENANCE Removing The Tractor From Storage 1. Check the engine oil If necessary, adjust front-to-back as instructed previously. 5. When proper adjustment is the blade tip to the ground and the rear of the blade tip deck and are not designed to support the weight of the cutting deck - Cub Cadet ZT1 42 | Operation Manual - Page 21
recurring problem with blown fuses, have the tractor's electrical system checked by your authorized service dealer the PTO pulley on 42" Decks 46/50/54/60" Decks the bottom of the engine. (b) b. side of the belt rearward and downward while manually turning the PTO pulley to the right until - Cub Cadet ZT1 42 | Operation Manual - Page 22
SERVICE AND MAINTENANCE b. Remove the third bow-tie pin (a) from the clevis pin (a) (b) that Refer to Figure 43 for 42" decks, Figure 44 for 46" decks and Figure 45 for 50", 54" and 60" decks. Note: Take note of the position of the belt guards (c) to ensure they are properly re-installed. Note - Cub Cadet ZT1 42 | Operation Manual - Page 23
heavy gloves when handling the blades. When servicing the tractor deck, be careful not to cut yourself on the sharpened blades. The cutting blades must be kept sharp at tools used in order to change the tractor's transmission drive belt. See your authorized service dealer to have the transmission - Cub Cadet ZT1 42 | Operation Manual - Page 24
any adjustments or repairs. This section addresses minor service issues. To locate the nearest authorized service center consult the separate supplement sheet for contact information. Problem Engine Fails to start Cause 1. PTO/Blade Engage knob engaged. 2. Parking brake not engaged. 3. Spark - Cub Cadet ZT1 42 | Operation Manual - Page 25
Para encontrar la placa de modelo, eleve el asiento y mire en la parte inferior de la bandeja del asiento. Si tiene que solicitar soporte técnico a manos después de estar en contacto con estos componentes. NOTA: Este manual de operación, corresponde a varios modelos. Las características pueden variar - Cub Cadet ZT1 42 | Operation Manual - Page 26
Esta máquina está diseñada para ser utilizada respetando las medidas de seguridad contenidas en este manual. Al igual que con cualquier tipo de equipo motorizado, un descuido o error por parte del operador puede producir lesiones graves. Esta máquina es capaz de amputar manos y pies y de arrojar - Cub Cadet ZT1 42 | Operation Manual - Page 27
usar el tractor en el lugar inclinado. Use el dispositivo de medición de pendientes además del indicador de pendientes que se incluye como parte de este manual para medir las pendientes antes de operar este tractor en una zona inclinada o con pendientes. Para medir las pendientes, también se pueden - Cub Cadet ZT1 42 | Operation Manual - Page 28
par de ajuste del perno de montaje del motor y las cuchillas de acuerdo con la tabla del Cronograma de mantenimiento de este manual. Además, inspeccione visualmente las cuchillas para detectar la presencia de daños (por ejemplo: desgaste excesivo, abolladuras, rajaduras). Reemplace las cuchillas por - Cub Cadet ZT1 42 | Operation Manual - Page 29
correas y/o el husillo de las cuchillas puede aplastar o lesionar las partes del cuerpo. ADVERTENCIA - EVITE LAS LESIONES POR PUNTOS DE APLASTAMIENTO/ las normas y las instrucciones de seguridad que se incluyen en el manual y en el tractor antes de intentar realizar el mantenimiento de este tractor - Cub Cadet ZT1 42 | Operation Manual - Page 30
Indicador de pendiente 6 (OK) Pendiente de 15°/25% Pendiente de 15°/25% (DEMASIADO EMPINADA) Figura 1 Figura 2 Línea de guiones a 15°/25% ¡UTILICE ESTE INDICADOR DE PENDIENTE PARA DETERMINAR SI UNA PENDIENTE ES DEMASIADO EMPINADA PARA OPERAR CON SEGURIDAD! Para comprobar la pendiente, proceda - Cub Cadet ZT1 42 | Operation Manual - Page 31
ún los modelos. No todas las características que se incluyen en este manual se Ajuste de perilla o ajuste de palanca aplican a todos los modelos fuera necesario) 1. Ubique el Enganche (a) e instálelo en la parte trasera del bastidor con los dos tornillos de arandela hexagonal (b) proporcionados. - Cub Cadet ZT1 42 | Operation Manual - Page 32
5 4. Deslice el deflector del canal hacia la parte posterior del tractor hasta que el orificio del perno de calibración delantera". Modelos de plataforma de 46"/50"/54"/60" 1. El canal se envía sujeto y con un soporte Ajuste de la plataforma en este manual para encontrar más información. Informaci - Cub Cadet ZT1 42 | Operation Manual - Page 33
para protegerlo contra la corrosión. Consulte la Figura 12. Nota: Si la batería se pone en funcionamiento después de la fecha indicada en su parte superior o al costado de la misma, cárguela siguiendo las instrucciones de la sección Cuidado del producto antes de operar el tractor. Mantenimiento de - Cub Cadet ZT1 42 | Operation Manual - Page 34
variar según los modelos. No todas las características que se incluyen en este manual se aplican a todos los modelos de tractor y la máquina que se ilustra una para cada transmisión derecha e izquierda) están ubicadas en la parte posterior del tractor, junto al motor. Cuando están engranadas, las dos - Cub Cadet ZT1 42 | Operation Manual - Page 35
cambie el aceite del motor según se indica en este Manual del operador del motor Poco aceite Nota: La función "LO" (nivel bajo) seguidas de las letras "OIL" (aceite), seguidas luego del tiempo acumulado del medidor las perillas de la parte inferior del asiento. Consulte la sección Montaje y - Cub Cadet ZT1 42 | Operation Manual - Page 36
Antes de hacer funcionar el tractor • Antes de la operación, consulte la tabla del Cronograma de mantenimiento que está ubicada en este manual para los artículos de servicio programado habitualmente. • Se certifica que este motor funciona únicamente con gasolina normal sin plomo, nueva y limpia - Cub Cadet ZT1 42 | Operation Manual - Page 37
FUNCIONAMIENTO 2. Conecte un extremo del otro cable al terminal negativo de la batería de urgencia; luego conecte el otro extremo de ese cable al marco del tractor que no funciona, a la mayor distancia posible de la batería. 3. Arranque el tractor que no funciona según las instrucciones de arranque - Cub Cadet ZT1 42 | Operation Manual - Page 38
FUNCIONAMIENTO Conducción del tractor en marcha atrás ADVERTENCIA Siempre mire hacia atrás y hacia abajo a ambos lados del tractor antes de desplazarse marcha atrás. Siempre mire hacia atrás cuando se desplaza en marcha atrás. No se recomienda cortar el césped en marcha atrás. 1. Mueva las dos - Cub Cadet ZT1 42 | Operation Manual - Page 39
FUNCIONAMIENTO Corte de césped ADVERTENCIA Para ayudar a evitar el contacto con las cuchillas o una lesión por algún objeto que sea arrojado, mantenga a las personas que lo observan, a los ayudantes, niños y mascotas alejados al menos 25 metros de la máquina mientras está en funcionamiento. Pare la - Cub Cadet ZT1 42 | Operation Manual - Page 40
evitar que se encienda accidentalmente. Utilice siempre anteojos de Consulte el Manual del operador del motor para obtener información sobre las tareas de Revise la presión de los neumáticos Revise/limpie la parte de abajo de la plataforma Revise el sistema de interbloqueo de seguridad - Cub Cadet ZT1 42 | Operation Manual - Page 41
los modelos. No todas las características que se incluyen en este manual se aplican a todos los modelos de tractor y la máquina que ni de una manguera de jardín para limpiar el tractor, excepto para limpiar la parte inferior de la plataforma. Puede dañar los componentes eléctricos, los husillos, - Cub Cadet ZT1 42 | Operation Manual - Page 42
en su lugar. Consulte 1 en la Figura 31.1. 2. Levante con cuidado la parte trasera del panel del piso. Consulte 2 en la Figura 31. 3. Para liberar el la tabla del Cronograma de mantenimiento que figura en este manual para conocer los intervalos de mantenimiento adecuados. Respete las siguientes - Cub Cadet ZT1 42 | Operation Manual - Page 43
. • Drene el combustible del recipiente del carburador, consultando el manual del motor. 3. Limpie perfectamente el motor y todo el tractor de una manguera de jardín para limpiar el tractor, excepto para limpiar la parte inferior de la plataforma. Puede dañar los componentes eléctricos, los husillos - Cub Cadet ZT1 42 | Operation Manual - Page 44
posible del canal de descarga de manera que esté en paralelo con el tractor. 3. Mida la distancia desde la parte delantera de la punta de la cuchilla hasta el suelo, y desde la parte posterior de la punta de la cuchilla hasta el suelo. La primera medición tomada debe ser de entre 2-6 mm - Cub Cadet ZT1 42 | Operation Manual - Page 45
a la posición que Plataformas de 42" Plataformas de 46"/50"/54"/60" le ofrece mayor recorrido horizontal de la correa entre (b) las poleas locas husillo. Consulte la Figura 38. (a) Figura 38 c. Desde abajo de la parte trasera del tractor, deslice la correa para sacarla de la polea de la - Cub Cadet ZT1 42 | Operation Manual - Page 46
colocado correctamente. Cambio de la correa 1. Extraiga la plataforma de la parte inferior del tractor, (consulte la sección Extracción de la plataforma). en el paso 3 con el Plataformas de lado en "V" orientado hacia 50/54/60" adentro. Una vez que todo esté en su lugar, vuelva a colocar - Cub Cadet ZT1 42 | Operation Manual - Page 47
46. 3. Cuando reinstale las cuchillas, asegúrese de que se instalen de modo que las aletas se orienten hacia arriba hacia la parte superior de la plataforma. 4. Ajuste las tuercas hexagonales (a) a 70-90 pies-libras. (95-122 N-m). 5. Reinstale la plataforma (consulte Instalación de la plataforma - Cub Cadet ZT1 42 | Operation Manual - Page 48
SOLUCIÓN DE PROBLEMAS ADVERTENCIA Antes de realizar cualquier tipo de mantenimiento o servicio, desactive todos los controles y detenga el motor. Espere a que se detengan completamente todas las piezas móviles. Desconecte el cable de la bujía y póngalo haciendo masa contra el motor para evitar que
-
 1
1 -
 2
2 -
 3
3 -
 4
4 -
 5
5 -
 6
6 -
 7
7 -
8
-
9
-
10
-
11
-
12
-
13
-
14
-
15
-
16
-
17
-
18
-
19
-
20
-
21
-
22
-
23
-
24
-
25
-
26
-
27
-
28
-
29
-
30
-
31
-
32
-
33
-
34
-
35
-
36
-
37
-
38
-
39
-
40
-
41
-
42
-
43
-
44
-
45
-
46
-
47
-
48
 |
 |

Important Safe Operation Practices • Assembly • Operation • Service and Maintenance
O
PERATOR
’
S
M
ANUAL
WARNING
California Proposition 65
Engine Exhaust, some of its constituents, and certain vehicle components contain or emit chemicals known to State of
California to cause cancer and birth defects or other reproductive harm.
Battery posts, terminals, and related accessories contain lead and lead compounds, chemicals known to the State of
California to cause cancer and reproductive harm. Wash hands after handling.
WARNING
Read and follow all safety rules and instructions in this manual before attempting to operate this machine.
Failure to comply with these instructions may result in personal injury.
Record Product Information
Before setting up and operating your new equipment,
please locate the model plate on the equipment and
record the information in the provided area to the right.
You can locate the model plate by lifting up the seat
and looking under the seat pan. This information will be
necessary, should you seek technical support via our web
site or with your local authorized service dealer.
M
ODEL
N
UMBER
S
ERIAL
N
UMBER
Form No. 769-18950
(November 12, 2018)
Important Safe Operation Practices
.....................
2
Assembly
..................................................................
7
Operation
................................................................
10
Service and Maintenance
......................................
16
Troubleshooting
....................................................
24
Parts/Warranty
..............
See Separate Supplement
Table of Contents
NOTE:
This Operator’s Manual covers several models. Features may vary by model. Not all features in this manual are applicable to all
models and the model depicted may differ from yours.
Zero-Turn Tractor
Lapbar Drive Control Levers