Cub Cadet Z Force S 54 Z-Force S 48 Operator's Manual - Page 27
Replacing the Deck Belt
 |
View all Cub Cadet Z Force S 54 manuals
Add to My Manuals
Save this manual to your list of manuals |
Page 27 highlights
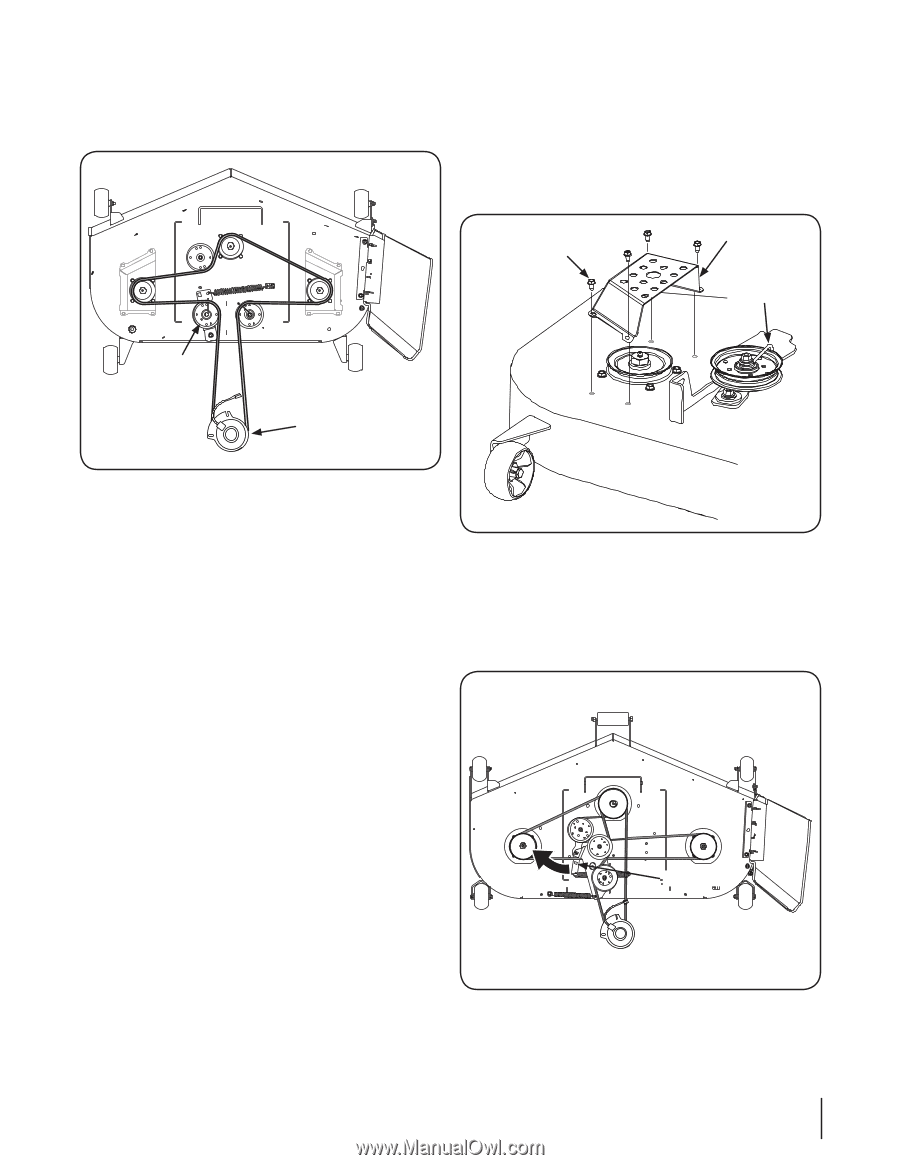
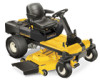
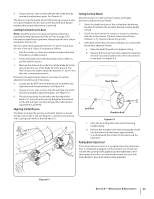
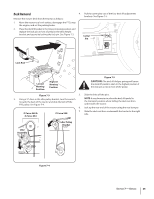
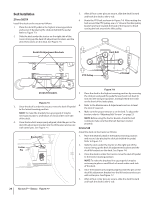
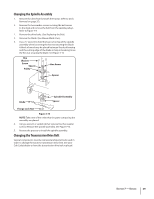
6. Route the belt as shown in Figure 7-9. After routing the belt Replacing the Deck Belt around the PTO pulley, use a 1⁄2" drive in the idler pulley bracket and turn towards the back of the tractor to finish routing the belt around the idler pulley. Z-Force S60/54 1. Remove the deck from beneath the tractor, (refer to Deck Removal on page 25). 2. Remove the hex washer screws securing the belt covers to the deck. See Figure 7-10. Hex Washer Screws Belt Cover Belt Keeper Idler Pulley PTO Pulley Figure 7-9 7. Place the deck in the highest mowing position by removing the click pin and push the pedal forward and rock back to lock into the transport position, locking behind the notch on the front of the index plate. Figure 7-10 8. Refer to the Maintenance & Adjustments section to level the deck if required. 9. Make sure the proper tension is on the belt. To adjust the tension, refer to "Adjusting Belt Tension" on page 23. 3. Using a 1⁄2" socket breaker bar or socket ratchet insert the male end into the 1⁄2" square opening in the lower idler arm assembly/Idler pulley bracket and pull the idler arm/pulley bracket clockwise. See Figure 7-11. While holding the idler arm back, loosen the deck belt from the pulleys and slide NOTE: Before using the tractor double-check the belt the belt away from the pulley. routing to make sure that the belt has been routed properly. Idler Arm Figure 7-11 4. Install the new deck belt around the spindle pulleys as shown in Figure 7-8 and reinstall the belt covers. 5. Reinstall the deck following the instructions in Deck Installation on page 26. Section 7 - Service 27
-
 1
1 -
2
-
3
-
4
-
5
-
6
-
7
-
8
-
9
-
10
-
11
-
12
-
13
-
14
-
15
-
16
-
17
-
18
-
19
-
20
-
21
-
 22
22 -
 23
23 -
 24
24 -
 25
25 -
 26
26 -
 27
27 -
 28
28 -
 29
29 -
 30
30 -
 31
31 -
 32
32 -
33
-
34
-
35
-
36
 |
 |