Cuisinart DCC-4000P1 Quick Reference
Cuisinart DCC-4000P1 Manual
 |
View all Cuisinart DCC-4000P1 manuals
Add to My Manuals
Save this manual to your list of manuals |
Cuisinart DCC-4000P1 manual content summary:
- Cuisinart DCC-4000P1 | Quick Reference - Page 1
agua fría durante 15 minutos (véase las instrucciones en la página 7 del manual de instrucciones). Introduzca el filtro de agua de carbón en el soporte. Abra de medición en el exterior del depósito de agua. QUICK REFERENCE GUIDE PROGRAMMING 1. To set the time: Hold down HOUR or MIN button until - Cuisinart DCC-4000P1 | Quick Reference - Page 2
QUICK REFERENCE GUIDE SETUP AND USE 1. Fully immerse the charcoal water filter in cold tap water and soak for 15 minutes (see complete instructions on page 7 of your Instruction Booklet). Insert the filter into the water filter holder. Open the water reservoir and slide into the unit. 2. Pour your
-
 1
1 -
 2
2
 |
 |

PROGRAMMING
QUICK REFERENCE GUIDE
GUÍA DE REFERENCIA RÁPIDA
PREPARACIÓN Y USO
To program the AUTO ON:
Press and hold the PROG/AUTO ON
button for 2 seconds. The display will flash
the default time or previously selected time.
Follow directions under SETTING THE TIME to program
your start-brew time. After 5 seconds, the unit will exit
AUTO ON. When AUTO ON indicator is lit, AUTO ON is
activated.
2.
To set the time:
Hold down HOUR or
MIN button until the clock begins flashing.
Press either button to select the desired time.
When the number displayed approaches the
desired time, press and release to advance one digit
at a time. To complete clock setting, do not touch
buttons for 5 seconds. The clock will stop flashing and
selected time will be displayed.
1.
4.
AUTO ON Notes:
To exit AUTO ON,
just press AUTO ON button again. To
activate AUTO ON using the previously
selected time, press the PROG/AUTO ON
button; the previously set time will appear
and indicator will illuminate. The display
will return to clock setting. To deactivate,
press illuminated AUTO ON, and light will
go out.
3.
Set coffee strength and/or 1–4
cup setting:
Set coffee strength and/or
1–4 cup setting: Select desired coffee
strength (Regular or Bold) and 1–4 cup
setting by pressing the appropriate buttons.
The indicator lights will illuminate.
Set ready tone to ON or OFF.
5.
To program the AUTO OFF:
Press
and hold the BREW OFF/AUTO OFF button for
2 seconds. The digital display will flash 2:00
or the previously selected time.
Follow
directions under SETTING THE CLOCK to
program your coffeemaker to shut off from
0–4 hours after brew cycle is finished.
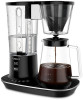
12-Cup Programmable Coffeemaker
2.
Agregue la cantidad de agua deseada,
usando las marcas de medición en el
exterior del depósito de agua.
4.
Fije sus preferencias.
Presione el botón
1–4 CUP si desea preparar menos de
cinco tazas de café, oprima el botón
BOLD si desea preparar café fuerte, y
elija la temperatura de la placa calentadora: LOW
(baja), MEDIUM (media) o HIGH (alta). Coloque la
perilla READY TONE en “ON” para activar la señal de
listo, o en “OFF” para desactivarla.
3.
Instale un filtro dorado permanente
o
un
filtro de papel en el portafiltros. Agregue 1
cucharada de café molido por taza (145 ml)
de café (ajuste la cantidad de café molido a
gusto) y cierre la tapa.
5.
Para empezar la preparación, presione el
botón BREW/OFF. Si la señal de lista ha
sido activada, la cafetera emitirá 5
pitidos al final de la preparación.
Remoje el filtro de agua de carbón en agua
fría durante 15 minutos (véase las
instrucciones en la página 7 del manual de
instrucciones). Introduzca el filtro de agua
de carbón en el soporte. Abra el depósito de agua y
deslice el filtro en la unidad.
1.
¡IMPORTANTE!
No lo tire. Lea esta información
antes de usar su nueva cafetera por
primera vez. Guarde esta
información para futura referencia.
Estos útiles consejos complementan el
manual de instrucciones. Para lograr un
rendimiento óptimo y una operación segura,
lea el manual de instrucciones.
Véase las instrucciones de programación al dorso.