D-Link DAP-1513 Product Manual
D-Link DAP-1513 Manual
 |
UPC - 790069352010
View all D-Link DAP-1513 manuals
Add to My Manuals
Save this manual to your list of manuals |
D-Link DAP-1513 manual content summary:
- D-Link DAP-1513 | Product Manual - Page 1
- D-Link DAP-1513 | Product Manual - Page 2
13 Web-based Configuration Utility 17 Wireless Setup Wizard 18 Manual Configuration 19 Wireless Setup 19 LAN Settings 20 Static IP 21 Advanced 22 Advanced Wireless 22 Maintenance 23 Admin 23 System 24 Language Pack 25 Firmware 25 D-Link DAP-1513 User Manual Time 26 Status 27 Device - D-Link DAP-1513 | Product Manual - Page 3
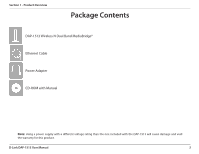
DAP-1513 Wireless N Dual Band MediaBridge® Ethernet Cable Power Adapter CD-ROM with Manual Note: Using a power supply with a different voltage rating than the one included with the DAP-1513 will cause damage and void the warranty for this product. D-Link DAP-1513 User Manual - D-Link DAP-1513 | Product Manual - Page 4
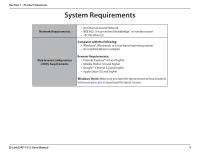
Requirements: • Internet Explorer® 6.0 and higher • Mozilla Firefox 3.0 and higher • Google™ Chrome 2.0 and higher • Apple Safari 3.0 and higher Windows® Users: Make sure you have the latest version of Java installed. Visit www.java.com to download the latest version. D-Link DAP-1513 User Manual 4 - D-Link DAP-1513 | Product Manual - Page 5
D-Link DAP-1513 Wireless N Dual Band MediaBridge®. With the ability to transfer files with a maximum wireless signal rate of up to 300Mbps*, the DAP-1513 gives you high-speed wireless network access for your home or office. The DAP-1513 is Wi-Fi IEEE 802.11n compliant, meaning that it can connect - D-Link DAP-1513 | Product Manual - Page 6
home coverage. TOTAL NETWORK SECURITY The DAP-1513 supports all of the latest wireless security features to prevent unauthorized access, be it from over the wireless network or from the Internet. Support for WPA and WPA2 standards ensure that you'll be able to use the best possible encryption method - D-Link DAP-1513 | Product Manual - Page 7
default PIN at any time. Only the Administrator ("Admin" account) can change or reset the PIN. • User-friendly Setup Wizard - Through its easy-to-use Web-based user interface, the DAP-1513 lets you configure your MediaBridge® to your specific settings within minutes. D-Link DAP-1513 User Manual - D-Link DAP-1513 | Product Manual - Page 8
Storage). 2 Power Receptor Receptor for the supplied power adapter. 3 Reset Button Hold the reset button for at least 6 seconds to reset the device back to the factory default settings. All the LEDs will turn on for 2 second and then begin the reboot process. D-Link DAP-1513 User Manual 8 - D-Link DAP-1513 | Product Manual - Page 9
2 1 Power LED A solid green light indicates a proper connection to the power supply. 2 Wireless LED A static green light indicates the wireless function is working. The light will blink fast when the WPS is associating. The light will be off during device reboot. D-Link DAP-1513 User Manual 9 - D-Link DAP-1513 | Product Manual - Page 10
Section 1 - Product Overview Hardware Overview WPS Button 1 1 WPS/Button Press the WPS button to start the process. You will have 120 seconds to start the WPS process on another wireless device. The Power LED will blink on and off when the WPS button is pressed. D-Link DAP-1513 User Manual 10 - D-Link DAP-1513 | Product Manual - Page 11
MediaBridge can support up to 4 wired devices. Additional devices can be added by connecting an Ethernet switch. Example: Connect a gaming console using an Ethernet cable to the DAP-1513. The unit is set to Wireless bridge which will wirelessly connect to a wireless router on your network. Internet - D-Link DAP-1513 | Product Manual - Page 12
fans, lights, and home security systems), your wireless connection may degrade dramatically or drop completely. Make sure your 2.4GHz phone base is as far away from your wireless devices as possible. The base transmits a signal even if the phone is not in use. D-Link DAP-1513 User Manual 12 - D-Link DAP-1513 | Product Manual - Page 13
3 - Configuration Configuration This section will show you how to configure your new D-Link wireless MediaBridge® using the web-based configuration utility. Click Next to continue. First Time Setup The DAP-1513 is in wireless bridge mode. Click Next to continue. D-Link DAP-1513 User Manual 13 - D-Link DAP-1513 | Product Manual - Page 14
Setup (WPS)-enabled wireless router or Access Point, select WPS and click Next to continue. If you want to manually enter the network settings, select Manual and click Next to continue. Skip to page 17. On the device you want to connect to, start the PBC process on the device. You will have - D-Link DAP-1513 | Product Manual - Page 15
SSID) of the network you want to connect to. If you do not know the exact name or would like to search for the wireless network, click Site Survey. Find your wireless router or access point from the list, click the radio button in the right column, and click Connect. D-Link DAP-1513 User Manual 15 - D-Link DAP-1513 | Product Manual - Page 16
Section 3 - Configuration Select the wireless security mode you would like to use. If you select WPA or WPA2, enter the wireless security password. Click Next to complete the Setup Wizard. The Setup Wizard is complete. Click Finish to reboot the device. D-Link DAP-1513 User Manual 16 - D-Link DAP-1513 | Product Manual - Page 17
the default settings or optimize the performance of the DAP-1513, you may use the web-based configuration utility. To access the configuration utility, open a web browser such as Internet Explorer and enter dlinkap or 192.168.0.50 in the address field. Type Admin and then enter your password. Leave - D-Link DAP-1513 | Product Manual - Page 18
Setup Wizard Click Launch Wireless Setup Wizard to configure your wireless bridge. Refer to the First Time Setup section for the Wireless Setup Wizard. If you want to enter your settings without running the wizard, click Wireless Setup on the left side and skip to the next page. D-Link DAP-1513 - D-Link DAP-1513 | Product Manual - Page 19
the wireless MAC address to connect Mode: the device. WPS: Select a wireless security setting. Options are None, WEP, WPA, or WPA2. See the Wireless Security section in this manual for a detailed explanation of the wireless security options. Select enable if you want to configure the DAP-1513 with - D-Link DAP-1513 | Product Manual - Page 20
will allow you to change the local network settings of the MediaBridge® and to configure the DHCP settings. LAN Connection Use the drop-down menu to select Dynamic IP Type: (DHCP) to automatically obtain an IP address on the LAN/private network. Device Name: Enter the Device Name of the DAP-1513 - D-Link DAP-1513 | Product Manual - Page 21
than one D-Link device within the subnet. You can enter the device name of the AP into your web browser to access the instead of IP address for configuration. If you are using the device name to connect, ensure that your PC and your DAP-1513 are on the same network. D-Link DAP-1513 User Manual 21 - D-Link DAP-1513 | Product Manual - Page 22
Section 3 - Configuration Advanced Advanced Wireless Transmit Power: Sets the transmit power of the antennas. D-Link DAP-1513 User Manual 22 - D-Link DAP-1513 | Product Manual - Page 23
require users Graphical to type letters or numbers from a distorted image Authentication: displayed on the screen to prevent online hackers and unauthorized users from gaining access to your router's network settings. D-Link DAP-1513 User Manual 23 - D-Link DAP-1513 | Product Manual - Page 24
have created. If you want to save the current MediaBridge® configuration settings, use the Save button above. Note: Restoring the factory default settings will not reset the Wi-Fi Protected Status to Not Configured. Reboot the Click to reboot the DAP-1513. Device: D-Link DAP-1513 User Manual 24 - D-Link DAP-1513 | Product Manual - Page 25
You can upgrade the firmware of the MediaBridge® here. Make sure the firmware you want to use is on the local hard drive of the computer. Click on Browse to locate the firmware file to be used for the update. Please check the D-Link support website for firmware updates at http://support.dlink.com - D-Link DAP-1513 | Product Manual - Page 26
will only connect to a server on the Internet, not a local server. NTP Server Used: Enter the NTP server or select one from the drop-down menu. Date and Time: To manually input the time, enter the values in these fields for the Year, Month, Day, Hour, Minute, and Second and then click Save Settings - D-Link DAP-1513 | Product Manual - Page 27
the DAP-1513. It will display the LAN and wireless LAN information. General: Displays the MediaBridge® time and firmware version. LAN: Displays the MAC address and the private (local) IP settings for the MediaBridge®. Wireless LAN: Displays the wireless MAC address and your wireless settings such - D-Link DAP-1513 | Product Manual - Page 28
Page: This button directs you to the next page of the log. Clear Log: This button clears all current log content. Save Log: This option will save the MediaBridge® to a log file on your computer. Refresh: This button refreshes the log. D-Link DAP-1513 User Manual 28 - D-Link DAP-1513 | Product Manual - Page 29
3 - Configuration Statistics The DAP-1513 keeps statistics of the traffic that passes through it. You can view the amount of packets that pass through the LAN and wireless portions of the network. The traffic counter will reset if the MediaBridge® is rebooted. D-Link DAP-1513 User Manual 29 - D-Link DAP-1513 | Product Manual - Page 30
Section 3 - Configuration Help D-Link DAP-1513 User Manual 30 - D-Link DAP-1513 | Product Manual - Page 31
Section 4 - Security Wireless Security This section will show you the different levels of security you can use to protect your data from intruders. The DAP-1513 offers the following types of security: • WPA2 (Wi-Fi Protected Access 2) • WPA (Wi-Fi Protected Access) • WPA2-PSK (Pre-Shared Key) • - D-Link DAP-1513 | Product Manual - Page 32
on your wireless bridge or MediaBridge® . WPA/WPA2 incorporates user authentication through the Extensible Authentication Protocol (EAP). EAP is built on a more secure public key encryption system to ensure that only authorized network users can access the network. D-Link DAP-1513 User Manual 32 - D-Link DAP-1513 | Product Manual - Page 33
. 6. Click Save Settings at the top of the window to save your settings. If you are configuring the MediaBridge® with a wireless adapter, you will lose connectivity until you enable WPA-PSK on your adapter and enter the same passphrase as you did on the MediaBridge®. D-Link DAP-1513 User Manual 33 - D-Link DAP-1513 | Product Manual - Page 34
your computer will look similar to the following examples.) 1. Why can't I access the web-based configuration utility? When entering the IP address of the D-Link MediaBridge® (192.168.0.50 for example), you are not connecting to a website on the Internet or have to be connected to the Internet. The - D-Link DAP-1513 | Product Manual - Page 35
to hold the button down for 10 seconds. Release the button and the MediaBridge® will go through its reboot process. Wait about 30 seconds to access the MediaBridge®. The default IP address is 192.168.0.50. When logging in, the username is Admin and leave the password box empty. D-Link DAP-1513 User - D-Link DAP-1513 | Product Manual - Page 36
will display the IP address, subnet mask, and the default gateway of your adapter. If the address is 0.0.0.0, check your adapter installation, security settings, and the settings on your router. Some firewall software programs may block a DHCP request on newly installed adapters. D-Link DAP-1513 - D-Link DAP-1513 | Product Manual - Page 37
. Set Default Gateway the same as the LAN IP address of your router (192.168.0.1). Set Primary DNS the same as the LAN IP address of your router (192.168.0.1). The Secondary DNS is not needed or you may enter a DNS server from your ISP. Step 5 Click OK twice to save your settings. D-Link DAP-1513 - D-Link DAP-1513 | Product Manual - Page 38
CCK • OFDM Frequency Range2 • 2.4GHz to 2.483GHz • 5.15GHz to 5.825GHz LEDs • Power • Wireless Operating Temperature • 32°F to 131°F ( 0°C to 55°C) Humidity • 90% maximum will adversely affect wireless signal range. 2Range varies depending on country's regulation. D-Link DAP-1513 User Manual - D-Link DAP-1513 | Product Manual - Page 39
asked questions and answers to technical issues. For customers within the United States: Phone Support: (877) 453-5465 Internet Support: http://support.dlink.com For customers within Canada: Phone Support: (800) 361-5265 Internet Support: http://support.dlink.ca D-Link DAP-1513 User Manual 39 - D-Link DAP-1513 | Product Manual - Page 40
the defective Hardware will be refunded by D-Link upon return to D-Link of the defective Hardware. All Hardware or part thereof that is replaced by D-Link, or for which the purchase price is refunded, shall become the property of D-Link upon replacement or refund. D-Link DAP-1513 User Manual 40 - D-Link DAP-1513 | Product Manual - Page 41
product ("Software") will substantially conform to D-Link's then current functional specifications for the Software, as set forth in the The customer shall return the product to the original purchase point based on its return policy. In case the return .dlink.com/. D-Link DAP-1513 User Manual 41 - D-Link DAP-1513 | Product Manual - Page 42
BE LIMITED TO THE DURATION OF THE APPLICABLE WARRANTY PERIOD SET FORTH ABOVE. EXCEPT AS EXPRESSLY COVERED UNDER THE LIMITED WARRANTY PROVIDED HEREIN, THE ENTIRE RISK AS TO THE QUALITY, SELECTION AND PERFORMANCE OF THE PRODUCT IS WITH THE PURCHASER OF THE PRODUCT. D-Link DAP-1513 User Manual 42 - D-Link DAP-1513 | Product Manual - Page 43
EQUIPMENT OR COMPUTER PROGRAMS TO WHICH D-LINK'S PRODUCT IS CONNECTED WITH, LOSS OF INFORMATION OR DATA CONTAINED IN, STORED ON, OR INTEGRATED WITH ANY PRODUCT RETURNED TO D-LINK FOR WARRANTY SERVICE) RESULTING FROM THE USE OF THE PRODUCT, RELATING TO WARRANTY SERVICE, OR ARISING OUT OF ANY BREACH - D-Link DAP-1513 | Product Manual - Page 44
limits set forth for an uncontrolled environment. This equipment should be installed and operated with minimum distance 20cm between the radiator & your body. This transmitter must not be co-located or operating in conjunction with any other antenna or transmitter. D-Link DAP-1513 User Manual 44 - D-Link DAP-1513 | Product Manual - Page 45
Canada. firmware programmed at the factory to match the intended destination. The firmware setting is not accessible by the end user. For detailed warranty information applicable to products purchased outside the United States, please contact the corresponding local D-Link office. D-Link DAP-1513 - D-Link DAP-1513 | Product Manual - Page 46
Appendix F - Registration Registration Product registration is entirely voluntary and failure to complete or return this form will not diminish your warranty rights. Version 1.1 May 5, 2011 D-Link DAP-1513 User Manual 46
-
 1
1 -
 2
2 -
 3
3 -
 4
4 -
 5
5 -
 6
6 -
 7
7 -
8
-
9
-
10
-
11
-
12
-
13
-
14
-
15
-
16
-
17
-
18
-
19
-
20
-
21
-
22
-
23
-
24
-
25
-
26
-
27
-
28
-
29
-
30
-
31
-
32
-
33
-
34
-
35
-
36
-
37
-
38
-
39
-
40
-
41
-
42
-
43
-
44
-
45
-
46
 |
 |