D-Link DAP-2610 Quick Install Guide 1
D-Link DAP-2610 Manual
 |
View all D-Link DAP-2610 manuals
Add to My Manuals
Save this manual to your list of manuals |
D-Link DAP-2610 manual content summary:
- D-Link DAP-2610 | Quick Install Guide 1 - Page 1
- D-Link DAP-2610 | Quick Install Guide 1 - Page 2
- D-Link DAP-2610 | Quick Install Guide 1 - Page 3
guide provides basic instructions for installing the DAP-2610 Wireless Gigabit PoE Access Point on your network. For additional information about how to use the Access Point, please see the User Manual which is available on the CD included in this package or from the D-Link support website - D-Link DAP-2610 | Quick Install Guide 1 - Page 4
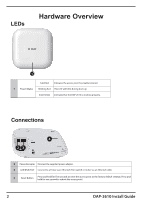
adapter. 3 LAN (PoE) Port Connect to a Power over Ethernet (PoE) switch or router via an Ethernet cable. 4 Reset Button Press and hold for five seconds to reset the access point to the factory default settings. Press and hold for one second to reboot the access point. 2 DAP-2610 Install Guide - D-Link DAP-2610 | Quick Install Guide 1 - Page 5
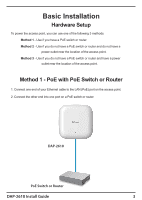
outlet near the location of the access point. Method 1 - PoE with PoE Switch or Router 1. Connect one end of your Ethernet cable to the LAN (PoE) port on the access point. 2. Connect the other end into one port on a PoE switch or router. DAP-2610 PoE Switch or Router DAP-2610 Install Guide 3 - D-Link DAP-2610 | Quick Install Guide 1 - Page 6
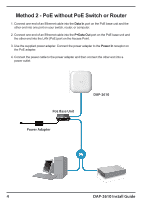
) port on the Access Point. 3. Use the supplied power adapter. Connect the power adapter to the Power In receptor on the PoE adapter. 4. Connect the power cable to the power adapter and then connect the other end into a power outlet. PoE Base Unit Power Adapter DAP-2610 4 DAP-2610 Install Guide - D-Link DAP-2610 | Quick Install Guide 1 - Page 7
to the Power receptor on the Access Point. 3. Connect the power cable to the power adapter and then connect the other end into a power outlet. DAP-2610 Power Adapter PC DAP-2610 Install Guide Switch or Router 5 - D-Link DAP-2610 | Quick Install Guide 1 - Page 8
a PoE switch. Configure the access point To set up and manage the DAP-2610, use one of the following methods: 1. Connect the access point and your computer directly via a straight-through Ethernet cable. Manage the access point from the computer. Ensure your computer is configured with a static IP - D-Link DAP-2610 | Quick Install Guide 1 - Page 9
cable into the Ethernet LAN port on the access point. 6. Attach the Access Point to the backet and slide it down to lock into place. DAP-2610 Install Guide 7 - D-Link DAP-2610 | Quick Install Guide 1 - Page 10
Access Point to the bracket and slide it into place. Ceiling bracket 2. Use the provided screws to attach the mounting bracket to the ceiling bracket. 8 DAP-2610 Install Guide - D-Link DAP-2610 | Quick Install Guide 1 - Page 11
Notes DAP-2610 Install Guide 9 - D-Link DAP-2610 | Quick Install Guide 1 - Page 12
Notes 10 DAP-2610 Install Guide - D-Link DAP-2610 | Quick Install Guide 1 - Page 13
Notes DAP-2610 Install Guide 11 - D-Link DAP-2610 | Quick Install Guide 1 - Page 14
Notes 12 DAP-2610 Install Guide - D-Link DAP-2610 | Quick Install Guide 1 - Page 15
- D-Link DAP-2610 | Quick Install Guide 1 - Page 16
Technical Support D-Link's website contains the latest user documentation and software updates for D-Link products. U.S. and Canadian customers can contact D-Link Technical Support through our website or by phone. United States Telephone (877) 354-6555 World Wide Web http://support.dlink.com Canada
-
 1
1 -
 2
2 -
 3
3 -
 4
4 -
 5
5 -
 6
6 -
 7
7 -
8
-
9
-
10
-
11
-
12
-
13
-
14
-
15
-
16
 |
 |
