D-Link DCS-1130 Product Manual - Page 34
Setup > Recording
 |
UPC - 790069321627
View all D-Link DCS-1130 manuals
Add to My Manuals
Save this manual to your list of manuals |
Page 34 highlights
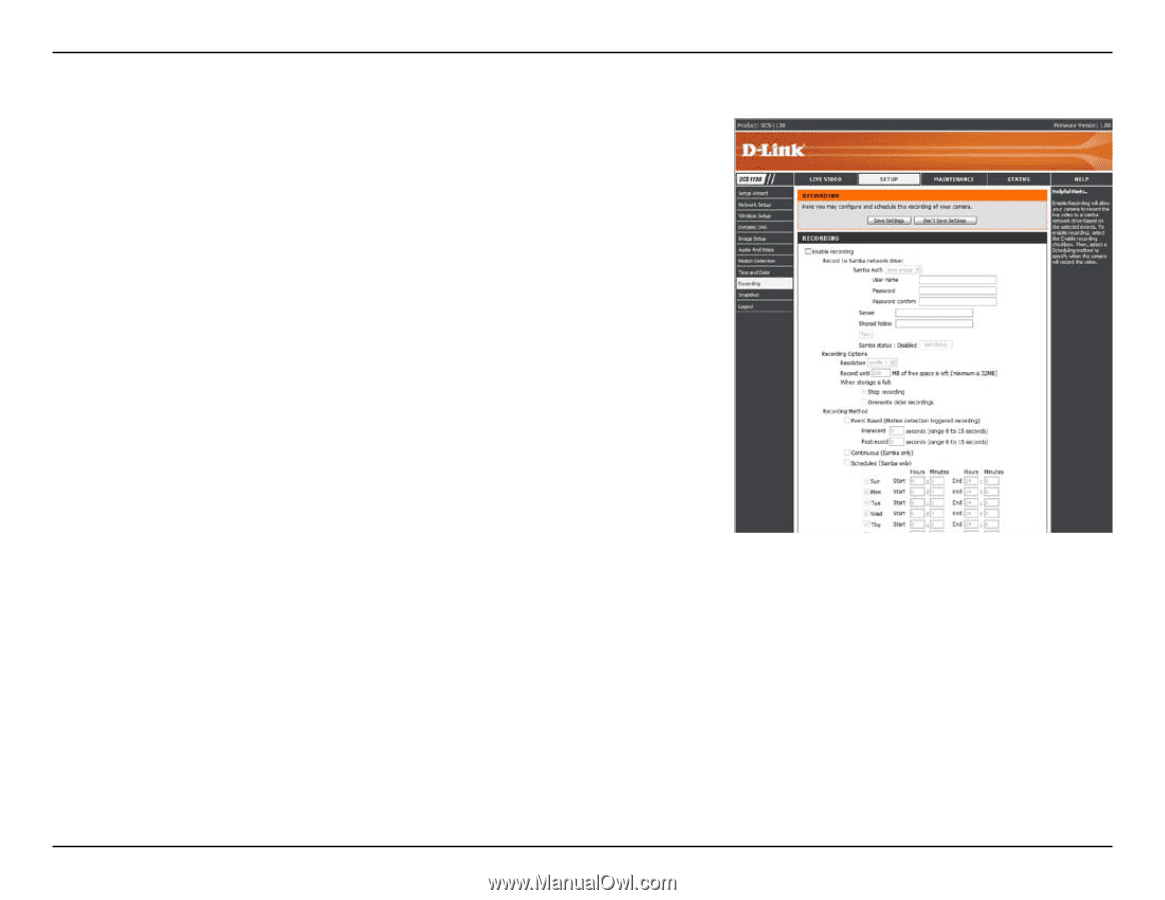
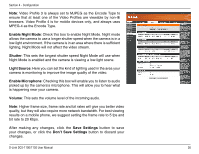
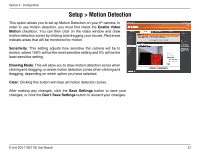
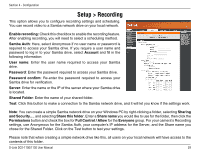
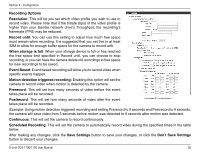
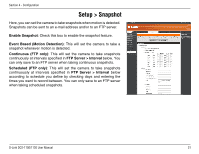
Section 4 - Configuration Setup > Recording This option allows you to configure recording settings and scheduling. You can record video to a Samba network drive on your local network. Enable recording: Check this checkbox to enable the recording feature. After enabling recording, you will need to select a scheduling method. Samba Auth: Here, select Anonymous if no user name or password is required to access your Samba drive. If you require a user name and password to log in to your Samba drive, select Account and fill in the following information: User name: Enter the user name required to access your Samba drive. Password: Enter the password required to access your Samba drive. Password confirm: Re-enter the password required to access your Samba drive for verification. Server: Enter the name or the IP of the server where your Samba drive is located. Shared Folder: Enter the name of your shared folder. Test: Click this button to make a connection to the Samba network drive, and it will let you know if the settings work. Note: You can create a simple Samba network drive on your Windows PC by right-clicking a folder, selecting Sharing and Security..., and selecting Share this folder. Enter a Share name you would like to use for the folder, then click the Permissions button and check the box for Full Control / Allow for the Everyone group. For your camera's Recording settings, use Anonymous for the Samba Auth, your computer's IP address for the Server, and the Share name you chose for the Shared Folder. Click on the Test button to test your settings. Please note that when creating a simple network drive like this, all users on your local network will have access to the contents of this folder. D-Link DCS-1100/1130 User Manual 29
-
 1
1 -
2
-
3
-
4
-
5
-
6
-
7
-
8
-
9
-
10
-
11
-
12
-
13
-
14
-
15
-
16
-
17
-
18
-
19
-
20
-
21
-
22
-
23
-
24
-
25
-
26
-
27
-
28
-
 29
29 -
 30
30 -
 31
31 -
 32
32 -
 33
33 -
 34
34 -
 35
35 -
 36
36 -
 37
37 -
 38
38 -
 39
39 -
40
-
41
-
42
-
43
-
44
-
45
-
46
-
47
-
48
-
49
-
50
-
51
-
52
-
53
-
54
-
55
-
56
-
57
-
58
-
59
-
60
-
61
-
62
-
63
 |
 |