D-Link DCS-1130 Product Manual - Page 48
Appendix A: Installing the DCS-1100/1130 on a, Router Without UPnP
 |
UPC - 790069321627
View all D-Link DCS-1130 manuals
Add to My Manuals
Save this manual to your list of manuals |
Page 48 highlights
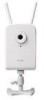
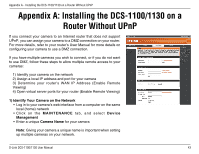
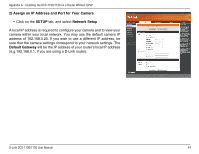
Appendix A - Installing the DCS-1100/1130 on a Router Without UPnP Appendix A: Installing the DCS-1100/1130 on a Router Without UPnP If you connect your camera to an Internet router that does not support UPnP, you can assign your camera to a DMZ connection on your router. For more details, refer to your router's User Manual for more details on configuring your camera to use a DMZ connection. If you have multiple cameras you wish to connect, or if you do not want to use DMZ, follow these steps to allow multiple remote access to your cameras: 1) Identify your camera on the network 2) Assign a local IP address and port for your camera 3) Determine your router's WAN IP Address (Enable Remote Viewing) 4) Open virtual server ports for your router (Enable Remote Viewing) 1) Identify Your Camera on the Network • Log in to your camera's web interface from a computer on the same local (home) network • Click on the MAINTENANCE tab, and select Device Management • Enter a unique Camera Name for your camera Note: Giving your camera a unique name is important when setting up multiple cameras on your network. D-Link DCS-1100/1130 User Manual 43
-
 1
1 -
2
-
3
-
4
-
5
-
6
-
7
-
8
-
9
-
10
-
11
-
12
-
13
-
14
-
15
-
16
-
17
-
18
-
19
-
20
-
21
-
22
-
23
-
24
-
25
-
26
-
27
-
28
-
29
-
30
-
31
-
32
-
33
-
34
-
35
-
36
-
37
-
38
-
39
-
40
-
41
-
42
-
 43
43 -
 44
44 -
 45
45 -
 46
46 -
 47
47 -
 48
48 -
 49
49 -
 50
50 -
 51
51 -
 52
52 -
 53
53 -
54
-
55
-
56
-
57
-
58
-
59
-
60
-
61
-
62
-
63
 |
 |