D-Link DCS-5010L User Manual
D-Link DCS-5010L Manual
 |
View all D-Link DCS-5010L manuals
Add to My Manuals
Save this manual to your list of manuals |
D-Link DCS-5010L manual content summary:
- D-Link DCS-5010L | User Manual - Page 1
Version 1.0 | 04/03/2013 User Manual Wireless N Day & Night Pan/Tilt Cloud Camera Lite DCS-5010L - D-Link DCS-5010L | User Manual - Page 2
may become obsolete as our services and websites develop and change. Please refer to the www.mydlink.com website for the most current information. Revision 1.00 Manual Revision Date 10 April, 2013 Initial release Description Trademarks D-Link and the D-Link logo are trademarks or registered - D-Link DCS-5010L | User Manual - Page 3
Setup 28 Video 29 Audio 30 Motion Detection 31 Mail 32 FTP 34 Time and Date 36 Day/Night Mode 37 Camera Control 38 Maintenance 39 Admin 39 System 40 Firmware Upgrade 41 Status 42 Device Info 42 Active User 43 Troubleshooting 44 Technical Specifications 47 D-Link DCS-5010L User - D-Link DCS-5010L | User Manual - Page 4
DCS-5010L Wireless N Day & Night Pan/Tilt Cloud Camera Lite • CAT5 Ethernet Cable • Power Adapter • Manual and Software on CD • Quick Install Guide or higher version with Java installed and enabled • Existing 10/100 Ethernet-based network or 802.11g/n wireless network D-Link DCS-5010L User Manual 4 - D-Link DCS-5010L | User Manual - Page 5
your camera from anywhere over the Internet through the mydlink website, or through the mydlink mobile app for iOS and Android. You can view your live video feed, take snapshots, and manage the camera's configuration, all from anywhere you have Internet access. D-Link DCS-5010L User Manual 5 - D-Link DCS-5010L | User Manual - Page 6
the D-ViewCam software, which adds enhanced features and functionality that help you create a full surveillance system for up to 32 cameras. With D-ViewCam, you can view multiple cameras at the same time, record video, and set up scheduled and triggered recordings. D-Link DCS-5010L User Manual 6 - D-Link DCS-5010L | User Manual - Page 7
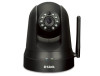
Section 1 - Product Overview Hardware Overview Front View Light Sensor Camera Lens Manual Focus Bezel WPS LED IR LED Microphone Power and Link LED D-Link DCS-5010L User Manual 7 - D-Link DCS-5010L | User Manual - Page 8
Section 1 - Product Overview Rear View WPS Button Reset Button Power Connector Ethernet Port D-Link DCS-5010L User Manual 8 - D-Link DCS-5010L | User Manual - Page 9
13. Manual Hardware Installation: This section shows you how to manually set up your camera, however in order to use the mydlink features of your camera, you will still need to run the Camera Installation Wizard. Refer to"Manual Hardware Installation" on page 15. D-Link DCS-5010L User Manual 9 - D-Link DCS-5010L | User Manual - Page 10
your camera wirelessly, you will be able to remove the cable after Zero Configuration Setup is complete. You can also plug the external power adapter cable into the camera at this time. Attach the External Power Adapter Plug the power adapter in to a wall outlet. D-Link DCS-5010L User Manual 10 - D-Link DCS-5010L | User Manual - Page 11
Section 2 - Installation Check Your mydlink Account From any computer with an Internet connection, open a web browser and log in to your mydlink account. The mydlink details. Make a note of the details and click Yes to add the camera to your account. DCS-5010L D-Link DCS-5010L User Manual 11 - D-Link DCS-5010L | User Manual - Page 12
about the mydlink features of this camera, or to"Configuration"on page 20 for advanced configuration of your camera. Note: If the live image is blurry or out of focus, you can manually adjust the focus by rotating the manual focus bezel surrounding the camera lens. D-Link DCS-5010L User Manual 12 - D-Link DCS-5010L | User Manual - Page 13
through the installation process from connecting your hardware to configuring your camera and registering it with your mydlink account. If you do not have a CD-ROM drive, or the CD is missing, please download the Setup Wizard from http://www.mydlink.com/support D-Link DCS-5010L User Manual 13 - D-Link DCS-5010L | User Manual - Page 14
through the installation process from connecting your hardware to configuring your camera and registering it with your mydlink account. If you do not have a CD-ROM drive, or the CD is missing, please download the Setup Wizard from http://www.mydlink.com/support D-Link DCS-5010L User Manual 14 - D-Link DCS-5010L | User Manual - Page 15
You can use WPS to connect your camera to your network wirelessly. For more information, refer to"WPS - Push Button Setup"on page 17. If your router does not support WPS, you will still be able to set up your camera's wireless settings in the camera's web interface. D-Link DCS-5010L User Manual 15 - D-Link DCS-5010L | User Manual - Page 16
frequency sources (such as microwave ovens), your wireless connection may degrade dramatically or drop completely. Make sure your 2.4 GHz phone base is as far away from your wireless devices as possible. The base transmits a signal even if the phone in not in use. D-Link DCS-5010L User Manual 16 - D-Link DCS-5010L | User Manual - Page 17
are not sure where the WPS button is on your router, please refer to your router's User Manual. The DCS-5010L will automatically create a secure wireless connection to your router. While connecting, the blue LED will flash and your camera will reboot. WPS Button D-Link DCS-5010L User Manual 17 - D-Link DCS-5010L | User Manual - Page 18
the mounting bracket, securing them with the built-in guides. Be sure to leave enough cable length protruding from the top to allow connection to the camera. D-Link DCS-5010L User Manual Adjust the angle of the arm on the mounting bracket as required. Tighten the thumbscrew to lock the arm in - D-Link DCS-5010L | User Manual - Page 19
see a screen similar to the following: For more details on using your camera with mydlink, go to the Support section of the mydlink website and check the User Manual section for your product to find the latest instruction guide for your camera's mydlink features. D-Link DCS-5010L User Manual 19 - D-Link DCS-5010L | User Manual - Page 20
your password, click OK. Note: If you are directly connecting your camera to your PC, or if you are using the camera on a closed network, the default IP is 192.168.0.20. If the camera is connected to a router or network, a different IP address may have been assigned. DCS-5010L D-Link DCS-5010L User - D-Link DCS-5010L | User Manual - Page 21
off. Night Mode: If you have set the night mode to manual, the night mode feature can be toggled using these buttons Note: If the live image is blurry or out of focus, you can manually adjust the focus by rotating the manual focus bezel surrounding the camera lens. D-Link DCS-5010L User Manual 21 - D-Link DCS-5010L | User Manual - Page 22
your connection using the Manual Internet Connection Setup. Note: To register your camera with mydlink and enable its mydlink-related features, you will need to use the Camera Installation Wizard. Please refer to "Camera Setup Wizard" on page 13 for more details. D-Link DCS-5010L User Manual 22 - D-Link DCS-5010L | User Manual - Page 23
with your Internet Service Provider or network administrator. PPPoE Connection: If your camera is directly connected to a DSL modem, you may need to use PPPoE. Enter the username and password provided to you by your Internet Service Provider. Click Next to continue. D-Link DCS-5010L User Manual 23 - D-Link DCS-5010L | User Manual - Page 24
select Disable. Click Next to continue. Enter a name for your camera. Click Next to continue. Configure the correct time to ensure that all displays your configured settings. Click Apply to save and activate your changes, or click Back to change your settings. D-Link DCS-5010L User Manual 24 - D-Link DCS-5010L | User Manual - Page 25
this setting to configure your camera as a UPnP device in the network. You can also enable UPnP port forwarding. Bonjour Enable this setting to allow your camera to be discovered by the Settings: Bonjour service. You can also specify a Bonjour name for the device. D-Link DCS-5010L User Manual 25 - D-Link DCS-5010L | User Manual - Page 26
to connect to, and will fill in the necessary settings for you. Wireless Select the wireless security mode used by your wireless network. If Security Mode: you select WEP or WPA-PSK/WPA2-PSK, enter the password for your wireless network in the text box that appears. D-Link DCS-5010L User Manual 26 - D-Link DCS-5010L | User Manual - Page 27
Name: Enter the host name of the DDNS server. User Name: Enter your username or e-mail used to connect to the DDNS. Password: Enter your password used to connect to the DDNS server. Timeout: This allows you to specify the periodic update time for the DDNS address. D-Link DCS-5010L User Manual 27 - D-Link DCS-5010L | User Manual - Page 28
the brightness level. Select a setting between Control: -5 and +5. Contrast Allows you to adjust the contrast level. Select a setting between -5 Control: and +5. Saturation Allows you to adjust the saturation level. Select a setting between -5 Control: and +5. D-Link DCS-5010L User Manual 28 - D-Link DCS-5010L | User Manual - Page 29
levels of image quality: Highest, High, Medium, Low, and Lowest. Default View Select the default encoding to use when viewing your video on the Mode: Live Video page. Light Select the frequency used by your lighting and power to help reduce Frequency: image flicker. D-Link DCS-5010L User Manual 29 - D-Link DCS-5010L | User Manual - Page 30
you to adjust the audio settings for your camera. Note: Please wait a few seconds for the camera to adjust the audio after making changes. Audio Settings: You may Enable or Disable the camera audio feed. Volume Select the desired volume percentage level. Settings: D-Link DCS-5010L User Manual 30 - D-Link DCS-5010L | User Manual - Page 31
motion detection enabled, or according to a Schedule that you define. Sensitivity: Specify the amount of difference required to determine whether there was motion. Detection Use your mouse to click on the areas of the video that you would like Areas: to monitor for motion. D-Link DCS-5010L User - D-Link DCS-5010L | User Manual - Page 32
listed above. Note: You can also use STARTTLS, which will use SMTP server port number 587. Note: If you want to use a Yahoo SMTP server, the SMTP server address will be different between each registered region, and only SMTP port 465 is supported for SSL-TLS. D-Link DCS-5010L User Manual 32 - D-Link DCS-5010L | User Manual - Page 33
the same as emailing images, as specified above, but will video clips take video clips according to the Video Limit settings you specify. to an email account: Test Email This will send a test email according to the email settings you have Account: specified above. D-Link DCS-5010L User Manual 33 - D-Link DCS-5010L | User Manual - Page 34
the camera to upload images only when motion is detected. Image Set how frequently you want images to be taken and uploaded. You Frequency: can choose to upload by frames per second, or by seconds per frame. Base File Name: Set the desired base file name for your snapshots. D-Link DCS-5010L User - D-Link DCS-5010L | User Manual - Page 35
stop the uploading of video. • Select Motion/Sound Detection if you would like the camera to upload video only when motion or sound is detected. File Name Set the desired base file name for your server specified above to make sure that your settings are correct. D-Link DCS-5010L User Manual 35 - D-Link DCS-5010L | User Manual - Page 36
saving corrections. Set the Date If Synchronize NTP Server is disabled, you can set the date and time and Time manually. You can also click on Copy Your Computer's Time Settings Manually: to automatically set the date and time based on your computer's settings. D-Link DCS-5010L User Manual 36 - D-Link DCS-5010L | User Manual - Page 37
This sets the camera to always use Day mode. Mode: Always Night This sets the camera to always use Night mode. Mode: Day Mode This sets the camera to use Day mode during the times you specify, Schedule: and will switch to Night mode outside the times you specify. D-Link DCS-5010L User Manual 37 - D-Link DCS-5010L | User Manual - Page 38
to move the camera's lens to the desired preset position. • Enter a name to help you easily identify the preset. • Click on the Set button to save the preset. • Any pre-saved positions can be cleared by selecting the desired preset and clicking on the Clear button. D-Link DCS-5010L User Manual 38 - D-Link DCS-5010L | User Manual - Page 39
a new user, enter a user name, password, and retype the password, then click Add. A maximum of 8 user accounts can be created. User List: Displays the account names of authorized users. You can modify or delete an account by clicking on its modify or delete icon. D-Link DCS-5010L User Manual 39 - D-Link DCS-5010L | User Manual - Page 40
Restore Factory Defaults button to reset all settings back To Factory to the factory defaults. Please note that this will erase any changes Default: you have made to the settings of the camera. Reboot The Click the Reboot the Device button to reboot the camera. Device: D-Link DCS-5010L User Manual - D-Link DCS-5010L | User Manual - Page 41
or the camera may be damaged. When upgrading firmware, do not unplug the camera or your PC, or close your web browser until the process is complete. It is also highly recommended that you use a wired connection for your camera and PC when upgrading firmware. D-Link DCS-5010L User Manual 41 - D-Link DCS-5010L | User Manual - Page 42
Section 3 - Configuration Status Device Info This section displays all the detailed information about your device and network settings. D-Link DCS-5010L User Manual 42 - D-Link DCS-5010L | User Manual - Page 43
Section 3 - Configuration Active User This page lists all the active users' information including the User Name, IP address, and the time that camera access began. D-Link DCS-5010L User Manual 43 - D-Link DCS-5010L | User Manual - Page 44
live view is blurry or out of focus, what can I do? You can manually adjust the focus of the lens by rotating the bezel on the front of the camera (surrounding the lens). While watching the live view, rotate the bezel until the desired level of focus is achieved. D-Link DCS-5010L User Manual 44 - D-Link DCS-5010L | User Manual - Page 45
will damage the sensor. 7. The camera is producing noisy images. How can I solve the problem? The video images might be noisy if the camera is used in a very low light environment. Try switching to night mode if you are consistently monitoring a low light area. D-Link DCS-5010L User Manual 45 - D-Link DCS-5010L | User Manual - Page 46
of Java installed. Java can be downloaded from http://www.java.com If you are using Internet Explorer with a version number 6 or lower, then you will need to upgrade your Web browser software in order to view the streaming video transmitted by the Network Camera. D-Link DCS-5010L User Manual 46 - D-Link DCS-5010L | User Manual - Page 47
to factory default Video Codecs • H.264 • MJPEG • JPEG for still images Video Features • Adjustable image size and quality • Time stamp and text overlay • Flip and Mirror • Resolution • 640 x 480 at up to 30 fps • 320 x 240 at up to 30 fps • 160 x 112 at up to 30 fps D-Link DCS-5010L User Manual - D-Link DCS-5010L | User Manual - Page 48
Appendix A - Technical Specifications Lens • Focal length: 2.2 mm, F2.0 Sensor • VGA 1/5 (Auto White Balance) • AES (Auto Electronic Shutter) D-Link DCS-5010L User Manual Power • Input: 100-240 V AC, 50/60 Hz • Output: 12 V DC, 1 A Dimensions (W x D x H) • Camera Only - 102.35 x 101.27 x 133.6 mm
-
 1
1 -
 2
2 -
 3
3 -
 4
4 -
 5
5 -
 6
6 -
 7
7 -
8
-
9
-
10
-
11
-
12
-
13
-
14
-
15
-
16
-
17
-
18
-
19
-
20
-
21
-
22
-
23
-
24
-
25
-
26
-
27
-
28
-
29
-
30
-
31
-
32
-
33
-
34
-
35
-
36
-
37
-
38
-
39
-
40
-
41
-
42
-
43
-
44
-
45
-
46
-
47
-
48
 |
 |

User Manual
Wireless N Day & Night Pan/Tilt Cloud Camera Lite
DCS-5010L
Version 1.0 | 04/03/2013