D-Link DCS-5020L User Manual - Page 15
Manual Hardware Installation - wireless
 |
View all D-Link DCS-5020L manuals
Add to My Manuals
Save this manual to your list of manuals |
Page 15 highlights
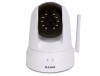
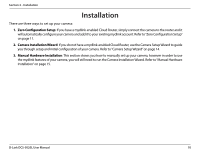
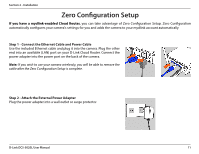
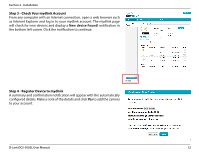
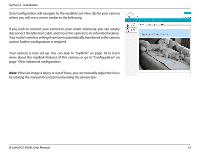
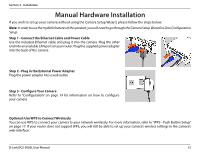
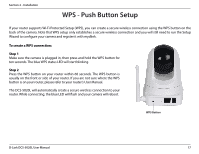
Section 2 - Installation Manual Hardware Installation If you wish to set up your camera without using the Camera Setup Wizard, please follow the steps below: Note: In order to use the mydlink features of this product, you will need to go through the Camera Setup Wizard or Zero Configuration Setup. Step 1 - Connect the Ethernet Cable and Power Cable Use the included Ethernet cable and plug it into the camera. Plug the other end into an available LAN port on your router. Plug the supplied power adapter into the back of the camera Step 2 - Plug in the External Power Adapter Plug the power adapter into a wall outlet. Step 3 - Configure Your Camera Refer to "Configuration" on page 19 for information on how to configure your camera. Optional: Use WPS to Connect Wirelessly You can use WPS to connect your camera to your network wirelessly. For more information, refer to "WPS - Push Button Setup" on page 17. If your router does not support WPS, you will still be able to set up your camera's wireless settings in the camera's web interface. D-Link DCS-5020L User Manual 15
-
 1
1 -
2
-
3
-
4
-
5
-
6
-
7
-
8
-
9
-
 10
10 -
 11
11 -
 12
12 -
 13
13 -
 14
14 -
 15
15 -
 16
16 -
 17
17 -
 18
18 -
 19
19 -
 20
20 -
21
-
22
-
23
-
24
-
25
-
26
-
27
-
28
-
29
-
30
-
31
-
32
-
33
-
34
-
35
-
36
-
37
-
38
-
39
-
40
-
41
-
42
-
43
-
44
-
45
-
46
-
47
-
48
-
49
-
50
-
51
-
52
-
53
-
54
-
55
-
56
-
57
-
58
 |
 |