D-Link DCS-6620 Product Manual - Page 105
Apply and Erase Buttons, Motion Detection
 |
UPC - 790069277078
View all D-Link DCS-6620 manuals
Add to My Manuals
Save this manual to your list of manuals |
Page 105 highlights
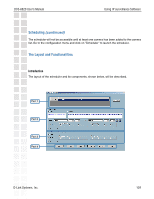
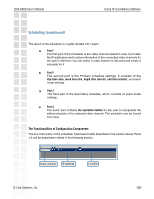
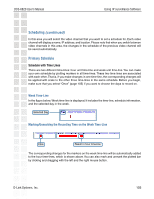
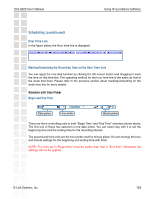
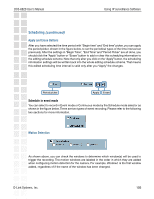
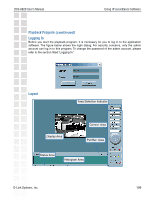
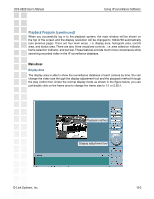
DCS-6620 User's Manual Using IP surveillance Software Scheduling (continued) Apply and Erase Buttons After you have selected the time period with "Begin time" and "End time" picker, you can apply the period picker, shown in the figure below, to set the periodical types of the time interval set previously. After the settings in "Begin Time", "End Time" and "Period Picker" are all done, you should click the "Apply" button or "Erase" button to add or clear this scheduling information to the editing schedule scheme. Note that only after you click on the "Apply" button, the scheduling information settings will be written back into the whole editing schedule scheme. That means this edited scheduling time interval is valid only after you "Apply" the changes. Period picker Apply Erase Schedule in event mode You can select to record in Event mode or Continuous mode by the Schedule mode selector as shown in the figure below. There are two types of event recording. Please refer to the following two sections for more information. Motion Detection As shown above, you can check the windows to determine which window(s) will be used to trigger the recording. The motion windows are labeled in the order in which they are added when configuring motion detection for the camera. For example, Window1 is the first window added, regardless of if the name of the window has been changed. D-Link Systems, Inc. 105
-
 1
1 -
2
-
3
-
4
-
5
-
6
-
7
-
8
-
9
-
10
-
11
-
12
-
13
-
14
-
15
-
16
-
17
-
18
-
19
-
20
-
21
-
22
-
23
-
24
-
25
-
26
-
27
-
28
-
29
-
30
-
31
-
32
-
33
-
34
-
35
-
36
-
37
-
38
-
39
-
40
-
41
-
42
-
43
-
44
-
45
-
46
-
47
-
48
-
49
-
50
-
51
-
52
-
53
-
54
-
55
-
56
-
57
-
58
-
59
-
60
-
61
-
62
-
63
-
64
-
65
-
66
-
67
-
68
-
69
-
70
-
71
-
72
-
73
-
74
-
75
-
76
-
77
-
78
-
79
-
80
-
81
-
82
-
83
-
84
-
85
-
86
-
87
-
88
-
89
-
90
-
91
-
92
-
93
-
94
-
95
-
96
-
97
-
98
-
99
-
 100
100 -
 101
101 -
 102
102 -
 103
103 -
 104
104 -
 105
105 -
 106
106 -
 107
107 -
 108
108 -
 109
109 -
 110
110 -
111
-
112
-
113
-
114
-
115
-
116
-
117
-
118
-
119
-
120
-
121
-
122
-
123
-
124
-
125
-
126
-
127
-
128
-
129
-
130
-
131
-
132
-
133
-
134
-
135
-
136
-
137
-
138
-
139
-
140
-
141
-
142
-
143
 |
 |