D-Link DES-3828 Product Manual - Page 68
enable autoconfig, Purpose, Syntax, Description, Parameters, Restrictions, config ipif System dhcp
 |
UPC - 790069276811
View all D-Link DES-3828 manuals
Add to My Manuals
Save this manual to your list of manuals |
Page 68 highlights
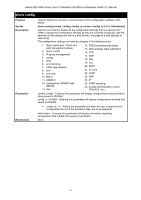
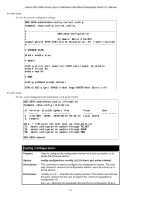
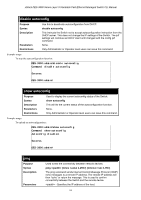
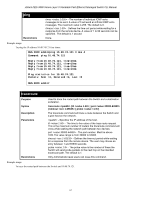
xStack DES-3800 Series Layer 3 Stackable Fast Ethernet Managed Switch CLI Manual enable autoconfig Purpose Syntax Description Parameters Restrictions Used to activate the autoconfiguration function for the Switch. This will load a previously saved configuration file for current use. enable autoconfig When autoconfig is enabled on the Switch, the DHCP reply will contain a configuration file and path name. It will then request the file from the TFTP server specified in the reply. When autoconfig is enabled, the ipif settings will automatically become DHCP client. None. When autoconfig is enabled, the Switch becomes a DHCP client automatically (same as: config ipif System dhcp). The DHCP server must have the TFTP server IP address and configuration file name, and be configured to deliver this information in the data field of the DHCP reply packet. The TFTP server must be running and have the requested configuration file in its base directory when the request is received from the Switch. Consult the DHCP server and TFTP server software instructions for information on loading a configuration file. If the Switch is unable to complete the autoconfiguration process the previously saved local configuration file present in Switch memory will be loaded. Only Administrator or Operator-level users can issue this command. NOTE: Dual-purpose (DHCP/TFTP) server utility software may require entry of the configuration file name and path within the user interface. Alternatively, the DHCP software may require creating a separate ext file with the configuration file name and path in a specific directory on the server. Consult the documentation for the DCHP server software if you are unsure. Example usage: To enable autoconfiguration on the Switch: DES-3800:admin#enable autoconfig Command: enable autoconfig Success. DES-3800:admin# When autoconfig is enabled and the Switch is rebooted, the normal login screen will appear for a few moments while the autoconfig request (i.e. download configuration) is initiated. The console will then display the configuration parameters as they are loaded from the configuration file specified in the DHCP or TFTP server. This is exactly the same as using a download configuration command. After the entire Switch configuration is loaded, the Switch will automatically "logout" the server. The configuration settings will be saved automatically and become the active configuration. Upon booting up the autoconfig process is initiated, the console screen will appear similar to the example below. The configuration settings will be loaded in normal order. 64
-
 1
1 -
2
-
3
-
4
-
5
-
6
-
7
-
8
-
9
-
10
-
11
-
12
-
13
-
14
-
15
-
16
-
17
-
18
-
19
-
20
-
21
-
22
-
23
-
24
-
25
-
26
-
27
-
28
-
29
-
30
-
31
-
32
-
33
-
34
-
35
-
36
-
37
-
38
-
39
-
40
-
41
-
42
-
43
-
44
-
45
-
46
-
47
-
48
-
49
-
50
-
51
-
52
-
53
-
54
-
55
-
56
-
57
-
58
-
59
-
60
-
61
-
62
-
 63
63 -
 64
64 -
 65
65 -
 66
66 -
 67
67 -
 68
68 -
 69
69 -
 70
70 -
 71
71 -
 72
72 -
 73
73 -
74
-
75
-
76
-
77
-
78
-
79
-
80
-
81
-
82
-
83
-
84
-
85
-
86
-
87
-
88
-
89
-
90
-
91
-
92
-
93
-
94
-
95
-
96
-
97
-
98
-
99
-
100
-
101
-
102
-
103
-
104
-
105
-
106
-
107
-
108
-
109
-
110
-
111
-
112
-
113
-
114
-
115
-
116
-
117
-
118
-
119
-
120
-
121
-
122
-
123
-
124
-
125
-
126
-
127
-
128
-
129
-
130
-
131
-
132
-
133
-
134
-
135
-
136
-
137
-
138
-
139
-
140
-
141
-
142
-
143
-
144
-
145
-
146
-
147
-
148
-
149
-
150
-
151
-
152
-
153
-
154
-
155
-
156
-
157
-
158
-
159
-
160
-
161
-
162
-
163
-
164
-
165
-
166
-
167
-
168
-
169
-
170
-
171
-
172
-
173
-
174
-
175
-
176
-
177
-
178
-
179
-
180
-
181
-
182
-
183
-
184
-
185
-
186
-
187
-
188
-
189
-
190
-
191
-
192
-
193
-
194
-
195
-
196
-
197
-
198
-
199
-
200
-
201
-
202
-
203
-
204
-
205
-
206
-
207
-
208
-
209
-
210
-
211
-
212
-
213
-
214
-
215
-
216
-
217
-
218
-
219
-
220
-
221
-
222
-
223
-
224
-
225
-
226
-
227
-
228
-
229
-
230
-
231
-
232
-
233
-
234
-
235
-
236
-
237
-
238
-
239
-
240
-
241
-
242
-
243
-
244
-
245
-
246
-
247
-
248
-
249
-
250
-
251
-
252
-
253
-
254
-
255
-
256
-
257
-
258
-
259
-
260
-
261
-
262
-
263
-
264
-
265
-
266
-
267
-
268
-
269
-
270
-
271
-
272
-
273
-
274
-
275
-
276
-
277
-
278
-
279
-
280
-
281
-
282
-
283
-
284
-
285
-
286
-
287
-
288
-
289
-
290
-
291
-
292
-
293
-
294
-
295
-
296
-
297
-
298
-
299
-
300
-
301
-
302
-
303
-
304
-
305
-
306
-
307
-
308
-
309
-
310
-
311
-
312
-
313
-
314
-
315
-
316
-
317
-
318
-
319
-
320
-
321
-
322
-
323
-
324
-
325
-
326
-
327
-
328
-
329
-
330
-
331
-
332
-
333
-
334
-
335
-
336
-
337
-
338
-
339
-
340
-
341
-
342
-
343
-
344
-
345
-
346
-
347
-
348
-
349
-
350
-
351
-
352
-
353
-
354
-
355
-
356
-
357
-
358
-
359
-
360
-
361
-
362
-
363
-
364
-
365
-
366
-
367
-
368
-
369
-
370
-
371
-
372
-
373
-
374
-
375
-
376
-
377
-
378
-
379
-
380
-
381
-
382
-
383
-
384
-
385
-
386
-
387
-
388
-
389
-
390
-
391
-
392
-
393
-
394
-
395
-
396
-
397
-
398
-
399
-
400
-
401
-
402
-
403
-
404
-
405
-
406
-
407
-
408
-
409
-
410
-
411
-
412
-
413
-
414
-
415
-
416
-
417
-
418
-
419
-
420
-
421
-
422
-
423
-
424
-
425
-
426
-
427
-
428
-
429
-
430
-
431
-
432
-
433
-
434
-
435
-
436
-
437
-
438
-
439
-
440
-
441
-
442
-
443
-
444
-
445
-
446
-
447
-
448
-
449
-
450
-
451
-
452
 |
 |