D-Link DIR-605 User Manual
D-Link DIR-605 Manual
 |
View all D-Link DIR-605 manuals
Add to My Manuals
Save this manual to your list of manuals |
D-Link DIR-605 manual content summary:
- D-Link DIR-605 | User Manual - Page 1
- D-Link DIR-605 | User Manual - Page 2
Wireless 38 Advanced Network 39 Device Administration 40 Save and Restore 41 Firmware Update 42 DDNS Setting 43 System Check 44 Schedules 45 Log Settings 46 Device Info 47 Log 48 Statistics 49 Wireless 50 Help 51 Wireless Security 52 What is WEP 52 D-Link DIR-605 User Manual - D-Link DIR-605 | User Manual - Page 3
an Unsecured Wireless Network..... 79 Troubleshooting 83 Wireless Basics 87 What is Wireless 88 D-Link DIR-605 User Manual Tips 90 Wireless Modes 91 Networking Basics 92 Check your IP address 92 Statically Assign an IP address 93 Technical Specifications 94 Contacting Technical Support 96 - D-Link DIR-605 | User Manual - Page 4
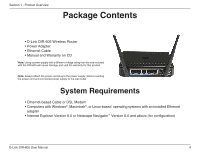
D-Link DIR-605 Wireless Router • Power Adapter • Ethernet Cable • Manual and Warranty on CD Note: Using a power supply with a different voltage rating than the one included with the DIR-605 Version 6.0 or Netscape Navigator™ Version 6.0 and above (for configuration) D-Link DIR-605 User Manual 4 - D-Link DIR-605 | User Manual - Page 5
and environmental factors, including volume of network traffic, building materials and construction, and network overhead, lower actual data throughput rate. Environmental conditions will adversely affect wireless signal range. D-Link DIR-605 User Manual 5 - D-Link DIR-605 | User Manual - Page 6
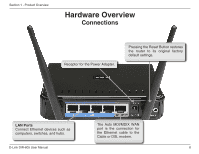
Adapter. Pressing the Reset Button restores the router to its original factory default settings. LAN Ports Connect Ethernet devices such as computers, switches, and hubs. The Auto MDI/MDIX WAN port is the connection for the Ethernet cable to the Cable or DSL modem. D-Link DIR-605 User Manual 6 - D-Link DIR-605 | User Manual - Page 7
is ready. This LED blinks during wireless data transmission. Power LED A solid light indicates a proper connection to the power supply. D-Link DIR-605 User Manual Local Network LEDs A solid light indicates a connection to an Ethernet-enabled computer on ports 1-4. This LED blinks during data - D-Link DIR-605 | User Manual - Page 8
cable and connect an Ethernet cable to the WAN port on the router, and then turn the modem back on. In some cases, you may need to call your ISP to change connection types (USB to Ethernet). If you wall or partition. C). Using the cables connect to the back panel. D-Link DIR-605 User Manual 8 - D-Link DIR-605 | User Manual - Page 9
on range. Try to position access points, wireless routers, wireless connection may degrade dramatically or drop completely. Make sure your 2.4GHz phone base is as far away from your wireless devices as possible. The base transmits a signal even if the phone in not in use. D-Link DIR-605 User Manual - D-Link DIR-605 | User Manual - Page 10
router. The power light, WAN light, and the LAN light (the port that your computer is plugged into) should be lit. If not, make sure your computer, modem, and router are powered on and verify the cable connections are correct. 9. Skip to page 16 to configure your router. D-Link DIR-605 User Manual - D-Link DIR-605 | User Manual - Page 11
and the subnet mask of your network. Click Save Settings to save your settings. Use this new IP address to access the configuration utility of the router in the future. Close the browser and change your computer's IP settings back to the original values as in Step 1. D-Link DIR-605 User Manual 11 - D-Link DIR-605 | User Manual - Page 12
other Ethernet devices and computers. To configure your wireless network, open a web browser and enter the IP address you assigned to the router. Refer to the Configuration and Wireless Security sections for more information on setting up your wireless network. D-Link DIR-605 User Manual 12 - D-Link DIR-605 | User Manual - Page 13
as Internet Explorer and enter the IP address of the router (192.168.0.1). Enter the user name (admin) and your password. Leave the password blank by default. If you get a Page Cannot be Displayed error, please refer to the Troubleshooting section for assistance. D-Link DIR-605 User Manual 13 - D-Link DIR-605 | User Manual - Page 14
run the setup wizard from the opening Internet Setup window to quickly set up your router. Click Internet Connection Setup Wizard, you will be directed to the first window of the wizard. Click Next to continue. Create a new password and then click Next to continue. D-Link DIR-605 User Manual 14 - D-Link DIR-605 | User Manual - Page 15
, click Clone Your PC's MAC Address and then click Next to continue. The Host Name is optional but may be required by some ISPs. The default host name is the device name of the Router and may be changed. D-Link DIR-605 User Manual 15 - D-Link DIR-605 | User Manual - Page 16
software from your computer. The software is no longer needed and will not work through a router. If you selected PPTP, enter your PPTP username and password. Click Next to continue. If you selected L2TP, enter your L2TP username and password. Click Next to continue. D-Link DIR-605 User Manual 16 - D-Link DIR-605 | User Manual - Page 17
If you selected Static, enter your network settings supplied by your Internet provider. Click Next to continue. Click Connect to save your settings. Please allow 1-2 minutes for rebooting. When the router has finished rebooting, the opening window will be displayed. D-Link DIR-605 User Manual 17 - D-Link DIR-605 | User Manual - Page 18
the Primary DNS server IP address Address: assigned by your ISP. Secondary DNS This is optional. Address: MTU: Maximum Transmission Unit - you may need to change the MTU for optimal performance with your specific ISP. 1492 is the default MTU. D-Link DIR-605 User Manual 18 - D-Link DIR-605 | User Manual - Page 19
you change the default MAC address unless required by your ISP. DNS Enter the DNS (Domain Name Server) server IP address assigned by your ISP. Addresses: MTU: Maximum Transmission Unit - You may need to change the MTU for optimal performance with your specific ISP. D-Link DIR-605 User Manual 19 - D-Link DIR-605 | User Manual - Page 20
. To disable this feature, enable Auto-reconnect. MTU: Maximum Transmission Unit - You may need to change the MTU for optimal performance with your specific ISP. 1492 is the default MTU. Connection Select either Always-on, Manual, or Connect-on Mode Select: demand. D-Link DIR-605 User Manual 20 - D-Link DIR-605 | User Manual - Page 21
Internet Time: connection is maintained during inactivity. To disable this feature, enable Auto-reconnect. MTU: Maximum Transmission Unit - You may need to change the MTU for optimal performance. Connect Mode: Select either Always-on, Manual, or Connect-on demand. D-Link DIR-605 User Manual 21 - D-Link DIR-605 | User Manual - Page 22
is maintained during inactivity. To disable this feature, enable Auto-reconnect. MTU: Maximum Transmission Unit - You may need to change the MTU for optimal performance with your specific ISP. Connect Mode: Select either Always-on, Manual, or Connect-on demand. D-Link DIR-605 User Manual 22 - D-Link DIR-605 | User Manual - Page 23
addition, the second step also includes an option to use a MAC address that will always be associated with the connection. The MAC address is entered manually or copied from the computer. D-Link DIR-605 User Manual 23 - D-Link DIR-605 | User Manual - Page 24
section provides additional explanation for how to configure the WEP, WPA, WPA2, and WPA/WPA2 wireless security mode options. Click Next to continue. Enter a Wireless Network Name in the textbox, which is also know as the SSID, and then click Next to continue. D-Link DIR-605 User Manual 24 - D-Link DIR-605 | User Manual - Page 25
wireless security settings. Please print this out or record this information in a safe place and then click Save to continue. The Router will save your new settings and reboot. When it is finished after 1-2 minutes, the opening Wireless Setup window is displayed. D-Link DIR-605 User Manual 25 - D-Link DIR-605 | User Manual - Page 26
the SSID of your wireless network to be broadcasted by the DIR-605. If this option is Wireless: checked, the SSID of the DIR-605 will not be seen by Site Survey utilities so your wireless clients will have to know the SSID of your DIR-605 in order to connect to it. D-Link DIR-605 User Manual 26 - D-Link DIR-605 | User Manual - Page 27
the Router. NOTE: It is recommended to enable encryption on your wireless Router before your wireless network adapters. Please establish wireless connectivity before enabling encryption. Your wireless signal may degrade when enabling encryption due to the added overhead. D-Link DIR-605 User Manual - D-Link DIR-605 | User Manual - Page 28
your settings. If you are configuring the router with a wireless adapter, you will lose connectivity until you enable WPA, WPA2, or WPA/WPA2 (whichever of the three options you have selected above) on your adapter and enter the same network key as you did on the router. D-Link DIR-605 User Manual - D-Link DIR-605 | User Manual - Page 29
to Port, enter the port you are using with your RADIUS server. 1812 is the default port. 6. Next to Shared Secret, enter the security key. 7. If you have a secondary RADIUS server, enter its IP address, port, and secret key. 8. Click Save Settings to save your settings. D-Link DIR-605 User Manual - D-Link DIR-605 | User Manual - Page 30
: Enable DNS Check the box to transfer the DNS server Relay: information from your ISP to your computers. If unchecked, your computers will use the router for a DNS server. Refer to the next page for DHCP information. D-Link DIR-605 User Manual 30 - D-Link DIR-605 | User Manual - Page 31
settings provided by the DIR-605. router. Uncheck to disable this function. DHCP IP Enter the starting and ending IP addresses for Address Range: the DHCP server's IP assignment. DHCP Lease The length of time for the IP address lease. Time: Enter the Lease time in minutes. D-Link DIR-605 User Manual - D-Link DIR-605 | User Manual - Page 32
select an NTP Server. NTP is short for Network Time Protocol. NTP synchronizes computer clock times in a network of computers. To manually input the time, enter the values Manual: in these fields for the Year, Month, Day, Hour, Minute, and Second. Click Save Settings. D-Link DIR-605 User Manual 32 - D-Link DIR-605 | User Manual - Page 33
it will be blocked. The schedule of time when the parental control Schedule: filter will be enabled. The schedule may be set to Always, which will allow the particular service to always be enabled. You can create your own times in the Maintenance > Schedules section. D-Link DIR-605 User Manual 33 - D-Link DIR-605 | User Manual - Page 34
IP address of the computer on your local network that you want to allow the incoming service to. Start Port/ Enter the port or ports that you want to open. If End Port: you want to open one port, enter the same port in both boxes. Traffic Type: Select TCP, UDP, or Any D-Link DIR-605 User Manual 34 - D-Link DIR-605 | User Manual - Page 35
port or a range of ports. Firewall Port: This is the port number on the WAN side that will be used to access the application. You may define a single port or a range of ports. You can use a comma to add multiple ports or port ranges. Traffic Type: Select TCP, UDP, or Any. D-Link DIR-605 User Manual - D-Link DIR-605 | User Manual - Page 36
copy that MAC List: Address. The schedule of time when the network filter Schedule: will be enabled. The schedule may be set to Always, which will allow the particular service to always be enabled. You can create your own times in the Maintenance > Schedules section. D-Link DIR-605 User Manual 36 - D-Link DIR-605 | User Manual - Page 37
a client PC that cannot run Internet applications properly from behind the DIR-605, then you can set the client up for unrestricted Internet access. It allows a computer to be used for the filter rule. Port Range: Enter the desired port range for the filter rule. D-Link DIR-605 User Manual 37 - D-Link DIR-605 | User Manual - Page 38
devices. 20MHz - Select if you are not using any 802.11n wireless clients. This is the default setting. Short GI: Check this box to reduce the guard interval time therefore increasing the data capacity. However, it's less reliable and may create higher data loss. D-Link DIR-605 User Manual 38 - D-Link DIR-605 | User Manual - Page 39
extra security from hackers. Tick this checkbox to allow the WAN port to be "Pinged". WAN Port You may set the port speed of the WAN port Speed: to 10Mbps, 100Mbps, or 10/100Mbps Auto. Some older cable or DSL modems may require you to set the port speed to 10Mbps. D-Link DIR-605 User Manual 39 - D-Link DIR-605 | User Manual - Page 40
into this field would present a security risk and is not recommended. Port: The port number used to access the DIR-605. For example: http://x.x.x.x:8080 whereas x.x.x.x is the WAN IP address of the DIR-605 and 8080 is the port used for the Web-Management interface. D-Link DIR-605 User Manual 40 - D-Link DIR-605 | User Manual - Page 41
Any settings that have not been saved will be lost, including any rules that you have created. If you want to save the current router configuration settings, use the Save button above. Reboots: Click the Reboots button on the left side of the window to restart the Router. D-Link DIR-605 User Manual - D-Link DIR-605 | User Manual - Page 42
there is an updated firmware; if so, download the new firmware to your hard drive. Browse: After you have downloaded the new firmware, click Browse in this window to locate the firmware update on your hard drive. Click Save Settings to complete the firmware upgrade. D-Link DIR-605 User Manual 42 - D-Link DIR-605 | User Manual - Page 43
- Configuration DDNS Setting The router supports DDNS (Dynamic Domain Name Service). The Dynamic DNS service allows a dynamic server. Username: Enter the username given to you by your DDNS server. Password: Enter the password or key given to you by your DDNS server. D-Link DIR-605 User Manual 43 - D-Link DIR-605 | User Manual - Page 44
reduces service calls and returns by allowing users to easily troubleshoot their cable connections. Ping Test: The Ping Test is used to send Ping packets to test if a computer is on the Internet. Enter the IP Address that you wish to Ping, and click Ping. D-Link DIR-605 User Manual 44 - D-Link DIR-605 | User Manual - Page 45
Router allows the user the ability to manage schedule rules for various firewall and parental control features on this window. Once you have finished configuring the new schedule rule, click the Save Settings and then enter a specific beginning and ending time. D-Link DIR-605 User Manual 45 - D-Link DIR-605 | User Manual - Page 46
Notice. Send by Mail: Enter the your SNTP server name(or IP address) and enter your mail address before sending your system log by mail. D-Link DIR-605 User Manual 46 - D-Link DIR-605 | User Manual - Page 47
the MAC address and the private (local) IP settings for the router. WAN: Displays the MAC address and the public IP settings for the router. Wireless Displays the wireless MAC address and your 802.11N: wireless settings such as SSID, Channel, and Encryption status. D-Link DIR-605 User Manual 47 - D-Link DIR-605 | User Manual - Page 48
allows you to view a log of activities on the Router. This is especially helpful detecting unauthorized network usage. First page. Clear: Clear the log. Link to Log Click this button to go directly to the Log Settings Settings: window (Maintenance > Log Settings). D-Link DIR-605 User Manual 48 - D-Link DIR-605 | User Manual - Page 49
of packets that pass through the DIR-605 on both the WAN and the LAN ports. The traffic counter will reset if the device is rebooted. Active Session The NAPT Active Session table displays a list of all active conversations between WAN computers and LAN computers. D-Link DIR-605 User Manual 49 - D-Link DIR-605 | User Manual - Page 50
Section 3 - Configuration Wireless The wireless client table displays a list of current connected wireless clients. This table also displays the connection time and MAC address of the connected wireless client. D-Link DIR-605 User Manual 50 - D-Link DIR-605 | User Manual - Page 51
Section 3 - Configuration Help Click the desired hyperlink to get more information about how to use the Router. D-Link DIR-605 User Manual 51 - D-Link DIR-605 | User Manual - Page 52
RC4 encryption algorithm. WEP provides security by encrypting data over your wireless network so that it is protected as it is transmitted from one wireless device to another. To gain access to a WEP network, you keys can be defined so that you can change keys easily. D-Link DIR-605 User Manual 52 - D-Link DIR-605 | User Manual - Page 53
). In ASCII all numbers and letters are valid. 6. Click Save Settings to save your settings. If you are configuring the router with a wireless adapter, you will lose connectivity until you enable WEP on your adapter and enter the same WEP key as you did on the router. D-Link DIR-605 User Manual 53 - D-Link DIR-605 | User Manual - Page 54
on your wireless router or access point. WPA/WPA2 incorporates user authentication through the Extensible Authentication Protocol (EAP). EAP is built on a more secure public key encryption system to ensure that only authorized network users can access the network. D-Link DIR-605 User Manual 54 - D-Link DIR-605 | User Manual - Page 55
all other wireless clients. 6. Click Save Settings to save your settings. If you are configuring the Router with a wireless adapter, you will lose connectivity until you enable WPA-PSK or WPA2-PSK on your adapter and enter the same passphrase as you did on the Router. D-Link DIR-605 User Manual 55 - D-Link DIR-605 | User Manual - Page 56
on all other wireless clients. 6. Click Save Settings to save your settings. If you are configuring the Router with a wireless adapter, you will lose connectivity until you enable WPA/WPA2-PSK on your adapter and enter the same passphrase as you did on the Router. D-Link DIR-605 User Manual 56 - D-Link DIR-605 | User Manual - Page 57
to Port, enter the port you are using with your RADIUS server. 1812 is the default port. 7. Next to Shared Secret, enter the security key. 8. If you have a secondary RADIUS server, enter its IP address, port, and secret key. 9. Click Save Settings to save your settings. D-Link DIR-605 User Manual - D-Link DIR-605 | User Manual - Page 58
on a network (displayed using the SSID) and click the Connect button. If you get a good signal but cannot access the Internet, check you TCP/IP settings for your wireless adapter. Refer to the Networking Basics section in this manual for more information. D-Link DIR-605 User Manual 58 - D-Link DIR-605 | User Manual - Page 59
Open the Windows® XP Wireless Utility by right-clicking on the wireless computer icon in your system tray (lower-right corner of screen). Select View Available Wireless Networks. 2. Highlight the wireless network (SSID) you would like to connect to and click Connect. D-Link DIR-605 User Manual 59 - D-Link DIR-605 | User Manual - Page 60
. Enter the same WEP key that is on your router and click Connect. It may take 20-30 seconds to connect to the wireless network. If the connection fails, please verify that the WEP settings are correct. The WEP key must be exactly the same as on the wireless router. D-Link DIR-605 User Manual 60 - D-Link DIR-605 | User Manual - Page 61
Open the Windows® XP Wireless Utility by right-clicking on the wireless computer icon in your system tray (lower-right corner of screen). Select View Available Wireless Networks. 2. Highlight the wireless network (SSID) you would like to connect to and click Connect. D-Link DIR-605 User Manual 61 - D-Link DIR-605 | User Manual - Page 62
. Enter the WPA-PSK passphrase and click Connect. It may take 20-30 seconds to connect to the wireless network. If the connection fails, please verify that the WPA-PSK settings are correct. The WPA-PSK passphrase must be exactly the same as on the wireless router. D-Link DIR-605 User Manual 62 - D-Link DIR-605 | User Manual - Page 63
or choose to click the Generate New PIN button or Reset PIN to Default button. If you are using third party software to set up Wi-Fi Protection, carefully follow the directions. When you are finished, proceed to the next section to set up the newly-configured Router. D-Link DIR-605 User Manual 63 - D-Link DIR-605 | User Manual - Page 64
Protection (WCN 2.0 in Windows Vista) Setting Up a Configured Router Once the Router has been configured, you can use the push button on the Router or third party software to invite push button method or to manually enter the PIN. Follow the on-screen instructions. D-Link DIR-605 User Manual 64 - D-Link DIR-605 | User Manual - Page 65
- Changing the Computer Name and Joining a Workgroup Changing the Computer Name and Joining a Workgroup The following are step-by-step directions to change the computer name and join a workgroup. 1. Click on Properties. 2. Click on the Advanced system settings link. D-Link DIR-605 User Manual - D-Link DIR-605 | User Manual - Page 66
and enter a description of your computer in the textbox. When you are finished, click the Change button. 4. Go to the Computer Name/Domain Changes window and click the radio button next to the Workgroup you want to join. When you are finished, click the OK button. D-Link DIR-605 User Manual 66 - D-Link DIR-605 | User Manual - Page 67
window and click the appropriate Local Area Connection icon. 3. Right-click the Local Area Connection icon and then select Properties from the drop-down menu. D-Link DIR-605 User Manual 67 - D-Link DIR-605 | User Manual - Page 68
in the space offered. Then click the "Use the following DNS server adresses" option on the same tab and enter the desired DNS server information. D-Link DIR-605 User Manual 68 - D-Link DIR-605 | User Manual - Page 69
and then select Status from the drop-down menu. 7. Go to the Local Area Connection Status window and click the Details button. 8. Confirm your new settings on the Network Connection Status window. When you are finished, click the Done button. D-Link DIR-605 User Manual 69 - D-Link DIR-605 | User Manual - Page 70
on Set up a connection or network in the Network and Sharing Center section. 2. Go to the Set up a connection or network window and choose the Set up a wireless router or access point Set up a new wireless network for your home or business option. Click the Next button. D-Link DIR-605 User Manual - D-Link DIR-605 | User Manual - Page 71
Wirelessly 3. Click the Next button on the Set up a wireless router or access point window. 4. The following window displays the system progress. 5. This window confirms that you want to create wireless network settings that are savable to a USB flash drive. D-Link DIR-605 User Manual 71 - D-Link DIR-605 | User Manual - Page 72
the Set up a wireless router or access point wizard. Click the Show advanced network security options link. 8. Select security method on the Choose advanced network security options window in the Set up a wireless router or access point wizard. Click the Next button. D-Link DIR-605 User Manual 72 - D-Link DIR-605 | User Manual - Page 73
. 11.Once you have saved your network settings to USB, use the pulldown menu on the Insert the USB flash drive into this computer window in the Set up a wireless router or access point wizard to select a destination for your network settings. Click the Next button. D-Link DIR-605 User Manual 73 - D-Link DIR-605 | User Manual - Page 74
router or access point wizard opens to indicate the system progress. 13.Once you are finished, the To add a device or computer, follow these instructions window in the Set up a wireless router or access point wizard opens. When you are finished, click the Close button. D-Link DIR-605 User Manual - D-Link DIR-605 | User Manual - Page 75
WPA2-PSK) Connecting to a Secured Wireless Network (WEP, WPA-PSK & WPA2-PSK) The following are step-by-step directions to set up a wireless connection. 1. Click on Properties. 2. Click the Manage network connections link in the Network and Sharing Center window. D-Link DIR-605 User Manual 75 - D-Link DIR-605 | User Manual - Page 76
Network (WEP, WPA-PSK & WPA2-PSK) 3. Right-click the Wireless Network Connection entry and then select Connect/Disconnect from the drop-down menu. 4. Select a click the Connect button. 5. The following Connect to a network wizard window displays the system progress. D-Link DIR-605 User Manual 76 - D-Link DIR-605 | User Manual - Page 77
Section 10 - Connecting to a Secured Wireless Network (WEP, WPA-PSK & WPA2-PSK) 6. Enter the network security key or passphrase for the Router in the textbox provided in the Type the network security key is displayed at the bottom of the Windows start up menu. D-Link DIR-605 User Manual 77 - D-Link DIR-605 | User Manual - Page 78
Section 10 - Connecting to a Secured Wireless Network (WEP, WPA-PSK & WPA2-PSK) 9. Confirm your new settings by calling up the command prompt and then entering the ipconfig command. 10.To test the new IP address, use the Ping feature of the command prompt. D-Link DIR-605 User Manual 78 - D-Link DIR-605 | User Manual - Page 79
Wireless Network Connecting to an Unsecured Wireless Network The following are step-by-step directions to set up an unsecured wireless connection. 1. Click on Properties. 2. Go to the Network and Sharing Center window and click the Manage Network Connections link. D-Link DIR-605 User Manual - D-Link DIR-605 | User Manual - Page 80
Section 11 - Connecting to an Unsecured Wireless Network 3. Right-click the Wireless Network Connection entry and then select Connect/Disconnect from the drop-down menu. 4. 5. Confirm your desire to connect anyway on the following Network Connection Status window. D-Link DIR-605 User Manual 80 - D-Link DIR-605 | User Manual - Page 81
Section 11 - Connecting to an Unsecured Wireless Network 6. The following Connect to a network wizard window displays the system progress. 7. The following Successfully Close button. 8. The successful connection is displayed at the bottom of the Windows start up menu. D-Link DIR-605 User Manual 81 - D-Link DIR-605 | User Manual - Page 82
Section 11 - Connecting to an Unsecured Wireless Network 9. Confirm your new settings by calling up the command prompt and then entering the ipconfig command. 10.To test the new IP address, use the Ping feature of the command prompt. D-Link DIR-605 User Manual 82 - D-Link DIR-605 | User Manual - Page 83
- Troubleshooting Troubleshooting This chapter provides solutions to problems that can occur during the installation and operation of the DIR-605. Read the following descriptions if you are having problems. software for more information on disabling or configuring it. D-Link DIR-605 User Manual 83 - D-Link DIR-605 | User Manual - Page 84
to hold the button down for 10 seconds. Release the button and the router will go through its reboot process. Wait about 30 seconds to access the router. The default IP address is 192.168.0.1. When logging in, the username is admin and leave the password box empty. D-Link DIR-605 User Manual 84 - D-Link DIR-605 | User Manual - Page 85
® 95, 98, and Me users type in command (Windows® NT, 2000, and XP users type in cmd) and press Enter (or click OK). • Once the window opens, you'll need to do a special ping. Use the following syntax: ping [url] [-f] [-l] [MTU value] Example: ping yahoo.com -f -l 1472 D-Link DIR-605 User Manual 85 - D-Link DIR-605 | User Manual - Page 86
on Setup and then click Manual Configure. • To change the MTU enter the number in the MTU field and click the Save Settings button to save your settings. • Test your email. If changing the MTU does not resolve the problem, continue changing the MTU in increments of ten. D-Link DIR-605 User Manual - D-Link DIR-605 | User Manual - Page 87
cards. Under many circumstances, it may be desirable for mobile network devices to link to a conventional Ethernet LAN in order to use servers, printers or an Internet connection supplied through the wired LAN. A Wireless Router is a device used to provide this link. D-Link DIR-605 User Manual 87 - D-Link DIR-605 | User Manual - Page 88
data from one point A to point B. But wireless technology has restrictions as to how you can access the network. You must be within the wireless network range area to be able to connect your computer. campuses, airports, golf courses, and many other outdoor venues. D-Link DIR-605 User Manual 88 - D-Link DIR-605 | User Manual - Page 89
is the industry standard wireless technology used for WPAN. Bluetooth devices in WPAN operate in a range up to 30 feet away. Compared to WLAN the speed and wireless operation range are both less than printer with multiple computers • No need to dedicate office space D-Link DIR-605 User Manual 89 - D-Link DIR-605 | User Manual - Page 90
support all AP and wireless STA if they work in the same wireless channel. AP-repeater (AP with WDS): only repeat same model or limited models which base on the same proprietary protocol. Please choose a universal repeater to boost the signal to extend the range. D-Link DIR-605 User Manual 90 - D-Link DIR-605 | User Manual - Page 91
Access Point or wireless router. All the wireless devices, or clients, will connect to the wireless router or access point. An Ad-Hoc network contains only clients, such as laptops with wireless cardbus adapters. All the adapters must be in Ad-Hoc mode to communicate. D-Link DIR-605 User Manual 91 - D-Link DIR-605 | User Manual - Page 92
. Some firewall software programs may block a DHCP request on newly installed adapters. If you are connecting to a wireless network at a hotspot (e.g. hotel, coffee shop, airport), please contact an employee or administrator to verify their wireless network settings. D-Link DIR-605 User Manual 92 - D-Link DIR-605 | User Manual - Page 93
Set Default Gateway the same as the LAN IP address of your router (192.168.0.1). Set Primary DNS the same as the LAN IP address of your router (192.168.0.1). The Secondary DNS is not needed or you may enter a DNS server from your ISP. Step 5 Click OK twice to save your settings. D-Link DIR-605 User - D-Link DIR-605 | User Manual - Page 94
IEEE 802.11g • IEEE 802.11b • IEEE 802.11n • IEEE 802.3 • IEEE 802.3u • IEEE 802.3x Wireless Signal Rates* • 300Mbps • 54Mbps • 48Mbps • 36Mbps • 24Mbps • 18Mbps • 12Mbps • 11Mbps • 9Mbps • 6Mbps • v6 or later; or other Java-enabled browsers • DHCP Server and Client D-Link DIR-605 User Manual 94 - D-Link DIR-605 | User Manual - Page 95
and environmental factors, including volume of network traffic, building materials and construction, and network overhead, lower actual data throughput rate. Environmental factors will adversely affect wireless signal range. D-Link DIR-605 User Manual 95 - D-Link DIR-605 | User Manual - Page 96
453-5465 24 hours a day, seven days a week. Internet Support: http://support.dlink.com [email protected] For customers within Canada: Phone Support: (800) 361-5265 Monday to Friday 7:30am to 9:00pm EST Internet Support: http://support.dlink.ca email:[email protected] D-Link DIR-605 User Manual 96 - D-Link DIR-605 | User Manual - Page 97
Link at an Authorized D-Link Service Office. The replacement Link upon return to D-Link of the defective Hardware. All Hardware or part thereof that is replaced by D-Link, or for which the purchase price is refunded, shall become the property of D-Link upon replacement or refund. D-Link DIR-605 User Manual - D-Link DIR-605 | User Manual - Page 98
will substantially conform to D-Link's then current functional specifications for the Software, as set forth in the applicable documentation . • The customer must obtain a Case ID Number from D-Link Technical Support at 1-877-453-5465, who will attempt to assist the Link DIR-605 User Manual 98 - D-Link DIR-605 | User Manual - Page 99
firmware or other products or services provided by anyone other than D-Link; and Products that have been purchased from inventory clearance or liquidation sales or other sales in which D-Link OF MERCHANTABILITY, FITNESS FOR A PARTICULAR PURPOSE AND NONINFRINGEMENT. D-Link DIR-605 User Manual 99 - D-Link DIR-605 | User Manual - Page 100
PERIOD SET Link Corporation/D-Link Systems, Inc., as stipulated by the United States Copyright Act of 1976 and any amendments thereto. Contents are subject to change without prior notice. Copyright ©2005-2007 by D-Link Corporation/D-Link Systems, Inc. All rights reserved. D-Link DIR-605 User Manual - D-Link DIR-605 | User Manual - Page 101
installed and used in accordance with the instructions, may cause harmful interference to radio Router must be used with the power adapter included with the device.Caution - To reduce the risk of fire, use only No. 26 AWG or larger telecommunication line cord. D-Link DIR-605 User Manual - D-Link DIR-605 | User Manual - Page 102
Appendix F - Registration Registration Product registration is entirely voluntary and failure to complete or return this form will not diminish your warranty rights. Version 2.0 11/20/2008 D-Link DIR-605 User Manual 102
-
 1
1 -
 2
2 -
 3
3 -
 4
4 -
 5
5 -
 6
6 -
 7
7 -
8
-
9
-
10
-
11
-
12
-
13
-
14
-
15
-
16
-
17
-
18
-
19
-
20
-
21
-
22
-
23
-
24
-
25
-
26
-
27
-
28
-
29
-
30
-
31
-
32
-
33
-
34
-
35
-
36
-
37
-
38
-
39
-
40
-
41
-
42
-
43
-
44
-
45
-
46
-
47
-
48
-
49
-
50
-
51
-
52
-
53
-
54
-
55
-
56
-
57
-
58
-
59
-
60
-
61
-
62
-
63
-
64
-
65
-
66
-
67
-
68
-
69
-
70
-
71
-
72
-
73
-
74
-
75
-
76
-
77
-
78
-
79
-
80
-
81
-
82
-
83
-
84
-
85
-
86
-
87
-
88
-
89
-
90
-
91
-
92
-
93
-
94
-
95
-
96
-
97
-
98
-
99
-
100
-
101
-
102
 |
 |