D-Link DKVM-2KU Manual
D-Link DKVM-2KU Manual
 |
View all D-Link DKVM-2KU manuals
Add to My Manuals
Save this manual to your list of manuals |
D-Link DKVM-2KU manual content summary:
- D-Link DKVM-2KU | Manual - Page 1
D-Link DKVM-16 16-Port Keyboard, Video, and Mouse Switch Manual Version 1.2 Building Networks for People 08/26/03 - D-Link DKVM-2KU | Manual - Page 2
Contents Package Contents 3 Introduction 4 Features and Benefits 5 Hardware Installation 6 Using the DKVM-16 12 Daisy-Chaining the DKVM-16 16 Hot Plug 17 Troubleshooting 21 Specifications 25 Warranty and Registration 26 Contacting Technical Support 29 2 - D-Link DKVM-2KU | Manual - Page 3
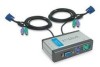
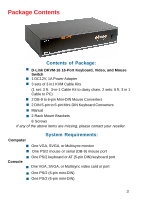
DKVM-16 16-Port Keyboard, Video, and Mouse Switch ! 1 DC12V, 1A Power Adapter ! 3 sets of 3 in1 KVM Cable Kits (1 set: 3 ft. 3-in-1 Cable Kit to daisy chain, 2 sets: 6 ft. 3 in 1 Cable to PC) ! 2 DB-9 to 6-pin Mini-DIN Mouse Converters ! 2 DIN 5-pin to 6-pin Mini-DIN Keyboard Converters ! Manual - D-Link DKVM-2KU | Manual - Page 4
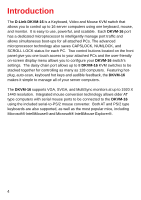
Introduction The D-Link DKVM-16 is a Keyboard, Video and Mouse KVM switch that allows you to control up to 16 server computers using one keyboard, mouse, and monitor. It is easy to use, powerful, and scalable. Each DKVM-16 port has a dedicated microprocessor to intelligently manage port traffic and - D-Link DKVM-2KU | Manual - Page 5
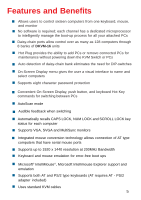
down the KVM Switch or PCs ! Auto detection of daisy-chain bank eliminates the need for DIP-switches ! On-Screen Display menu gives the user a visual interface to name and select computers ! Supports eight character password protection ! Convenient On-Screen Display, push button, and keyboard Hot - D-Link DKVM-2KU | Manual - Page 6
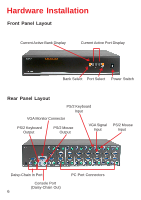
Layout Current Active Bank Display Current Active Port Display Bank Select Port Select Power Switch Rear Panel Layout PS/2 Keyboard Input VGA Monitor Connector PS/2 Keyboard Output PS/2 Mouse Output VGA Signal Input PS/2 Mouse Input Daisy-Chain In Port Console Port (Daisy-Chain Out) 6 PC - D-Link DKVM-2KU | Manual - Page 7
note of the length of your cables so that your computers, DKVM-16, keyboard, mouse, and monitor are distanced properly. Step 2 Connect the monitor console to the DKVM-16. Connect the attached cable, or the one included with your monitor, to the HD DB-15 female port, labeled with the monitor symbol - D-Link DKVM-2KU | Manual - Page 8
(Continued) Step 3 Connect the keyboard console to the DKVM-16. If you have an AT type keyboard, you will need an AT to PS/2 adapter. Step 4 Connect the mouse console to the DKVM-16. If you have an older mouse with 9 pins, you will need to use the 9 to 5 pin mouse converter that is included with the - D-Link DKVM-2KU | Manual - Page 9
end to the PC1 PS/2 mouse port on the back panel of the DKVM-16. If there are not enough PS/2 ports on the computer, you can choose a serial port for the mouse connection. Be sure to add a serial to PS/2 converter included with the DKVM-16 before connecting the 3-in-1 cable to the computer. Back of - D-Link DKVM-2KU | Manual - Page 10
Step 8 Double-check all of your connections. Make sure that the keyboard and mouse cables are connected to the correct ports. Step 9 Repeat steps 5 through 8 for the remainder of the computers. Step 10 Attach the power supply to the DKVM-16 unit and plug the other end into an electrical receptacle - D-Link DKVM-2KU | Manual - Page 11
the trouble-shooting section of this manual. Note: Please do not switch the PC ports (i.e. do not press the "push" button of the KVM switch or run Hot Key) while the computers are in the boot-up process. Normally, during the boot-up process, each PC will communicate with the keyboard and mouse. If - D-Link DKVM-2KU | Manual - Page 12
" State of the DKVM-16 When you power on the KVM switch, it will prompt you for the password; the default value is eight zeros - "00000000". Please enter eight zeros and enter the same value in the retype field. Note: If you are not familiar with the operation of the OSD manual, please do - D-Link DKVM-2KU | Manual - Page 13
now appear in the OSD menu. With the reset command, the PC ports of the DKVM-16 will not be reset. The PC ports can only be reset by powering off the DKVM-16. The Keyboard Hot Keys You can also manage and switch the DKVM-16 through simple hot key sequences. To send commands to the - D-Link DKVM-2KU | Manual - Page 14
Using the DKVM-16 (Continued) Hot Key Commands (Continued) Scroll Scroll Lock + Lock + Page = Previous Bank Up Scroll Scroll Lock + Lock + Page = Next Bank Down Note: Bank no. and port no. selection must be made using the numeric keys on the keyboard. Numeric keys on the keypad are not - D-Link DKVM-2KU | Manual - Page 15
Scan Note: 1. If you have already set up the scan mode command, DKVM-16 will issue one beep to confirm each hop from one PC port to the next. 2. To exit Auto Scan Mode, press any key or Search PC name command starts with the 1st PC port. Scroll Scroll Lock + Lock + Space Bar = On Screen Display - D-Link DKVM-2KU | Manual - Page 16
chain up to 8 DKVM-16s. Step 1 Connect your keyboard, mouse, and monitor to the console port (white color block) of the master KVM bank (bank1). Step 2 Use the 3-in-one Cable Kit to connect the daisy-chain port of bank 1 to the console port (white color block) of the 2nd KVM switch. Step 2 Please - D-Link DKVM-2KU | Manual - Page 17
before changing the configuration, and then you can switch back to the master port. 3. You may unplug the mouse or the keyboard from the console port and plug it back in at any time. Note: Some Operating Systems like SCO Unix are unable to support the Hot Plug function. If you apply the Hot Plug - D-Link DKVM-2KU | Manual - Page 18
to switch automatically between PC ports in intervals. Default scan time is 10 sec. and maximum time is 99 sec. You can use the up or down arrow key to select the port destination by PC name. BANK : 1 "CONSOLE ON/OFF" lets you select the console access of the KVM swith. "ON" allows any user to - D-Link DKVM-2KU | Manual - Page 19
must retype the new password to confirm the password change. The following window appears to confirm the completion of your password change. CONSOLE ON/OFF The Console On/Off function lets you select the console access of the KVM switch. If you select "CONSOLE ON", any sure can use the console. If - D-Link DKVM-2KU | Manual - Page 20
(!/ ") You can use the up arrow key "!" or the down arrow key """ to select the port destination by PC name. After you have selected the PC port, you can press the "ENTER" Key to select the PC port you want immediately. You can also use the "PgUp" key or the "PgDn" key for - D-Link DKVM-2KU | Manual - Page 21
Troubleshooting General Problems Q: The OSD menu does not display a " " on a channel where a computer is connected and powered up. A: DKVM my monitor. A: ! Check the cables and make sure that they are connected cable may be too long. Replace your VGA cables with coaxial, double-shielded cables. - D-Link DKVM-2KU | Manual - Page 22
the keyboard driver is for 101,102, or 104-key keyboards, and not old XT keyboards. ! Check to make sure that the power adapter is plugged in and is working properly. Make sure that the power switch is on. PS/2 Mouse Problems Q: The mouse is not detected during boot up. A: ! Check the cables - D-Link DKVM-2KU | Manual - Page 23
switch is on. Q: When I switch from one port to another, mouse movement is completely erratic. What do I do? A: Switch the console port to the problem PC port and power on this PC again to recover the mouse. Problems with Computers Using Serial Mouse Output Note: The DKVM-16 has integrated mouse - D-Link DKVM-2KU | Manual - Page 24
Troubleshooting (Continued) Q: The wheel on the mouse does not work on my computer. A: ! Make sure that the mouse is a Microsoft® Intellimouse® or Microsoft® Intellimouse® Explorer®. ! The DKVM-16 does not support special wheel functions of certain mice. Problems with the Power Supply Q: The - D-Link DKVM-2KU | Manual - Page 25
Keyboard Mouse Monitor Cascade Cascade Port On Screen Display 19" Rack Mount Cascade (Level) Max. Access Pcs Manual Selection Hot Key Switching Configuration Keyboard State Keyboard Mouse Resolution Bandwidth Enclosure Storage (Celsius) Dimensions Weight (lbs) Power Supply : 16 : 3 : 6-pin Mini - D-Link DKVM-2KU | Manual - Page 26
to refund at D-Link's sole discretion. Such repair or replacement will be rendered by D-Link at an Authorized D-Link Service Office. The replacement Hardware, the price paid by the original purchaser for the defective Hardware will be refunded by D-Link upon return to D-Link of the defective - D-Link DKVM-2KU | Manual - Page 27
manuals or accessories in the shipping package. D-Link firmware or other products or services provided by anyone other than DLink; Products that have been purchased from inventory clearance or liquidation sales or other sales in which D-Link LINK UNDER THIS WARRANTY IS LIMITED TO THE PURCHASE PRICE - D-Link DKVM-2KU | Manual - Page 28
installed and used in accordance with the instructions, may cause harmful interference to radio determined by turning the equipment off and on, the user is encouraged to try to correct the interference by Link office. Register online your D-Link product at http://support.dlink.com/register/ 28 - D-Link DKVM-2KU | Manual - Page 29
over the Telephone: (877) 453-5465 24 hours a day, seven days a week. D-Link Technical Support over the Internet: http://support.dlink.com email:[email protected] Tech Support for customers within Canada: D-Link Technical Support over the Telephone: (800) 361-5265 Monday to Friday 8:30am to 9:00pm - D-Link DKVM-2KU | Manual - Page 30
30
-
 1
1 -
 2
2 -
 3
3 -
 4
4 -
 5
5 -
 6
6 -
 7
7 -
8
-
9
-
10
-
11
-
12
-
13
-
14
-
15
-
16
-
17
-
18
-
19
-
20
-
21
-
22
-
23
-
24
-
25
-
26
-
27
-
28
-
29
-
30
 |
 |

Manual
Building Networks for People
08/26/03
D-Link DKVM-16
16-Port Keyboard, Video,
and Mouse Switch
Version 1.2