D-Link DNS-340L Setup Guide
D-Link DNS-340L Manual
 |
View all D-Link DNS-340L manuals
Add to My Manuals
Save this manual to your list of manuals |
D-Link DNS-340L manual content summary:
- D-Link DNS-340L | Setup Guide - Page 1
download the software drivers and user manual from the D-Link website. (See Technical Support below). 3. WHAT HARD DRIVES ARE COMPATIBLE WITH THE SHARECENTER? Most SATA hard drives are compatible with the ShareCenter. Please visit your local D-Link support site listed on the Technical Support page
-
 1
1
 |
 |
ENGLISH
DNS-340L
Version 1.00(US)_128x188 | December 10, 2014
6DNS340LQ.D1G
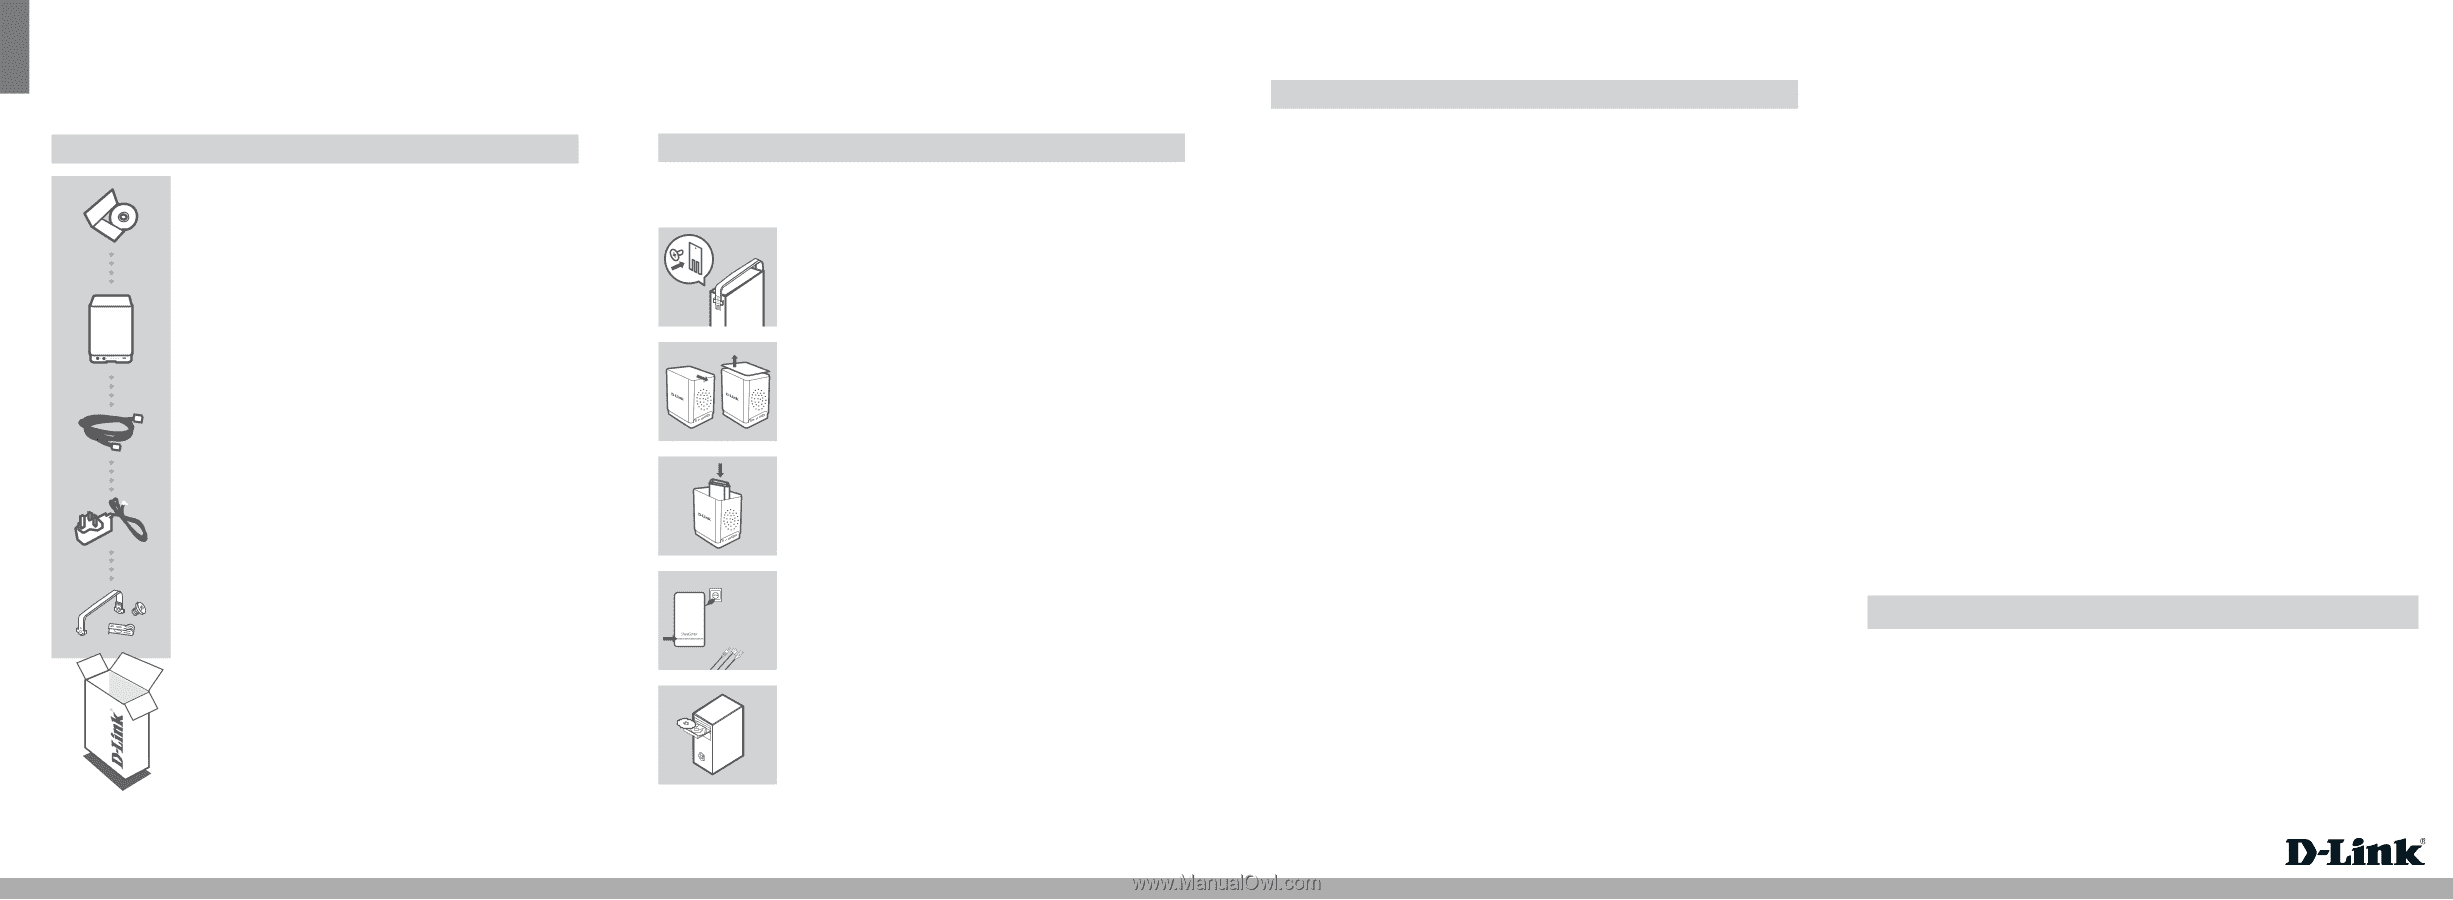
CONTENTS OF
PACKAGING
CONTENTS
INSTALLATION CD
INCLUDES SETUP WIZARD & TECHNICAL MANUALS
ShareCenter
TM
+
4-BAY CLOUD NETWORK STORAGE ENCLOSURE
DNS-340L
If any of these items are missing from your packaging, please
contact your reseller.
ETHERNET CABLE
CAT5 UTP
POWER ADAPTER
HARD DRIVE MOUNTING KIT
CONTAINS 4 BRACKETS AND 8 SCREWS
PRODUCT
SETUP
QUICK INSTALLATION
In order to use all of the functions of this device, you must register it with mydlink.
Simply
follow the steps at the end of the Setup Wizard during installation to register your product with
your mydlink account.
POWE R
1.
Attach the hard drive brackets to the back of your hard drives with
the included screws. Ensure that the brackets are aligned so that
when the hard drive is inserted, the arrow on the bracket points to
the front of the ShareCenter.
2.
Remove the top cover from the ShareCenter by sliding the lid in the
direction indicated on the back and lifting the cover.
3.
Insert the hard disk drive(s) into an empty bay. Make sure the
tops of the hard disk drives are all facing the same direction in the
ShareCenter. Push each drive into its slot until you feel it lock into
place.
Reattach the top cover of the ShareCenter.
4.
Connect one end of the Ethernet cable to one of the ShareCenter's
Ethernet ports, and the other end into your Router. Next, connect the
power cable to the power adapter and connect it to the ShareCenter's
power port and then plug the power cable into your wall outlet or
power strip.
Press the power button on the front of the device to turn it on.
5.
Remove the ShareCenter CD from the package and insert it into
your computer. Click the gray
Start
button on the welcome screen
to begin the Setup Wizard. Follow the instructions on the screen.
Default IP
: Determined by DHCP
Default Username
: admin
Default Password
: (leave this blank)
Important
: Ensure that your Internet connection is active. Do not
connect any USB storage devices yet. To register for a mydlink
account, your Internet connection must be plugged into LAN port 1.
TROUBLESHOOTING
SETUP AND CONFIGURATION PROBLEMS
1.
HOW DO I ACCESS THE CONTENT ON MY DNS-340L FROM MY MOBILE PHONE OR
TABLET?
To access your DNS-340L using your mobile phone or tablet, please download the ‘mydlink Access-
NAS' application from the Apple App Store or Google Play.
2.
I HAVE LOST MY D-LINK CD, WHAT CAN I DO?
You can download the software drivers and user manual from the D-Link website. (See Technical
Support below).
3. WHAT HARD DRIVES ARE COMPATIBLE WITH THE SHARECENTER?
Most SATA hard drives are compatible with the ShareCenter. Please visit your local D-Link support site
listed on the Technical Support page for an updated list of compatible hard drives.
4.
THE HARD DISK LED ON MY SHARECENTER IS ORANGE. IS MY DEVICE FAULTY?
No. An orange light means that the hard drive (HD) inside the ShareCenter needs to be formatted
before use. If you have not yet installed the ShareCenter or if you are inserting a replacement hard
drive, the orange light will indicate that the HD needs to be formatted for use in the ShareCenter. Insert
the Installation CD into your computer’s CD/DVD drive and follow the instructions to use the Setup
Wizard utility to format the inserted disk. A correctly formatted disk can be identified when the orange
LED changes to white.
5.
HOW CAN I ACCESS MY SHARECENTER ON THE NETWORK?
• You can access the device by clicking on the drive letter you have mapped to the device. For
example, if you mapped the drive to ‘G drive’, open up windows explorer (not Internet Explorer) and
type ‘G:’ into the address bar.
• You may also access it like a regular Windows share on a network, by typing its IP address into
Windows Explorer as <IP address> (e.g. \\192.168.0.32\), or by using FTP, in which case the address
is ftp://<IP address> .
6. HOW DO I RESET MY SHARECENTER?
Locate the reset button on the back of the ShareCenter. Press and hold the button (using an implement
such as a straightened paperclip) until the power LED on the front panel starts flashing. Allow a minute
for the device to reset.
Note:
Resetting the ShareCenter to the factory defaults will erase the current configuration settings. To
reconfigure your settings, log into the ShareCenter Web interface or alternatively, reinstall the device
using the Setup Wizard software supplied on the CD-ROM.
7.
THE DEVICE HAS A USB PORT. CAN I PLUG AN EXTERNAL HARD DRIVE INTO THIS PORT?
The ShareCenter does support external additional drives via the USB port. This port can also be used
to connect a USB Printer, UPS, or USB Flash drive.
8.
HOW DO I ACCESS THE FTP SERVER FROM THE INTERNET?
• If the ShareCenter connects to the Internet though a NAT gateway or router, you may need to
configure port forwarding. Forward the FTP port (TCP 21 by default) to the IP address of your
ShareCenter.
• To access your FTP server from the Internet, use the public IP (or domain name) of your gateway or
router (e.g. ftp://mydomain.com).
9. WHY CAN'T I REGISTER MY DEVICE WITH MYDLINK?
If you experience issues registering this device with your mydlink account, try performing a hard reset
by using an unfolded paperclip to press and hold the reset button for 10 seconds while the device is
powered on. This may be necessary if you purchased an open box or resold unit.
Having trouble installing your new product? D-Link’s website contains the latest user documentation and software
updates for D-Link products. U.S. and Canadian customers can contact D-Link Technical Support through our
website.
United States
Internet:
Canada
Internet:
Technical Support
©2014 D-Link Corporation/D-Link Systems, Inc. All rights reserved. D-Link and the D-Link logo are registered trademarks of D-Link
Corporation or its subsidiaries in the United States and/or other countries. Other trademarks or registered trademarks are the
property of their respective owners. Product specifications, size and shape are subject to change without notice, and actual product
appearance may differ from that depicted on the package. Visit dlink.com (US) or dlink.ca (Canada) for more details.