D-Link DP-G301 Product Manual
D-Link DP-G301 - Print Server - Parallel Manual
 |
UPC - 790069287510
View all D-Link DP-G301 manuals
Add to My Manuals
Save this manual to your list of manuals |
D-Link DP-G301 manual content summary:
- D-Link DP-G301 | Product Manual - Page 1
D-Link DP-G301 AirPlus G Wireless Parallel Port Print Server Manual - D-Link DP-G301 | Product Manual - Page 2
4 Wireless Basics 7 Setting up the DP-G301 9 Power On Self Test 10 Using the Web Configuration 11 TCP/IP Printing for Windows XP 29 TCP/IP Printing for Windows 2000 38 Unix/Linux Printing (See PS Admin Manual on CD-ROM 48 Setting up AppleTalk or LPR Printing in MAC OSX 49 Setting up - D-Link DP-G301 | Product Manual - Page 3
Package Contents Contents of Package: D-Link DP-G301 Wireless Parallel Port Print Server Manual and Warranty on CD Printed Quick Installation Guide If any of the above items are missing, please contact your reseller. System Requirements: A computer with an installed Ethernet adapter for - D-Link DP-G301 | Product Manual - Page 4
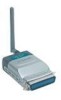
Introduction The D-Link DP-G301 Print Server is a 802.11g wireless Parallel Port Print Server that can also connect to your Ethernet/Fast Ethernet network. Now you can locate parallel port printer services virtually anywhere in your home or office. The DP-G301 manages the flow of print files from - D-Link DP-G301 | Product Manual - Page 5
User's Guide, available on the CD that came with the DP-G301, for information about configuring the print server's ports.) The Print Server also supports web configuration permitting users to configure settings through the web browser. The default IP Address is as follows: Default IP Address - 192 - D-Link DP-G301 | Product Manual - Page 6
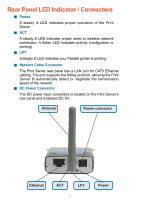
proper wired or wireless network connection. A flicker LED indicates acitivity (configuation or printing) LPT A steady lit LED indicates your Parallel printer is printing. Network Cable Connector The Print Server rear panel has a LAN port for CAT5 Ethernet cabling. The port supports the NWay protocol - D-Link DP-G301 | Product Manual - Page 7
speed wireless connectivity within your home, business or public access wireless networks. D-Link wireless products Wireless adapter cards used on laptop and desktop systems support the same protocols as Ethernet adapter cards. People use wireless Costs - WLANs are easy to set up, manage, change and - D-Link DP-G301 | Product Manual - Page 8
technology with data transfer speeds of up to 54Mbps* when used with other D-Link AirPlus G devices. Installation Considerations The D-Link AirPlus G DP-G301 lets you print through your network, using a wireless connection, from virtually anywhere within its operating range. Keep in mind, however - D-Link DP-G301 | Product Manual - Page 9
Setting up the DP-G301 Installing the Print Server WARNING: Configuration problems may result if the Print Server is powered up without first establishing its network connection. Follow this procedure to avoid complications at the configuration stage. 1. Confirm proper operation of - D-Link DP-G301 | Product Manual - Page 10
properly. When the DP-G301 is powered , of the LED during this LED test may mean there is a problem with the LED itself. The actual component tests immediately follow the LED 's MAC Controller error Parallel IC setup error LPT error LAN PHY or MII interface error Wireless Card init error Wireless Card - D-Link DP-G301 | Product Manual - Page 11
cable, connect the DP-G301 to the Ethernet-adapter equipped computer in your network that you will be using for configuration. Open your web browser and type http://192.168.0.10 in the address box, and press Enter. This set of numbers is the default IP Address of your Print Server. Please note that - D-Link DP-G301 | Product Manual - Page 12
about the DP-G301's System Status and Printer Status. Home > System As shown below, the System displays the status of your print server, printer and network. Clicking Refresh will update the information. Device Status: Information about the print server, including the firmware version, MAC/IP address - D-Link DP-G301 | Product Manual - Page 13
the Web Configuration (continued) Home > Wireless Click the Wireless button in the left column to display information about the wireless LAN. Clicking Refresh will update the information. Wireless Status: The items in this field display information about the wireless LAN, such as the connection mode - D-Link DP-G301 | Product Manual - Page 14
to display information about the wireless LAN. Clicking Refresh will update the information. Auto IP: This field contains the current settings of TCP/IP, including DHCP/BOOTP, UPnP, and MAC Rendezvous. The items in this field are configured in Configurat ion>Network>TCP/IP. TCP/IP Printing: In this field - D-Link DP-G301 | Product Manual - Page 15
Using the Web Configuration (continued) Home > User Click the User button in the left column to display the user's information. Users Printing Log: The items in this field display the user(s) information, which include the user(s) Mac address, IP address, name, and status of printing tasks. 15 - D-Link DP-G301 | Product Manual - Page 16
options that include System Device and Port Setting System Device and Port Setting This option will show you settings required to configure the DP-G301 Print Server. Consult your printers owner manual for the PJL(Printer Job Language) and print speed supported on your printer. Click the Save button - D-Link DP-G301 | Product Manual - Page 17
print server, and the description for the parallel port. It also allows you to select the PJL Printer setting (Yes or NOTE: PJL (Print Job Language) has certain job requirements that must be met to work correctly. for more information, please refer to your printer's manual. Configuration > Wireless - D-Link DP-G301 | Product Manual - Page 18
SSID in this box. You can manually input the name or select one from the pull-down menu. To search the available print server within the network, click the Site Survey button. Wireless Channel: Select the channel from the pull-down menu. The default setting is 6. Transmission Rate: Select the data - D-Link DP-G301 | Product Manual - Page 19
Using the Web Configuration (continued) Network 19 - D-Link DP-G301 | Product Manual - Page 20
allows you to set the IP address manually or automatically. When you choose Manually Assign, you should enter the related information in the following boxes, including IP Address, Subnet Mask, and Default Gateway. UPnP: This option allows you to enable or disable UPnP mode. MAC Rendezvous: This - D-Link DP-G301 | Product Manual - Page 21
option (Yes or No), the user in the User List is permitted to access the print server or not. Define Users You can add/delete the user(s) to/from the User List. The User List at the bottom of the screen - D-Link DP-G301 | Product Manual - Page 22
Using the Web Configuration (continued) Configuration > SNMP SNMP Management SNMP (Simple Network Management Protocol) is a set of protocols for managing complex networks. Community 1/2/3: Enter a name in the Name box, and configure the Access Right by selecting Read Only or Read/ - D-Link DP-G301 | Product Manual - Page 23
Using the Web Configuration (continued) Tools Click on the Tools link from the tools bar of the main screen to enter the Tools Page; it provides the control options that include Print Test , E-mail, Reset, Upgrade, and Backup. Tools > Print Test Print Test Click Test to print a test page. 23 - D-Link DP-G301 | Product Manual - Page 24
in this box. Outgoing E-mail (SMTP) Server Address: Enter the server address that is used to send your E-mail in this box. If your mail server needs to verify the user when sending E-mail, the DP-G301 will apply the same Account Name and Password to the mail server as it does when receiving E-mail - D-Link DP-G301 | Product Manual - Page 25
to the given administrator's Email address. Receive E-mail: Click Yes to immediately check and receive E-mail, and then print out the mail when available. Reset Reset Click Apply to immediately reset the print server. Factory Reset Click Apply to reload the factory settings of the print server. 25 - D-Link DP-G301 | Product Manual - Page 26
Using the Web Configuration (continued) Tools > Upgrade Firmware Upgrade When a new version of firmware is available (e.g., downloaded from the manufacturer's web site), you can upgrade the firmware of your print server. Click Browse to locate the firmware file, then click Apply. 26 - D-Link DP-G301 | Product Manual - Page 27
Using the Web Configuration (continued) Tools > Backup Backup Device Configuration to File Click Apply to backup your current configuration of the print server to file and then save in the computer. Restore Device Configuration from File You can reload a configuration that you saved before. Click Browse - D-Link DP-G301 | Product Manual - Page 28
guration (continued) Help Click on the Help link from the tools bar of the main screen to enter the Help Page. It provides a link to D-Link's support web site. D-Link's support web site will provide the most up to date information on your DP-G301 Print Server. Please check the web site regularly for - D-Link DP-G301 | Product Manual - Page 29
Open the web browser, and type in the IP Address of the DP-G301. For example, type http://192.168.0.10 into the Location or Address field. Press the Enter or (Return) Key. Note: The PC's IP Address must be in the same subnet as the Print Server's IP Address for the two devices to communicate. (For - D-Link DP-G301 | Product Manual - Page 30
TCP/IP Printing for Windows XP (continued) At the Configuration window, write down the Port Name for future reference. You will need this information later in the configuration process. 30 - D-Link DP-G301 | Product Manual - Page 31
TCP/IP Printing for Windows XP (continued) Select your Connection Mode Enter the SSID of the remote access point or wireless router you wish to connect to. If you would like to set WEP Encryption, select the encryption level and the key here. Click Apply 31 - D-Link DP-G301 | Product Manual - Page 32
TCP/IP Printing for Windows XP (continued) When you select TCP/IP Protocol at the Network window, the screen below appears. (We recommend that you keep the default settings as shown.) If you need to make changes, make sure to click Apply after you have made the changes. (You may wish to make a note - D-Link DP-G301 | Product Manual - Page 33
TCP/IP Printing for Windows XP (continued) Go to Start > Settings > Printers and Faxes > Add a Printer Click Next 33 - D-Link DP-G301 | Product Manual - Page 34
TCP/IP Printing for Windows XP (continued) Select Local Printer Deselect Automatically detect and install my Plug and Play printer. Click Next Select Create a new port. At the pull-down menu, highlight Standard TCP/IP Port. Click Next Click Next 34 - D-Link DP-G301 | Product Manual - Page 35
TCP/IP Printing for Windows XP (continued) Type in the IP address of the Print Server (i.e. 192.168.0.10). The Port Name will automatically be filled in. Select Custom Then click Settings Select LPR Input the Port Name of the port being used by the printer. Click OK 35 - D-Link DP-G301 | Product Manual - Page 36
TCP/IP Printing for Windows XP (continued) Click Next Click OK Highlight the printer, as shown. If the desired printer is not on the list, click Have Disk and insert the printer driver disk that came with your printer to install the printer drivers. Click Next 36 - D-Link DP-G301 | Product Manual - Page 37
TCP/IP Printing for Windows XP (continued) At this screen, you can input a name for the printer. Click Next Click Next Click Finish 37 - D-Link DP-G301 | Product Manual - Page 38
Open the Web browser, and type in the IP Address of the DP-G301. For example, type http://192.168.0.10 into the Location or Address field. Press the Enter or (Return) Key. Note: The PC's IP Address must be in the same subnet as the Print Server's IP Address for the two devices to communicate. (For - D-Link DP-G301 | Product Manual - Page 39
TCP/IP Printing for Windows 2000 (continued) At the Configuration window, write down the Port Names for future reference. You will need this information later in the configuration process. 39 - D-Link DP-G301 | Product Manual - Page 40
TCP/IP Printing for Windows 2000 (continued) Select your Connection Mode Enter the SSID of the remote access point or wireless router to which you wish to connect. If you would like to set WEP Encryption, select the encryption level and the key here. 40 - D-Link DP-G301 | Product Manual - Page 41
TCP/IP Printing for Windows 2000 (continued) When you select TCP/IP Protocol at the Network window, the screen below appears. (We recommend that you keep the default settings as shown.) If you need to make changes, make sure to click Apply after you have made the changes. (You may wish to make a - D-Link DP-G301 | Product Manual - Page 42
TCP/IP Printing for Windows 2000 (continued) Go to Start > Settings > Printers Double-click on the Add Printer icon. Click Next 42 - D-Link DP-G301 | Product Manual - Page 43
TCP/IP Printing for Windows 2000 (continued) Select Local Printer Click Next Select Create a new port at the pull-down menu, highlight Standard TCP/IP Port. Click Next 43 - D-Link DP-G301 | Product Manual - Page 44
TCP/IP Printing for Windows 2000 (continued) Click Next Type in the IP address of the Print Server in the Printer Name or IP Address field. The Port Name field will automatically be filled in. Click Next Select "Custom" Then click on Settings. 44 - D-Link DP-G301 | Product Manual - Page 45
TCP/IP Printing for Windows 2000 (continued) Select LPR Input the port name of the port being used by the printer. Click OK Click Next Click Finish 45 - D-Link DP-G301 | Product Manual - Page 46
TCP/IP Printing for Windows 2000 (continued) Highlight the printer, as shown. If the desired printer is not on the list, click Have Disk and insert the printer driver disk that came with your printer to install the printer drivers. Click Next At this screen, you can input a name for the printer. - D-Link DP-G301 | Product Manual - Page 47
TCP/IP Printing for Windows 2000 (continued) Select Do not share this printer. . Click Next Select Yes to print a test page. Click Next Click Finish The printer is now ready for printing with Windows 2000 on your network. 47 - D-Link DP-G301 | Product Manual - Page 48
Unix/Linux Printing Please refer to the PS Admin Manual on the CD included with your purchase for information on setting up the Print Server in Unix/Linux. 48 - D-Link DP-G301 | Product Manual - Page 49
Talk or LPR Printing in Mac OS X Note: Mac OS printing with this print server is supported by PostScript printers only! With Mac OSX you can use AppleTalk or LPR printers using IP protocols for printing through Print Servers. Follow the instructions below for setting up the Print After attaching the - D-Link DP-G301 | Product Manual - Page 50
Setting up Apple Talk or LPR Printing in Mac OS X (continued) The default IP address of the Print Server is 192.168.0.10. Manually change your IP Address to 102.168.0.x, where x is any number between 1 and 254 (except 10 which is the IP Address of the Print Server.) The IP Addresses and Subnet Mask - D-Link DP-G301 | Product Manual - Page 51
Setting up Apple Talk or LPR Printing in Mac OS X (continued) To print, open a document and select File > Print from the menu. Select Edit Printer List from the Printer dialog box. Click Add Printer. 51 - D-Link DP-G301 | Product Manual - Page 52
Setting up Apple Talk or LPR Printing in Mac OS X (continued) Select the printing protocol preferred, AppleTalk or LPR Printers using IP. In this example, AppleTalk has been selected. PS - 116688-U1 Laserwriter AppleTalk protocol: After selecting AppleTalk the Port Name of the Print Server will - D-Link DP-G301 | Product Manual - Page 53
Setting up Apple Talk or LPR Printing in Mac OS X (continued) LPR Printers using IP protocol: When you select LPR Printers using IP Protocol, this window will appear. Type the IP Address of the Print Server into the LPR Printer's Address field. PS-116688 - U1 In the Queue Name field, type in the - D-Link DP-G301 | Product Manual - Page 54
Web browser. 192.168.0.10 is the default IP Address of the DP-G301. Select the Network tab and scroll to the bottom to the AppleTalk protocol section. If your AppleTalk network is divided into AppleTalk zones, you will have to specify which zone the Print Server should be in. You should locate - D-Link DP-G301 | Product Manual - Page 55
LaserWriter 8. To choose a printer connected to your Print Server as your Mac OS workstation's default printer, Open the Chooser by selecting Chooser from the Apple menu. Select the LaserWriter 8 icon on the left. Make sure that AppleTalk is set to Active. A list of all network PostScript printers - D-Link DP-G301 | Product Manual - Page 56
Printing from Mac OS Client Workstations (Continued) If you have not previously set this printer as the default, your computer setting in the future, you can use the Setup button in the Chooser window. The selected printer will become your computer's default printer. You may need to choose Page Setup - D-Link DP-G301 | Product Manual - Page 57
Networking Basics Using the Network Setup Wizard in Windows XP In this section you will learn how to establish a network at home computers using Windows 2000, ME or 98SE. Go to Start>Control Panel>Network Connections Select Set up a home or small office network When this screen appears, click Next. 57 - D-Link DP-G301 | Product Manual - Page 58
Networking Basics (continued) Please follow all the instructions in this window: Click Next In this window, select the best description of your computer. If your computer connects to the Internet through a gateway/router, select the second option as shown. Click Next 58 - D-Link DP-G301 | Product Manual - Page 59
Networking Basics (continued) Enter a Computer description and a Computer name (optional.) Click Next Enter a Workgroup name. All computers on your network should have the same Workgroup name. Click Next 59 - D-Link DP-G301 | Product Manual - Page 60
Networking Basics (continued) Please wait while the Network Setup Wizard applies the changes. When the changes are complete, click Next. Please wait while the Network Setup Wizard configures the computer. This may take a few minutes. 60 - D-Link DP-G301 | Product Manual - Page 61
Networking Basics (continued) In this window, select the best option. In this example, Create a Network Setup Disk has been selected. You will run this disk on each of the computers on your network. Click Next Insert a disk into the Floppy Disk - D-Link DP-G301 | Product Manual - Page 62
Networking Basics (continued) Please wait while the Network Setup Wizard copies the files. Please read the information under Here's how in the screen below. After you complete the Network Setup Wizard you will use the Network Setup Disk to run the Network Setup Wizard once on each of the computers on - D-Link DP-G301 | Product Manual - Page 63
this screen, then click Finish to complete the Network Setup Wizard. The new settings will take effect when you restart the computer. Click the Network Setup Disk on all the other computers on your network. After running the Network Setup Disk on all your computers, your new wireless network will be - D-Link DP-G301 | Product Manual - Page 64
Networking Basics (continued) How to assign a Name to your computer To name your computer, please follow these directions in Windows XP: Click Start (in the lower left corner of the screen) Right-click My Computer Select Properties Select the Computer Name tab in the System Properties window - D-Link DP-G301 | Product Manual - Page 65
on your network must have the same Workgroup name. Click OK How to find your IP Address in Windows XP The computers connected to your network must be in the same IP address range. To verify the IP address, please do the following: Right-click on the Local Area Connection icon in the - D-Link DP-G301 | Product Manual - Page 66
the Support tab Click Close Assigning a Static IP Address in Windows XP/2000 Note: DHCP-capable routers will automatically assign IP addresses assign static IP addresses. If you are not using a DHCP capable router, or you need to assign a static IP address, please follow these instructions: Go - D-Link DP-G301 | Product Manual - Page 67
Networking Basics (continued) Assigning a Static IP Address in Windows XP/2000 Double-click Network Connections Right-click Local Area Connections Double-click Properties 67 - D-Link DP-G301 | Product Manual - Page 68
The subnet mask must be the same for all the computers on the network.) Input your DNS server addresses. (Note: If you are entering a DNS server, you must enter the IP address of the Default Gateway.) The DNS server information will be supplied by your ISP (Internet Service Provider.) Click OK 68 - D-Link DP-G301 | Product Manual - Page 69
SNAP (auto-switching) Transport Protocols: TCP/IP, NetBEUI, AppleTalk/EtherTalk, LPR,SMB TCP/IP Protocols Supported: BOOTP, SNMP, Telnet, TFTP, FTP, 95% non-condensing Emissions: FCC Class B, CE Class B * Maximum wireless signal rate based on IEEE Standard 802.11g specifications. Actual data - D-Link DP-G301 | Product Manual - Page 70
over the Telephone: (877) 453-5465 24 hours a day, seven days a week. D-Link Technical Support over the Internet: http://support.dlink.com email:[email protected] Tech Support for customers within Canada: D-Link Technical Support over the Telephone: (800) 361-5265 Monday to Friday 8:30am to 9:00pm - D-Link DP-G301 | Product Manual - Page 71
the purchase price is refunded, shall become the property of D-Link upon replacement or refund. Limited Software Warranty: D-Link warrants that the software portion of the product ("Software") will substantially conform to D-Link's then current functional specifications for the Software, as set forth - D-Link DP-G301 | Product Manual - Page 72
covered in the operating manual for the product, and normal maintenance; Damage that occurs in shipment, due to act of God, failures due to power surge, and cosmetic damage; Any hardware, software, firmware or other products or services provided by anyone other than D-Link; Products that have been - D-Link DP-G301 | Product Manual - Page 73
transformation, or adaptation without permission from D-Link Corporation/D-Link Systems, Inc., as stipulated by the installed and used in accordance with the instructions, may cause harmful interference to radio complies with FCC radiation exposure limits set forth for an uncontrolled environment. - D-Link DP-G301 | Product Manual - Page 74
Registration Product registration is entirely voluntary and failure to complete or return this form will not diminish your warranty rights. (07/13/2005) 74 - D-Link DP-G301 | Product Manual - Page 75
Appendix: DP-G301 Printer Compatibility List For Windows The Canon Printer Canon BJC-255SP Canon BJ-330 Canon BJC-600, 620 Canon BJC-2000SP Canon BJC-4100 Canon - D-Link DP-G301 | Product Manual - Page 76
Appendix: DP-G301 Printer Compatibility List for Windows The HP Printer HP LaserJet III HP LaserJet 4P, 4L, 4V HP , All in One Officejet HP T47, 710 Other printers from the brands listed above may also be supported. For an updated compatibility list please visit: http://www.support.dlink.com 76
-
 1
1 -
 2
2 -
 3
3 -
 4
4 -
 5
5 -
 6
6 -
 7
7 -
8
-
9
-
10
-
11
-
12
-
13
-
14
-
15
-
16
-
17
-
18
-
19
-
20
-
21
-
22
-
23
-
24
-
25
-
26
-
27
-
28
-
29
-
30
-
31
-
32
-
33
-
34
-
35
-
36
-
37
-
38
-
39
-
40
-
41
-
42
-
43
-
44
-
45
-
46
-
47
-
48
-
49
-
50
-
51
-
52
-
53
-
54
-
55
-
56
-
57
-
58
-
59
-
60
-
61
-
62
-
63
-
64
-
65
-
66
-
67
-
68
-
69
-
70
-
71
-
72
-
73
-
74
-
75
-
76
 |
 |

Manual
Wireless Parallel Port Print
Server
D-Link DP-G301
Air
Plus G