D-Link DSL-2640B V1 Manual
D-Link DSL-2640B - ADSL2/2+ Modem With Wireless Router Manual
 |
UPC - 790069298288
View all D-Link DSL-2640B manuals
Add to My Manuals
Save this manual to your list of manuals |
D-Link DSL-2640B manual content summary:
- D-Link DSL-2640B | V1 Manual - Page 1
Table of Content D-Link DSL-2640B User Manual 1 - D-Link DSL-2640B | V1 Manual - Page 2
PORT FORWARDING 37 D-Link DSL-2640B User Manual APPLICATION RULES 38 QOS SETUP ...39 OUTBOUND IP FILTER 41 INBOUND IP FILTER 43 DNS SETUP...45 FIREWALL & DMZ 47 ADVANCED ADSL 50 ADVANCED WIRELESS 51 ADVANCED LAN 52 REMOTE MANAGEMENT 53 MAINTENANCE ...54 PASSWORD ...54 SAVE/RESTORE SETTINGS - D-Link DSL-2640B | V1 Manual - Page 3
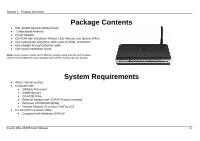
Internet service • Computer with: • 200MHz Processor • 64MB Memory • CD-ROM Drive • Ethernet Adapter with TCP/IP Protocol Installed • Windows XP/2000/98 SE/ME • Internet Explorer v6 or later, FireFox v1.5 • D-Link Click'n Connect Utility • Computer with Windows 2000/XP D-Link DSL-2640B User Manual - D-Link DSL-2640B | V1 Manual - Page 4
INTERNET CONNECTION The DSL-2640B ADSL2+ router is a versatile, high-performance remote router for home and the small office. With integrated ADSL2/2+ supporting up to 24Mbps download speed, firewall protection, Quality of Service (QoS), 802.11g wireless LAN and 4 Ethernet switch ports, this router - D-Link DSL-2640B | V1 Manual - Page 5
.11b Devices - The DSL-2640B is still fully compatible with the IEEE 802.11b and g standards, so it can connect with existing 802.11b and g PCI, USB and Cardbus adapters. • DHCP Support - Dynamic Host Configuration Protocol automatically and dynamically assigns all LAN IP settings to each host on - D-Link DSL-2640B | V1 Manual - Page 6
Overview Connections Reset button To manually reset, depress button with the power on for five to seven seconds Ethernet ports Use the Ethernet ports to connect to power source ADSL port Use the ADSL cable to connect to the your telephone line (RJ-11 port) D-Link DSL-2640B User Manual 6 - D-Link DSL-2640B | V1 Manual - Page 7
blink when there is activity currently passing through the Ethernet port. Status Steady green light indicates traffic is passing through the device. D-Link DSL-2640B User Manual WLAN Steady green light indicates a wireless connection. A blinking green light indicates activity on the WLAN interface - D-Link DSL-2640B | V1 Manual - Page 8
you understand all the prerequisites for proper installation of your new Router. Have all the necessary information and equipment on hand before beginning the installation. D-Link DSL-2640B User Manual 8 - D-Link DSL-2640B | V1 Manual - Page 9
NIC adapter as standard equipment. If your computer does not have an Ethernet port, you must install an Ethernet NIC adapter before you can use the Router. If you must install an adapter, follow the installation instructions that come with the Ethernet NIC adapter. D-Link DSL-2640B User Manual 9 - D-Link DSL-2640B | V1 Manual - Page 10
in a number of ways. The DSL-2640B supports WPA (Wi-Fi Protected Access), WPA2, and mixed WPA/WPA2. Wireless access can also be controlled by selecting MAC addresses that are allowed to associate with the device. Please read the section on Wireless Configuration. D-Link DSL-2640B User Manual 10 - D-Link DSL-2640B | V1 Manual - Page 11
of ADSL, ADSL2, and ADSL2+ modulation. However, if you are instructed to specify the modulation type used for the Router, you may choose among the numerous options available on the Modulation Type drop-down menu on the ADSL Configuration window (Advanced > ADSL) D-Link DSL-2640B User Manual 11 - D-Link DSL-2640B | V1 Manual - Page 12
are setting up the Router for multiple virtual connections, you will need to configure the VPI and VCI as instructed by your ADSL service provider for the additional connections. This setting can be changed in the WAN Settings window of the web management interface. D-Link DSL-2640B User Manual 12 - D-Link DSL-2640B | V1 Manual - Page 13
interface. The default Password is "admin." The user may change this. LAN IP addresses for the DSL-2640B This is the IP address you will enter into the Address field of your web browser to access the Router's configuration graphical user interface (GUI) using a web browser. The default IP address is - D-Link DSL-2640B | V1 Manual - Page 14
that your collect and record this information here, or in some other secure place, in case you have to re-configure your ADSL connection in the future. Once you have the above information, you are ready to setup and configure your DSL-2640B Wireless ADSL Router. D-Link DSL-2640B User Manual 14 - D-Link DSL-2640B | V1 Manual - Page 15
fans, lights, and home security systems), your wireless connection may degrade dramatically or drop completely. Make sure your 2.4GHz phone base is as far away from your wireless devices as possible. The base transmits a signal even if the phone in not in use. D-Link DSL-2640B User Manual 15 - D-Link DSL-2640B | V1 Manual - Page 16
for troubleshooting. port is connected to a working device, check the Ethernet Link configured this should light up after several seconds. If this is the first time installing the device, some settings may need to be changed before the Router can establish a connection. D-Link DSL-2640B User Manual - D-Link DSL-2640B | V1 Manual - Page 17
in flash memory including user account information and LAN IP settings. The device settings will be restored to the factory default IP address 192.168.1.1 and the subnet mask is 255.255.255.0, the default management Username is "admin" and the default Password is "admin." Network Connections Connect - D-Link DSL-2640B | V1 Manual - Page 18
to any on the other MDI-X ports (1x, 2x, etc.) with a crossed cable. Computer to Router Connection You can connect the Router directly to a 10/100BASE-TX Ethernet adapter card (NIC) installed on a PC using the Ethernet cable provided as shown in this diagram. D-Link DSL-2640B User Manual 18 - D-Link DSL-2640B | V1 Manual - Page 19
a web-browser such as Internet Explorer and enter the IP address of the router (192.168.1.1). Type "admin" for the User Name and "admin" in the Password field. If you get a Page Cannot be Displayed error, please refer to the Troubleshooting section for assistance. D-Link DSL-2640B User Manual 19 - D-Link DSL-2640B | V1 Manual - Page 20
the Router including how to change IP settings and DHCP server setup. WIZARD ADSL SETUP Click on the Setup Wizard button to launch the Setup Wizard. WELCOME TO D-LINK SETUP WIZARD There are three steps to configuring your router. Click on the Next to continue. D-Link DSL-2640B User Manual 20 - D-Link DSL-2640B | V1 Manual - Page 21
- Troubleshooting STEP 1: CHANGE YOUR DSL-2640B PASSWORD The default password is "admin", in order to secure your network, please modify the password. Note: Confirm Password must be same as "New Password". Of on the Next button to go to the next Setup Wizard window. D-Link DSL-2640B User Manual 21 - D-Link DSL-2640B | V1 Manual - Page 22
on the Next button to go to the next Setup Wizard window. Using the Setup Wizard - For PPPoE/PPPoA connection Type in the Username and Password (and PPPoE Service Name, if required by your ISP). The Auto PVC on the Next button to go to the next Setup Wizard window. D-Link DSL-2640B User Manual 22 - D-Link DSL-2640B | V1 Manual - Page 23
Please input the correct IP address, Subnet Mask, Default Gateway and DNS information. Note: Should you select to leave default Gateway and DNS information blank, they should be automatically generated. Click on the Next button to go to the next Setup Wizard window. D-Link DSL-2640B User Manual 23 - D-Link DSL-2640B | V1 Manual - Page 24
- Troubleshooting STEP 3: RESTART Click Back to review or modify settings. Click on Restart to apply current settings and reboot the DSL-2640B router. If your Internet connection does not work after the router restarts, you can try the Setup Wizard again with alternative settings or use Manual Setup - D-Link DSL-2640B | V1 Manual - Page 25
configure the below messages as in WIZARD. Click on the Save Settings button to save your settings. You will be asked to reboot by a pop-up window. Click on the OK to reboot the router. Click on the Connect button to connect the router to the Internet with the WAN interface. D-Link DSL-2640B User - D-Link DSL-2640B | V1 Manual - Page 26
colour. If it is in dark and you are having problems browsing web pages, then there may be a problem with your internet settings and you will need to revert to step 2. Click on the Disconnect button to disconnect the router to the Internet and the icon will be dark. D-Link DSL-2640B User Manual 26 - D-Link DSL-2640B | V1 Manual - Page 27
4 - Troubleshooting WIRELESS Use this section to configure the wireless settings for your D-Link router. Please note that changes made in this section will also need to be duplicated onto your wireless clients and PC. To access the WIRELESS (WLAN) settings window, click on the Wireless Setup button - D-Link DSL-2640B | V1 Manual - Page 28
Wireless Network button to enter the SECURE MY WIRELESS NETWORK window. SECURE MY WIRELESS NETWORK Input the SSID. Select the Wireless Channel. Select the Encryption type. WPA-PSK is more secure than WEP 64 bit. Click on the Apply Settings button to apply the settings D-Link DSL-2640B User Manual - D-Link DSL-2640B | V1 Manual - Page 29
1~4. (Key length is outlined at the bottom of the window.) Specify the encryption key from the Default WEP Key drop-down menu. Select Authentication type from the drop-down menu. (Shared is better than Open) Click on the Apply Settings button to apply settings. D-Link DSL-2640B User Manual 29 - D-Link DSL-2640B | V1 Manual - Page 30
Section 4 - Troubleshooting WIRELESS SECURITY MODE - WPA-Personal WPA-PSK WPA-PSK configuration is similar to WEP. The key length is between 8 to 63 ASCII codes. D-Link DSL-2640B User Manual 30 - D-Link DSL-2640B | V1 Manual - Page 31
use 802.1X security measures to overcome some weaknesses in standard WEP applications. A RADIUS server is used to authenticate all potential users. Enter your RADIUS server data: IP Address, Port, and Key. Click on the Apply Settings button to apply settings. D-Link DSL-2640B User Manual 31 - D-Link DSL-2640B | V1 Manual - Page 32
Section 4 - Troubleshooting LAN SETUP You can configure the LAN IP address to suit your preference. Many users will find it convenient to use the default settings together with DHCP service to manage the IP settings for their private network. The IP address of the Router is the base address used for - D-Link DSL-2640B | V1 Manual - Page 33
Save Settings button. You will be asked to reboot by a pop-up window. Click on the OK to reboot the router. LAN SETUP Do not turn the Router off while it is rebooting. You might need to re-configure your PC NIC settings to enter the Router's web manager after reboot. D-Link DSL-2640B User Manual - D-Link DSL-2640B | V1 Manual - Page 34
from the Time Zone drop-down menu. Check the Enable Daylight Saving if needed and then select the proper Daylight Saving Offset drop-down menu. Configure the Daylight Saving Dates from start date to end. Click on the Save Settings button to apply your settings. D-Link DSL-2640B User Manual 34 - D-Link DSL-2640B | V1 Manual - Page 35
items will be deleted from the table. INTERNET ACCESS TIME RESTRICTIONS Select days and time frame to allow/deny this rule. Click on the Save Settings button to apply settings. D-Link DSL-2640B User Manual 35 - D-Link DSL-2640B | V1 Manual - Page 36
you you to logout of your router configuration and close the browser. To access the LOGOUT setting window, click on the Logout button in the SETUP directory LOGOUT Click on the Logout button to logout of the router configuration settings and close the browser. D-Link DSL-2640B User Manual 36 - D-Link DSL-2640B | V1 Manual - Page 37
IP address in the IP address input box to appoint the PC to receive the forwarded packets. The Ports to Open box shows which ports you want to open on the router. The TCP/UDP means the protocol type of the opened ports. Click on the Add/Apply button to apply settings. D-Link DSL-2640B User Manual - D-Link DSL-2640B | V1 Manual - Page 38
RULES CONFIGURATION Select a name from the drop-down menu for pre-configured application or type a name in the Name input box to define your own rules. Enter your Trigger and Firewall port(s), and select the Traffic Type. Click on the Add/Apply button to apply settings. D-Link DSL-2640B User Manual - D-Link DSL-2640B | V1 Manual - Page 39
the service type and configure the port range if need. Click on the Save Settings button to apply settings ADVANCED QoS SETUP Click on the Wireless QoS button to enter the WIRELESS QoS RULES CONFIGURATION window. Note the below description also applies for LAN QoS. D-Link DSL-2640B User Manual 39 - D-Link DSL-2640B | V1 Manual - Page 40
the following parameters: Protocol, Source/Destination IP Range, and Source/Destination Port Range. Click on the Add/Apply button to add and apply this rule. ACTIVE WIRELESS QoS RULES Check the Remove items and click on the Remove Selected button to delete settings. D-Link DSL-2640B User Manual 40 - D-Link DSL-2640B | V1 Manual - Page 41
Troubleshooting OUTBOUND IP FILTER By default, all outgoing IP traffic from the LAN is allowed. The Outbound Filter allows you to create a filter rule to block outgoing IP IP FILTER setting window, click on the Outbound Filter button in the ADVANCED directory. D-Link DSL-2640B User Manual 41 - D-Link DSL-2640B | V1 Manual - Page 42
Port. Click on the Add/Apply button to add and apply settings. The Active Outbound IP Filter shows detailed information about each created outbound IP filter. To remove an IP filter, click on the Remove button (only appears when there is an existing IP filter). D-Link DSL-2640B User Manual - D-Link DSL-2640B | V1 Manual - Page 43
Section 4 - Troubleshooting INBOUND IP FILTER By default, all incoming IP traffic that does not originate from the internal network the rule to take effect. To access the INBOUND IP FILTER setting window, click on the Inbound Filter button in the ADVANCED directory. D-Link DSL-2640B User Manual 43 - D-Link DSL-2640B | V1 Manual - Page 44
settings. Note: This section only applies when the Firewall is enabled. The Active Inbound IP Filter shows detailed information about each created inbound IP filter. To remove an IP filter, click on the Remove button (only appears when there is an existing IP filter). D-Link DSL-2640B User Manual - D-Link DSL-2640B | V1 Manual - Page 45
the Internet if the public IP address changes. DDNS requires that an account be setup with one of the supported DDNS service providers (DyndDNS.org or dlinkddns.com). To access the DNS SETUP setting window, click on the DNS Setup button in the ADVANCED directory. D-Link DSL-2640B User Manual 45 - D-Link DSL-2640B | V1 Manual - Page 46
those listed in the pull-down menu. Available servers include DynDns.org and dlinkddns.com. Enter the Host Name that you registered with your DDNS service provider. Enter the Username for your DDNS account. Password or Enter the Password for your DDNS account. Key: D-Link DSL-2640B User Manual 46 - D-Link DSL-2640B | V1 Manual - Page 47
as client-based virus protection) to protect the remaining client PCs on your LAN from possible contamination through the DMZ. To access the FIREWALL & DMZ setting window, click on the Firewall & DMZ button under the ADVANCED tab. D-Link DSL-2640B User Manual 47 - D-Link DSL-2640B | V1 Manual - Page 48
. Port scan protection is designed to block attempts to discover vulnerable ports or services that might be exploited in an attack from the WAN. DMZ SETTING Check the Enable DMZ box and type the IP Address of the server or device on your LAN in the DMZ IP Address box. D-Link DSL-2640B User Manual - D-Link DSL-2640B | V1 Manual - Page 49
Section 4 - Troubleshooting APPLICATION LEVEL GATEWAY (ALG) CONFIGURATION Check the relevant ALG options as required. Click on the Apply Settings button to apply settings. D-Link DSL-2640B User Manual 49 - D-Link DSL-2640B | V1 Manual - Page 50
the default settings (Auto sense) will work. This configuration works with all ADSL implementations. Do not change any settings unless you have been instructed. To make ADSL settings, select the desired items and click on the Apply Settings button to apply the settings. D-Link DSL-2640B User Manual - D-Link DSL-2640B | V1 Manual - Page 51
- Troubleshooting ADVANCED WIRELESS These options are for users that wish to change the behavior of their 802.11g wireless radio from the standard setting. D-Link does not recommend changing these settings from the factory default. Incorrect settings may impair the performance of your wireless radio - D-Link DSL-2640B | V1 Manual - Page 52
Troubleshooting ADVANCED LAN The ADVANCED LAN options are for users that wish to change the LAN settings. D-Link does not recommend changing these settings from factory default. Changing these settings WAN to LAN. Click on the Apply Settings button to apply settings. D-Link DSL-2640B User Manual 52 - D-Link DSL-2640B | V1 Manual - Page 53
CONTROL Select the management services which you want to enable/disable on your LAN/WAN interface. Click on the Apply Settings button to apply settings. Notice If you disable HTTP service, you'll not be able to access the router's configuration window permanently. D-Link DSL-2640B User Manual 53 - D-Link DSL-2640B | V1 Manual - Page 54
loose all your device configuration settings. To access the PASSWORD setting window, click on the Password button under the MAINTENANCE tab. SET PASSWORD (OPTIONAL) To change password, enter the old/new password. Click on the Apply Settings button to apply settings. D-Link DSL-2640B User Manual 54 - D-Link DSL-2640B | V1 Manual - Page 55
to its factory default settings, click on the Restore Device button. You will be prompted to confirm your decision to reset the Router. The Router will reboot with the factory default settings including IP settings (192.168.1.1) and Administrator password (admin). D-Link DSL-2640B User Manual 55 - D-Link DSL-2640B | V1 Manual - Page 56
button to begin copying the file. The Router will load the file and restart automatically. Notice Performing a Firmware Upgrade can sometimes change the configuration settings. Be sure to back-up the Router's configuration settings before upgrading the firmware. D-Link DSL-2640B User Manual 56 - D-Link DSL-2640B | V1 Manual - Page 57
may be done through the local or external interface to test connectivity to known IP addresses. The diagnostics feature executes a series of test on your system software and hardware connections. Use this window when working with your ISP to troubleshoot problems. D-Link DSL-2640B User Manual 57 - D-Link DSL-2640B | V1 Manual - Page 58
Troubleshooting , Notice, Informational and Debugging. To access the SYSTEM LOG setting window, click on the System Log button under the MAINTENANCE IP IP address of the remote system Address: log server Server UDP UDP port number of the remote Port: system log server D-Link DSL-2640B User Manual - D-Link DSL-2640B | V1 Manual - Page 59
Section 4 - Troubleshooting ENABLE EMAIL NOTIFICATION Click on the Enable EMAIL Notification check-box to enable the E-mail alarm system log. EMAIL SETTINGS Set the E-mail address messages to system log. Click on the Apply Settings button to apply your settings. D-Link DSL-2640B User Manual 59 - D-Link DSL-2640B | V1 Manual - Page 60
Section 4 - Troubleshooting STATUS Click on configuration (both wireless and Ethernet status). To access the DEVICE INFO setting window, click on the Device Info button in the STATUS directory. GENERAL This window displays current system time and the firmware version. D-Link DSL-2640B User Manual - D-Link DSL-2640B | V1 Manual - Page 61
information including IP address, Mask, Default Gateway, Primary/Secondary DNS Server. WIRELESS LAN This window displays authenticated wireless stations and their status. LAN This window displays LAN information including IP address, Subnet Mask, and DHCP Server. D-Link DSL-2640B User Manual 61 - D-Link DSL-2640B | V1 Manual - Page 62
Clients button in the STATUS directory. CONNECTED WIRELESS CLIENTS This window displays authenticated wireless stations and their status. CONNECTED DHCP LAN CLIENTS This window displays all the client devices which have obtained IP addresses from the router. D-Link DSL-2640B User Manual 62 - D-Link DSL-2640B | V1 Manual - Page 63
informative and does not affect the function of your router. To access the STATISTICS setting window, click on the Statistics button in the STATUS directory. WAN STATISTICS This window displays WAN information LAN STATISTICS This window displays LAN information. D-Link DSL-2640B User Manual 63 - D-Link DSL-2640B | V1 Manual - Page 64
Section 4 - Troubleshooting ADSL STATISTICS This window displays ADSL information including Link Rate, SNR, and some Error Counters. D-Link DSL-2640B User Manual 64 - D-Link DSL-2640B | V1 Manual - Page 65
. Software firewalls such as Zone Alarm, Black Ice, Sygate, Norton Personal Firewall, and Windows® XP firewall may block access to the configuration pages. Check the help files included with your firewall software for more information on disabling or configuring it. D-Link DSL-2640B User Manual 65 - D-Link DSL-2640B | V1 Manual - Page 66
go through its reboot process. Wait about 30 seconds to access the router. The default IP address is 192.168.1.1. When logging in, type in the default User Name "admin," and the default Password "admin" then click on the OK button to access the web-based manager. D-Link DSL-2640B User Manual 66 - D-Link DSL-2640B | V1 Manual - Page 67
as to how you can access the network. You must be within the wireless network range area to be able to connect your computer. There are two different types of wireless networks Wireless Local Area Network (WLAN), and Wireless Personal Area Network (WPAN). D-Link DSL-2640B User Manual 67 - D-Link DSL-2640B | V1 Manual - Page 68
, D-Link has a wireless solution for it. Home • Gives everyone at home broadband access • Surf the web, check email, instant message, download multimedia files wireless access to attract people. The wireless connection in public places is usually called "hotspots". D-Link DSL-2640B User Manual 68 - D-Link DSL-2640B | V1 Manual - Page 69
Point or wireless router. All the wireless devices, or clients, will connect to the wireless router or access point. An Ad-Hoc network contains only clients, such as laptops with wireless cardbus adapters. All the adapters must be in Ad-Hoc mode to communicate. D-Link DSL-2640B User Manual 69 - D-Link DSL-2640B | V1 Manual - Page 70
Some firewall software programs may block a DHCP request on newly installed adapters. If you are connecting to a wireless network at a hotspot (e.g. hotel, coffee shop, airport), please contact an employee or administrator to verify their wireless network settings. D-Link DSL-2640B User Manual 70 - D-Link DSL-2640B | V1 Manual - Page 71
the same as the LAN IP address of your router (192.168.1.1). Set Primary DNS the same as the LAN IP address of your router (192.168.1.1). The Secondary DNS is not needed or you may enter a DNS server from your ISP. Step 5 Click on the OK twice to save your settings. D-Link DSL-2640B User Manual 71 - D-Link DSL-2640B | V1 Manual - Page 72
11 connector for connection to 24/26 AWG twisted pair telephone line • LAN interface: RJ-45 port for 10/100BASE-T Ethernet connection • ARP • RARP • ICMP • RFC1058 RIP v1 • RFC1213 throughput rate. Environmental factors will adversely affect wireless signal range. D-Link DSL-2640B User Manual 72 - D-Link DSL-2640B | V1 Manual - Page 73
Fri 10.00am-7.00pm Sat & Sun For Customers within Canada: D-Link Canada Technical Support over the Telephone: 1-800-361-5265 (Canada) Mon. to Fri. 7:30AM to 9:00PM EST D-Link Canada Technical Support over the Internet: http://support.dlink.ca email: [email protected] D-Link DSL-2640B User Manual 73
-
 1
1 -
 2
2 -
 3
3 -
 4
4 -
 5
5 -
 6
6 -
 7
7 -
8
-
9
-
10
-
11
-
12
-
13
-
14
-
15
-
16
-
17
-
18
-
19
-
20
-
21
-
22
-
23
-
24
-
25
-
26
-
27
-
28
-
29
-
30
-
31
-
32
-
33
-
34
-
35
-
36
-
37
-
38
-
39
-
40
-
41
-
42
-
43
-
44
-
45
-
46
-
47
-
48
-
49
-
50
-
51
-
52
-
53
-
54
-
55
-
56
-
57
-
58
-
59
-
60
-
61
-
62
-
63
-
64
-
65
-
66
-
67
-
68
-
69
-
70
-
71
-
72
-
73
 |
 |

Table of Content
D-Link DSL-2640B User Manual
1