D-Link DSL-2750B Manual - Page 8
Installation, DSL Filters/Microfilters, Con your Computer, Windows® 7/Vista®/XP/2000 - d link
 |
View all D-Link DSL-2750B manuals
Add to My Manuals
Save this manual to your list of manuals |
Page 8 highlights
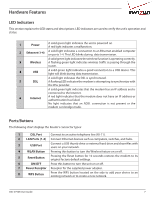
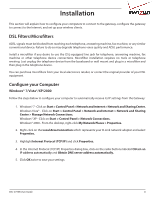
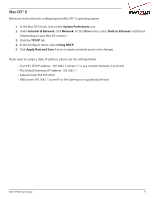
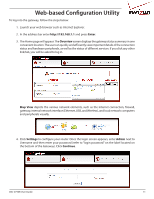
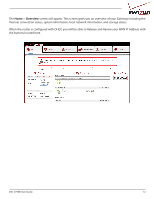
Installation This section will explain how to configure your computers to connect to the gateway, configure the gateway to connect to the Internet, and set up your wireless clients. DSL Filters/Microfilters ADSL signals must be blocked from reaching each telephone, answering machine, fax machine, or any similar conventional device. Failure to do so may degrade telephone voice quality and ADSL performance. Install a microfilter if you desire to use the DSL-equipped line jack for telephone, answering machine, fax machine or other telephone device connections. Microfilter installation requires no tools or telephone rewiring. Just unplug the telephone device from the baseboard or wall mount and plug in a microfilter and then plug in the telephone device. You can purchase microfilters from your local electronics retailer, or contact the original provider of your DSL equipment. Configure your Computer Windows® 7/Vista®/XP/2000 Follow the steps below to configure your computer to automatically receive its IP settings from the Gateway: 1. Windows® 7 - Click on Start > Control Panel > Network and Internet > Network and Sharing Center. Windows Vista® - Click on Start > Control Panel > Network and Internet > Network and Sharing Center > Manage Network Connections. Windows® XP - Click on Start > Control Panel > Network Connections. Windows® 2000 - From the desktop, right-click My Network Places > Properties. 2. Right-click on the Local Area Connection which represents your D-Link network adapter and select Properties. 3. Highlight Internet Protocol (TCP/IP) and click Properties. 4. In the Internet Protocol (TCP/IP) Properties dialog box, click on the radio buttons labeled Obtain an IP address automatically and Obtain DNS server address automatically. 5. Click OK twice to save your settings. DSL-2750B User Guide 8
-
 1
1 -
2
-
 3
3 -
 4
4 -
 5
5 -
 6
6 -
 7
7 -
 8
8 -
 9
9 -
 10
10 -
 11
11 -
 12
12 -
 13
13 -
14
-
15
-
16
-
17
-
18
-
19
-
20
-
21
-
22
-
23
-
24
-
25
-
26
-
27
-
28
-
29
-
30
-
31
-
32
-
33
-
34
-
35
-
36
-
37
-
38
-
39
-
40
-
41
-
42
-
43
-
44
-
45
-
46
-
47
-
48
-
49
-
50
-
51
-
52
-
53
-
54
-
55
-
56
-
57
-
58
-
59
-
60
-
61
-
62
-
63
-
64
-
65
-
66
-
67
-
68
-
69
-
70
-
71
-
72
-
73
-
74
-
75
-
76
-
77
-
78
-
79
-
80
-
81
-
82
-
83
-
84
-
85
-
86
-
87
-
88
 |
 |