D-Link DWA-130 Product Manual - Page 49
Windows Vista, Users
 |
UPC - 790069303043
View all D-Link DWA-130 manuals
Add to My Manuals
Save this manual to your list of manuals |
Page 49 highlights
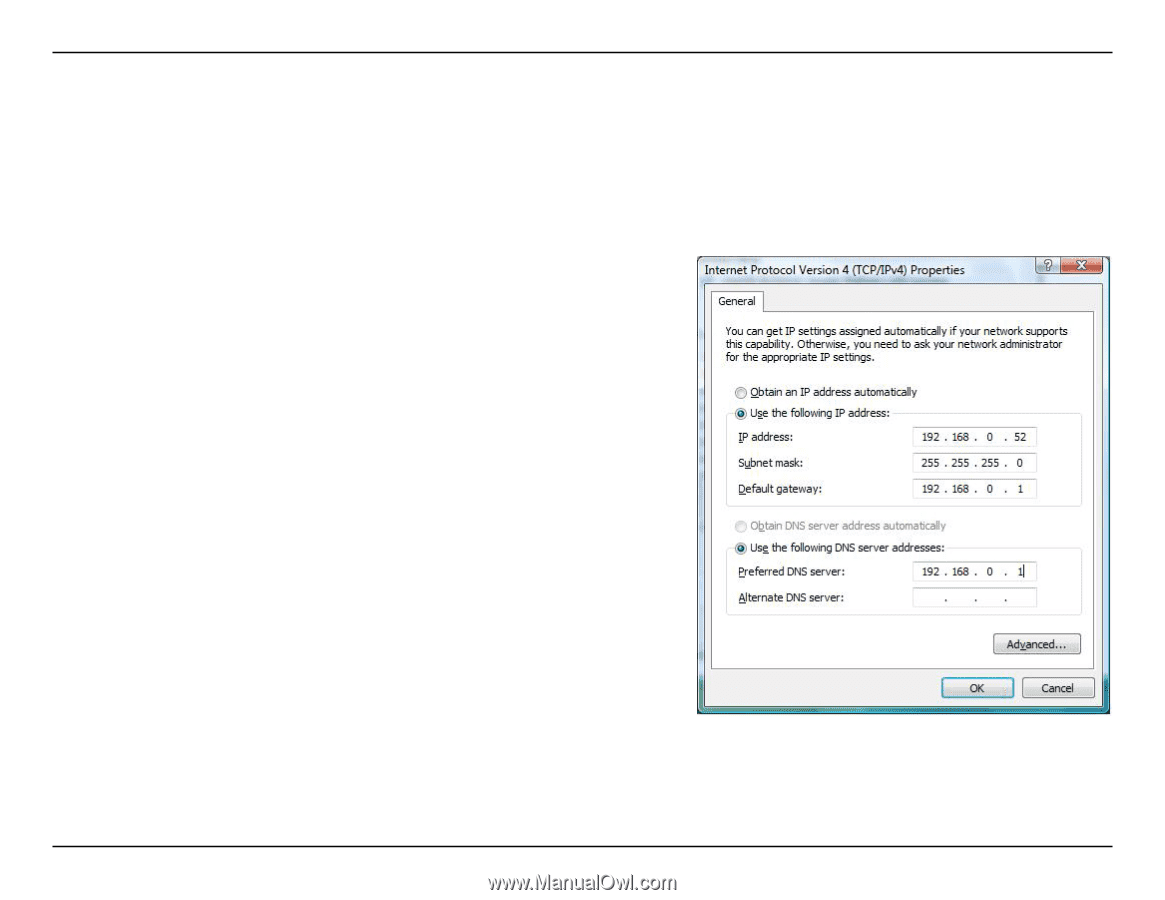
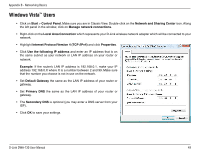
Appendix B - Networking Basics Windows Vista™ Users • Click on Start > Control Panel. Make sure you are in Classic View. Double-click on the Network and Sharing Center icon. Along the left panel in the window, click on Manage network connections. • Right-click on the Local Area Connection which represents your D-Link wireless network adapter which will be connected to your network. • Highlight Internet Protocol Version 4 (TCP /IPv4) and click Properties. • Click Use the following IP address and enter an IP address that is on the same subnet as your network or LAN IP address on your router or network. Example: If the router's LAN IP address is 192.168.0.1, make your IP address 192.168.0.X where X is a number between 2 and 99. Make sure that the number you choose is not in use on the network. • Set Default Gateway the same as the LAN IP address of your router or gateway. • Set Primary DNS the same as the LAN IP address of your router or gateway. • The Secondary DNS is optional (you may enter a DNS server from your ISP). • Click OK to save your settings. D-Link DWA-130 User Manual 49
-
 1
1 -
2
-
3
-
4
-
5
-
6
-
7
-
8
-
9
-
10
-
11
-
12
-
13
-
14
-
15
-
16
-
17
-
18
-
19
-
20
-
21
-
22
-
23
-
24
-
25
-
26
-
27
-
28
-
29
-
30
-
31
-
32
-
33
-
34
-
35
-
36
-
37
-
38
-
39
-
40
-
41
-
42
-
43
-
 44
44 -
 45
45 -
 46
46 -
 47
47 -
 48
48 -
 49
49 -
 50
50 -
 51
51 -
 52
52 -
 53
53 -
 54
54 -
55
-
56
-
57
-
58
 |
 |