D-Link DWL-120 Product Manual
D-Link DWL-120 Manual
 |
View all D-Link DWL-120 manuals
Add to My Manuals
Save this manual to your list of manuals |
D-Link DWL-120 manual content summary:
- D-Link DWL-120 | Product Manual - Page 1
D-Link AirPlus® DWL-120+ 2.4GHz Wireless USB Adapter Manual Building Networks for People - D-Link DWL-120 | Product Manual - Page 2
Contents Package Contents 3 Introduction 4 Wireless Basics 6 Getting Started 9 Using the Configuration Utility 12 Networking Basics 18 Troubleshooting 31 Technical Specifications 34 Contacting Technical Support 35 Warranty and Registration 36 2 - D-Link DWL-120 | Product Manual - Page 3
Contents of Package: D-Link AirPlus DWL-120+ 2.4 GHz Wireless USB Adapter Manual on CD-ROM Quick Installation Guide USB Cable If any of the above items are missing, please contact your reseller. System Requirements: A computer or laptop with an available USB port Windows XP/2000/Me/98SE - D-Link DWL-120 | Product Manual - Page 4
Quick Installation Guide (included in your package) you will have the ability to share information and resources, such as files, printers, and Internet connection and enjoy the freedom that wireless networking delivers. The DWL-120+ comes with software drivers for the most popular Microsoft Windows - D-Link DWL-120 | Product Manual - Page 5
Features and Benefits Convenience of Plug & Play installation Fully 802.11b compatible USB 1.1 standard Stronger Network Security with 256-bit WEP encryption Supports infrastructure networks via an Access Point or Router and Peer-to-Peer communication in Ad-Hoc mode User-friendly confi - D-Link DWL-120 | Product Manual - Page 6
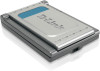
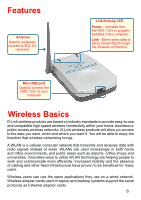
/Activity LED Power - Indicates that the DWL-120+ is properly installed in the computer. Link - Blinks when data is being transmitted through the wireless connection. Mini-USB port Used to connect the DWL-120+ to your computer Wireless Basics D-Link wireless products are based on industry standards - D-Link DWL-120 | Product Manual - Page 7
locations where installation of wiring may be impractical. Installation and Network Expansion - Installing a WLAN DWL-120+ is interoperable with existing compatible 2.4GHz wireless technology with data transfer speeds of up to 22Mbps* when used with other D-Link AirPlus devices. *"Maximum wireless - D-Link DWL-120 | Product Manual - Page 8
) Installation Considerations The D-Link AirPlus DWL-120+ lets you access your network, using a wireless connection, from virtually anywhere within its operating range. Keep in mind, however, that the number, thickness and location of walls, ceilings, or other objects that the wireless signals - D-Link DWL-120 | Product Manual - Page 9
(your existing network may be comprised of other devices): A wireless broadband RouterD-Link AirPlus DI-614+ A laptop computer with a USB wireless network adapter D-Link AirPlus DWL-120+ A desktop computer with a USB wireless network adapter D-Link AirPlus DWL-120+ A Cable modem D-Link DCM-201 9 - D-Link DWL-120 | Product Manual - Page 10
to your broadband router (see the Quick Installation Guide included with your router.) Install the D-Link AirPlus DWL-120 wireless USB adapter into an available USB port on your desktop computer. (See the Quick Installation Guide included with the DWL-120+.) If you are connecting a laptop computer - D-Link DWL-120 | Product Manual - Page 11
Ad Hoc Network Install the D-Link AirPlus DWL-120+ Wireless USB adapter into the desktop computer. (See the Quick Installation Guide included with the product for installation instructions.) Install another DWL-120+ into the laptop computer. Or you may install another wireless adapter such as the - D-Link DWL-120 | Product Manual - Page 12
Using the Configuration Utility D-Link AirPlus DWL-120+ uses the Configuration Utility as the management software. The utility provides the user an easy interface to change any settings related to the wireless adapter. When the computer is started, the Configuration Utility starts automatically and - D-Link DWL-120 | Product Manual - Page 13
setting is channel 6. In Infrastructure mode, the DWL-120+ will automatically select the channel to match the channel setting for the selected Access Point. In Ad Hoc mode, the channel must be manually set to the same channel for each wireless adapter. Tx Rate: You can adjust the transmission rate - D-Link DWL-120 | Product Manual - Page 14
Authentication - allows communication only with other devices with identical WEP settings Auto - will automatically adjust to the Authentication mode of the wireless Access Point or Router Default Key: Enter a key in either ASCII (e.g., a word) or hexadecimal format. Select one of the 4 keys that - D-Link DWL-120 | Product Manual - Page 15
Utility Site Survey Available Networks: The top section of the window displays the Available Networks. Scroll up and down the list half of the screen, you can manage the profiles that you have created for the wireless network at home, at the office and in public places. Scroll up and down and - D-Link DWL-120 | Product Manual - Page 16
Using the Configuration Utility (continued) Properties Current Setting Current Setting/Default Setting default In this window you can configure all the properties of a profile in order to connect with a network of your choice. Click OK to save the changes. 16 - D-Link DWL-120 | Product Manual - Page 17
Using the Configuration Utility About The About tab displays the utility and the firmware versions. 17 - D-Link DWL-120 | Product Manual - Page 18
how to establish a network at home or work, using Microsoft Windows XP. Note: Please refer to websites such as http://www.homenethelp.com and http://www.microsoft.com/windows2000 for information about networking computers using Windows 2000, ME or 98SE. Go to Start>Control Panel>Network Connections - D-Link DWL-120 | Product Manual - Page 19
Networking Basics Please follow all the instructions in this window: Click Next In the following window, select the best description of your computer. If your computer connects to the internet through a gateway/router, select the second option as shown. Click Next 19 - D-Link DWL-120 | Product Manual - Page 20
Networking Basics Enter a Computer description and a Computer name (optional.) Click Next Enter a Workgroup name. All computers on your network should have the same Workgroup name. Click Next 20 - D-Link DWL-120 | Product Manual - Page 21
Networking Basics Please wait while the Network Setup Wizard applies the changes. When the changes are complete, click Next. Please wait while the Network Setup Wizard configures the computer. This may take a few minutes. 21 - D-Link DWL-120 | Product Manual - Page 22
Networking Basics In the window below, select the option that fits your needs. In this example, Create a Network Setup Disk has been selected. You will run this disk on each of the computers on your network. Click Next. Insert a disk into the Floppy Disk Drive, in this case drive A. 22 - D-Link DWL-120 | Product Manual - Page 23
Networking Basics Please read the information under Here's how in the screen below. After you complete the Network Setup Wizard you will use the Network Setup Disk to run the Network Setup Wizard once on each of the computers on your network. To continue click Next. 23 - D-Link DWL-120 | Product Manual - Page 24
run the Network Setup Disk on all the other computers on your network. After running the Network Setup Disk on all your computers, your new wireless network will be ready to use. 24 - D-Link DWL-120 | Product Manual - Page 25
To name your computer, please follow these directions:In Windows XP: Click Start (in the lower left corner of the screen) Right-click on My Computer Select Properties and click Select the Computer Name Tab in the System Properties window. You may enter a Computer Description if you wish - D-Link DWL-120 | Product Manual - Page 26
on your network must have the same Workgroup name. Click OK Checking the IP Address in Windows XP The wireless adapter-equipped computers in your network must be in the same IP Address range (see Getting Started in this manual for a definition of IP Address Range.) To check on the IP Address of the - D-Link DWL-120 | Product Manual - Page 27
Checking the IP Address in Windows XP This window will appear. Click the Support tab Click Close Assigning a Static IP Address in Windows XP/2000 Note: Residential Gateways/ need to assign a Static IP Address, please follow these instructions: Go to Start Double-click on Control Panel 27 - D-Link DWL-120 | Product Manual - Page 28
Networking Basics Assigning a Static IP Address in Windows XP/2000 Double-click on Network Connections Right-click on Local Area Connections Double-click on Properties 28 - D-Link DWL-120 | Product Manual - Page 29
Networking Basics Assigning a Static IP Address in Windows XP/2000 Click on Internet Protocol (TCP/IP) Click Properties Input your IP address and subnet mask. IP Address of the Default Gateway.) The DNS server information will be supplied by your ISP (Internet Service Provider.) Click OK 29 - D-Link DWL-120 | Product Manual - Page 30
Networking Basics Checking the Wireless Connection by Pinging in Windows XP and 2000* Go to Start > Run > type cmd. A window similar to this one will appear. Type ping xxx.xxx.xxx. xxx, where xxx is the IP Address of the Wireless Router or Access Point. A good wireless connection will show four - D-Link DWL-120 | Product Manual - Page 31
Troubleshooting This chapter provides solutions to problems that can occur during the installation and operation of the DWL-120+. Read the following descriptions if you are having problems. (The examples below are illustrated in Windows XP. If you have another operating system, these solutions will - D-Link DWL-120 | Product Manual - Page 32
Troubleshooting Double-click on Network Adapters Right-click on D-Link AirPlus DWL-120+ Wireless USB Adapter Select Properties to check that the drivers are installed properly Look under Device Status to check that the device is working properly Click OK 32 - D-Link DWL-120 | Product Manual - Page 33
Installation Considerations in the Wireless Basics section of this manual for further information about the most advantageous placement of your D-Link wireless products. 3. Why does my wireless connection keep dropping? Antenna Orientation- Try different antenna orientations for the D-Link DWL-120 - D-Link DWL-120 | Product Manual - Page 34
Specifications Standard IEEE 802.11b Diagnostic LED Power Link Status Temperature Operating: 0ºC to 55ºC (32ºF to 131ºF) Interface: USB 1.1 Available Channels: Eleven channels for North America Media Access Protocol: CSMA/CA with ACK *"Maximum wireless signal rate derived - D-Link DWL-120 | Product Manual - Page 35
over the Telephone: (877) 453-5465 24 hours a day, seven days a week. D-Link Technical Support over the Internet: http://support.dlink.com email:[email protected] Tech Support for customers within Canada: D-Link Technical Support over the Telephone: (800) 361-5265 Monday to Friday 8:30am to 9:00pm - D-Link DWL-120 | Product Manual - Page 36
(90) days ("Warranty Period"), provided that the Software is properly installed on approved hardware and operated as contemplated in its documentation. D-Link further warrants that, during the Warranty Period, the magnetic media on which D-Link delivers the Software will be free of physical defects - D-Link DWL-120 | Product Manual - Page 37
covered in the operating manual for the product, and normal maintenance; Damage that occurs in shipment, due to act of God, failures due to power surge, and cosmetic damage; Any hardware, software, firmware or other products or services provided by anyone other than D-Link; Products that have been - D-Link DWL-120 | Product Manual - Page 38
derivative such as translation, transformation, or adaptation without permission from D-Link Corporation/D-Link Systems, Inc., as stipulated by the installation. This equipment generates, uses, and can radiate radio frequency energy and, if not installed and used in accordance with the instructions - D-Link DWL-120 | Product Manual - Page 39
Registration Product registration is entirely voluntary and failure to complete or return this form will not diminish your warranty rights. 060105 39
-
 1
1 -
 2
2 -
 3
3 -
 4
4 -
 5
5 -
 6
6 -
 7
7 -
8
-
9
-
10
-
11
-
12
-
13
-
14
-
15
-
16
-
17
-
18
-
19
-
20
-
21
-
22
-
23
-
24
-
25
-
26
-
27
-
28
-
29
-
30
-
31
-
32
-
33
-
34
-
35
-
36
-
37
-
38
-
39
 |
 |

Manual
Building Networks for People
D-Link
Air
Plus® DWL-120+
2.4GHz
Wireless USB Adapter