D-Link DWL-G710 Product Manual
D-Link DWL-G710 - AirPlus G Wireless Range Extender Manual
 |
UPC - 790069271427
View all D-Link DWL-G710 manuals
Add to My Manuals
Save this manual to your list of manuals |
D-Link DWL-G710 manual content summary:
- D-Link DWL-G710 | Product Manual - Page 1
D-Link AirPlusTM G DWL-G710 802.11g Wireless Range Extender Manual Version 1.1 - D-Link DWL-G710 | Product Manual - Page 2
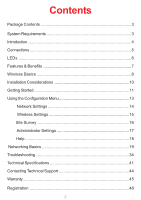
7 Wireless Basics 8 Installation Considerations 10 Getting Started 11 Using the Configuration Menu 13 Network Settings 14 Wireless Settings 15 Site Survey 16 Administrator Settings 17 Help 18 Networking Basics 19 Troubleshooting 34 Technical Specifications 41 Contacting Technical Support - D-Link DWL-G710 | Product Manual - Page 3
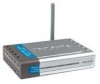
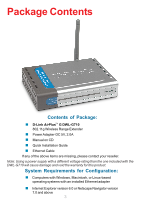
Package Contents Contents of Package: D-Link AirPlusTM G DWL-G710 802.11g Wireless Range Extender Power Adapter-DC 5V, 2.0A Manual on CD Quick Installation Guide Ethernet Cable If any of the above items are missing, please contact your reseller. Note: Using a power supply with a different voltage - D-Link DWL-G710 | Product Manual - Page 4
able to move across the network quickly. The D-Link AirPlusTM G DWL-G710 Wireless Range Extender can repeat the wireless signal of D-Link AirPlusTM G access points and wireless routers to extend the range of your wireless network. The DWL-G710 is capable of a maximum wireless signal rate of up to - D-Link DWL-G710 | Product Manual - Page 5
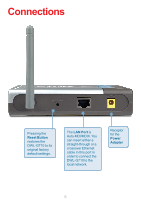
Pressing the Reset Button restores the DWL-G710 to its original factory default settings. The LAN Port is Auto-MDI/MDIX. You can insert either a straight-through or a crossover Ethernet cable in this port in order to connect the DWL-G710 to the local network. Receptor for the Power Adapter - D-Link DWL-G710 | Product Manual - Page 6
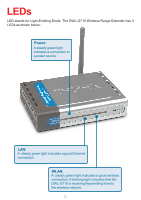
-G710 Wireless Range Extender has 3 LEDs as shown below: Power: A steady green light indicates a connection to a power source. LAN: A steady green light indicates a good Ethernet connection. WLAN: A steady green light indicates a good wireless connection. A blinking light indicates that the DWL-G710 - D-Link DWL-G710 | Product Manual - Page 7
with the setup wizard. Web-based interface for managing and configuring - Easy-to-use interface independent of the operating system. Simple configuration with the Site Survey tool. Just click on a network to extend the range of an access point or router in that network. No MAC addresses needed. Auto - D-Link DWL-G710 | Product Manual - Page 8
products are based on industry standards to provide easy-to-use and compatible high-speed wireless connectivity within your home, business or public access wireless networks. D-Link wireless products will allow you access to the data you want, when and where you want it. You will be able to enjoy - D-Link DWL-G710 | Product Manual - Page 9
computers D-Link AirPlusTM G DWL-G630 Wireless Cardbus Adapter used with laptop computers D-Link AirPlusTM G DI-524 Wireless Router The DWL-G710 is also interoperable with other 802.11g and 802.11b standards-compliant devices. Standards-Based Technology The DWL-G710 Wireless Range Extender utilizes - D-Link DWL-G710 | Product Manual - Page 10
) Installation Considerations The D-Link AirPlusTM G DWL-G710 lets you access your network, using a wireless connection, from virtually anywhere within its operating range. Keep in mind, however, that the number, thickness and location of walls, ceilings, or other objects that the wireless signals - D-Link DWL-G710 | Product Manual - Page 11
an access point or a wireless router. The Infrastructure Network example shown on the following page contains the following D-Link network devices (your existing network may be comprised of other devices): A wireless range extender D-Link AirPlusTM G DWL-G710 A wireless router - D-Link AirPlusTM - D-Link DWL-G710 | Product Manual - Page 12
to communicate with the DI-524 router. (See the printed Quick Installation Guide included with the DWL-G710.) If you are connecting a desktop computer to your network, install the D-Link AirPlus G DWLTM-G510 wireless PCI adapter into an available PCI slot on your desktop computer.* (See the printed - D-Link DWL-G710 | Product Manual - Page 13
Menu After you have completed the Setup Wizard (please see the Quick Installation Guide that came with the product) you can access the Configuration menu at any time by opening the Web browser and typing in the IP address of the DWL-G710. The DWL-G710 default IP address is shown below: Open the - D-Link DWL-G710 | Product Manual - Page 14
Using the Configuration Menu (continued) Network IP Address- Enter the static IP address of the DWL-G710 into this field. The IP address must be within the range of the IP addresses in your network. Subnet Mask- Enter the subnet mask. Gateway- Enter the IP address of the router in the network. - D-Link DWL-G710 | Product Manual - Page 15
DWL-G710, especially if you have more than one DWL-G710 on your network. Wireless SSID (Service Set Identifier) Enter the SSID of the network you wish to repeat. Site Survey - Click Site Survey to receive a list of networks that are available for connection , and the access point, must share - D-Link DWL-G710 | Product Manual - Page 16
Configuration Menu (continued) Click Site Survey in the Wireless configuration screen displayed on the previous page. Site Survey Scanning The DWL-G710 will scan the network. Please wait a few or gives you the information you need to configure your DWL-G710 for connection to a specific network. 16 - D-Link DWL-G710 | Product Manual - Page 17
appear. Click OK to restore to factory default settings or click Cancel to cancel the procedure. Firmware Upgrade - Upgrade the firmware for the DWL-G710. Find upgrades to the firmware on the D-Link website at http://support.dlink.com. After you have downloaded a firmware upgrade to your local drive - D-Link DWL-G710 | Product Manual - Page 18
Using the Configuration Menu (continued) Help Help Menu - Click on any item in the Help menu for more information. 18 - D-Link DWL-G710 | Product Manual - Page 19
Networking Basics Using the Network Setup Wizard in Windows XP In this section you will learn how to establish a network at computers using Windows 2000/Me/98SE. Go to Start>Control Panel>Network Connections Select Set up a home or small office network When this screen appears, click Next. 19 - D-Link DWL-G710 | Product Manual - Page 20
Networking Basics (continued) Please follow all the instructions in this window: Click Next. In the following window, select the best description of your computer. If your computer connects to the Internet through a router, select the second option as shown. Click Next. 20 - D-Link DWL-G710 | Product Manual - Page 21
Networking Basics (continued) Enter a Computer description and a Computer name (optional.) Click Next. Enter a Workgroup name. All computers on your network should have the same Workgroup name. Click Next. 21 - D-Link DWL-G710 | Product Manual - Page 22
Networking Basics (continued) Please wait while the Network Setup Wizard applies the changes. When the changes are complete, click Next. Please wait while the Network Setup Wizard configures the computer. This may take a few minutes. 22 - D-Link DWL-G710 | Product Manual - Page 23
Networking Basics (continued) In the window below, select the option that fits your needs. In this example, Create a Network Setup Disk has been selected. You will run this disk on each of the computers on your network. Click Next. Insert a disk into the Floppy Disk - D-Link DWL-G710 | Product Manual - Page 24
Networking Basics (continued) Please read the information under Here's how in the screen below. After you complete the Network Setup Wizard you will use the Network Setup Disk to run the Network Setup Wizard once on each of the computers on your network. Click Next. 24 - D-Link DWL-G710 | Product Manual - Page 25
on this screen, then click Finish to complete the Network Setup Wizard. The new settings will take effect when you restart the run the Network Setup Disk on all the other computers on your network. After running the Network Setup Disk on all your computers, your new wireless network will be ready - D-Link DWL-G710 | Product Manual - Page 26
Networking Basics (continued) Naming your Computer To name your computer using Windows XP, please follow these directions: Click Start (in the lower left corner of the screen). Right-click on My Computer. Select Properties. Select the Computer Name Tab in the System Properties window. You may enter - D-Link DWL-G710 | Product Manual - Page 27
-equipped computers in your network must be in the same IP address range (see Getting Started in this manual for a definition of IP address range.) To check on the IP address of the adapter, please do the following: Right-click on the Local Area Connection icon in the task bar. Click on Status. 27 - D-Link DWL-G710 | Product Manual - Page 28
Host Configuration Protocol) technology. If you are using a DHCP-capable router you will not need to assign static IP addresses. If you are not using a DHCP capable router, or you need to assign a static IP address, please follow these instructions: Go to Start. Double-click on Control Panel. 28 - D-Link DWL-G710 | Product Manual - Page 29
Networking Basics (continued) Assigning a Static IP Address in Windows XP/2000 Double-click on Network Connections. Right-click on Local Area Connections. Double-click on Properties. 29 - D-Link DWL-G710 | Product Manual - Page 30
on Internet Protocol (TCP/IP). Click Properties. D-Link DWL-G650 Input your IP address and subnet mask. (The IP addresses on your network must be within the same range. For example, if one computer has an IP address of 192.168.0.2, the other computers should have IP addresses that are sequential - D-Link DWL-G710 | Product Manual - Page 31
Menu and select System Preferences. cClick on Network. Select Built-in Ethernet in the Show pull-down menu. Select Manually in the Configure pull-down menu. Built-in Ethernet Input the Static IP Address, the Subnet Mask and the Router IP Address in the appropriate fields. Click Apply Now. 31 - D-Link DWL-G710 | Product Manual - Page 32
. Click on Network. Select Built-in Ethernet in the Show pull-down menu. Select Using DHCP in the Configure pull-down menu. Built-in Ethernet Manually Using DHCP Click Apply Now. The IP Address, Subnet mask, and the Router's IP Address will appear in a few seconds. 32 - D-Link DWL-G710 | Product Manual - Page 33
one will appear. Type ping xxx.xxx.xxx.xxx, where xxx is the IP address of the wireless router or access point. A good wireless connection will show four replies from the wireless router or access point, as shown. Checking the Wireless Connection by Pinging in Windows Me/98 Go to Start > Run > type - D-Link DWL-G710 | Product Manual - Page 34
Troubleshooting This chapter provides solutions to problems that can occur during the installation and operation of the DWL-G710 Wireless Range Extender. We cover various aspects of the network setup, including the network adapters. Please read the following if you are having problems. Note: It is - D-Link DWL-G710 | Product Manual - Page 35
Connect to Wireless Network screen will appear. Please make sure you have selected the correct available network, as shown in the illustration below. default Check that the IP address assigned to the wireless adapter is within the same IP address range as the existing network. (Since the DWL-G710 - D-Link DWL-G710 | Product Manual - Page 36
G DI-524 Wireless Router 2 D-Link AirPlusTM G DWL-G700AP Wireless Access Point 3 D-Link AirPlusTM G DWL-G710 Wireless Range Extender If you wish to repeat a device that is not a D-Link product, please check the FAQs for supported products on the D-Link support website (http://support.dlink.com) to - D-Link DWL-G710 | Product Manual - Page 37
you may be using other network adapters, but the procedure will remain the same.) D-Link AirPlus G DWL-G630 Select Properties to check that the drivers are installed properly. D-Link AirPlus G DWL-G630 Wireless Cardbus Adapter Look under Device Status to check that the device is working properly - D-Link DWL-G710 | Product Manual - Page 38
to Installation Considerations in the Wireless Basics section of this manual for further information about the most advantageous placement of your D-Link wireless products. 5. Why does my wireless connection keep dropping? Antenna Orientation - Try different antenna orientations for the DWL-G710 - D-Link DWL-G710 | Product Manual - Page 39
Troubleshooting (continued) 6. Why can't I get a wireless connection? (continued) Make sure that all devices are set to Infrastructure mode. Check that the LEDs are indicating normal activity. If not, check that the AC power and Ethernet cables are firmly connected. Check that the IP address, subnet - D-Link DWL-G710 | Product Manual - Page 40
Troubleshooting (continued) 8. Resetting the DWL-G710 to factory default settings After you have tried other methods for troubleshooting your network, you may choose to Reset the DWL-G710 to the factory default settings. Reset button To hard-reset the D-Link DWL-G710 to the factory default settings, - D-Link DWL-G710 | Product Manual - Page 41
18, 12, 9 and 6Mbps For 802.11b: • 11, 5.5, 2, and1Mbps Security • 64-, 128-bit WEP Wireless Frequency Range • 2.412GHz to 2.462GHz • Channels 1-11 utilize the 2.4GHz band Wireless Operating Range** 802.11g (Full Power with 2dBi gain diversity dipole antenna) Outdoors: • 164ft (50m) @ 54Mbps • 492ft - D-Link DWL-G710 | Product Manual - Page 42
48 and 54Mbps DSSS: • DBPSK @ 1Mbps • DQPSK @ 2Mbps • CCK @ 5.5 and 11Mbps For 802.11b: DSSS: • DBPSK @ 1Mbps • DQPSK @ 2Mbps • CCK @ 5.5 and 11Mbps Wireless Transmit Power Typical RF Output Power at each Data Rate For 802.11g: • 31mW (15dBm) @ 54Mbps • 40mW (16dBm) @ 48Mbps • 40mW (16dBm) @ 36, 24 - D-Link DWL-G710 | Product Manual - Page 43
Technical Specifications (continued) LEDs • Power • LAN • WLAN Temperature • Operating: 32ºF to 131ºF (0ºC to 55ºC) • Storing: -4ºF to 149ºF (-20ºC to 65ºC) Humidity • 5%~95% (non-condensing) Certifications • FCC • UL Dimensions • L = 5.59 inches (142mm) • W = 4.29 inches (109mm) • H = 1.22 inches ( - D-Link DWL-G710 | Product Manual - Page 44
over the Telephone: (877) 453-5465 24 hours a day, seven days a week. D-Link Technical Support over the Internet: http://support.dlink.com email:[email protected] Tech Support for customers within Canada: D-Link Technical Support over the Telephone: (800) 361-5265 Monday to Friday 7:30am to 9:00pm - D-Link DWL-G710 | Product Manual - Page 45
Installations, addresses with an APO or FPO. Limited Warranty: D-Link warrants that the hardware portion of the D-Link Link's sole discretion. Such repair or replacement will be rendered by D-Link at an Authorized D-Link Service by D-Link for the Software. Software will original purchase point based on - D-Link DWL-G710 | Product Manual - Page 46
to power surge, and cosmetic damage; Any hardware, software, firmware or other products or services provided by anyone other than DLink; Products that have been purchased from inventory clearance or liquidation sales or other sales in which D-Link, the sellers, or the liquidators expressly disclaim - D-Link DWL-G710 | Product Manual - Page 47
from D-Link Corporation/D-Link Systems, Inc installation. This equipment generates, uses, and can radiate radio frequency energy and, if not installed and used in accordance with the instructions Connect the equipment into an outlet on a circuit different from that to which the receiver is connected - D-Link DWL-G710 | Product Manual - Page 48
Registration Product registration is entirely voluntary and failure to complete or return this form will not diminish your warranty rights. Revised 08/11/2005 Version 1.1 48
-
 1
1 -
 2
2 -
 3
3 -
 4
4 -
 5
5 -
 6
6 -
 7
7 -
8
-
9
-
10
-
11
-
12
-
13
-
14
-
15
-
16
-
17
-
18
-
19
-
20
-
21
-
22
-
23
-
24
-
25
-
26
-
27
-
28
-
29
-
30
-
31
-
32
-
33
-
34
-
35
-
36
-
37
-
38
-
39
-
40
-
41
-
42
-
43
-
44
-
45
-
46
-
47
-
48
 |
 |

Manual
Version 1.1
D-Link
Air
Plus
TM
G
DWL-G710
WL-G710
WL-G710
WL-G710
WL-G710
802.11g Wireless Range Extender