D-Link DWR-512 User Manual
D-Link DWR-512 Manual
 |
View all D-Link DWR-512 manuals
Add to My Manuals
Save this manual to your list of manuals |
D-Link DWR-512 manual content summary:
- D-Link DWR-512 | User Manual - Page 1
- D-Link DWR-512 | User Manual - Page 2
trademarks or registered trademarks of their respective companies. Copyright © 2011 by D-Link Corporation, Inc. All rights reserved. This publication may not be reproduced, in whole or in part, without prior expressed written permission from D-Link Corporation, Inc. D-Link DWR-512 User Manual i - D-Link DWR-512 | User Manual - Page 3
undesired operation. This device has been tested and found to comply with the accordance with the instructions, may cause of the following measures: • Reorient or relocate the receiving antenna. • antenna shall not be less than 20cm (8 inches) during normal operation. D-Link DWR-512 User Manual ii - D-Link DWR-512 | User Manual - Page 4
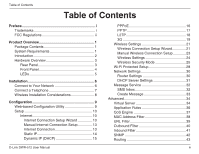
Considerations 8 Configuration 9 Web-based Configuration Utility 9 Setup 10 Internet 10 Internet Connection Setup Wizard 10 Manual Internet Connection Setup 13 Internet Connection 13 Static IP 14 Dynamic IP (DHCP 15 D-Link DWR-512 User Manual PPPoE 16 PPTP 17 L2TP 18 3G 19 Wireless - D-Link DWR-512 | User Manual - Page 5
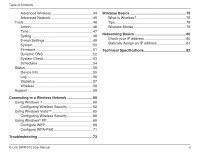
66 Using Windows® XP 68 Configure WEP 69 Configure WPA-PSK 71 Troubleshooting 73 Wireless Basics 75 What is Wireless 76 Tips 78 Wireless Modes 79 Networking Basics 80 Check your IP address 80 Statically Assign an IP address 81 Technical Specifications 82 D-Link DWR-512 User Manual iv - D-Link DWR-512 | User Manual - Page 6
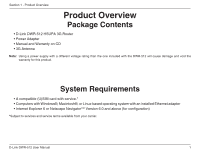
Section 1 - Product Overview Product Overview Package Contents • D-Link DWR-512 HSUPA 3G Router • Power Adapter • Manual and Warranty on CD • 3G Antenna Note: Using a power supply with a different voltage rating than the one included with the DWR-512 will cause damage and void the warranty for this - D-Link DWR-512 | User Manual - Page 7
network safe with WPA/WPA2 wireless encryption. The DWR-512 utilizes dual-active firewalls (SPI and NAT) to prevent potential attacks across the Internet, and includes MAC address filtering to control access to your network. The HSUPA 3G Router can be installed quickly and easily almost anywhere - D-Link DWR-512 | User Manual - Page 8
Ethernet cable. Connects to a DSL/Cable modem or router through an Ethernet cable. Accepts a standard (U)SIM card for 3G connectivity. Connects to the included power adapter. Turns the device on or off. Connects to a telephone through a standard RJ-11 telephone cable. D-Link DWR-512 User Manual 3 - D-Link DWR-512 | User Manual - Page 9
Overview Front Panel WAN LAN1 LAN2 LAN3 LAN4 Status 2G 3G SMS WLAN Signal Strength Reset Button WPS Button Button Name Function Reset Press this button with an unfolded paperclip to reset the device. WPS Press this button to initiate a new WPS connection. D-Link DWR-512 User Manual 4 - D-Link DWR-512 | User Manual - Page 10
2G 3G SMS WLAN HSDPA/HSUPA connection is established Blinking: Data is being transferred via 2G Solid Green: SMS storage is full Blinking Green: There is an unread SMS message Solid Green: WLAN is active and available Blinking Green: Data is being transferred over the WLAN D-Link DWR-512 User Manual - D-Link DWR-512 | User Manual - Page 11
DWR-512 HSUPA 3G Router performs initialization and Internet connection processes. c. After a few moments, if a connection has been established, the following LEDs will turn solid green: Power, Status, WAN, WLAN, and any LAN Port LEDs that are connected computers or other devices. D-Link DWR-512 - D-Link DWR-512 | User Manual - Page 12
2 - Installation Connect a Telephone The RJ-11 jack on the back of the router allows you to connect a standard analog telephone for voice calls. Simply plug the phone voice calls. Note: Calls made will be charged at a rate determined by your mobile service provider. D-Link DWR-512 User Manual 7 - D-Link DWR-512 | User Manual - Page 13
The key to maximizing the wireless range is to follow these basic guidelines: 1. Minimize the number of walls and ceilings between the D-Link router and other network devices. Each wall or ceiling can home security systems may dramatically degrade wireless connectivity. D-Link DWR-512 User Manual 8 - D-Link DWR-512 | User Manual - Page 14
pages by clicking on the categories at the top of the screen (SETUP/ADVANCED/TOOLS/STATUS/SUPPORT), and then selecting a configuration page from the bar on the left side. The following pages will describe each section in detail, starting with the SETUP pages. D-Link DWR-512 User Manual 9 - D-Link DWR-512 | User Manual - Page 15
Setup Wizard This wizard will guide you through a step-by-step process to configure your D-Link router to connect to the Internet. Click Next to continue. Note: While using the wizard, you can click Prev to go back to the previous page or you can click Cancel to close the wizard. D-Link DWR-512 - D-Link DWR-512 | User Manual - Page 16
page or click Cancel to close the wizard. Note: The DWR-512 has a WAN Failover feature that allows the router to switch to a 3G connection if the WAN connection is down or unavailable. To configure this feature, please refer to "Internet Connection" on page 13. D-Link DWR-512 User Manual 11 - D-Link DWR-512 | User Manual - Page 17
SIM card into the DWR-512. See "3G" on page 19 for information about how to configure this type of connection. Static IP Address Choose this option if your Internet Setup Provider provided you with IP Address information that has to be Connection: manually configured. See "Static IP" on page 14 for - D-Link DWR-512 | User Manual - Page 18
the Internet Host (specified below) is unreachable. Internet Host: Enter an IP address for the router to use to check if it is connected to the Internet. If Auto-Backup is enabled and the IP address cannot be reached, the router will switch over to a 3G connection. D-Link DWR-512 User Manual 13 - D-Link DWR-512 | User Manual - Page 19
MAC address on the Broadband Router. It is not recommended that you change the default MAC address unless required by your ISP. You can use the Clone Your PC's MAC Address button to replace the Internet port's MAC address with the MAC address of your Ethernet card. D-Link DWR-512 User Manual 14 - D-Link DWR-512 | User Manual - Page 20
by your ISP. You can use the Clone Your PC's MAC Address button to replace the Internet port's MAC address with the MAC address of your PC. This feature enables this product to renew the WAN IP Auto-reconnect: address automatically when the lease time has expired. D-Link DWR-512 User Manual 15 - D-Link DWR-512 | User Manual - Page 21
changes. Username: The username/account name that your ISP provides to you for PPPoE dial-up. Password: Password that your ISP provides to you for PPPoE dial-up. Verify Password: Fill in with the same password in Password field. Service Name: (Optional) Fill in if provided by your ISP. IP Address - D-Link DWR-512 | User Manual - Page 22
Address: (Only applicable for Static IP PPTP.) PPTP Server IP IP address of PPTP server. Address: Username: User/account name that your ISP provides to you for PPTP dial-up. Password: Password that your ISP provides to you for PPTP dial-up. Verify Password feature. D-Link DWR-512 User Manual 17 - D-Link DWR-512 | User Manual - Page 23
Address: (Only applicable for Static IP L2TP.) L2TP Server IP IP address of L2TP server. Address: Username: User/account name that your ISP provides to you for L2TP dial-up. Password: Password that your ISP provides to you for L2TP dial-up. Verify Password feature. D-Link DWR-512 User Manual 18 - D-Link DWR-512 | User Manual - Page 24
be used if required by your service provider. After modifying any settings, click Save Settings to save your changes. Account/Profile Name: Fill in a name to identify the following 3G configuration. Username: (Optional) Fill in only if requested by ISP. Password: (Optional) Fill in only if requested - D-Link DWR-512 | User Manual - Page 25
Section 3 - Configuration Keep Alive: Select Disable or Use LCP Echo Request depending on the settings required by your ISP. Bridge Ethernet Ports: Activate this feature to use the Ethernet WAN port as an additional LAN port. D-Link DWR-512 User Manual 20 - D-Link DWR-512 | User Manual - Page 26
Setup Wizard This wizard will guide you through a step-by-step process to configure your D-Link router's wireless . Click Next to continue. Note: While using the wizard, you can click Prev to go back to the previous page or you can click Cancel to close the wizard. D-Link DWR-512 User Manual - D-Link DWR-512 | User Manual - Page 27
26 digit password using only hex characters (0-9, A-F). If you choose ASCII, the password can be up to 5 or 13 alphanumeric characters. Click Next to continue. This completes the Wireless Connection Setup Wizard. Click Save to save your changes and reboot the router. D-Link DWR-512 User Manual 22 - D-Link DWR-512 | User Manual - Page 28
Section 3 - Configuration Manual Wireless Connection Setup To set up your wireless connection manually, click Manual Wireless Connection Setup. D-Link DWR-512 User Manual 23 - D-Link DWR-512 | User Manual - Page 29
, the following parameters take effect. Wireless Network Name: Also known as the SSID (Service Set Identifier Channel Scan: Enabling this feature will allow the router to scan for the best channel to use manually enter the SSID of your network to connect. D-Link DWR-512 User Manual 24 - D-Link DWR-512 | User Manual - Page 30
support WPA or WPA2. • WPA-Personal: WPA-PSK encryption will be used. This setting is recommended for most users. • WPA-Enterprise: WPA-EAP encryption will be used. This setting is only recommended if you have a RADIUS authentication server. Otherwise, WPA-Personal should be used. D-Link DWR-512 - D-Link DWR-512 | User Manual - Page 31
TKIP or AES cipher. The AES cipher is the most secure, provided that all of your clients can support it. Network Key: Enter the key/password you want to use for your wireless network. The key must be 8 to 63 characters long, and may only contain letters and numbers. D-Link DWR-512 User Manual 26 - D-Link DWR-512 | User Manual - Page 32
that all of your clients can support it. RADIUS Server IP Enter the IP address of your RADIUS server. Address: RADIUS Server Port: Enter the port used for your RADIUS server. RADIUS Server Shared Enter the Shared Secret/password Secret: for your RADIUS server. D-Link DWR-512 User Manual 27 - D-Link DWR-512 | User Manual - Page 33
a PIN code. You can also use Windows 7 to do initial configuration of your router by using the Connect to a network wizard in Windows, and entering the WPS PIN/AP PIN of the router when prompted. After modifying any settings, click Save Settings to save your changes. D-Link DWR-512 User Manual 28 - D-Link DWR-512 | User Manual - Page 34
initial configuration of the router, you will need to enter the WPS PIN/AP PIN into the wizard when prompted. The factory default WPS PIN router. WPS Status: This will show the current WPS connection process status. Click the Trigger button to initiate a WPS connection. D-Link DWR-512 User Manual - D-Link DWR-512 | User Manual - Page 35
address, you will need to enter the new IP address in your browser to get into the configuration utility. Default Subnet Mask: Enter the Subnet Mask of the router. The default subnet mask is 255.255.255.0. Local Domain Name: Enter the local domain name for your network. D-Link DWR-512 User Manual - D-Link DWR-512 | User Manual - Page 36
- Configuration DHCP Server Settings The DWR-512 has a built-in DHCP (Dynamic Host Control Protocol) server. The DHCP server assigns IP addresses to devices on the network that request them. By default, the DHCP Server is enabled on the device. The DHCP address pool contains a range of IP addresses - D-Link DWR-512 | User Manual - Page 37
Delete: Deletes the selected SMS message. Reply: Opens a Create Message window to reply to the selected SMS message. Forward: Opens a Create Message windows to forward the selected SMS message to another recipient. Refresh: Click this button to check for new messages. D-Link DWR-512 User Manual 32 - D-Link DWR-512 | User Manual - Page 38
Section 3 - Configuration Create Message This page allows you to send an SMS to your contacts. Just fill in the phone number of the recipient, and type the content of Sent Message: Click this button to send the message. Cancel: Click this button to clear the message. D-Link DWR-512 User Manual 33 - D-Link DWR-512 | User Manual - Page 39
configured as a virtual server so that users can access services such as Web or FTP via the public (WAN) IP address of the router. You can also allow the settings to run on a specified schedule. The Virtual Server function is also known as Port Forwarding " on page 54. D-Link DWR-512 User Manual 34 - D-Link DWR-512 | User Manual - Page 40
to allow the incoming service. In the next box, enter the port number that you would like to open. Enable: Tick the checkbox to enable the specified rule. Schedule Rule #: Specify the schedule rule number. To create schedules, please refer to "Schedules" on page 54. D-Link DWR-512 User Manual 35 - D-Link DWR-512 | User Manual - Page 41
RULES ID: This identifies the rule. Trigger: Enter the port to listen to in order to trigger the rule. Incoming Ports: Specify the incoming port(s) to open when traffic comes over the Trigger port. Enable: Tick the checkbox to enable the specified rule. D-Link DWR-512 User Manual 36 - D-Link DWR-512 | User Manual - Page 42
Configuration Save Settings to save your changes. QOS ENGINE SETUP Enable QOS Packet Select this box to enable the Local IP : Ports: Specify the local IP address(es) and port(s) for the rule to affect. Remote IP : Ports: Specify the remote IP address(es) and port(s) D-Link DWR-512 User Manual 37 - D-Link DWR-512 | User Manual - Page 43
LAN. C: If this box is ticked, the rule will follow the connection control setting specified in MAC filtering settings specified above. A: If this box is ticked, the rule will follow the association control setting specified in MAC filtering settings specified above. D-Link DWR-512 User Manual 38 - D-Link DWR-512 | User Manual - Page 44
Section 3 - Configuration URL Filter URL Filter allows you to set up a list of websites that will be blocked from users on your network. After like to block. All URLs that begin with this URL will be blocked. Enable: Tick the checkbox to enable the specified rule. D-Link DWR-512 User Manual 39 - D-Link DWR-512 | User Manual - Page 45
Configuration IP address and then the port after the colon. Enable: Tick the checkbox to enable the specified rule. Schedule Rule #: Specify the schedule rule number. Previous Page: Go back to the previous filter page. Next Page: Advance to the next filter page. D-Link DWR-512 User Manual - D-Link DWR-512 | User Manual - Page 46
Configuration IP address and then the port after the colon. Enable: Tick the checkbox to enable the specified rule. Schedule Rule #: Specify the schedule rule number. Previous Page: Go back to the previous filter page. Next Page: Advance to the next filter page. D-Link DWR-512 User Manual - D-Link DWR-512 | User Manual - Page 47
. SNMP Version: Select the SNMP version of your system. WAN Access IP Address If you want to limit remote access SNMP access, enter the IP address of the remote computer you will use to access this device. All other IP addresses will be denied remote SNMP access. D-Link DWR-512 User Manual 42 - D-Link DWR-512 | User Manual - Page 48
Note: In a transmission path, each link is terminated at a network device such as a router or gateway. The number of hops equals the number of routers or gateways that data must pass through before reaching the destination. Enable: Select this box to enable the rule. D-Link DWR-512 User Manual 43 - D-Link DWR-512 | User Manual - Page 49
of your router if configured improperly. Do not change these settings unless you are already familiar with them or have been instructed to make the change by one of our support personnel. After network. It is strongly recommended to keep this setting to Auto. D-Link DWR-512 User Manual 44 - D-Link DWR-512 | User Manual - Page 50
Plug and Play (UPnP™) feature. UPNP provides compatibility with various networking equipment, software, and peripherals. Enable WAN Ping Select the box to allow the WAN port to be Respond: "pinged." Blocking WAN pings may provide some extra security from hackers. D-Link DWR-512 User Manual 45 - D-Link DWR-512 | User Manual - Page 51
Remote management allows the DWR-512 to be configured over the Internet through a web browser. A username and password will still be required to access the Web-Management interface. IP Allowed to Access: Enter the Internet IP address of the PC that has access to the Broadband Router. If you enter - D-Link DWR-512 | User Manual - Page 52
DATE CONFIGURATION Time router to use an NTP server to update the router's internal clock. NTP Server Used: Enter an NTP server to use for time synchronization, or use the dropdown box to select one. Click the Update Now button to synchronize the time with the NTP server. D-Link DWR-512 User Manual - D-Link DWR-512 | User Manual - Page 53
modifying any settings, click Save Settings to save your changes. Enable Logging to Tick this checkbox to send the router Syslog Server: logs to a syslog server. Syslog Server IP Enter the IP address of the syslog server Address: that the router will send the logs to. D-Link DWR-512 User Manual 48 - D-Link DWR-512 | User Manual - Page 54
password for the SMTP account. Send E-mail Alert to: Enter the e-mail address where you would like the router to send e-mails to. E-mail Subject: Enter a subject for the e-mail. E-mail Log Now: Click this button to send the current logs to the specified e-mail address. D-Link DWR-512 User Manual - D-Link DWR-512 | User Manual - Page 55
to save your current router configuration Hard Drive settings to router. Restore To Factory This option will restore all settings back to their defaults. Default Settings: Any settings that have not been backed up will be lost, including any rules that you have created. D-Link DWR-512 User Manual - D-Link DWR-512 | User Manual - Page 56
3 - Configuration Firmware Here, you can upgrade the firmware of your router. Make sure the firmware you want to use is on the local hard drive of the computer and then click Browse to upload the file. You can check for and download firmware updates at the D-Link support site at http://support.dlink - D-Link DWR-512 | User Manual - Page 57
DDNS feature. Provider: Select a DDNS service provider to use. Host Name: Enter the Host Name that you registered with your DDNS service provider. Username / E-mail: Enter the Username for your DDNS account. Password / Key: Enter the Password for your DDNS account. D-Link DWR-512 User Manual 52 - D-Link DWR-512 | User Manual - Page 58
. After modifying any settings, click Save Settings to save your changes. Host Name or IP Enter a host name or the IP address that you want to ping Address: and click the Ping button. The results of the ping attempt will be displayed in the PING RESULT section below. D-Link DWR-512 User Manual 53 - D-Link DWR-512 | User Manual - Page 59
Section 3 - Configuration Schedules This section allows you to manage schedule rules for various firewall and parental control features. After modifying would like the schedule to become inactive. After making your changes, click Save Settings to save the schedule. D-Link DWR-512 User Manual 54 - D-Link DWR-512 | User Manual - Page 60
the router. 3G Card: Displays the 3G connection details of the router. LAN: Displays the LAN connection details of the router. Wireless LAN: Displays the wireless LAN connection details of the router LAN Computers: Displays the list of clients connected to the router. D-Link DWR-512 User Manual 55 - D-Link DWR-512 | User Manual - Page 61
refresh the system log. Download: Click this button to download the current system log to your computer. Clear Logs: Click this button to clear the system log. Link To Log Settings: Click this button to go to the Log Settings page. For more, refer to "Log" on page 56. D-Link DWR-512 User Manual 56 - D-Link DWR-512 | User Manual - Page 62
Section 3 - Configuration Statistics Here you can view the packets transmitted and received passing through your router on both WAN and LAN ports. The traffic counter will reset if the device is rebooted. Click the Refresh button to refresh the WAN statistics. D-Link DWR-512 User Manual 57 - D-Link DWR-512 | User Manual - Page 63
Section 3 - Configuration Wireless This table displays a list of wireless clients that are connected to your wireless router. It also displays the connection time and MAC address of the connected wireless clients. Click Refresh to refresh the list. D-Link DWR-512 User Manual 58 - D-Link DWR-512 | User Manual - Page 64
Section 3 - Configuration Support The SUPPORT pages provide help information for each section of the device's interface. To view the Support pages, click on SUPPORT at the top of the screen. D-Link DWR-512 User Manual 59 - D-Link DWR-512 | User Manual - Page 65
network. If you are using another company's utility or Windows 2000, please refer to the user manual of your wireless adapter for help with connecting to a wireless network. Most utilities will have a display any available wireless networks in your area. Wireless D-Link DWR-512 User Manual 60 - D-Link DWR-512 | User Manual - Page 66
(SSID) you would like to connect to and click the Connect button. If you get a good signal but cannot access the Internet, check your TCP/ IP settings for your wireless adapter. Refer to the Networking Basics section in this manual for more information. D-Link DWR-512 User Manual 61 - D-Link DWR-512 | User Manual - Page 67
It is recommended to enable wireless security (WPA/WPA2) on your wireless router or access point before configuring your wireless adapter. If you are joining an existing network, you will The utility will display any available wireless networks in your area. Wireless D-Link DWR-512 User Manual 62 - D-Link DWR-512 | User Manual - Page 68
Section 4 - Connecting to a Wireless Network 3. Highlight the wireless network (SSID) you would like to connect to and click the Connect button. 4. The following window appears while your computer tries to connect to the router. D-Link DWR-512 User Manual 63 - D-Link DWR-512 | User Manual - Page 69
passphrase that is on your router and click Connect. It may take 20-30 seconds to connect to the wireless network. If the connection fails, please verify that the security settings are correct. The key or passphrase must be exactly the same as on the wireless router. D-Link DWR-512 User Manual 64 - D-Link DWR-512 | User Manual - Page 70
. Click on a network (displayed using the SSID) and click the Connect button. If you get a good signal but cannot access the Internet, check the TCP/IP settings for your wireless adapter. Refer to the Networking Basics section in this manual for more information. D-Link DWR-512 User Manual 65 - D-Link DWR-512 | User Manual - Page 71
It is recommended to enable wireless security (WEP/WPA/WPA2) on your wireless router or access point before configuring your wireless adapter. If you are joining an existing network, you will need wireless network (SSID) you would like to connect to and click Connect. D-Link DWR-512 User Manual 66 - D-Link DWR-512 | User Manual - Page 72
passphrase that is on your router and click Connect. It may take 20-30 seconds to connect to the wireless network. If the connection fails, please verify that the security settings are correct. The key or passphrase must be exactly the same as on the wireless router. D-Link DWR-512 User Manual 67 - D-Link DWR-512 | User Manual - Page 73
Windows® XP users may use the built-in wireless utility (Zero Configuration Utility). The following instructions are for Service Pack 2 users. If you are using another company's utility or Windows® 2000, please refer to the user manual of your wireless adapter for help with connecting to a wireless - D-Link DWR-512 | User Manual - Page 74
WEP It is recommended to enable WEP on your wireless router or access point before configuring your wireless adapter. If you are joining an existing network, you will need to know the WEP key being used. 1. O p e n t h e W i n d o w s ® connect to and click Connect. D-Link DWR-512 User Manual 69 - D-Link DWR-512 | User Manual - Page 75
. Enter the same WEP key that is on your router and click Connect. It may take 20-30 seconds to connect to the wireless network. If the connection fails, please verify that the WEP settings are correct. The WEP key must be exactly the same as on the wireless router. D-Link DWR-512 User Manual 70 - D-Link DWR-512 | User Manual - Page 76
WPA-PSK It is recommended to enable WPA on your wireless router or access point before configuring your wireless adapter. If you are joining an existing network, you will need to 2. Highlight the wireless network (SSID) you would like to connect to and click Connect. D-Link DWR-512 User Manual 71 - D-Link DWR-512 | User Manual - Page 77
the connection fails, please verify that the WPA-PSK settings are correct. The WPA-PSK passphrase must be exactly the same as on the wireless router. D-Link DWR-512 User Manual 72 - D-Link DWR-512 | User Manual - Page 78
having problems. (The examples below are illustrated in Windows® XP. If you have a different operating system, the screenshots on your computer will look similar to the following examples.) 1. Why can't I access the web-based configuration utility? When entering the IP address of the D-Link router - D-Link DWR-512 | User Manual - Page 79
to hold the button down for 10 seconds. Release the button and the router will go through its reboot process. Wait about 30 seconds to access the router. The default IP address is 192.168.0.1. When logging in, the username is admin and leave the password box empty. D-Link DWR-512 User Manual 74 - D-Link DWR-512 | User Manual - Page 80
cards. Under many circumstances, it may be desirable for mobile network devices to link to a conventional Ethernet LAN in order to use servers, printers or an Internet connection supplied through the wired LAN. A Wireless Router is a device used to provide this link. D-Link DWR-512 User Manual 75 - D-Link DWR-512 | User Manual - Page 81
of networking products. D-Link delivers the performance you need at a price you can afford. D-Link has all the products (AP) connects computers to the network. The access point has a small antenna attached to it, which allows it to transmit data back and forth over D-Link DWR-512 User Manual 76 - D-Link DWR-512 | User Manual - Page 82
popular in recent years that almost everyone is using it, whether it's for home, office, business, D-Link has a wireless solution for it. Home • Gives everyone at home broadband access • Surf the web, printer with multiple computers • No need to dedicate office space D-Link DWR-512 User Manual 77 - D-Link DWR-512 | User Manual - Page 83
quite a task not knowing where to start. That's why we've put together a few setup steps and tips to help you through the process of setting up a wireless network. Tips feature on the router. Refer to product manual for detail information on how to set it up. D-Link DWR-512 User Manual 78 - D-Link DWR-512 | User Manual - Page 84
Access Point or wireless router. All the wireless devices, or clients, will connect to the wireless router or access point. An Ad-Hoc network contains only clients, such as laptops with wireless cardbus adapters. All the adapters must be in Ad-Hoc mode to communicate. D-Link DWR-512 User Manual 79 - D-Link DWR-512 | User Manual - Page 85
the IP address, subnet mask, and the default gateway of your adapter. If the address is 0.0.0.0, check your adapter installation, security settings, and the settings on your router. Some firewall software programs may block a DHCP request on newly installed adapters. D-Link DWR-512 User Manual 80 - D-Link DWR-512 | User Manual - Page 86
Default Gateway the same as the LAN IP address of your router (192.168.0.1). Set Primary DNS the same as the LAN IP address of your router (192.168.0.1). The Secondary DNS is not needed or you may enter a DNS server from your ISP. Step 5 Click OK twice to save your settings. D-Link DWR-512 User - D-Link DWR-512 | User Manual - Page 87
ƒƒ Network Address Translation (NAT) ƒƒ Stateful Packet Inspection (SPI) Antenna ƒƒ 1 External antenna Ports ƒƒ 4 x LAN (RJ-45) ƒƒ 1 x WAN (RJ-45) ƒƒ 1 x Phone (RJ-11) USIM Slot ƒƒ Standard 6-pin SIM card interface LED Status Indicators ƒƒ Status ƒƒ WPS ƒƒ WAN ƒƒ LAN ƒƒ WLAN ƒƒ 2G ƒƒ 3G ƒƒ SMS - D-Link DWR-512 | User Manual - Page 88
Humidity ƒƒ 10% to 90% (Non-condensing) Certifications ƒƒ CE ƒƒ FCC 1 Supported frequency band is dependent upon regional hardware version. 2 Maximum wireless signal rate derived data throughput rate. Environmental factors will adversely affect wireless signal range. D-Link DWR-512 User Manual 83
-
 1
1 -
 2
2 -
 3
3 -
 4
4 -
 5
5 -
 6
6 -
 7
7 -
8
-
9
-
10
-
11
-
12
-
13
-
14
-
15
-
16
-
17
-
18
-
19
-
20
-
21
-
22
-
23
-
24
-
25
-
26
-
27
-
28
-
29
-
30
-
31
-
32
-
33
-
34
-
35
-
36
-
37
-
38
-
39
-
40
-
41
-
42
-
43
-
44
-
45
-
46
-
47
-
48
-
49
-
50
-
51
-
52
-
53
-
54
-
55
-
56
-
57
-
58
-
59
-
60
-
61
-
62
-
63
-
64
-
65
-
66
-
67
-
68
-
69
-
70
-
71
-
72
-
73
-
74
-
75
-
76
-
77
-
78
-
79
-
80
-
81
-
82
-
83
-
84
-
85
-
86
-
87
-
88
 |
 |