DELPHI SA10035 User Guide
DELPHI SA10035 - Roady XM Satellite Radio Receiver Manual
 |
UPC - 689604153925
View all DELPHI SA10035 manuals
Add to My Manuals
Save this manual to your list of manuals |
DELPHI SA10035 manual content summary:
- DELPHI SA10035 | User Guide - Page 1
SA10035 User Guide Satellite Radio Receiver - DELPHI SA10035 | User Guide - Page 2
IMPORTANT: The FCC and FAA have not certified the Delphi XM Roady Satellite Radio Receiver for use in any aircraft (neither portable nor permanent installation). Therefore, Delphi cannot support this type of application or installation. - DELPHI SA10035 | User Guide - Page 3
3 Welcome Thank you for purchasing a Delphi XM® Roady™ Satellite Radio Receiver. Your Roady Receiver gives you access to over 100 XM Satellite Radio channels of music, news, and information.* Your Roady Receiver must be used with the enclosed connecting devices to ensure maximum performance and - DELPHI SA10035 | User Guide - Page 4
technologies. Delphi has a broad portfolio of products to answer a wide variety of information and entertainment needs. About XM One big idea can change everything. And XM Satellite Radio is one big idea: Radio to the Power of X®. America's most popular satellite radio service gives you the power to - DELPHI SA10035 | User Guide - Page 5
Selection 10 Save and Recall 12 Section 4 Menu Commands and Settings 13 Section 5 Installation Roady Kit Set-up 15 Roady Receiver Installation 17 XM Antenna Set-up 20 Section 6 Reference Taking Care of Your Roady 24 Troubleshooting 25 Contacting Customer Service 28 Section 7 Warranty 29 - DELPHI SA10035 | User Guide - Page 6
To quickly begin enjoying Delphi XM Satellite Radio, follow these simple steps: 1. Set up your Roady Receiver using the installation instructions in Section 5 of this guide (see page 15) or with the help of a professional installer. 2. Press the power button to turn the Roady Receiver on and verify - DELPHI SA10035 | User Guide - Page 7
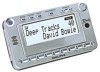
Section 2 7 Roady Receiver Roady Display Screen While tuned to an XM channel, the Roady default display contains information about that channel and the Roady settings. See figure 1. Your Roady display can be customized. See the Basic Operations section, beginning on page 10. Signal-strength - DELPHI SA10035 | User Guide - Page 8
Section 2 8 Roady Controls Power button Control keys Category search Number keys Tuning Wheel (inset on corner of unit) Infrared lens Figure 2. Roady Receiver. - DELPHI SA10035 | User Guide - Page 9
buttons, a Tuning Wheel, and 10 number keys. Turns the Roady Receiver on or off. display The display button toggles between three display . Press Menu to select and change receiver configuration options. menu Pressing Menu when in menu mode will allow the user to back out to the previous level - DELPHI SA10035 | User Guide - Page 10
/direct until the display says "Direct." 2. Enter channel number using the number keys, i.e., 5 + 0 for Channel 50. Set/select channel presets Your Roady Receiver can store up to 30 preset channels. They are organized into three different groups (Preset A, Preset B, and Preset C), each with 10 - DELPHI SA10035 | User Guide - Page 11
receiver will beep to indicate that the preset is registered. 4. Pressing a number key in preset mode without having saved a number to that preset will cause the Roady select channels using the Tuning Wheel You can use your Roady to preview the XM channel lineup, see what is currently playing, and - DELPHI SA10035 | User Guide - Page 12
Section 3 12 Select a channel by category Press either of the category keys category to enter category search. 1. Continue pressing one of the category keys category until a category you are interested in appears. 2. Use the Tuning Wheel to display a channel within the given category. 3. Press the - DELPHI SA10035 | User Guide - Page 13
your car. Most users will NOT need to change this level from the factory setting. This is not a volume control. You should set the volume using the audio system connected to your Roady Receiver. Contrast This control allows you to adjust the contrast of your display. Auto-On Once you have installed - DELPHI SA10035 | User Guide - Page 14
Auto-Off You can set your radio to automatically shut off 60, 120, or 180 minutes after it is turned on. This feature should be used if your vehicle continues to power the cigarette lighter/auxiliary power after you remove your key, so if you leave it on, Roady will shut down automatically after the - DELPHI SA10035 | User Guide - Page 15
does not have a preview mode when this feature is active. Installation Roady Kit Set-up Your Roady Kit contains the following components: Car mount XM Antenna 12V power adaptor Cassette audio adaptor Your kit also includes: • Car mount bracket • Extra adhesive pad • Surface preparation cleaning - DELPHI SA10035 | User Guide - Page 16
. Cassette Adaptor For vehicles with a built-in cassette player, using the cassette adaptor for audio is the most popular solution. FM Modulator For a more professional-looking installation, an additional FM modulator installation kit can be purchased from Delphi. See www.delphi.com or your retailer - DELPHI SA10035 | User Guide - Page 17
Modulator* Many late model cars do not come with built-in cassette players. These Roady users may purchase an optional wireless FM modulator that sends the audio signal through the vehicle's existing FM antenna. Roady Receiver Installation Your Roady Receiver can be installed as follows: 1. First - DELPHI SA10035 | User Guide - Page 18
Section 5 18 3. Clean the vehicle mounting surface with the enclosed surface preparation cleaning kit. Wipe with the towelette in only for maximum adhesion. 6. Clip the Roady Receiver onto the car mount (figure 5). To vehicle dashboard Figure 5. Attach car mount to back of Roady Receiver as shown. - DELPHI SA10035 | User Guide - Page 19
as in step 1, inserting cassette audio adaptor into the vehicle's cassette deck and the 12V power adaptor into the cigarette lighter. 8. Attach the antenna as explained on page 20. Removing car mount from your dashboard You can remove the car mount from your dashboard by taking the following steps - DELPHI SA10035 | User Guide - Page 20
20 Section 5 XM Antenna Set-up Antenna Installation • Best reception is achieved with the antenna mounted on the metal surface of the vehicle roof in the center of an area with at least 12" x 12" of surface area and a minimum of 6" from a window or sunroof. Figure 6 shows three - DELPHI SA10035 | User Guide - Page 21
damage. • For antenna mounting locations at the front or middle of the roof, the cable can be routed down along the door jamb and into the vehicle. In some vehicles, the cable may be brought into the vehicle through the grommet in the door jamb which carries the power window and power lock wires. If - DELPHI SA10035 | User Guide - Page 22
mounting locations at the rear of the roof, the antenna cable can be routed into the vehicle through the trunk, as shown in figure 8. Always . • Use pre-existing wiring channels created by the vehicle manufacturer whenever possible. Rear Mounting Option Figure 8. Route XM Antenna wiring as shown. - DELPHI SA10035 | User Guide - Page 23
23 Final installation Verify that the antenna is in its final desired position. The antenna contains a powerful magnet that will secure the antenna to a metal roof under normal driving conditions. - DELPHI SA10035 | User Guide - Page 24
Section 6 24 Reference Taking Care of Your Roady (Failure to follow these instructions may result in personal injury or damage to your Roady Receiver or to your vehicle.) Important: • Use only a soft, dry cloth to clean the outside of your Roady and any peripherals. • Do not use any solvents, - DELPHI SA10035 | User Guide - Page 25
25 Troubleshooting Your Roady Receiver is designed and built to provide you with troublefree performance without the need for service. If it does not appear to be functioning correctly, please follow these troubleshooting steps: 1. Make sure all connectors are properly attached. 2. Make sure the - DELPHI SA10035 | User Guide - Page 26
an indoor garage. If the problem persists, make sure your antenna is mounted outside and on top of your car with a clear view of the sky. ANTENNA Make sure antenna is correctly attached to the receiver and that antenna cable is undamaged and free from kinks. Turn the Roady Receiver off and back on - DELPHI SA10035 | User Guide - Page 27
Settings: Audio Level" on page 13. Verify that you are authorized to receive that channel as part of your subscription with XM and that you have not asked XM to block that channel on your Roady unit. Nothing is wrong with your receiver. This is normal on many talk and news channels where there is - DELPHI SA10035 | User Guide - Page 28
Time Customer Service and Technical Support is also available at www.delphi.com. Technical Information Dimensions Roady Receiver 3.97 in. W x 2.37 in. H x 1 in. D (101 mm x 61 mm x 25.4 mm) Weight Roady Receiver 5.1 oz. (144.6 g) Inputs/Outputs Antenna RF SMB connector Power P13 connector - DELPHI SA10035 | User Guide - Page 29
Warranty Delphi Product and Service Solutions ("Delphi") warrants all XM Satellite Radio Products sold by Delphi ("Products") to be free of defects in material and workmanship, subject to the following conditions. The duration of Delphi's warranty with respect to Delphi XM Satellite Radio Products - DELPHI SA10035 | User Guide - Page 30
daytime phone number where you can be reached. If further clarification or additional information is required from Delphi, you may call Delphi at 1.877.GO DELPHI (1.877.463.3574). If warranty service is needed at any time during the warranty period, the purchaser will be required to furnish a sales - DELPHI SA10035 | User Guide - Page 31
- DELPHI SA10035 | User Guide - Page 32
Delphi Corporation 1441 West Long Lake Road Troy, Michigan 48098-5090 U.S.A. Customer Service: [1] 877.GO DELPHI www.delphi.com The Roady name, XM name, and related logos are trademarks of XM Satellite Radio Inc. Printed on Recycled Paper ©2003 Delphi Corporation. All rights reserved. DPSS-03-E-049
-
 1
1 -
 2
2 -
 3
3 -
 4
4 -
 5
5 -
 6
6 -
 7
7 -
8
-
9
-
10
-
11
-
12
-
13
-
14
-
15
-
16
-
17
-
18
-
19
-
20
-
21
-
22
-
23
-
24
-
25
-
26
-
27
-
28
-
29
-
30
-
31
-
32
 |
 |

Satellite
Radio
Receiver
User
Guide
SA10035