DELPHI SA10085 User Guide - Page 20
tion cleaning kit. Wipe with the towelette in only one direction. Do
 |
UPC - 689604157787
View all DELPHI SA10085 manuals
Add to My Manuals
Save this manual to your list of manuals |
Page 20 highlights
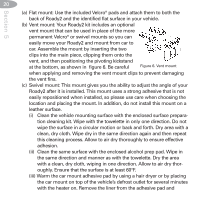
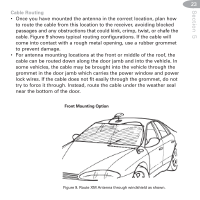
Section 5 20 (a) Flat mount: Use the included Velcro® pads and attach them to both the back of Roady2 and the identified flat surface in your vehicle. (b) Vent mount: Your Roady2 kit includes an optional vent mount that can be used in place of the more permanent Velcro® or swivel mounts so you can easily move your Roady2 and mount from car to car. Assemble the mount by inserting the two clips into the main piece, clipping them onto the vent, and then positioning the pivoting kickstand at the bottom, as shown in figure 6. Be careful Figure 6. Vent mount when applying and removing the vent mount clips to prevent damaging the vent fins. (c) Swivel mount: This mount gives you the ability to adjust the angle of your Roady2 after it is installed. This mount uses a strong adhesive that is not easily repositioned when installed, so please use care when choosing the location and placing the mount. In addition, do not install this mount on a leather surface. (i) Clean the vehicle mounting surface with the enclosed surface preparation cleaning kit. Wipe with the towelette in only one direction. Do not wipe the surface in a circular motion or back and forth. Dry area with a clean, dry cloth. Wipe dry in the same direction again and then repeat this cleaning process. Allow to air dry thoroughly to ensure effective adhesion. (ii) Clean the same surface with the enclosed alcohol prep pad. Wipe in the same direction and manner as with the towelette. Dry the area with a clean, dry cloth, wiping in one direction. Allow to air dry thoroughly. Ensure that the surface is at least 60°F. (iii) Warm the car mount adhesive pad by using a hair dryer or by placing the car mount on top of the vehicle's defrost outlet for several minutes with the heater on. Remove the liner from the adhesive pad and
-
 1
1 -
2
-
3
-
4
-
5
-
6
-
7
-
8
-
9
-
10
-
11
-
12
-
13
-
14
-
 15
15 -
 16
16 -
 17
17 -
 18
18 -
 19
19 -
 20
20 -
 21
21 -
 22
22 -
 23
23 -
 24
24 -
 25
25 -
26
-
27
-
28
-
29
-
30
-
31
-
32
 |
 |