DELPHI SA10201 User Guide
DELPHI SA10201 - Boom Box Audio System Manual
 |
UPC - 689604163528
View all DELPHI SA10201 manuals
Add to My Manuals
Save this manual to your list of manuals |
DELPHI SA10201 manual content summary:
- DELPHI SA10201 | User Guide - Page 1
Delphi Audio System & Installation Operation Guide - DELPHI SA10201 | User Guide - Page 2
Obey all safety messages that follow this symbol to avoid possible injury or death. Warning: To prevent fire or shock hazard, do not expose the Delphi Audio System to rain, with Canadian ICES-003. The Delphi XM® SKYFi2™ and roadyXT™ Satellite Radio Receiver each incorporate an FM transmitter - DELPHI SA10201 | User Guide - Page 3
What's in the Box 4 Setting up the Delphi Audio System 4 Using SKYFi/SKYFi2 with the Delphi Audio System 5 Using roadyXT with the Delphi Audio System 5 Using the Delphi Audio System with Batteries 6 Setting up the Antenna 6 Positioning the XM Antenna 6 Optimizing Antenna Position/Signal - DELPHI SA10201 | User Guide - Page 4
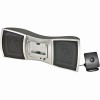
the Box Your Delphi Audio System Kit contains the following components: 12V DC adaptor Battery compartment and antenna cable storage 12V DC jack XM Antenna Setting up the Delphi Audio System Set up your Delphi Audio System by following these steps: 1. Connect the supplied 12V DC power adaptor - DELPHI SA10201 | User Guide - Page 5
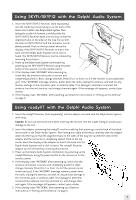
, and change channels again. If the message still appears, contact your retailer. 4. If the display reads "NO SIGNAL" after powering up, follow the instructions in "Setting up the Antenna" on page 6. Using roadyXT with the Delphi Audio System 1. Insert the roadyXT Receiver (sold separately) into the - DELPHI SA10201 | User Guide - Page 6
signal. In some cases, it will be possible to receive the XM signal through standard home walls or a roof. To position your antenna, first set up the Delphi Audio System as described in this guide. Next, position the antenna until you receive the strongest possible satellite signal. If the satellite - DELPHI SA10201 | User Guide - Page 7
antenna down flat against its base. 3. Position the antenna so that the XM logo is upside down, then place the antenna base against the back of the Delphi Audio System your antenna up, find a wall location that ensures a strong signal. It is recommended that you use an extension cord to temporarily - DELPHI SA10201 | User Guide - Page 8
an XM-approved extension kit (Delphi model number SA10006) with your receiver. Using the Delphi Audio System Once the Delphi Audio System is set up and the SKYFi/SKYFi2 or roadyXT Receiver installed, the complete setup can be controlled as described in the receiver's operating guide. Unique Delphi - DELPHI SA10201 | User Guide - Page 9
the Delphi Audio System. If audio system to a safe sound level before your hearing adapts supplied AC power adaptor is used. If you need to use another one, make sure it is a 12V, 1500mA DC adaptor with a unified polarity-type jack. • The satellite radio receiver is not disconnected from the AC power - DELPHI SA10201 | User Guide - Page 10
is no audio: • Unplug the satellite radio receiver from the Delphi Audio System and re-insert it. 3. Noise is heard coming through the Delphi Audio System: • Someone is using a portable telephone or other equipment that emits radio waves near the antenna (~2.3GHz). To solve this problem, move the - DELPHI SA10201 | User Guide - Page 11
>4.5K 8 Max noise ratio mV 3 5 9 Battery power range V 7~16 7.5~15 10 Dimensions in./mm 18 3/4" Delphi Limited Consumer Warranty (United States) Delphi Product and Service Solutions ("Delphi") warrants all XM Satellite Radio Products sold by Delphi with Delphi's written instructions, ( - DELPHI SA10201 | User Guide - Page 12
which is inconsistent with Delphi's written instructions, (iii) alteration or Service [1] 877.GO DELPHI www.delphi.com Printed on Recycled Paper ©2006 Delphi Corporation. All rights reserved. DPSS-06-E-103 The XM name, SKYFi, SKYFi2, roadyXT, and related logos are trademarks of XM Satellite Radio
-
 1
1 -
 2
2 -
 3
3 -
 4
4 -
 5
5 -
 6
6 -
 7
7 -
8
-
9
-
10
-
11
-
12
 |
 |

&
Delphi Audio System
Installation
Operation Guide