DELPHI SA50002 Installation Guide
DELPHI SA50002 - SKYFi Vehicle Kit Manual
 |
UPC - 689604153451
View all DELPHI SA50002 manuals
Add to My Manuals
Save this manual to your list of manuals |
DELPHI SA50002 manual content summary:
- DELPHI SA50002 | Installation Guide - Page 1
Kit Set-up 1 XM Home Antenna Set-up 3 SKYFi Vehicle Kit Set-up 7 SKYFi Car Cradle Installation 9 XM Vehicle Antenna Installation 14 Warning: This manual and the SKYFi Operating Guide contain important safety and operating information. Please read and follow the instructions in these manuals - DELPHI SA50002 | Installation Guide - Page 2
1 SKYFi Home Kit Set-up Your SKYFi™ Home Kit contains the following components: SKYFi Home Stand 6V A/C power adaptor XM® High-gain Home Antenna Audio cable Figure 1. SKYFi Home Kit components. Set up your SKYFi Home Kit as follows: 1. Connect the ministereo (black connector) end of the - DELPHI SA50002 | Installation Guide - Page 3
, reconnect the antenna, turn the unit back on, and change channels again. If the message still appears, contact your retailer. 3 1 Figure 2. Connect accessories to your SKYFi Home Stand as shown. 2 2 - DELPHI SA50002 | Installation Guide - Page 4
signal. A higher-resolution signal-strength indicator screen is available to allow you to optimally aim your XM Antenna. To access and use this screen: 1. Press the menu button on the SKYFi Receiver and select the "Antenna Aiming" option. A screen similar to figure 4 will appear. 2. Adjust the - DELPHI SA50002 | Installation Guide - Page 5
return to The antenna that comes with the SKYFi home system as described earlier in this the normal play screen. Home Kit is a high-gain antenna that can installation guide. Next, position the anten- receive XM's signal from one of XM's na until you receive the strongest possible satellites - DELPHI SA50002 | Installation Guide - Page 6
your antenna at the satellite: a 50-foot cable extension (Delphi model number SA10006) from your SKYFi retailer. 2. Attach four screws to the wall using the screw is firmly secured. Note that cord to temporarily locate your SKYFi the XM logo will be upside down when Your antenna comes with 20 - DELPHI SA50002 | Installation Guide - Page 7
mm) are specially chosen and attached at the factory to ensure that they will work with XM's unique frequency band. Use an XM- approved extension kit (Delphi model number SA10006) with your SKYFi system. Failure to do so could damage the unit. 1.4 in (35 mm) Figure 5. Photocopy this diagram - DELPHI SA50002 | Installation Guide - Page 8
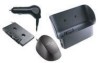
7 SKYFi Vehicle Kit Set-up Your SKYFi Vehicle Kit contains the following components: SKYFi Car Cradle Car cradle mount Cassette audio adaptor Nokia®-style button mount converter Figure 6. SKYFi Vehicle Kit components. XM Vehicle Antenna 12V power adaptor Remote control visor clip kit Your - DELPHI SA50002 | Installation Guide - Page 9
Hooking up your SKYFi Car Cradle 8 Figure 7. Connect accessories to your SKYFi Car Cradle as shown. - DELPHI SA50002 | Installation Guide - Page 10
Cradle Installation user as well as access to the cassette play- 3. Clean the vehicle mounting surface with Using the enclosed car cradle mount Your SKYFi Vehicle Kit comes with a car cradle mount, which can be installed as follows: 1. First, attach all of the components as shown in figure 7 (page - DELPHI SA50002 | Installation Guide - Page 11
5. Warm the cradle mount adhesive pad by You can also mount the SKYFi Car Cradle 10 using a hair dryer or by placing the cra- directly to your dashboard without using dle mount on top of the vehicle's defrost the car cradle mount by using the enclosed outlet for several minutes with the heater - DELPHI SA50002 | Installation Guide - Page 12
heat gun or paint-stripping gun. This could result in damage to the unit or to your vehicle. a 90-degree angle. Avoid using sharp 3. If any adhesive remains on the dash- tools that could damage the car interior. board surface, the adhesive can easily be removed by rubbing your thumb or finger - DELPHI SA50002 | Installation Guide - Page 13
mounts. Use the Nokia-style button mount converter • AMPS-compatible mounts. The back of 12 the SKYFi Car Cradle has a four-hole work with many different styles of readily included in the SKYFi Vehicle Kit to con- pattern that allows it to be connected to available third-party cell phone, PDA - DELPHI SA50002 | Installation Guide - Page 14
13 • Custom brackets. Pro.Fit International Installing the visor clip on your SKYFi Vehicle Specific Mounts™ (VSMs) are avail- Remote Control able for most vehicle types to give your Your SKYFi Vehicle Kit comes with a visor installation a more integrated look. The VSMs clip to allow you to - DELPHI SA50002 | Installation Guide - Page 15
with or are unsure of these procedures, please seek the services of a professional car audio installer. • Temporarily mount the antenna on top of your vehicle (make sure the vehicle surface is clean to prevent scratching it). • Re-dock SKYFi in its cradle. With power connected, check to see if - DELPHI SA50002 | Installation Guide - Page 16
is an alternative for hard- or soft-top convertibles with nonmetallic rooftops. Figure 10. The design flexibility of your XM Vehicle Antenna allows mounting on many types of vehicles. Trunk mounting of the antenna is an alternative for hard- or soft-top convertibles with nonmetallic rooftops. - DELPHI SA50002 | Installation Guide - Page 17
• To ease routing of the cable, the antenna connector may be removed by pushing • Use pre-existing wiring channels created by 16 the vehicle manufacturer whenever feasible. location to the receiver, avoiding blocked down on the tab marked "PUSH" and passages and any obstructions that could - DELPHI SA50002 | Installation Guide - Page 18
adhesive pad included in the SKYFi Vehicle Kit can be used to create a more permanent mount. Follow the surface preparation instructions on pages 9 and 10. or drinks near the SKYFi Receiver. Spilling food or drinks into the unit could damage it. Figure 11. Route XM Vehicle Antenna wiring as - DELPHI SA50002 | Installation Guide - Page 19
cause undesired operation. length is needed, purchase a TERK® XM 15-foot cable extension kit (TERK model # Changes or modifications not expressly TRK-SREXT). approved by Delphi could void the user's 5. When you reach the SKYFi Car Cradle, authority to operate this equipment. verify that the - DELPHI SA50002 | Installation Guide - Page 20
Delphi Corporation 1441 West Long Lake Road Troy, Michigan 48098-5090 U.S.A. Customer Service: [1] 877.GO DELPHI www.delphi.com Printed on Recycled Paper ©2003 Delphi Corporation. All rights reserved. DPSS-03-E-036 The SKYFi name, XM name, and related logos are trademarks of XM Satellite Radio Inc.
-
 1
1 -
 2
2 -
 3
3 -
 4
4 -
 5
5 -
 6
6 -
 7
7 -
8
-
9
-
10
-
11
-
12
-
13
-
14
-
15
-
16
-
17
-
18
-
19
-
20
 |
 |

Guide
Installation
SKYFi
™
Radio to the power of X
™
Home and Vehicle Kits
Contents:
SKYFi Home Kit Set-up· · · · · · · · · · · · · · · · · · · · · · 1
XM Home Antenna Set-up· · · · · · · · · · · · · · · · · · 3
SKYFi Vehicle Kit Set-up · · · · · · · · · · · · · · · · · · · · 7
SKYFi Car Cradle Installation · · · · · · · · · · · · · · · · 9
XM Vehicle Antenna Installation · · · · · · · · · · · · · 14
Warning:
This manual and the
SKYFi Operating Guide
contain important
safety and operating information. Please
read and follow the instructions in these
manuals. Failure to do so could result in
personal injury or damage to your SKYFi
or to your vehicle.