DIRECTV HR21 Quick Start Guide
DIRECTV HR21 Manual
 |
View all DIRECTV HR21 manuals
Add to My Manuals
Save this manual to your list of manuals |
DIRECTV HR21 manual content summary:
- DIRECTV HR21 | Quick Start Guide - Page 1
Quick Start Guide Network Your DIRECTV Plus® HD DVR - DIRECTV HR21 | Quick Start Guide - Page 2
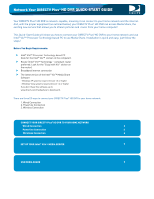
Network Your DIRECTV Plus®HD DVR QUICK-START GUIDE Your DIRECTV Plus® HD DVR is network-capable, meaning it can connect to your home network and the internet. And, with the proper equipment (as outlined below), your DIRECTV Plus® HD DVR can access Media Share, the exciting new service that allows - DIRECTV HR21 | Quick Start Guide - Page 3
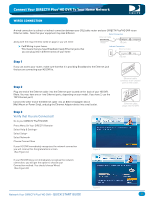
Connected! Go to your DIRECTV Plus®HD DVR: Press Menu On Your DIRECTV Remote> Select Help & Settings> Select Setup> Select Network> Choose Connect Now If your HD DVR immediately recognizes the network connection you will receive this Congratulations screen. (See Figure A.) Figure A If your HD DVR - DIRECTV HR21 | Quick Start Guide - Page 4
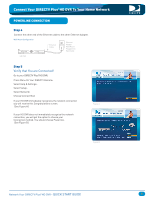
DIRECTV Plus®HD DVR, connect another Ethernet cable into the back of your DIRECTV Plus®HD DVR. (Note: You may have one or two Ethernet ports, depending on your model. If you have 2, use the TOP Ethernet port.) Ethernet cable plugs into HD DVR. Network Your DIRECTV Plus®HD DVR - QUICK START GUIDE - DIRECTV HR21 | Quick Start Guide - Page 5
are Connected! Go to your DIRECTV Plus®HD DVR: Press Menu On Your DIRECTV Remote> Select Help & Settings> Select Setup> Select Network> Choose Connect Now If your HD DVR immediately recognizes the network connection you will receive this Congratulations screen. (See Figure A.) If your HD DVR does - DIRECTV HR21 | Quick Start Guide - Page 6
are Connected! Go to your DIRECTV Plus®HD DVR: Press Menu On Your DIRECTV Remote> Select Help & Settings> Select Setup> Select Network> Choose Connect Now If your HD DVR immediately recognizes the network connection you will receive this Congratulations screen. (See Figure A.) If your HD DVR does - DIRECTV HR21 | Quick Start Guide - Page 7
, you can verify that your DIRECTV Plus®HD DVR is connected at any time. Step 1 The first step in preparing your home computer for the Intel® Viiv™ experience is to set up the Intel® Viiv™ Technology. Double-click on the Intel® Viiv™ icon at the bottom-right corner of the screen to display the Intel - DIRECTV HR21 | Quick Start Guide - Page 8
that it is Unknown. You can confirm that it is your DIRECTV Plus® HD DVR by comparing the IP Address on the screen with the IP Address that is displayed in the "Advanced Setup" screen in your DIRECTV Plus® HD DVR "Network Setup" menu. Select the "Unknown" device. Step 4 Follow the steps to approve - DIRECTV HR21 | Quick Start Guide - Page 9
your TV screen to confirm the connection. Press the SELECT button on the remote to select CONTINUE. Step 3 Press the MENU button on the remote control again to display the MENU, then select "Music & Photos". The Media Share screen will display. Network Your DIRECTV Plus®HD DVR - QUICK START GUIDE - DIRECTV HR21 | Quick Start Guide - Page 10
can also select your favorite XM Music Channel. Your favorite music will play as you watch your TV or view photos from your Intel®Viiv™ Processor Technology-based PC. Step 5 Once the desired songs are and you can see several photos at once! Network Your DIRECTV Plus®HD DVR - QUICK START GUIDE 10 - DIRECTV HR21 | Quick Start Guide - Page 11
a party and show your friends your favorite digital photos on the big screen! Step 8 Pressing the yellow button on your remote control toggles control between music and photos or video. Pressing the stop the video from the current channel. Network Your DIRECTV Plus®HD DVR - QUICK START GUIDE 11
-
 1
1 -
 2
2 -
 3
3 -
 4
4 -
 5
5 -
 6
6 -
 7
7 -
8
-
9
-
10
-
11
 |
 |

Quick Start Guide
Network Your
DIRECTV Plus
®
HD DVR