Danby DAC12010E Product Manual
Danby DAC12010E Manual
 |
View all Danby DAC12010E manuals
Add to My Manuals
Save this manual to your list of manuals |
Danby DAC12010E manual content summary:
- Danby DAC12010E | Product Manual - Page 1
l'utilisation initiale de ce produit. AIR CONDITIONER Owner's Use and Care Guide • Welcome • Part Identification • Important Safety Information • Installation • Operating Instructions • Care and Maintenance • Troubleshooting • Warranty 1 - 10 CLIMATISEUR Guide d'utilisation et soins de Propri - Danby DAC12010E | Product Manual - Page 2
for choosing a Danby Room Air Conditioner to cool your home. This Owner's Use and Care Guide will provide you with valuable information necessary for the proper care and maintenance of your new appliance. If properly maintained, your Danby appliance will give you many years of trouble free operation - Danby DAC12010E | Product Manual - Page 3
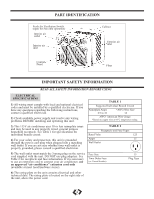
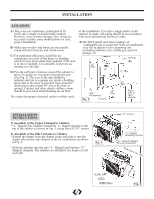
any wiring problems BEFORE installing and operating this unit. TABLE 1 Suggested Individual Branch Circuit Nameplate Amps 4.9 to 10 *AWG Wire Size 14 AWG- American Wire Gauge *Based on copper wire at 60°C temperature rating. 3) This 115V air conditioner uses 10 or less nameplate amps and may - Danby DAC12010E | Product Manual - Page 4
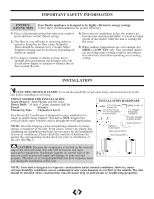
installing or servicing. TOOLS NEEDED FOR INSTALLATION: Screw Drivers: Both Phillips and flat head Power Drill: 1/8 inch (3.2mm) diameter drill bit Pencil Scissors Measuring Tape Carpenters Level Your Room Air Conditioner is designed for easy installtion in a single or double-hung window - Danby DAC12010E | Product Manual - Page 5
installation. B) Make sure window and frame are structurally sound and free from dry and rotted wood. C) For maximum efficiency, install the air conditioner or other obstacle INSTALLATION INSTRUCTIONS 1) Assembly of the Upper Channel to Cabinet. • "L" Shaped Top Channel: Install the "L" shaped - Danby DAC12010E | Product Manual - Page 6
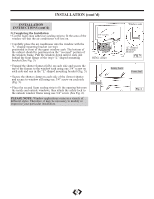
INSTALLATION (cont'd) INSTALLATION INSTRUCTIONS (cont'd) Window sash 3) Completing the Installation • Cut the foam (non adhesive) sealing strip to fit the area of the window sill that the air conditioner will rest on. 3/4" screws • Carefully place the air conditioner into the window with the - Danby DAC12010E | Product Manual - Page 7
INSTRUCTIONS Timer On/Off settings in 30min./1hr. increments. Note: This appliance allows you select the temperature scale to be displayed in either . 5) The time you selected will appear in the LED display. While the Air Conditioner is on (Auto-Off): 1) Press the Auto-Timer button twice and the - Danby DAC12010E | Product Manual - Page 8
OPERATING INSTRUCTIONS REMOTE CONTROL FEATURES Electronic Display: Displays the following information: A: Remote (AAA) following the same orientation (polarity) depicted inside the battery chamber (+/-). 3) Re-install rear cover. 4) If the remote control will not be used for extended periods of time - Danby DAC12010E | Product Manual - Page 9
filter may be vacuumed or washed by hand in warm water. Dry thoroughly before re-installing. 4) Store (covered) air conditioner in a dry location. CAUTION: When installing and/or removing the air conditioner from the window, ensure that caution is taken to prevent it from falling backward. It is - Danby DAC12010E | Product Manual - Page 10
troubleshooting guide for a possible solution. If the unit continues to operate improperly, call an authorized service depot or Danby's Toll Free Number for assistance: 1-800-26- (1-800-263-2629) PROBLEM POSSIBLE CAUSE SOLUTION 1) Air conditioner installed on an angle for water to drain - Danby DAC12010E | Product Manual - Page 11
climatiseur vous donnera de nombreuses années d'utilisation sans problème. Pour éviter toute difficulté d'installation, veuillez lire les présentes instructions, complètement, avant d'installer renseignements si vous contactez un représentant du Service à la clientèle. Numéro de modèle: Numéro - Danby DAC12010E | Product Manual - Page 12
instructions ci-dessous, contactez un électricien qualifié. 2) Vérifiez la fourniture d'alimentation électrique disponsible et résolvez tout problème de câblage AVANT d'installer et de faire fonctionner cet appareil. 3) Ce climatiseur à 115V utilise 10 amp le cordon de service fourni avec l'appareil - Danby DAC12010E | Product Manual - Page 13
froides, placer le climatiseur hors de service et utiliser le MODE DE VENTILATEUR à la position HAUTE, MOYENNE ou BAS. Ceci fait circuler l'air à l'intérieur de la pièce pour fournir un certain confort de climatisation en utilisant moins d'électricité. INSTALLATION RISQUE DE CHOC ÉLECTRIQUE - Danby DAC12010E | Product Manual - Page 14
air. E) Assurez-vous que la prise électrique appropriée se trouve à la portée de l'installation. N'utilisez qu'un circuit à prise unique calculé à 15 amp , mur ou autre obstacle INSTRUCTIONS D'INSTALLATION 1) Montage de canaux sup dans les support de volets sur le canal latéral du climatiseur comme - Danby DAC12010E | Product Manual - Page 15
INSTALLATION (suite) INSTRUCTIONS D'INSTALLATION (suite) Cadre de la fenêtre 3) Pour compléter l'installation • Coupez la lisière à calfeutrer en mousse (non adhésif) pour qu'elle se fixe adéquatement au dessous du bas du cadre de la fenêtre. Vis de 3/4 po • Placez le climatiseur 5. Support de - Danby DAC12010E | Product Manual - Page 16
rifiez le Filtre: L'afficheurau-dessus du bouton s'allumine pour indiquer le filtre à air doit être nettoyé (voir la page 20). Une fois que le filtre . 5) L'heure réglée apparaîtra sur l'affichage. Quand le Climatiseur est en service (Arrêt Auto); 1) Appuyer sur la touche Minutrie deux fois et - Danby DAC12010E | Product Manual - Page 17
se sépare complètement de l'unité. 2) Insérer deux (2) piles (AAA) en observant la polarité indiquée dans le compartiment des piles (+/-). 3) Réinstaller le couvercle. 4) Si la télécommande ne sera pas utilisée pour des périodes prolongées (vacances, etc.), les piles devraient être retirées de la - Danby DAC12010E | Product Manual - Page 18
est bouché par de la poussière, la circulation d'air est obstruée et perd de son efficacité. Le filtre à air doit être nettoyé toutes les 2 semaines. MISE EN GARDE: N'oubliez PAS d'installer le filtre à air. Si on fait fonctionner le climatiseur sans filtre à air, la poussière n'est pas éliminée de - Danby DAC12010E | Product Manual - Page 19
être nécessaire. Employez ce guide de dépannage pour une solution possible. Si l'unité continue à fonctionner incorrectement, demandez un dépôt autorisé de service ou le numéro de appel sans frais Danby pour l'aide à: 1-800-26- (1-800-263-2629) PROBLEME 1) Le climatiseur ne veut pas fonctionner - Danby DAC12010E | Product Manual - Page 20
• Modèle DAC8010E, DAC10010E, DAC12010E For service, contact your nearest service depot or call: 1-800-26(1-800-263-2629) to recommend a depot in your area. AIR CONDITIONER The model number can be found on the serial plate located on the back panel of the unit. All repair parts are available for
-
 1
1 -
 2
2 -
 3
3 -
 4
4 -
 5
5 -
 6
6 -
 7
7 -
8
-
9
-
10
-
11
-
12
-
13
-
14
-
15
-
16
-
17
-
18
-
19
-
20
 |
 |

Owner’s Use and Care Guide
Guide d’utilisation et soins de Propriètaire
Model • Modèle
DAC8010E, DAC10010E, DAC12010E
Danby Products Ltd, Guelph, Ontario Canada N1H 6Z9
Danby Products Inc, Findlay, Ohio USA 45840
V1.12.09 JF
KEEP THESE INSTRUCTIONS FOR FUTURE REFERENCE:
If the air conditioner changes ownership, be sure this manual accompanies the unit.
CONSERVER CES INSTRUCTIONS POUR CONSULTATION ULTÉRIEURE:
En cas de revente du climatiseur, ce manuel doit être inclus avec l’appareil.
CAUTION:
Read and follow all
safety rules and
operating instructions
before first use
of this product.
MISE EN GARDE :
Veuillez lire
attentivement les
consignes de sécurité
et les directives
d'utilisation avant
l'utilisation initiale de
ce produit.
AIR CONDITIONER
Owner’s Use and Care Guide
. . . . . . . . . . . . . . . . . . . . . . . . . . . . . . . . . . . . . . . . . .
1 - 10
• Welcome
• Part Identification
• Important Safety Information
• Installation
• Operating Instructions
• Care and Maintenance
• Troubleshooting
• Warranty
CLIMATISEUR
Guide d’utilisation et soins de Propriètaire
. . . . . . . . . . . . . . . . . . . . . . . . . . . . . . . 11 - 20
• Bienvenue
• Consignes de Sécurité Importantes
• Installation
• Consignes d’utilisation
• Soins et Entretien
• Dépannage
• Garantie