Danby DAC15009EE Product Manual
Danby DAC15009EE Manual
 |
View all Danby DAC15009EE manuals
Add to My Manuals
Save this manual to your list of manuals |
Danby DAC15009EE manual content summary:
- Danby DAC15009EE | Product Manual - Page 1
the air conditioner changes ownership, be sure this manual accompanies the unit. CONSERVER CES INSTRUCTIONS POUR CONSULTATION ULTÉRIEURE: En cas de revente du climatiseur, ce manuel doit être inclus avec l'appareil. Danby Products Ltd, PO Box 1778, Guelph, Ontario Canada N1H 6Z9 Danby Products Inc - Danby DAC15009EE | Product Manual - Page 2
SAFETY INFORMATION Electrical Specifications 3 Energy Saving Tips 4 FEATURES 5 Unit Control 5 Adjusting Air Flow 6 INSTALLATION Before Installing 6 Location 7 Window Mounting Instructions 7-9 CARE AND MAINTENANCE 10 TROUBLESHOOTING 11 Warranty 12 - Danby DAC15009EE | Product Manual - Page 3
you for choosing a Danby Air Conditioner to cool your home. This Owner's Use and Care Guide will provide you with valuable information necessary for the proper care and maintenance of your new appliance. If properly maintained, your Danby appliance will give you many years of trouble free operation - Danby DAC15009EE | Product Manual - Page 4
power supply and resolve any wiring problems BEFORE installing and operating this unit. 3) This 115V air conditioner uses 12.2 or less nameplate amps and may be used in any properly wired, general purpose household receptacle. See Table 1 for specifications for individual branch circuit. TABLE - Danby DAC15009EE | Product Manual - Page 5
new cord from the product manufacturer. NOTE: Some plugs have buttons on the top. ENERGYSAVING TIPS Your Danby appliance is designed to be drapes or curtains to obstruct the air flow around the unit. 4) Start your air conditioner before the outdoor air becomes hot and uncomfortable, to avoid - Danby DAC15009EE | Product Manual - Page 6
cooling is not desired, such as for room circulation or to exhaust stale air. Remember to open the vent during this function, but keep it closed . 8) Check Filter Button: This feature is a reminder to clean the Air Filter for more efficient operation. The LED (light) will illuminate after 250 - Danby DAC15009EE | Product Manual - Page 7
REMOTE CONTROL FEATURES 1 2 3 4 5 67 1) ON/OFF Button: Push this button to start/stop operation. 2) MODE selection button: Each time you push this button, a mode is selected (Auto, Cool, Dry, Heat, Fan). 3) ENERGY SAVER Button: This function is only available in COOL mode. Push this button - Danby DAC15009EE | Product Manual - Page 8
for anything that could block airflow; check area outside window for things such as shrubs, trees, or awnings. Inside, be sure furniture, drapes or blinds will not stop proper airflow. (See Fig. 2 pg. 7) • Carefully unpack air conditioner. Remove all packing material, and check for all included - Danby DAC15009EE | Product Manual - Page 9
the installation of your air conditioner. Please check the contents of hardware kit against the corresponding model check list, prior to installed where condensation run-off cannot drip on pedestrains or neighbouring properties. WINDOW MOUNTING 1 Remove Chassis: 1) Pull down front panel and remove - Danby DAC15009EE | Product Manual - Page 10
with internal packaging. This packaging must be removed prior to installing the air conditioner back into the cabinet. Fig. D Foam Inserts Fig. E show in Fig. F. 3 Assemble Window Filler Panels 1) Place cabinet on floor, a bench, or a table. 2) Slide the window filler panel frame into the top (L - Danby DAC15009EE | Product Manual - Page 11
any changes later. 3) Install support brackets (with sill anchor brackets attached) to correct hole in bottom of cabinet as shown in Fig. K. 4) Tighten all 6 bolts securely. Fig. J Anchor Fig. I Fig. K 6 Extend Window Filler Panels 1) Extend panels to fill window opening completely. Secure the - Danby DAC15009EE | Product Manual - Page 12
Excess water in or around the controls may cause damage to the air conditioner. WINTER STORAGE If you plan to store the air conditioner during the winter, remove it carefully from the window according to the installation instructions. Cover it with plastic or return it to the original carton. Always - Danby DAC15009EE | Product Manual - Page 13
may occur that is minor, and a service call may not be necessary. Use this troubleshooting guide for a possible solution. If the unit continues to operate improperly, call an authorized service depot or Danby's Toll Free Number for assistance. PROBLEM • Unit does not work POSSIBLE CAUSE • Power - Danby DAC15009EE | Product Manual - Page 14
É IMPORTANT Spécifications Électrique 15 Suggestions pour économiseur d'énergie 16 CARACTÉRISTIQUES Controle de l'unité 17 Reglage de débit d'air 18 INSTALLATION Avant l'installation 18 Endroit 19 Fixation dans la fenêtre 19-21 SOINS ET ENTRETIEN 22 DÉPANNAGE 23 - Danby DAC15009EE | Product Manual - Page 15
la maison, au chalet ou au bureau. Ce guide d'utiliser et soins de propriètaire vous offre des renseignements pratiques pour le soin et l'entretien de votre nouvel appareil. Un appareil Danby bien entretenu vous fournira plusieurs années de service sans ennui. Veuillez prendre quelques moments pour - Danby DAC15009EE | Product Manual - Page 16
SPECIFICATIONS ELECTRIQUE 1) Tous les câblages doivent être conformes aux codes électriques locaux et nationaux et doivent être installés par un électricien qualifié. Si vous avez la moindre question au suject des instructions 3 broches sur le cordon de service fourni avec l'appareil. N'utilisez PAS - Danby DAC15009EE | Product Manual - Page 17
enfoncé. Branchez et pressez la remise SUGGESTIONS POUR Votre appareil ménager Danby est conçu pour l'efficacité en économie de L'ÉCONOMIE DE l'é hors de restriction de la circulation d'air autour de l'unité par les draperies ou les rideaux. service et utiliser le MODE DE VENTILATEUR à - Danby DAC15009EE | Product Manual - Page 18
Check Filter) : Cette fonction vous rappelle de nettoyer le filtre à air pour assurer un fonctionnement plus efficace. Le voyant DEL s'allume au bout teindra. FONCTIONS SUPPLÉMENTAIRES : • Le circuit de refroidissement a un départ différé automatique de 3 minutes si l'appareil est éteint et rallumé - Danby DAC15009EE | Product Manual - Page 19
CARACTERISTIQUES (suite) LA TÉLÉCOMMANDE 1 2 3 4 5 67 1) Bouton Marche/Arrêt (ON/OFF): Pousser ce bouton pour commencer et arrêter l'opération 2) Bouton MODE: Chaque fois vous poussez ce bouton, un mode est choisi (Auto, Frais, Sec, Chaleur, Ventilateur). 3) Bouton Économiseur d'énergie ( - Danby DAC15009EE | Product Manual - Page 20
le mobilier, les rideaux ou les stores ne bloquent pas la circulation de l'air. (Voir Fig. 2 p. 19) • Déballez soigneusement le climatiseur. Enlevez et contre-écrou Boulon à tête plate de ¾ po de longueur et contre-écrou Support d'angle pour appui de fenêtre 4 chacun 2 chacun 2 Vis de blocage à - Danby DAC15009EE | Product Manual - Page 21
suffisamment d'espace libre autour du cabinet pour permettre une ample circulation d'air à travers l'appareil. Voir Fig. 2. L'arrière de l'appareil ou d'autres objets à l'intérieur de la pièce puissent bloquer le flux d'air. Obstacle latéral Sol Clôture, mur ou autre obstacle D) Assurez-vous que - Danby DAC15009EE | Product Manual - Page 22
inférieur de « U » de le cabinet fermement posé au-dessus du filon-couche de fenêtre. Réduisez la fenêtre temporairement derrière le dessus « L » support pour tenir le cabinet en place. 3) Décalez le cabinet laissé ou droit en tant que nécessaire d'aligner le centre du cabinet sur la ligne centrale - Danby DAC15009EE | Product Manual - Page 23
tel qu'illustré dans la Fig. J. Serrez à la main, mais de manière à ce que des changements puissent être apportés ultérieurement. 3) Installez les supports (sur lesquels les supports d'ancrage de l'appui de fenêtre sont fixés) dans le bon orifice dans le bas du caisson, tel qu'illustré dans la Fig - Danby DAC15009EE | Product Manual - Page 24
température est supérieure à 40°C (104°F) pour nettoyer le filtre à air. NETTOYAGE DU CAISSON • Assurez-vous de débrancher le climatiseur afin d'éliminer les , enlevez-le soigneusement de la fenêtre en suivant les instructions d'installation. Recouvrez-le d'une feuille de plastique ou remettez-le - Danby DAC15009EE | Product Manual - Page 25
pas être nécessaire. Employez ce guide de dépannage pour une solution possible. Si l'unité continue à fonctionner incorrectement, demandez un dépôt autorisé de service ou le numéro de appel sans frais Danby pour l'aide. PROBLEME • L'appareil ne fonctionne pas • L'air sortant de l'appareil ne semble - Danby DAC15009EE | Product Manual - Page 26
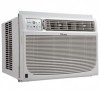
• Modèledelo DAC15009EE For service, contact your nearest service depot or call: 1-800-26(1-800-263-2629) to recommend a depot in your area. Air Conditioner The model number can be found on the serial plate located on the back panel of the unit. All repair parts available for purchase or special
-
 1
1 -
 2
2 -
 3
3 -
 4
4 -
 5
5 -
 6
6 -
 7
7 -
8
-
9
-
10
-
11
-
12
-
13
-
14
-
15
-
16
-
17
-
18
-
19
-
20
-
21
-
22
-
23
-
24
-
25
-
26
 |
 |

Owner’s Use and Care Guide
Guide d’utiliser et soins de propriètaire
Model • Modèle
DAC 15009EE
AIR CONDITIONER
Table of contents
. . . . . . . . . . . . . . . . . . . . . . . . . . . . . . . . . . . . . . . . . . . . .
1
CLIMATISEUR
Table des matières
. . . . . . . . . . . . . . . . . . . . . . . . . . . . . . . . . . . . . . . . . . .
13
Danby Products Ltd, PO Box 1778, Guelph, Ontario Canada N1H 6Z9
Danby Products Inc, PO Box
669, Findlay, Ohio USA 45839-0669
Version 1.1. 09 JF
CAUTION: Read and follow all safety rules and operating instructions before first use of this product.
MISE EN GARDE : Veuillez lire attentivement les consignes de sécurité et les directives d'utilisation avant
l'utilisation initiale de ce produit.
KEEP THESE INSTRUCTIONS FOR FUTURE REFERENCE: If the air conditioner changes ownership, be
sure this manual accompanies the unit.
CONSERVER CES INSTRUCTIONS POUR CONSULTATION ULTÉRIEURE: En cas de revente du
climatiseur, ce manuel doit être inclus avec l’appareil.