Danby DAC5200DB Product Manual
Danby DAC5200DB Manual
 |
View all Danby DAC5200DB manuals
Add to My Manuals
Save this manual to your list of manuals |
Danby DAC5200DB manual content summary:
- Danby DAC5200DB | Product Manual - Page 1
• Owner's Use and Care Guide • Guide d'utilisation et d'entretien AIR CONDITIONER CLIMATISEUR Model • Modèle • DAC5200DB Danby Products Limited, Ontario, Canada N1H 6Z9 Danby Products Inc., Findlay, Ohio, USA 45840 V1 11.10 DM - Danby DAC5200DB | Product Manual - Page 2
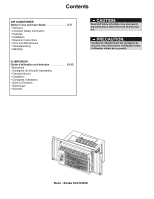
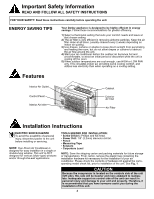
Contents AIR CONDITIONER Owner's Use and Care Guide 2-17 • Welcome • Important Safety Information • Features • Installation • Operation Instructions • Care and Maintenance • Troubleshooting • Warranty CAUTION: Read and follow all safety rules and operating instructions before first use of this - Danby DAC5200DB | Product Manual - Page 3
's Use and Care Guide will provide you with valuable information necessary for the proper care and maintenance of your new appliance. If properly maintained, your Danby appliance will give you many years of trouble free operation. Please take a few moments to read the instructions thoroughly and - Danby DAC5200DB | Product Manual - Page 4
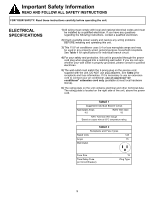
electrician. If you have any questions regarding the following instructions, contact a qualified electrician. 2) Check available power supply and resolve any wiring problems BEFORE installing and operating this unit. 3) This 115V air conditioner uses 5.4 or less nameplate amps and may be used - Danby DAC5200DB | Product Manual - Page 5
Outlet Control Panel Interior Air Inlet Cabinet Exterior Air Inlet Air FIlter Installation Instructions ELECTRIC SHOCK HAZARD To avoid the possibility of personal injury, disconnect power to the unit before installing or servicing. NOTE: Your Room Air Conditioner is designed for easy installtion - Danby DAC5200DB | Product Manual - Page 6
Safety Lock (1) "L" Shaped mounting bracket (1) * Factory installed on some models Adhesive Foam Seal(1) Sash bracket (2) Side Curtain RH (1) Side Curtain LH (1) Regular Foam Seal(1) LOCATION A) This room air conditioner is designed to fit easily into a single or double hung window. However - Danby DAC5200DB | Product Manual - Page 7
Installation Instructions LOCATION Fig. 2 20" Min Awning 12" Min Side 30" Min Obstruction the shutter from the shutter frame and slide it into the shutter tabs on the side channel of the air conditioner, as shown in Fig. 4. • Slide the shutters into the top ("L" Shaped) and bottom ("U" Shaped - Danby DAC5200DB | Product Manual - Page 8
Installation Instructions 3) Completing the Installation (cont'd) • Carefully place the air conditioner into the window with the "L" shaped mounting bracket (on top) positioned in front of the upper window sash. The bottom of the cabinet should be - Danby DAC5200DB | Product Manual - Page 9
Operating Instructions KEY PAD FEATURES LED DISPLAY: Displays the following information Select the fan speed setting. 5) The time you selected will appear in the LED display. While the Air Conditioner is on (Auto-Off): 1) Press the Auto-Timer button twice and the adjacent Auto-Off indicator light - Danby DAC5200DB | Product Manual - Page 10
sunlight, the air conditioner may not function properly. Use curtains to prevent the sunlight from falling on the receiver. • If other electrical appliances react to the remote controller, either move these appliances or call the service depot. REMOTE CONTROLLER SPECIFICATIONS Model Rated Voltage - Danby DAC5200DB | Product Manual - Page 11
Operating Instructions REMOTE CONTROLLER BUTTONS ON/OFF button Operation starts when SAVER button Press this button to activate the Energy saving mode. Press it again to stop the funtion. Models: R15B MODE button Each time you press this button, a mode is selected in a sequence that contain AUTO - Danby DAC5200DB | Product Manual - Page 12
mode is not comfortable for you, the desired mode can be selected manually. COOLING /FAN OPERATION Ensure the unit is plugged in and power is 1 2 available. 3 3 1) Press the ON/OFF button to start the air conditioner. 2) Press the MODE button to cool. 4 3) Press the TEMP / button to set - Danby DAC5200DB | Product Manual - Page 13
Operating Instructions USING THE REMOTE CONTROLLER BUTTONS SLEEP OPERATION • In this mode, the selected temperature will increase(in cooling wait for about 10 seconds until the setting temperature reverts back in the display window of the air conditioner. This indicates the program is set. 12 - Danby DAC5200DB | Product Manual - Page 14
Operating Instructions USING THE REMOTE CONTROLLER BUTTONS TIMER OPERATION To set the cancel the TIMER setting, push the TIMER button until 0 hour is displayed on the LCD window of the air conditioner. ENERGY SAVER OPERATION 1 In this mode, the fan will continue to run for 3 minutes after the - Danby DAC5200DB | Product Manual - Page 15
Operating Instructions CHANGING THE BATTERIES ON THE REMOTE The remote controller is powered ICES-003. The remote operates within a range of 8 meters (26 ft.) from the receiver located inside the main unit.Any obstruction between the receiver and remote may cause signal interference, limiting the - Danby DAC5200DB | Product Manual - Page 16
out the inside of the unit. 2) Turn off power and remove plug from wall socket. 3) Clean filter. 4) Store (covered) air conditioner in a dry location. CAUTION When installing and/or removing the air conditioner from the window, ensure that caution is taken to prevent it from falling backward. It is - Danby DAC5200DB | Product Manual - Page 17
troubleshooting guide for a possible solution. If the unit continues to operate improperly, call an authorized service depot or Danby's Toll Free Number 1-800-263-2629 for assistance. PPRROOBBLLEEMM 1) Air conditioner • Inadequate support. • Tighten loose parts. • Provide additional support to unit - Danby DAC5200DB | Product Manual - Page 18
alteration, abuse or misuse of the appliance such as inadequate air circulation in the room or abnormal operating conditions (extremely high In the event warranty service is required, present this document to our AUTHORIZED SERVICE DEPOT. Warranty Service Carry-In Danby Products Limited PO Box 1778 - Danby DAC5200DB | Product Manual - Page 19
climatiseur de chambre Danby pour refroidir votre difficulté d'installation, veuillez lire les présentes instructions, complètement, avant d'installer et de faire aurez besoin de ces renseignements si vous contactez un représentant du Service à la clientèle. REMARQUE: CET APPAREIL N'A PAS ÉTÉ CONÇU - Danby DAC5200DB | Product Manual - Page 20
lectricien qualifié. Si vous avez la moindre question au suject des instructions ci-dessous, contactez un électricien qualifié. 2) Vérifiez la murale doit correspondre à la fiche à 3 broches sur le cordon de service fourni avec l'appareil. N'utilisez PAS de fiches d'adaptation. Voir Tableau 2 - Danby DAC5200DB | Product Manual - Page 21
SÉCURITÉ: Lire attentivement ces instructions avant d'utiliser l'appareil. L'ÉCONOMIE DE L'ÉNERGIE Votre appareil ménager Danby est conçu pour l'efficacit le climatiseur hors de service et utiliser le MODE DE VENTILATEUR à la position HAUTE, MOYENNE ou BAS. Ceci fait circuler l'air à l'intérieur de - Danby DAC5200DB | Product Manual - Page 22
*Préinstallé sur certain modèles Scellement mousse (1) adhésif Support de fermeture (2) Rideau latéral droit (1) Rideau latéral gauche rideaux ou d'autres objets à l'intérieur de la pièce puissent bloquer le flux d'air. E) Assurez-vous que la prise électrique appropriée se trouve à la portée de - Danby DAC5200DB | Product Manual - Page 23
ral 20 po Min 30 po Min Sol Clôture, mur ou autre obstacle INSTRUCTIONS D'INSTALLATION Fig. 3 1) Montage de canaux supérieur sur le caisson. rideaux latéraux au caisson. • Étendez les volets et glissez-le dans les support de volets sur le canal latéral du climatiseur comme montré dans Fig. 4. - Danby DAC5200DB | Product Manual - Page 24
Installation INSTRUCTIONS D'INSTALLATION 3) Pour compléter l'installation • Coupez la lisière à calfeutrer en mousse (non adh Fig. 5 Vis de 3/4 po Cadre de la fenêtre Canal supérieur en forme de "L" Support de fermeture Fig. 6 Serrure de sûreté Scellement mousse (adhésif) Vis de 3/4 po 23 - Danby DAC5200DB | Product Manual - Page 25
Vérifiez le Filtre: L'afficheurau-dessus du bouton s'allumine pour indiquer le filtre à air doit être nettoyé (voir la page 20). Une fois que le filtre En March Auto et/ou Arrêt Auto. Quand le Climatiseur est hors de service (En March Auto): 1) Appuyer sur la touche Minutrie une fois et l'afficheur - Danby DAC5200DB | Product Manual - Page 26
Consignes d'utilisation UTILISATION DE LA TÉLÉCOMMANDE Emplacement de la télécommande. • Utilisez la télécommande à une distance maximale de 8 mètres de l'appareil, en l'orientant dans la direction du récepteur. La réception est confirmée par un bip sonore. CARACTÉRISTIQUES DE LA TÉLÉCOMMANDE 8m - Danby DAC5200DB | Product Manual - Page 27
Consignes d'utilisation TÉLÉCOMMANDE DE LA TÉLÉCOMMANDE Bouton ON/OFF (MARCHE/ARRÊT) Le climatiseur se met en marche lorsque l'utilisateur appuie sur ce bouton et s'arrête lorsque l'utilisateur appuie dessus à nouveau. Bouton TEMP UP (AUGMENTER LA TEMPÉRATURE) Appuyez sur ce bouton pour augmenter le - Danby DAC5200DB | Product Manual - Page 28
Consignes d'utilisation UTILISATION DES BOUTONS DE LA 1 TÉLÉCOMMANDE 3 FONCTIONNEMENT AUTOMATIQUE Assurez-vous que l'appareil est branché et 2 sous tension. 1) Appuyez sur le bouton ON/OFF pour 3 mettre le climatiseur en marche. 2) Appuyez sur le bouton Mode et sélec- tionnez AUTO. 3) - Danby DAC5200DB | Product Manual - Page 29
Consignes d'utilisation UTILISATION DES BOUTONS DE LA TÉLÉCOMMANDE Mode Sommeil • Dans ce mode, la température sélectionnée augmente (en mode refroidissement) ou diminue de 2 °F 1 heures après la sélection du mode. • La température augmentera ensuite de 2 °F supplémentaires au bout de 1 - Danby DAC5200DB | Product Manual - Page 30
Consignes d'utilisation UTILISATION DES BOUTONS DE LA TÉLÉCOMMANDE MINUTEUR Pour régler l'heure de mise en marche automatique. 1) Appuyez sur le bouton TIMER lorsque l'appareil est en marche; seule la fonc- tion d'arrêt automatique peut être 1 réglée. 2) Continuez à appuyer sur le bouton - Danby DAC5200DB | Product Manual - Page 31
Consignes d'utilisation CHANGEMENT DES PILES DE LA TÉLÉCOMMANDE La télécommande est alimentée par une pile bouton installée dans la partie arrière et protégée par un couvercle. Enlevez la pile bouton dans la direction indiquée par les flèches sur l'arrière de la télécommande. 1 1. Appuyez légè - Danby DAC5200DB | Product Manual - Page 32
ère n'est pas éliminée de l'atmosphère de la pièce et peut entraîner une défaillance de la machine. Quand la grille de l'entrée d'air et le caisson sont sales, essuyezles avec de l'eau tiède (au-dessous de 40°C). On recommande l'utilisation d'un détersif doux. ENTRETIEN HORS SAISON 1) Faites - Danby DAC5200DB | Product Manual - Page 33
guide de dépannage pour une solution possible. Si l'unité continue à fonctionner incorrectement, demandez un dépôt autorisé de service ou le numéro de appel sans frais Danby Support inadéquat. • Serrez les pièces qui sont desserrées ou ont de jeu. • Fournissez un support Le filtre à air de l'appareil - Danby DAC5200DB | Product Manual - Page 34
abusif ou incorrect de l'appareil tel qu'une circulation d'air inadéquate dans la pièce ou des conditions de senter ce document à la station technique agréée ou s'adresser à: Service sous-garantie En Atelier Danby Products Limited PO Box 1778, Guelph, Ontario, Canada N1H 6Z9 Telephone - Danby DAC5200DB | Product Manual - Page 35
AIR CONDITIONER The model number can be found on the serial plate located on the back panel of the unit. All repair parts are available for purchase or special order when you visit your nearest service depot. To request service and/or the location of the service oledelo DAC5200DB
-
 1
1 -
 2
2 -
 3
3 -
 4
4 -
 5
5 -
 6
6 -
 7
7 -
8
-
9
-
10
-
11
-
12
-
13
-
14
-
15
-
16
-
17
-
18
-
19
-
20
-
21
-
22
-
23
-
24
-
25
-
26
-
27
-
28
-
29
-
30
-
31
-
32
-
33
-
34
-
35
 |
 |

Danby Products Limited, Ontario, Canada N1H 6Z9
Danby Products Inc., Findlay, Ohio, USA 45840
• Owner’s Use and Care Guide
• Guide d’utilisation et d'entretien
AIR CONDITIONER
CLIMATISEUR
V1 11.10 DM
Model • Modèle •
DAC5200DB