Danby DAC6011E Product Manual
Danby DAC6011E Manual
 |
View all Danby DAC6011E manuals
Add to My Manuals
Save this manual to your list of manuals |
Danby DAC6011E manual content summary:
- Danby DAC6011E | Product Manual - Page 1
• Owner's Use and Care Guide • Guide d'utilisation et soins de Propriètaire AIR CONDITIONER CLIMATISEUR Model • Modèle • DMAoCd6e0lo10E / DAC6011E Danby Products Limited, Ontario, Canada N1H 6Z9 Danby Products Inc., Findlay, Ohio, USA 45840 V1 11.10 DM - Danby DAC6011E | Product Manual - Page 2
Contents AIR CONDITIONER Owner's Use and Care Guide 2-17 • Welcome • Important Safety Information • Features • Installation • Operation Instructions • Care and Maintenance • Troubleshooting • Warranty CAUTION: Read and follow all safety rules and operating instructions before first use of this - Danby DAC6011E | Product Manual - Page 3
Guide will provide you with valuable information necessary for the proper care and maintenance of your new appliance. If properly maintained, your Danby appliance will give you many years of trouble free operation. Please take a few moments to read the instructions -WALL" INSTALLATION. Model Number: - Danby DAC6011E | Product Manual - Page 4
power supply and resolve any wiring problems BEFORE installing and operating this unit. 3) This 115V air conditioner uses 5.4 or less nameplate amps and may be used in any properly wired, general purpose household receptacle. See Table 1 for specifications for individual branch circuit. 4) For your - Danby DAC6011E | Product Manual - Page 5
Cabinet Exterior Air Inlet Air FIlter Installation Instructions ELECTRIC SHOCK HAZARD To avoid the possibility of personal injury, disconnect power to the unit before installing or servicing. NOTE: Your Room Air Conditioner is designed for easy installtion in a single or double-hung window. This - Danby DAC6011E | Product Manual - Page 6
"L" Shaped mounting bracket (1) * Factory installed on some models Adhesive Foam Seal(1) Sash bracket (2) Side Curtain RH (1) Side Curtain LH (1) LOCATION A) This room air conditioner is designed to fit easily into a single or double hung window. However, since window designs vary, it may be - Danby DAC6011E | Product Manual - Page 7
. The shutters are identified (on frame) as left and right. 3) Completing the Installation • Cut the foam (non adhesive) sealing strip to fit the area of the window sill that the air conditioner will rest on. Fig. 3 3/8" screws Fig. 4 "L" shaped mounting bracket "U" shaped Channel (Factory - Danby DAC6011E | Product Manual - Page 8
Installation Instructions 3) Completing the Installation (cont'd) • Carefully place the air conditioner into the window with the "L" shaped mounting bracket (on top) positioned in front of the upper window sash. The bottom of the cabinet should be positioned on the "recessed" portion of the window - Danby DAC6011E | Product Manual - Page 9
Operating Instructions KEY PAD FEATURES LED DISPLAY: Displays the following information air conditioner filter (see page 9) Once the filter has been cleaned and replaced, depress the Check Filter button in order to resume operation. Temp / Timer Control Check Filter Mode Selector Energy - Danby DAC6011E | Product Manual - Page 10
sunlight, the air conditioner may not function properly. Use curtains to prevent the sunlight from falling on the receiver. • If other electrical appliances react to the remote controller, either move these appliances or call the service depot. REMOTE CONTROLLER SPECIFICATIONS Model Rated Voltage - Danby DAC6011E | Product Manual - Page 11
Operating Instructions REMOTE CONTROLLER BUTTONS NOTE: Modle R15B does not have CLEAN AIR feature. ON/OFF button from AUTO, HEAT (cooling and heating models only) COOL, DRY, FAN and back to AUTO. TEMP UP FA N S TEMP DOWN ENERGY SAVER TIMER CLEAN AIR SLEEP TEMP DOWN button Push this button - Danby DAC6011E | Product Manual - Page 12
Operating Instructions USING THE REMOTE CONTROLLER BUTTONS 1 ON/OFF MODE 3 TEMP UP FAN S TEMP DOWN ENERGY SAVER TIMER CLEAN AIR SLEEP AUTO OPERATION Ensure the unit is plugged in and power is 2 available. 1) Press the ON/OFF button to start the air 3 conditioner. 2) Press the mode - Danby DAC6011E | Product Manual - Page 13
Operating Instructions USING THE REMOTE the Sleep button. ON/OFF MODE TEMP UP FAN S TEMP DOWN ENERGY SAVER TIMER CLEAN AIR SLEEP TIMER OPERATION press the TIMER button can set the Autostart and in the display window of the air conditioner. This indicates the program is set. 12 - Danby DAC6011E | Product Manual - Page 14
cancel the TIMER setting, push the TIMER button until 0 hour is displayed on the LCD window of the air conditioner. ON/OFF MODE TEMP UP FAN S TEMP DOWN ENERGY SAVER TIMER 1 CLEAN AIR SLEEP CLEAN AIR OPERATION When this button is pushed, the ion generator is energized and will help remove - Danby DAC6011E | Product Manual - Page 15
Operating Instructions CHANGING THE BATTERIES ON THE REMOTE The remote controller is powered by one button cell housed in the rear part and protected by a cover. Remove the button cell according to the arrow marked at the back of the remote controller. 1 1. Slightly press "A" position according - Danby DAC6011E | Product Manual - Page 16
of the unit. 2) Turn off power and remove plug from wall socket. 3) Clean filter. 4) Store (covered) air conditioner in a dry location. CAUTION When installing and/or removing the air conditioner from the window, ensure that caution is taken to prevent it from falling backward. It is recommended - Danby DAC6011E | Product Manual - Page 17
call may not be neccessary. Use this troubleshooting guide for a possible solution. If the unit continues to operate improperly, call an authorized service depot or Danby's Toll Free Number 1-800-263-2629 for assistance. PPRROOBBLLEEMM 1) Air conditioner will not operate. 2) Inefficient or no - Danby DAC6011E | Product Manual - Page 18
To obtain Service Boundaries of In Home Service During the first twelve (12) months, any functional parts of this installed in a location that is 100 kilometers (62 miles) or more from the nearest service center your unit must be delivered to the nearest authorized Danby Service Depot, as service - Danby DAC6011E | Product Manual - Page 19
climatiseur de chambre Danby pour refroidir votre difficulté d'installation, veuillez lire les présentes instructions, complètement, avant d'installer et de contactez un représentant du Service à la clientèle. REMARQUE: CET APPAREIL N'A PAS ÉTÉ CONÇU POUR UNE INSTALLATION À TRAVERS UNE PAROI. Num - Danby DAC6011E | Product Manual - Page 20
instructions avant d'utiliser l'appareil. SPECIFICATIONS ELECTRIQUE 1) Tous les câblages doivent être conformes aux codes électriques locaux et nationaux et doivent être install à la fiche à 3 broches sur le cordon de service fourni avec l'appareil. N'utilisez PAS de fiches d'adaptation. - Danby DAC6011E | Product Manual - Page 21
de commande Entrée d'air intérieure Caisson Entrée d'air extérieure Filtre à air Installation RISQUE DE CHOC ÉLECTRIQUE Pour éviter la possibilité de blessures corporelles, débrancher l'alimentation de courant à l'unité avant d'entreprendre l'installation ou le service. REMARQUE: Votre climatiseur - Danby DAC6011E | Product Manual - Page 22
éinstallé sur certain modèles Serrure de Sûreté (1) Canal supérieur (1) *Préinstallé sur certain modèles Scellement mousse (1) adhésif Support de ce puissent bloquer le flux d'air. E) Assurez-vous que la prise électrique appropriée se trouve à la portée de l'installation. N'utilisez qu'un circuit - Danby DAC6011E | Product Manual - Page 23
po Min 30 po Min Sol Clôture, mur ou autre obstacle INSTRUCTIONS D'INSTALLATION Fig. 3 1) Montage de canaux supérieur sur le caisson. (Préinstallé sur certain modèles) • Canal supérieur en forme de "L": bas Canal en form de "L" Canal en forme de "U" Support de volets Volets Cadre des volets 22 - Danby DAC6011E | Product Manual - Page 24
Installation INSTRUCTIONS D'INSTALLATION 3) Pour compléter l'installation • Coupez la lisière à nécessaure de modifier ou d'improviser votre installation particulière. Fig. 5 Vis de 3/4 po Cadre de la fenêtre Canal supérieur en forme de "L" Support de fermeture Fig. 6 Serrure de sûret - Danby DAC6011E | Product Manual - Page 25
Vérifiez le Filtre: L'afficheurau-dessus du bouton s'allumine pour indiquer le filtre à air doit être nettoyé (voir la page 20). Une fois que le filtre En March Auto et/ou Arrêt Auto. Quand le Climatiseur est hors de service (En March Auto): 1) Appuyer sur la touche Minutrie une fois et l'afficheur - Danby DAC6011E | Product Manual - Page 26
sunlight, the air conditioner may not function properly. Use curtains to prevent the sunlight from falling on the receiver. • If other electrical appliances react to the remote controller, either move these appliances or the service depot. REMOTE CONTROLLER SPECIFICATIONS Model Rated Voltage - Danby DAC6011E | Product Manual - Page 27
Consignes d'utilisation REMOTE CONTROLLER BUTTONS NOTE: Modle R15B does not have the CLEAN AIR feature. ON/OFF button AUTO, HEAT (cooling and heating models only) COOL, DRY, FAN and back to AUTO. TEMP UP FA N S ENERGY SAVER TEMP DOWN TIMER CLEAN AIR SLEEP TEMP DOWN button Push this button - Danby DAC6011E | Product Manual - Page 28
manually. COOLING /HEATING/FAN OPERATION Ensure the unit is plugged in and power is 1 2 available. ON/OFF MODE 3 3 1) Press the ON/OFF button to start the air TEMP UP S TEMP DOWN conditioner. 2) Press the MODE button to cool, heat 4 ENERGY SAVER (cooling and heating models only - Danby DAC6011E | Product Manual - Page 29
USING THE REMOTE CONTROLLER BUTTONS ON the Sleep button. ON/OFF MODE TEMP UP FAN S TEMP DOWN ENERGY SAVER TIMER CLEAN AIR SLEEP TIMER OPERATION press the TIMER button to set the Autostart and Auto back in the display window of the air conditioner. This indicates the program is set. 28 - Danby DAC6011E | Product Manual - Page 30
cancel the TIMER setting, push the TIMER button until 0 hour is displayed on the LCD window of the air conditioner. ON/OFF MODE TEMP UP FAN S TEMP DOWN ENERGY SAVER TIMER 1 CLEAN AIR SLEEP CLEAN AIR OPERATION When this button is pressed, the ion generator is energized and will help remove - Danby DAC6011E | Product Manual - Page 31
controller is powered by one button cell housed in the rear part and protected by a cover. Remove the button cell according to the arrow marked at the back of the remote controller. 1 1. Slightly press "A" position according to the number 1 arrow direction by your CR2025 forefinger. 2 2. Press - Danby DAC6011E | Product Manual - Page 32
neutre de nettoyage. 3) Rincez le filtre avec de l'eau propre et séchez-le à fond avant de le réinstaller. MISE EN GARDE N'oubliez PAS d'installer le filtre à air. Si on fait fonctionner le climatiseur sans filtre à air, la poussière n'est pas éliminée de l'atmosphère de la pièce et peut entraîner - Danby DAC6011E | Product Manual - Page 33
peut ne pas être nécessaire. Employez ce guide de dépannage pour une solution possible. Si l'unité continue à fonctionner incorrectement, demandez un dépôt autorisé de service ou le numéro de appel sans frais Danby pour l'aide à: (1-800-263-2629) PPRROOBBLLEEMMEE CCAAUUSSEE PPRROOBBAABBLLEE - Danby DAC6011E | Product Manual - Page 34
est installé à plus de 100 kilomètres (62 milles) du centre de service le plus proche, il doit être livré à l'atelier de réparation autorisé par Danby le , emploi abusif ou incorrect de l'appareil tel qu'une circulation d'air inadéquate dans la pièce ou des conditions de fonctionnement anormales - Danby DAC6011E | Product Manual - Page 35
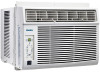
AIR CONDITIONER The model number can be found on the serial plate located on the back panel of the unit. All repair parts are available for purchase or special order when you visit your nearest service depot. To request service and/or the location of the service DAC6011E
-
 1
1 -
 2
2 -
 3
3 -
 4
4 -
 5
5 -
 6
6 -
 7
7 -
8
-
9
-
10
-
11
-
12
-
13
-
14
-
15
-
16
-
17
-
18
-
19
-
20
-
21
-
22
-
23
-
24
-
25
-
26
-
27
-
28
-
29
-
30
-
31
-
32
-
33
-
34
-
35
 |
 |

Danby Products Limited, Ontario, Canada N1H 6Z9
Danby Products Inc., Findlay, Ohio, USA 45840
Model • Modèle • Modelo
• Owner’s Use and Care Guide
• Guide d’utilisation et soins de Propriètaire
AIR CONDITIONER
CLIMATISEUR
V1 11.10 DM
DAC6010E / DAC6011E