Danby DPAC13009 Product Manual
Danby DPAC13009 Manual
 |
View all Danby DPAC13009 manuals
Add to My Manuals
Save this manual to your list of manuals |
Danby DPAC13009 manual content summary:
- Danby DPAC13009 | Product Manual - Page 1
initiale de ce produit. PORTABLE AIR CONDITIONER Table of contents 1 CLIMATISEUR PORTATIF Table des matières 14 KEEP THESE INSTRUCTIONS FOR FUTURE REFERENCE: If the Dehumidifier changes ownership, be sure this manual accompanies the unit. CONSERVER CES INSTRUCTIONS POUR CONSULTATION ULTÉRIEURE - Danby DPAC13009 | Product Manual - Page 2
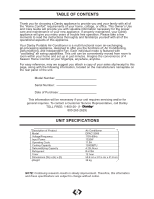
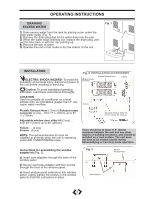
4 Draining Excess Water 5 INSTALLATION 5 Window Kit Installation 6 OPERATION Remote Control 7 LCD Display 7 Air Conditioning 8 Auto 8 Dehumidifier 9 Fan 9 Auto Timer 11 Clock Set 11 CARE AND MAINTENANCE 12 TROUBLESHOOTING 13 Warranty 14 1 - Danby DPAC13009 | Product Manual - Page 3
Service Representative, call Danby TOLL FREE: 1-800-26- (1800-263-2629) UNIT SPECIFICATIONS Description of Product Model Voltage/Frequency Input Power Operating Cycle Cooling Capacity Dehumidifying Capacity Refrigerant Timer Dimensions (W) x (H) x (D) Weight Air Conditioner DPAC13009 115V - Danby DPAC13009 | Product Manual - Page 4
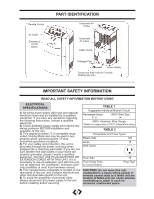
Remote Control Air Outlet Emergency On/Off Switch PART IDENTIFICATION Evaporator Air Intake Evaporator Air instructions, contact a qualified electrician. 2) Check available power supply and resolve any wiring problems "air conditioner" extension cord only (available at most local hardware stores). - Danby DPAC13009 | Product Manual - Page 5
energized and supplying electricity to the air conditioner • The power supply cord must be replaced if it fails (on some products air conditioner off and use the FAN MODE on HIGH, MED, or LOW. This circulates indoor air operation. CAUTION: During air conditioning and dehumidifier mode, if the - Danby DPAC13009 | Product Manual - Page 6
servicing. Fig. 2 INSTALLATION ACCESSORIES Exhaust Nozzle Connector Flexible Exhaust Hose Fixture Caution: To avoid installation/operation difficulties, read these instructions thoroughly. LOCATION Use this portable air conditioner Dehumidifying or Fan Only mode operation. Instructions for - Danby DPAC13009 | Product Manual - Page 7
INSTALLATION WINDOW KIT INSTALLATION Air Conditioning Mode ONLY Your window kit has been designed to fit most standard "vertical"/"horizontal" windows up to a maximum height of 80" (203cm). For vertical - Danby DPAC13009 | Product Manual - Page 8
- Features of the Control Panel REMOTE CONTROL Key Pad Functions: Power Switch: Turn unit ON/OFF FAN: Select from four (4) fan settings: Auto, High TEMPERATURE Indicator Automatic Cooling Mode Dehumidify Mode Fan Only Mode HIGH Fan Speed MEDIUM Fan Speed LOW Fan Speed EMERGENCY ON / OFF - Danby DPAC13009 | Product Manual - Page 9
. 2) Press the MODE key (Fig. B) until the COOL indicator light illuminates on the control panel (Fig.C). Each depression of the MODE key will advance to a different mode setting (Cool- Dehumidifier-Fan-Auto) 3) Press the appropriate (UP) or (DOWN) buttons (Fig. D1 & D2) to select a suitable - Danby DPAC13009 | Product Manual - Page 10
the MODE key will advance to a different mode setting (Cool-Dehumidifier-Fan-Auto). 3) Press the FAN Key (Fig. M) to select the desired FAN SPEED setting. Your selection will appear on the control panel. Each press of the fan key will advance to a different fan speed (High- Med- Low) as shown in Fig - Danby DPAC13009 | Product Manual - Page 11
OPERATING INSTRUCTIONS (cont'd) AUTO TIMER The AUTO-TIMER is given after approximately 650 hours of operation in order to prevent you from forgetting to replace the filter. A light on the front of the device will illuminate (Fig. X). lights, please contact your qualified service technician. 10 - Danby DPAC13009 | Product Manual - Page 12
clean water. Allow time to dry before reinstalling into the unit. 5) Replace the air filter and cover. 6) Replacement air filter information is available by contacting the Customer Service Department at: 1-800-26- (1-800-263-2629) Fig. 5 Store the cable as illustrated in Fig. 6a & 6b below: Fig - Danby DPAC13009 | Product Manual - Page 13
TROUBLESHOOTING PROBLEM • Unit does not work POSSIBLE CAUSE • Power is out • The plug is not the duct hose • Close all windows/doors • Move any heat sources from room • Clean air intake grill • Replace the filter • Lower temp. setting • Remove drain plug on rear bottom and drain out water 12 - Danby DPAC13009 | Product Manual - Page 14
TABLE DES MATIÉRES SPÉCIFICATIONS DE L'UNITÉ 15 IDENTIFICATION DE PARTIE 16 CONSIGNES DE SÉCURITÉ IMPORTANT Spécifications électriques 16 Suggestions pour économiseur d'énergie 17 CONSIGNES D'UTILISATION Dispositifs internes de sécurit 17 Vidange de l'exès d'eau 18 - Danby DPAC13009 | Product Manual - Page 15
portable Danby est un appareil d'échange et de traitement de l'air le service est demandé et/ou si vous désirez obtenir des renseignements supplémentaires. Pour consulter un Représentant du service Temporisateur Dimensions (lgr) x (pfdr) x (htr) Poids de l'unité Climatiseur portatif DPAC13009 115V- - Danby DPAC13009 | Product Manual - Page 16
télécommande entrée d'air de vaporisateur bouche d'air commutateur "Marche/Arrêt " de secours entrée d'air de vaporisateur crochet de l'alimentation de courant à l'unité avant d'entreprendre l'installation et/ou le service. MISE EN GARDE: Ne jamais laisser cet appareil en marche dans un endroit - Danby DPAC13009 | Product Manual - Page 17
Danby air est très efficace pour éliminer les particules qui flottent dans l'air. Conserver le filtre à air propre en tout temps. 3) Utiliser des draperies, des rideaux ou des stores service et utiliser le MODE DE VENTILATEUR à la position HAUTE, MOYENNE ou BAS. Ceci fait circuler l'air ou replacé. - Danby DPAC13009 | Product Manual - Page 18
d'entreprendre l'installation ou le service. Fig. 2 ACCESSOIRES D'INSTALLATION attentivement. EMPLACEMENT: Utilisez cet air conditionné portatif sur une durant le fonctionnement en mode Déshumidification ou Ventilateur seulement. Instructions d'assemblage pour l'ensemble d'adaptateurs de fenêtre ( - Danby DPAC13009 | Product Manual - Page 19
INSTALLATION INSTALLATION DU KIT DE FENÊTRE Mode Climatisation Seulement Votre kit de fenêtre a été conçu pour l'adaptation à la plupart des fenêtres verticales et/ou horizontales et portes patio standard. Les applications de porte patio sont limitées aux portes atteignant une hauteur maximale de 80 - Danby DPAC13009 | Product Manual - Page 20
FONCTIONNEMENT -Caractéristique du Panneau de Commande TÉLÉCOMMANDE Fonctions du bloc numérique : Interrupteur d'alimentation : Permet de mettre l'appareil en Marche/Arrêt VENTILATEUR : Sélection à partir de quatre (4) ajustements de ventilateur : Automatique, Haut, Moyenne et Bas. MODE : Vous - Danby DPAC13009 | Product Manual - Page 21
FONCTIONNEMENT CLIMATISEUR IMPORTANT : Le tuyau d'échappement doit être adéquatement purgé (à l'extérieur) dans le mode de climatisation. 1) Appuyez sur la touche de l'INTERRUPTEUR D'ALIMENTATION Fig. A (Fig. A) pour mettre en marche l'unité, et la température réglée précédemment apparaîtra sur - Danby DPAC13009 | Product Manual - Page 22
FONCTIONNEMENT (suite) DÉSHUMIDIFICATEUR REMARQUE : Dans le mode déshumidificateur, le tuyau d'échappement n'a pas à être purgé à l'extérieur. Important: Le tuyau de vidange doit être installé au cours de déshumidificateur 1) Appuyez sur la touche MARCHE/ ARRÊT du bloc numérique pour mettre l' - Danby DPAC13009 | Product Manual - Page 23
défaut sont illuminés, ceci indique l'échec interne de câblage. Si vous voyez les deux lumières ci-dessus d'échec, contactez svp votre technicien qualifié de service. 23 - Danby DPAC13009 | Product Manual - Page 24
. Accordez l'heure de sécher avant la réinstallation dans l'unité. 5) Remplacez le filtre à air et le couvrez. 6) L'information de filtre à air de remplacement est disponible en entrant en contact avec le département de service à la clientèle à : 1-800-26- (1-800-263-2629) Rangez le câble comme - Danby DPAC13009 | Product Manual - Page 25
DÉPANNAGE PROBLEME • L'unité ne fonctionne pas • L'unité arrête soudainement durant son fonctionnement CAUSE PROBABLE • • Il y a une source de chaleur ou trop de gens dans la pièce • La grille de prise d'air est obstruée • Le filtre est trop sale • Le réglage de la température est trop élevé • Le - Danby DPAC13009 | Product Manual - Page 26
• Modèledelo DPAC13009 Portable Air Conditioner For service, contact your nearest service depot or call: 1-800-26(1-800-263-2629) to recommend a depot in your area. The model number can be found on the serial plate located on the back panel of the unit. All repair parts available for purchase
-
 1
1 -
 2
2 -
 3
3 -
 4
4 -
 5
5 -
 6
6 -
 7
7 -
8
-
9
-
10
-
11
-
12
-
13
-
14
-
15
-
16
-
17
-
18
-
19
-
20
-
21
-
22
-
23
-
24
-
25
-
26
 |
 |
Owner’s Use and Care Guide
Guide d’utilisation et soins de Propriètaire
Guía a utilizar y a cuidar
Model • Modèle
DPAC 13009
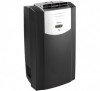
PORTABLE AIR CONDITIONER
Table of contents
. . . . . . . . . . . . . . . . . . . . . . . . . . . . . . . . . . . . . .
1
CLIMATISEUR PORTATIF
Table des matières
. . . . . . . . . . . . . . . . . . . . . . . . . . . . . . . . . . . . 14
Danby Products Ltd, PO Box 1778, Guelph, Ontario Canada N1H 6Z9
Danby Products Inc, PO Box
669, Findlay, Ohio USA 45839-0669
Version 2.12.08 JF
CAUTION: Read and follow all safety rules and operating instructions before first use
of this product.
MISE EN GARDE : Veuillez lire attentivement les consignes de sécurité et les directives
d'utilisation avant l'utilisation initiale de ce produit.
KEEP THESE INSTRUCTIONS FOR FUTURE REFERENCE: If the Dehumidifier changes ownership,
be sure this manual accompanies the unit.
CONSERVER CES INSTRUCTIONS POUR CONSULTATION ULTÉRIEURE: En cas de revente du
déshumidificateur, ce manuel doit être inclus avec l’appareil.