Dell 1100 Laser Mono Printer Dell™ Laser Printer 1100 User's Guide
Dell 1100 Laser Mono Printer Manual
 |
View all Dell 1100 Laser Mono Printer manuals
Add to My Manuals
Save this manual to your list of manuals |
Dell 1100 Laser Mono Printer manual content summary:
- Dell 1100 Laser Mono Printer | Dell™ Laser Printer 1100 User's Guide - Page 1
Dell™ Laser Printer 1100 User's Guide Click the links to the left for information on the features, options, and operation of your printer. For information on other documentation included with your printer, see "Finding Information". To order replacement toner cartridges or supplies from Dell: 1. - Dell 1100 Laser Mono Printer | Dell™ Laser Printer 1100 User's Guide - Page 2
reserved. Reproduction in any manner whatsoever without the written permission of Dell Inc. is strictly forbidden. Trademarks used in this text: Dell, DELL logo, and Dell Toner Management System are trademarks of Dell Inc.; Microsoft and Windows are registered trademarks of Microsoft Corporation - Dell 1100 Laser Mono Printer | Dell™ Laser Printer 1100 User's Guide - Page 3
. Safety • information How to use my • printer Warranty • information Owner's Manual CAUTION: Read and follow all safety instructions in your Owner's Manual prior to setting up and operating your printer. How to set up my Setup Diagram printer Express Service Code Express Service Code - Dell 1100 Laser Mono Printer | Dell™ Laser Printer 1100 User's Guide - Page 4
in all countries. • Latest drivers for my printer • Answers to technical service and support questions • Documentation for my printer Dell Support Website The Dell Support Website provides several online tools, including: • Solutions- Troubleshooting hints and tips, articles from technicians, and - Dell 1100 Laser Mono Printer | Dell™ Laser Printer 1100 User's Guide - Page 5
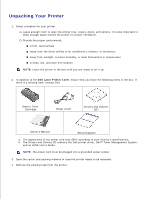
ready to set it up. 2. In addition to the Dell Laser Printer 1100, ensure that you have the following items in the box. If there is a missing item, contact Dell: Starter Toner Cartridge Power Corda Drivers and Utilities CDb Owner's Manual Setup Diagram a. The appearance of the power cord may - Dell 1100 Laser Mono Printer | Dell™ Laser Printer 1100 User's Guide - Page 6
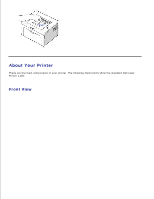
4. About Your Printer These are the main components of your printer. The following illustrations show the standard Dell Laser Printer 1100: Front View - Dell 1100 Laser Mono Printer | Dell™ Laser Printer 1100 User's Guide - Page 7
Rear View - Dell 1100 Laser Mono Printer | Dell™ Laser Printer 1100 User's Guide - Page 8
Operator Panel Button Functions The operator panel on the top right side of your printer has two LEDs and one button. LEDs - Dell 1100 Laser Mono Printer | Dell™ Laser Printer 1100 User's Guide - Page 9
conditions, such as printer status, intervention (for example, out of paper and jammed paper), or service. For more information on what the LEDs sequence means and what you can do, see "Understanding the Operator Panel LEDs". Button Item To print a demo page Manual feeding To cancel a print - Dell 1100 Laser Mono Printer | Dell™ Laser Printer 1100 User's Guide - Page 10
1. 2. Unpack the starter toner cartridge from its package and gently shake the cartridge from side-to-side 5 or 6 times to distribute the toner evenly inside the cartridge. Thoroughly rolling the cartridge will assure maximum copies per cartridge. NOTE: If toner comes into contact with your clothing - Dell 1100 Laser Mono Printer | Dell™ Laser Printer 1100 User's Guide - Page 11
, one on each side. 5. Unfold the toner cartridge handle and grasp it. Insert the cartridge into the printer until it snaps into place. 6. Close the front cover. Make sure that the cover is securely closed. If the cover is not firmly closed, printing - Dell 1100 Laser Mono Printer | Dell™ Laser Printer 1100 User's Guide - Page 12
application after loading paper into the paper tray. See "Paper Tab". To load paper: 1. Open the paper input tray. Pull on the length and width guides to extend the tray. 2. Flex the sheets back and forth to loosen them, and then fan them out. Do not fold or crease the print - Dell 1100 Laser Mono Printer | Dell™ Laser Printer 1100 User's Guide - Page 13
touches the end of the paper stack. Squeeze the width guide and move it toward the stack of paper until it lightly touches the side of the stack. NOTE: Improper adjustment of paper guides can result in paper jams. Connecting a Printer Cable To print from your computer, you need to connect your - Dell 1100 Laser Mono Printer | Dell™ Laser Printer 1100 User's Guide - Page 14
. USB cables are sold separately. Contact Dell to purchase a USB cable. NOTE: Connecting the printer to the USB port of the computer requires a certified USB cable. You will need to buy a USB 1.1 compliant cable that is 3 m or less in length. To connect the printer to a computer: 1. Make sure the - Dell 1100 Laser Mono Printer | Dell™ Laser Printer 1100 User's Guide - Page 15
2. Printing a Demo Page Print a demo page to make sure that the printer is operating correctly. 1. Wait approximately 30 seconds for the printer to warm up, then press and hold panel for 2 seconds to print a demo page. on the operator 2. The Demo page shows the printer's current configuration. - Dell 1100 Laser Mono Printer | Dell™ Laser Printer 1100 User's Guide - Page 16
2. - Dell 1100 Laser Mono Printer | Dell™ Laser Printer 1100 User's Guide - Page 17
you send a job to print. The Dell Toner Management System™ window also displays the level of toner remaining and allows you to order replacement toner cartridges. User's Guide- HTML documentation provides detailed information about using your printer. Installing Software Before you begin, ensure - Dell 1100 Laser Mono Printer | Dell™ Laser Printer 1100 User's Guide - Page 18
appears. Follow the instructions to install the software. 2. Insert the Drivers and Utilities CD. 3. If necessary, select a language by pressing the Language button on the main screen. 4. Select Typical Installation to install the User's Guide, the printer driver, and Dell Toner Management System - Dell 1100 Laser Mono Printer | Dell™ Laser Printer 1100 User's Guide - Page 19
Start menu, select Programs Dell Printers Dell Laser Printer 1100 Dell Printer Software uninstall. 2. Select the software you want to remove and click Next. The selected driver and all of its components are removed from your computer. 3. Click Finish. Using the Dell™ Toner Management System Printing - Dell 1100 Laser Mono Printer | Dell™ Laser Printer 1100 User's Guide - Page 20
Dell Toner Reorder Program The Dell Toner Reorder Program window can be launched from the Printing Status window, the Programs window, or the desktop icon. You can order toner by phone or from the Web. For details, see "Ordering Supplies". - Dell 1100 Laser Mono Printer | Dell™ Laser Printer 1100 User's Guide - Page 21
Manual Feed Mode Printing on Special Materials Print Media Guidelines Printer media includes paper, card stock, transparencies, labels, and envelopes. Your printer : Your printer supports paper weights as follows problems that may require service. This service is not covered by the warranty or service - Dell 1100 Laser Mono Printer | Dell™ Laser Printer 1100 User's Guide - Page 22
Envelopesb Labelsb Transparenciesb Card Stockb Input Mode/Capacitya Automatic Feed 150 - Manual Feed 1 1 1 1 1 a. Maximum capacity may be reduced a time. Only use materials specifically recommended for use with laser printers. To prevent special materials, such as transparencies and label sheets - Dell 1100 Laser Mono Printer | Dell™ Laser Printer 1100 User's Guide - Page 23
are wrinkled, bubbled, or otherwise damaged. Use only labels recommended for laser printers. For Card Stock or Custom-sized materials: Postcards, 3.5 by by 14 in.(216 by 356 mm). Always insert the short-edge into the Manual Feeder first. If you want to print in landscape mode, make this selection - Dell 1100 Laser Mono Printer | Dell™ Laser Printer 1100 User's Guide - Page 24
Do not use Carbonless paper and Tracing paper. Use of these types of paper could result in chemical smells and could damage your printer. Verifying the Output Location The printer has a paper output tray that collects paper face-down, in print order. NOTE: If you print many pages, the surface of the - Dell 1100 Laser Mono Printer | Dell™ Laser Printer 1100 User's Guide - Page 25
Proper paper loading helps prevent paper jams and ensures trouble-free printing. Do not remove the paper in the ". NOTE: If you experience problems with paper feed, place a sheet of paper in the tray using the manual feed mode. Using Manual Feed Mode If you select Manual Feed in the Source option in - Dell 1100 Laser Mono Printer | Dell™ Laser Printer 1100 User's Guide - Page 26
and width guides against the print material without bending it. 2. To print a document in Manual Feed mode, you must select Manual Feed for Source from the software application, and then select the appropriate paper size and type. For details, see "Paper Tab". 3. Press on the printer's operator - Dell 1100 Laser Mono Printer | Dell™ Laser Printer 1100 User's Guide - Page 27
NOTICE: Never load envelopes with stamps, clasps, snaps, windows, coated linings, or self-stick adhesives. These envelopes may severely damage the printer. The stamp is shown in the illustration only for placement. CAUTION: If you print 20 envelopes in succession, the surface of the top cover may - Dell 1100 Laser Mono Printer | Dell™ Laser Printer 1100 User's Guide - Page 28
other, do not let the printed sheets stack up as they are printed out. NOTE: Place transparencies on a flat surface after removing them from the printer. NOTE: Do not use transparencies that are separating from the backing sheet. Load a sheet of card stock with the side to be printed on facing - Dell 1100 Laser Mono Printer | Dell™ Laser Printer 1100 User's Guide - Page 29
NOTE: Before you load letterhead, verify that the ink on the paper is dry. During the fusing process, wet ink can come off preprinted paper. - Dell 1100 Laser Mono Printer | Dell™ Laser Printer 1100 User's Guide - Page 30
Manual Duplex) Fitting Your Document to a Selected Paper Size Printing a Reduced or Enlarged Document Using Watermarks Using Overlays Setting Up a Locally Shared Printer Printing a Document The driver provided with your printer software application's User's Guide for the exact printing procedure - Dell 1100 Laser Mono Printer | Dell™ Laser Printer 1100 User's Guide - Page 31
that button instead. Then click Properties on the next screen. 4. Click OK to close the printer properties window. 5. To start the print job, click Print or OK , depending on the : To stop a print job from the operator panel: Press . In Manual Feed mode, you can't cancel a print job by pressing . - Dell 1100 Laser Mono Printer | Dell™ Laser Printer 1100 User's Guide - Page 32
of the Windows desktop. 1. From the Windows Start button, click Settings . 2. Select to Printers (Windows 98/Me/2000) or Printers and Faxes (Windows XP) to open the Printers window and double-click the Dell Laser Printer 1100 icon. 3. From the Document menu, click Cancel (Windows 2000/XP) or Cancel - Dell 1100 Laser Mono Printer | Dell™ Laser Printer 1100 User's Guide - Page 33
User's Guide ) and the Printer tab (see "Printer Tab" ). NOTE: Most Windows applications override settings you specify in the printer driver and point to Printers . For Windows XP, click Printers and Faxes . c. Point to the Dell Laser Printer 1100 icon. d. Right-click on the printer icon and: For - Dell 1100 Laser Mono Printer | Dell™ Laser Printer 1100 User's Guide - Page 34
Printing Double-sided Printing allows you to print two-sided jobs manually. For details, see "Printing on (Manual Duplex)" . Paper Tab Use the following options to set paper handling needs when you access printer properties. See step 3 in "Printing a Document" for more information about accessing - Dell 1100 Laser Mono Printer | Dell™ Laser Printer 1100 User's Guide - Page 35
source is used when printing on special materials. You need to load one sheet at a time into the paper tray. See "Using Manual Feed Mode" . If the paper source is set to Auto Select , the printer automatically picks up print materials from the paper tray. Make sure that Type is set to - Dell 1100 Laser Mono Printer | Dell™ Laser Printer 1100 User's Guide - Page 36
or color paper, select Color Paper . Scaling allows you to automatically or manually scale your print job on a page. You can choose from None , your cost per page print quality. Darkness • On : Select this option to allow the printer to use less toner on each page. • Off : If you don't need to - Dell 1100 Laser Mono Printer | Dell™ Laser Printer 1100 User's Guide - Page 37
TrueType Options This option determines what the driver tells the printer about how to print the text in your do setting according to the on Extras Tab See step 3 in "Printing a Document" for more information about accessing printer properties. Click the Extras tab to access the following features: - Dell 1100 Laser Mono Printer | Dell™ Laser Printer 1100 User's Guide - Page 38
reprint the last pa computer after you have cleared the jam. NOTE: When a paper jam occurs in the paper exit area, your printer will not reprint failed pages. Reprint the failed pages. About Tab Use the About tab to display the copyright notice and the version number of - Dell 1100 Laser Mono Printer | Dell™ Laser Printer 1100 User's Guide - Page 39
. 2. For Windows 98/Me/2000, select Settings and then Printer . For Windows XP, select Printers and Faxes . 3. Select the Dell Laser Printer 1100 icon. 4. Right-click on the printer icon and select Properties . 5. Click the Printer tab and set the options. Property High Altitude Correction Power - Dell 1100 Laser Mono Printer | Dell™ Laser Printer 1100 User's Guide - Page 40
Display Printing Status Window specified time has elapsed since its last activity. You can select the length of time before your printer goes into power save mode from the Time Delay dropdown list. The minimum time you can select is 5 Minutes . When this option is checked, the - Dell 1100 Laser Mono Printer | Dell™ Laser Printer 1100 User's Guide - Page 41
the Favorites drop-down list. To delete a favorite setting item, select it from the list and click Delete . You can also restore the printer driver's default settings by selecting Printer Default from the list. Using Help Your printer has a help screen that can be activated by the Help button in the - Dell 1100 Laser Mono Printer | Dell™ Laser Printer 1100 User's Guide - Page 42
arranged on the sheet. You can print up to 16 pages on one sheet. 1. To change the print settings from your software application, access printer properties. See step 3 in "Printing a Document" . 2. From the Layout tab, choose Multiple Pages per Side from the Type drop-down list. 3. Select the number - Dell 1100 Laser Mono Printer | Dell™ Laser Printer 1100 User's Guide - Page 43
the purpose of pasting the sheets together to form one poster-sized document. 1. To change the print settings from your software application, access printer properties. See step 3 in "Printing a Document" . 2. From the Layout tab, select Poster from the Type drop-down list. 3. Configure the poster - Dell 1100 Laser Mono Printer | Dell™ Laser Printer 1100 User's Guide - Page 44
: A4, Letter, Legal, and Folio, with a weight of 20~24 lbs (75~90 g/m2 ). To manually print a 2-sided document: 1. To change the print settings from your software application, access printer properties. See step 3 in "Printing a Document" . 2. From the Layout tab, select the paper orientation. 3. - Dell 1100 Laser Mono Printer | Dell™ Laser Printer 1100 User's Guide - Page 45
paper source, size, and type. 5. Click OK and print the document. The printer prints every other page of the document first. Once the first side of your job into the printer with the already-printed side down and the top of the page toward the front of the tray according to the instructions in the - Dell 1100 Laser Mono Printer | Dell™ Laser Printer 1100 User's Guide - Page 46
This can be useful when you want to check fine details on a small document. 1. To change the print settings from your software application, access printer properties. See step 3 in "Printing a Document" . 2. From the Paper tab, select Fit to Page from the Type drop-down list. 3. Select the size that - Dell 1100 Laser Mono Printer | Dell™ Laser Printer 1100 User's Guide - Page 47
You can scale your print job on a page. 1. To change the print settings from your software application, access printer properties. See step 3 in "Printing a Document" . 2. From the Paper tab, select Reduce/Enlarge from the Type drop-down list. 3. Enter the scaling rate in the - Dell 1100 Laser Mono Printer | Dell™ Laser Printer 1100 User's Guide - Page 48
shows how the page will look when it is printed. Creating a Watermark 1. To change the print settings from your software application, access printer properties. See step 3 in "Printing a Document" . 2. Click the Extras tab and click Edit in the Watermark section. The Edit Watermark window appears - Dell 1100 Laser Mono Printer | Dell™ Laser Printer 1100 User's Guide - Page 49
, select [No Watermark] from the Watermark drop-down list. Editing a Watermark 1. To change the print settings from your software application, access printer properties. See step 3 in "Printing a Document" . 2. Click the Extras tab and click Edit in the Watermark section. The Edit Watermark window - Dell 1100 Laser Mono Printer | Dell™ Laser Printer 1100 User's Guide - Page 50
on your letterhead. To print a letter with your company's letterhead, you do not need to load preprinted letterhead paper in the printer. You need only tell the printer to print the letterhead overlay on your document. Creating a New Page Overlay To use a page overlay, you must create a new page - Dell 1100 Laser Mono Printer | Dell™ Laser Printer 1100 User's Guide - Page 51
4. In the Edit Overlay window, click Create Overlay . 5. In the Create Overlay window, type a name of up to eight characters in the File name box. Select the destination path, if necess ary. (The default is C:\Formover ). 6. Click Save . You can see the name in the Overlay List . 7. Click OK or Yes - Dell 1100 Laser Mono Printer | Dell™ Laser Printer 1100 User's Guide - Page 52
an overlay with a document: 1. Create or open the document you want to print. 2. To change the print settings from your software application, access printer properties. See step 3 in "Printing a Document" . 3. Click the Extras tab. 4. Select the overlay you want to print from the Overlay drop-down - Dell 1100 Laser Mono Printer | Dell™ Laser Printer 1100 User's Guide - Page 53
with your print job and printed on your document. Deleting a Page Overlay You can delete page overlays that are no longer used. 1. In the printer properties window, click the Extras tab. 2. Click Edit in the Overlay section. 3. Select the overlay you want to delete from the Overlay List box - Dell 1100 Laser Mono Printer | Dell™ Laser Printer 1100 User's Guide - Page 54
1. Right-click the Start button and select Explore . 2. Open your network folder in the left column. 3. Right-click the shared name and click Capture Printer Port . 4. Select the port you want, check the Reconnect at log on box, and then click OK . 5. Click the Start button and select Settings - Dell 1100 Laser Mono Printer | Dell™ Laser Printer 1100 User's Guide - Page 55
menu and select Sharing . 5. For Windows 2000, check the Shared As box. For Windows XP, check the Share this printer box. 6. Fill in the Share Name field and click OK . Setting Up the Client Computer 1. Right-click the Start button and select Explore . 2. Open your - Dell 1100 Laser Mono Printer | Dell™ Laser Printer 1100 User's Guide - Page 56
. Cleaning the Interior Paper, toner, and dust particles can accumulate inside the printer and cause print quality problems, such as smearing or toner specks. Clean inside the printer to prevent these problems. 1. Power the printer off and unplug the power cord. Wait approximately 10 minutes for the - Dell 1100 Laser Mono Printer | Dell™ Laser Printer 1100 User's Guide - Page 57
2. 3. Gently pull the toner cartridge out, being careful not to scratch against the printer, and lift it up and away from the printer. Set it on a clean flat surface. CAUTION: To prevent damage to the toner cartridge, do not expose the toner cartridge to light for more than a - Dell 1100 Laser Mono Printer | Dell™ Laser Printer 1100 User's Guide - Page 58
4. CAUTION: Do not touch the transfer roller inside the printer. Oil from your fingers may cause print quality problems. 5. Reinsert the toner cartridge and close the front cover. 6. Plug in the power cord and power the printer on. Maintaining the Toner Cartridge Storing the Toner Cartridge Store - Dell 1100 Laser Mono Printer | Dell™ Laser Printer 1100 User's Guide - Page 59
toner remaining in the toner cartridge in the Printing Status window each time you send a print job to the printer. If you are having print quality problems, this can help you determine if the problem is caused by low toner. In the Printing Status window, you will see how much toner is remaining - Dell 1100 Laser Mono Printer | Dell™ Laser Printer 1100 User's Guide - Page 60
1. 2. Gently pull the toner cartridge out, being careful not to scratch against printer, and lift it up and away from the printer. Gently shake the cartridge 5 or 6 times to distribute the toner evenly inside the cartridge. NOTE: If toner comes into contact with your clothing, wipe the - Dell 1100 Laser Mono Printer | Dell™ Laser Printer 1100 User's Guide - Page 61
reliability are not guaranteed if you do not use Dell supplies. To replace the toner cartridge: 1. Open the front cover. 2. Pull the used toner cartridge out and lift it up and away from the printer. CAUTION: Avoid reaching too far into the printer. The fusing area may be hot. 3. Unpack a new toner - Dell 1100 Laser Mono Printer | Dell™ Laser Printer 1100 User's Guide - Page 62
, do not expose it to light for more than a few minutes. 4. Pull the tape to remove the protective paper. 5. Locate the cartridge slot inside the printer, one on each side. 6. Unfold the toner cartridge handle and grasp it. Insert the cartridge into the - Dell 1100 Laser Mono Printer | Dell™ Laser Printer 1100 User's Guide - Page 63
toner cartridge is low and you should order a new toner cartridge. 1. Double-click the Dell Toner Reorder Program icon on your desktop. OR From the Start menu, click Programs Dell Printers Dell Laser Printer 1100 Reorder Program. OR In the Printing Status window, click the Order Supplies button - Dell 1100 Laser Mono Printer | Dell™ Laser Printer 1100 User's Guide - Page 64
2. The Order Toner Cartridges window appears. Click Visit Dell's cartridge ordering web site to order supplies online. If ordering by phone, call the number that appears under the By Telephone heading. - Dell 1100 Laser Mono Printer | Dell™ Laser Printer 1100 User's Guide - Page 65
the Operator Panel LEDs Troubleshooting Checklist Solving General Printing Problems Solving Print Quality Problems Clearing Jams in the guides are not properly positioned. Paper that does not meet paper specifications has been used. See "Paper Specifications" . Paper that is outside of the supported - Dell 1100 Laser Mono Printer | Dell™ Laser Printer 1100 User's Guide - Page 66
1. 2. Open and close the front or top cover to resume printing the document from failed pages. Paper Exit Jam NOTE: Paper jams in this area may result in loose toner on the page. If you get any toner on your clothes, wash them in cold water as hot water will set the toner into the fabric. 1. If the - Dell 1100 Laser Mono Printer | Dell™ Laser Printer 1100 User's Guide - Page 67
2. CAUTION: The top and inner cover themselves may also be hot due to the heat roller(located underneath the inner cover). Allow the printer to cool before opening the covers. 3. Loosen the paper if it is caught in the heat roller. Then remove the paper by gently pulling it - Dell 1100 Laser Mono Printer | Dell™ Laser Printer 1100 User's Guide - Page 68
: Failed pages will not reprint. Reprint the failed pages. Fuser Area Jam NOTICE: The fuser area is hot. Take care when removing paper from the printer. 1. Open the front cover. 2. Gently pull the toner cartridge out, being careful not to scratch against the printer, and lift it up and away from the - Dell 1100 Laser Mono Printer | Dell™ Laser Printer 1100 User's Guide - Page 69
Jams in the Paper Tray" . Follow the procedures in "Loading Print Media in the Paper Tray" . Ensure that the adjustable guides are correctly positioned. Do not overload the paper tray. Do not remove the paper from the tray while your printer is printing. Do not add paper to the tray while your - Dell 1100 Laser Mono Printer | Dell™ Laser Printer 1100 User's Guide - Page 70
different things, depending on their sequences. LEDs that are off, on, and/or blinking indicate printer conditions such as printer status, intervention (for example, out of paper and jammed paper), or service. The following table shows the most common LED sequences. Find the LED pattern below that - Dell 1100 Laser Mono Printer | Dell™ Laser Printer 1100 User's Guide - Page 71
printer has some problems. If this problem occurs, contact your service representative. • A paper jam has occurred. To solve the problem removing unnecessary graphics from your document. In Manual Feed mode, there is no paper in Troubleshooting Checklist If the printer is not working properly, - Dell 1100 Laser Mono Printer | Dell™ Laser Printer 1100 User's Guide - Page 72
the checklist does not resolve the printer problem, check the following troubleshooting sections. • "Solving General Printing Problems" . • "Understanding the Operator Panel LEDs" . Solving General Printing Problems For problems with the operation of your printer, refer to the table for suggested - Dell 1100 Laser Mono Printer | Dell™ Laser Printer 1100 User's Guide - Page 73
Cartridge" . The printer may be in Manual Feed mode and out of paper. Add paper to the tray and press on the printer's operator panel to set incorrectly. From the Start menu, choose Settings and Printers . Right-click Dell Laser Printer 1100 , choose Properties , click the Details tab, and then - Dell 1100 Laser Mono Printer | Dell™ Laser Printer 1100 User's Guide - Page 74
it does not contain blank pages. Contact a service representative. Print the document by selecting Download as Bit Image in the Advanced Options window of Graphics properties. Solving Print Quality Problems Print Quality Checklist Print quality problems can be resolved by following the checklist - Dell 1100 Laser Mono Printer | Dell™ Laser Printer 1100 User's Guide - Page 75
" . • The transfer roller may be dirty. Clean the inside of the printer. See "Cleaning the Interior" . • The paper path may need cleaning. repetitive defects ". • If these steps do not correct the problems, contact a service representative. If black vertical streaks appear on the page, the - Dell 1100 Laser Mono Printer | Dell™ Laser Printer 1100 User's Guide - Page 76
the Toner Cartridge" . • Parts of the printer may have toner on them. If the defects occur on the back of the page, the problem will likely correct itself after a few more pages. • The fusing assembly may be damaged. Contact a service representative. Background scatter Background scatter results - Dell 1100 Laser Mono Printer | Dell™ Laser Printer 1100 User's Guide - Page 77
Paper Specifications" . • Ensure that the paper or other material is loaded correctly and the guides are not too tight or too loose against the paper stack. Curl or wave • the toner. Clean the inside of the printer. See "Cleaning the Interior" . • The transfer roller may be dirty. See "Cleaning - Dell 1100 Laser Mono Printer | Dell™ Laser Printer 1100 User's Guide - Page 78
cartridge and reinsert. • The toner cartridge may be defective. Install a new toner cartridge. See "Replacing the Toner Cartridge" . • If the problem persists, the printer may require repair. Contact a service representative. Curl If the printed paper is curled or the paper does not feed into the - Dell 1100 Laser Mono Printer | Dell™ Laser Printer 1100 User's Guide - Page 79
Specifications Paper Specifications Printer Specifications Item Specifications and Description Print Speed Up to 14 ppm in A4 (15 ppm in Letter) Resolution 600 x 600 dpi First Printing Time 10 - Dell 1100 Laser Mono Printer | Dell™ Laser Printer 1100 User's Guide - Page 80
the paper meets the requirements specified in this User's Guide . CAUTION: Using paper that does not meet these specifications may cause problems, requiring repairs. These repairs are not covered by the Dell warranty or service agreements. Supported Sizes of Paper Paper Plain Paper Letter A4 A5 - Dell 1100 Laser Mono Printer | Dell™ Laser Printer 1100 User's Guide - Page 81
.1 in. (182 x 257 mm) • 60 to 90 g/m²ond (16 to 24 lb) for the paper tray • 60 to 163 g/m² bond (16 to 43 lb) for manual feed mode 6.93 x 9.84 in. (176 x 250 mm) 4.13 x 5.85 in. (105 x 148.5 mm) 8.50 x 13.50 in. (216 x 343 mm) 8.5 x 13 in. (216 x 330 - Dell 1100 Laser Mono Printer | Dell™ Laser Printer 1100 User's Guide - Page 82
Legal) (216 x 356 mm) 60 to 120 g/m² bond (16 to 32 lb) for manual feed mode a. The printer supports a wide range of media sizes. b. Capacity may vary depending on print materials' weight and on the package. The following problems may cause print quality deviations, jamming, or even damage to the - Dell 1100 Laser Mono Printer | Dell™ Laser Printer 1100 User's Guide - Page 83
, or short-grain construction • Use the rear output slot. • Use long-grain paper. Jamming, damage to printer Cutouts or Do not use paper with cutouts or perforations. perforations Problems with Ragged feeding edges Use good quality paper. NOTE: Do not use letterhead paper printed with low - Dell 1100 Laser Mono Printer | Dell™ Laser Printer 1100 User's Guide - Page 84
Location Paper Output Tray (Face Down) Capacity 50 sheets of 75 g/m² bond (20 lb) paper Printer and Paper Storage Environment Paper storage conditions directly affect the feed operation. Ideally, the printer and paper storage environment should be at or near room temperature, and not too dry or - Dell 1100 Laser Mono Printer | Dell™ Laser Printer 1100 User's Guide - Page 85
or too humid. The best way to store an opened ream of paper is to rewrap it tightly in its moisture-proof wrapping. If the printer environment is subject to extremes, unwrap only the amount of paper to be used during the day's operation to prevent unwanted moisture changes. - Dell 1100 Laser Mono Printer | Dell™ Laser Printer 1100 User's Guide - Page 86
other safety service or seriously degrades, obstructs, or repeatedly interrupts a licensed radio communications service. Radio communications services include but a Dell Technical Support representative or an experienced radio/television technician for additional suggestions. Dell™ printers are - Dell 1100 Laser Mono Printer | Dell™ Laser Printer 1100 User's Guide - Page 87
EMI or product safety information. FCC Notices (U.S. Only) Most Dell printers are classified by the Federal Communications Commission (FCC) as Class if not installed and used in accordance with the manufacturer's instruction manual, may cause interference with radio communications. However, there is - Dell 1100 Laser Mono Printer | Dell™ Laser Printer 1100 User's Guide - Page 88
covered in this document in compliance with FCC regulations: Model number: Dell Laser Printer 1100 Company name: Dell Inc. One Dell Way Round Rock, Texas 78682 USA 512-338-4400 IC Notice (Canada Only) Most Dell printers (and other Dell digital apparatus) are classified by the Industry Canada (IC - Dell 1100 Laser Mono Printer | Dell™ Laser Printer 1100 User's Guide - Page 89
- "Safety of Information Technology Equipment." EN 60825-1 - "Safety of Laser Products." NOTE: EN 55022 emissions requirements provide for two classifications: Class A commercial areas. Class B is for typical domestic areas. This Dell device is classified for use in a typical Class B domestic - Dell 1100 Laser Mono Printer | Dell™ Laser Printer 1100 User's Guide - Page 90
The equipment should draw power from a socket with an attached protection circuit (a 3-prong socket). All equipment that works together (computer, monitor, printer, and so on) should have the same power supply source. The phasing conductor of the room's electrical installation should have a reserve - Dell 1100 Laser Mono Printer | Dell™ Laser Printer 1100 User's Guide - Page 91
BSMI Notice (Taiwan Only) If you find a or mark on the regulatory label on the bottom, side, or back panel of your Printer, the following section is applicable: NOM Information (Mexico Only) The following information is provided on the device(s) described in this document in compliance with the - Dell 1100 Laser Mono Printer | Dell™ Laser Printer 1100 User's Guide - Page 92
S. de R.L. Avenida Soles No. 55 Col. Peñon de los Baños 15520 México, D.F. Dell Laser Printer 1100 110~127 VAC 50 Hz/60 Hz 4.0 Arms +5 VDC, +24 VDC 0.8 Arms(+5 VDC), 1.5 Arms (+24 VDC) ENERGY STAR® Compliance Any Dell product bearing the ENERGY STAR® emblem on the product or on a start-up screen is - Dell 1100 Laser Mono Printer | Dell™ Laser Printer 1100 User's Guide - Page 93
and recycling of products, components, and/or materials. For more information about recycling programs in the U.S., see www.dell.com/environment.
-
 1
1 -
 2
2 -
 3
3 -
 4
4 -
 5
5 -
 6
6 -
 7
7 -
8
-
9
-
10
-
11
-
12
-
13
-
14
-
15
-
16
-
17
-
18
-
19
-
20
-
21
-
22
-
23
-
24
-
25
-
26
-
27
-
28
-
29
-
30
-
31
-
32
-
33
-
34
-
35
-
36
-
37
-
38
-
39
-
40
-
41
-
42
-
43
-
44
-
45
-
46
-
47
-
48
-
49
-
50
-
51
-
52
-
53
-
54
-
55
-
56
-
57
-
58
-
59
-
60
-
61
-
62
-
63
-
64
-
65
-
66
-
67
-
68
-
69
-
70
-
71
-
72
-
73
-
74
-
75
-
76
-
77
-
78
-
79
-
80
-
81
-
82
-
83
-
84
-
85
-
86
-
87
-
88
-
89
-
90
-
91
-
92
-
93
 |
 |

Dell™ Laser Printer 1100 User's Guide
Click the links to the left for information on the features, options, and operation of your printer. For
information on other documentation included with your printer, see
"Finding Information"
.
To order replacement toner cartridges or supplies from Dell:
Double-click the Dell Toner Reorder Program icon on your desktop.
OR
1.
Visit Dell's website, or order Dell printer supplies by phone.
2.
www.dell.com/supplies
Notes, Notices, and Cautions
NOTE:
A
NOTE
indicates important information that helps you make better use of your printer.
NOTICE:
A
NOTICE
indicates either potential damage to hardware or loss of data and tells you
how to avoid the problem.
CAUTION:
A CAUTION indicates a potential for property damage, personal injury, or
death.