Dell 1135n Multifunction Mono Laser Printer User Guide
Dell 1135n Multifunction Mono Laser Printer Manual
 |
View all Dell 1135n Multifunction Mono Laser Printer manuals
Add to My Manuals
Save this manual to your list of manuals |
Dell 1135n Multifunction Mono Laser Printer manual content summary:
- Dell 1135n Multifunction Mono Laser Printer | User Guide - Page 1
strictly forbidden. Trademarks used in this text: Dell, the DELL logo, and Dell Toner Management System are trademarks of Dell Inc.; Microsoft, Windows, Windows Vista, and Windows Server are registered trademarks of Microsoft Corporation in the United States and/or other countries; Adobe and Acrobat - Dell 1135n Multifunction Mono Laser Printer | User Guide - Page 2
Multi-Functional Printer User's Guide www.dell.com | support.dell.com? - Dell 1135n Multifunction Mono Laser Printer | User Guide - Page 3
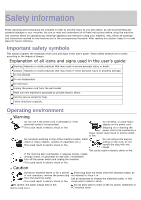
all of these instructions before using the machine. all warnings and instructions marked on the signs in the user's guide. These safety symbols are in signs used in the user's guide: Warning Hazards or electric shock. Call the service center for help. Follow paper output area is hot. Burns could - Dell 1135n Multifunction Mono Laser Printer | User Guide - Page 4
. You may get injured. When removing jammed paper, do not use tweezers or sharp metal objects. It can cause damage to the machine. Do not block or push objects into the ventilation opening. Do not allow too many papers to stack up in the paper output tray. This could result in elevated component - Dell 1135n Multifunction Mono Laser Printer | User Guide - Page 5
such as toner cartridge or fuser unit. It can cause an explosion or fire. Using recycled supplies, such as toner, can cause damage to the machine. In case of damage due to the use of recycled supplies, a service fee will be charged. When changing the toner cartridge or removing jammed paper, be - Dell 1135n Multifunction Mono Laser Printer | User Guide - Page 6
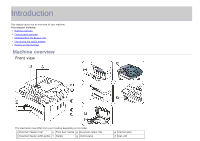
useful buttons Turning on the machine Machine overview Front view This illustration may differ from your machine depending on its model. 1 Document feeder cover 6 Front door handle 11 Document output tray 2 Document feeder width guides 7 Handle 12 Control panel 16 Scanner glass 17 Scan unit - Dell 1135n Multifunction Mono Laser Printer | User Guide - Page 7
3 Document feeder input tray 8 Tray 1 4 Document feeder output tray 9 Manual tray 5 Output support 10 Front door [a] This button is used when you close the scan unit. Rear view 13 Toner cartridge 18 Scan unit close button[a] 14 Manual tray paper width guides 15 Scanner lid This - Dell 1135n Multifunction Mono Laser Printer | User Guide - Page 8
the machine is waiting for the error to be cleared. Check the display message. When the problem is cleared, the machine resumes. Small amount of toner is left in the cartridge. The estimated cartridge life[a] of toner is close. Prepare a new cartridge for replacement. You may temporarily increase - Dell 1135n Multifunction Mono Laser Printer | User Guide - Page 9
toner cartridges will not be covered under the machine warranty. Check the message on the display. Follow the instructions in the message or refer to troubleshooting part (See Understanding display messages). If the problem persists, call for service. All printing errors will appear in the Printer - Dell 1135n Multifunction Mono Laser Printer | User Guide - Page 10
, troubleshooting, and replacing supplies. Machine Driver Help Dell website This help provides you with help information on printer driver and instructions for setting up the options for printing (See Using help). If you have Internet access, you can get help, support, machine drivers, manuals - Dell 1135n Multifunction Mono Laser Printer | User Guide - Page 11
- Dell 1135n Multifunction Mono Laser Printer | User Guide - Page 12
23 ppm. Handle many different types of printable material Manual tray supports plain paper in various sizes, letterhead, envelopes, labels, custom-sized media, postcards, and heavy paper. The 250-sheet tray supports plain paper. Create professional documents Print Watermarks. You can customize your - Dell 1135n Multifunction Mono Laser Printer | User Guide - Page 13
model include: FEATURES Dell 1135n Print ? Duplex (2-sided) printing (manual) ? Copy ? FAX ? Network PC fax ? Fax to PC (Dell Scan and Fax Manager) ? On hook dial ? USB 2.0 ? Network Interface Ethernet 10/100 Base TX wired LAN ? IPv6 ? Embedded Web Service ? Document Feeder - Dell 1135n Multifunction Mono Laser Printer | User Guide - Page 14
chapter gives you step-by-step instructions for setting up the USB connected machine and software. This chapter includes: Setting up the hardware Supplied software System requirements Installing USB connected machine's driver Sharing your machine locally Supported optional devices and features may - Dell 1135n Multifunction Mono Laser Printer | User Guide - Page 15
and installed scan driver's condition. Dell 1135n Laser MFP Toner Reorder: The Dell 1133 Laser MFP Toner Reorder window also displays the level of toner remaining and allows you to order replacement toner cartridge. Firmware Update Utility: This program helps you to update printer's firmware. SetIP - Dell 1135n Multifunction Mono Laser Printer | User Guide - Page 16
4.0, 5.0 (32/64 bit) CPU Pentium® IV 2.4 GHz (Intel Core™2) RAM 512 MB (1024 MB) Free HDD space 1 GB (2 GB) It is necessary to claim swap partition of 300 MB or larger for working with large scanned images. The Linux scanner driver supports the optical resolution at maximum. Installing USB - Dell 1135n Multifunction Mono Laser Printer | User Guide - Page 17
in Windows Vista, Windows 7, or Windows 2008 Server R2, click Run Setup.exe in Install or run program field, and click Continue or Yes in the User Account Control windows. 3. Click Next. If necessary, select a language from the drop-down list. 4. Select Typical installation for a local printer. Then - Dell 1135n Multifunction Mono Laser Printer | User Guide - Page 18
printer at this time, click Next, and No on the following screen. The installation starts and a test page will not print at the end of the installation. The installation window in this user guide the printer driver does not work properly, follow the steps below to repair or reinstall the driver. 1. - Dell 1135n Multifunction Mono Laser Printer | User Guide - Page 19
If you have installed scanner driver, click Restart. 13. Open the Applications folder > Utilities > Print Setup Utility. For Mac OS X 10.5 ~ 10.6, open the Applications folder > System Preferences and click Print & Fax. 14. Click Add on the Printer List. For Mac OS X 10.5 ~ 10.6, press the "+" icon - Dell 1135n Multifunction Mono Laser Printer | User Guide - Page 20
on. 2. When the Administrator Login window appears, type in "root" in the Login field and enter the system password. You must log in as a super user (root) to uninstall the printer driver. If you are not a super user, ask your system administrator. 3. Insert the supplied software CD into your CD/DVD - Dell 1135n Multifunction Mono Laser Printer | User Guide - Page 21
the host computer. Windows Setting up a host computer 1. Install your printer driver (See Installing USB connected machine's driver). 2. Click the Windows Start menu. 3. For Windows 2000, select Settings > Printers. For Windows XP/2003, select Printers and Faxes. For Windows 2008/Vista, select - Dell 1135n Multifunction Mono Laser Printer | User Guide - Page 22
steps are for Mac OS X 10.5 ~ 10.6. Refer to Mac Help for other OS versions. Setting up a host computer 1. Install your printer driver (See Macintosh). 2. Open the Applications folder > System Preferences and click Print & Fax. 3. Select the printer to share in the Printers list. 4. Select Share - Dell 1135n Multifunction Mono Laser Printer | User Guide - Page 23
save modes Setting the default tray and paper Setting job timeout Altitude adjustment installed the printer driver with the provided software CD. 2. You can launch Printer Settings Utility from the Start menu, select Programs or All Programs > Dell > Dell Printers > your printer driver name > Printer - Dell 1135n Multifunction Mono Laser Printer | User Guide - Page 24
. 2. Press the left/right arrow until System Setup appears and press OK. 3. Press the left/right arrow until Machine Setup appears and press OK. 4. Press the left/ option set to On, an alarm tone sounds when an error occurs or fax communication ends. Speaker: Turns On or Off the sounds from the telephone - Dell 1135n Multifunction Mono Laser Printer | User Guide - Page 25
Menu ( ) on the control panel. 2. Press the left/right arrow until System Setup appears and press OK. 3. Press the left/right arrow until Sound/Volume appears machine, you enter your name or your company's name, and the fax number. Entering alphanumeric characters 1. When you are prompted to enter a - Dell 1135n Multifunction Mono Laser Printer | User Guide - Page 26
Setup appears and press OK. 4. Press the left/right arrow until Toner Save appears and press OK. 5. Press the left/right arrow until On appears and press OK. 6. Press Stop/Clear ( ) to return to ready mode. When PC-printing, you can also turn on or off toner save mode in the printer properties - Dell 1135n Multifunction Mono Laser Printer | User Guide - Page 27
to select the paper tray you want. 7. Press OK to save the selection. 8. Press Stop/Clear ( ) to return to ready mode. In the computer Windows 1. Click the Windows Start menu. 2. For Windows 2000, select Settings > Printers. For Windows XP/2003, select Printers and Faxes. For Windows 2008/Vista - Dell 1135n Multifunction Mono Laser Printer | User Guide - Page 28
5. Select tray (source) and its options, such as paper size and type. 6. Press OK. Setting job on the control panel. 2. Press the left/right arrow until System Setup appears and press OK. 3. Press the left/right arrow until Machine Setup appears and press OK. 4. Press the left/right arrow until Job - Dell 1135n Multifunction Mono Laser Printer | User Guide - Page 29
to a file (PRN) Macintosh printing Linux printing The procedures in this chapter are mainly based on Windows XP. Printer driver features Your printer drivers support the following standard features: Paper orientation, size, source, and media type selection Number of copies In addition, you can use - Dell 1135n Multifunction Mono Laser Printer | User Guide - Page 30
tool is available for the download. Canceling a print job If the print job is waiting in a print queue or print spooler, cancel the job as follows: 1. Click the Windows Start menu. 2. For Windows 2000, select Settings > Printers. For Windows XP/2003, select Printer and Faxes. For Windows 2008/Vista - Dell 1135n Multifunction Mono Laser Printer | User Guide - Page 31
settings you selected on the upper right of the Printing Preferences. 1. Open the document you want to print. 2. Select Print from the file menu. The Print window appears. 3. Select your machine from the Select Printer. 4. Click Properties or Preferences. Using a Presets setting The Presets option - Dell 1135n Multifunction Mono Laser Printer | User Guide - Page 32
the Dell tab in the Printing Preferences window, and enter a keyword in the input line of the Help option. Using special print features Special print features include: Printing multiple pages on one sheet of paper. Printing posters. Printing booklets (Manual). Printing on both sides of paper (Manual - Dell 1135n Multifunction Mono Laser Printer | User Guide - Page 33
labels, envelopes, or thick paper. It may cause a paper jam or damage the machine. 1. To change the print settings from your software application, access Printing Preferences (See Opening printing preferences). 2. Click the Advance tab. 3. From the Double-Sided Printing (Manual) section, select the - Dell 1135n Multifunction Mono Laser Printer | User Guide - Page 34
5. Click OK or Print until you exit the Print window. If your machine does not have a duplex unit, you should complete the printing job manually. The machine prints every alternate page of the document first. After that, an instruction message appears on your computer. Follow the on-screen - Dell 1135n Multifunction Mono Laser Printer | User Guide - Page 35
and change the watermark message and options. 4. Click Update to save the changes. 5. Click OK or Print until you exit the Print window. Deleting a watermark 1. To change the print settings from your software application, access Printing Preferences (See Opening printing preferences). 2. Click the - Dell 1135n Multifunction Mono Laser Printer | User Guide - Page 36
save toner when printing a document, select this option. 3. Click OK or Print until you exit the Print window. Changing the default print settings 1. Click the Windows Start menu. 2. For Windows 2000, select Settings > Printers. For Windows XP/2003, select Printer and Faxes. For Windows 2008/Vista - Dell 1135n Multifunction Mono Laser Printer | User Guide - Page 37
your machine as a default machine 1. Click the Windows Start menu. 2. For Windows 2000, select Settings > Printers. For Windows XP/2003, select Printer and Faxes. For Windows 2008/Vista, select Control Panel > Hardware and Sound > Printers. For Windows 7, select Control Panel > Hardware and Sound - Dell 1135n Multifunction Mono Laser Printer | User Guide - Page 38
with a Macintosh, you need to check the printer driver setting in each application you use. Follow the steps below to print from a Macintosh: 1. Open the document you want to print. 2. Open the File menu and click Page Setup. 3. Choose your paper size, orientation, scaling, other options, and make - Dell 1135n Multifunction Mono Laser Printer | User Guide - Page 39
, select the corresponding paper type. Printer Settings Printer Settings tab provides Toner Save options. Select Printer Settings from the drop-down list under Orientation to access the following features: Toner Save: Selecting this option extends the life of your toner cartridge and reduces your - Dell 1135n Multifunction Mono Laser Printer | User Guide - Page 40
the Printers configuration, you can change the various properties for your machine as a printer. 1. Open the Unified Driver Configurator. If necessary, switch to Printers configuration. 2. Select your machine on the available printers list and click Properties. 3. The Printer Properties window opens - Dell 1135n Multifunction Mono Laser Printer | User Guide - Page 41
printer list in Printers configuration. Connection: This option allows you to view or select another port. If you change the machine port from USB to parallel or vice versa while in use, you must re-configure the machine port in this tab. Driver the changes and close the Printer Properties window. - Dell 1135n Multifunction Mono Laser Printer | User Guide - Page 42
instructions for copying documents. This chapter includes: Basic copy Changing the settings for each copy Changing the default copy settings Using special copy features Deciding the form of copy output Setting copy timeout Supported optional devices and features may differ according to your printer - Dell 1135n Multifunction Mono Laser Printer | User Guide - Page 43
a copied image from 25% to 400% when you copy original documents from the scanner glass, or from 25% to 100% from the ADF. To select from the predefined ) on the control panel. 3. Press the left/right arrow until Copy Setup appears and press OK. 4. Press the left/right arrow until Change Default - Dell 1135n Multifunction Mono Laser Printer | User Guide - Page 44
] appears on the display. 3. Place the front side of an original facing down on the scanner glass where arrows indicate as shown, and close the scanner lid. 4. Press OK on the control panel. Your machine begins scanning the front side and shows Place Back Side and Press [Start]. 5. Turn the original - Dell 1135n Multifunction Mono Laser Printer | User Guide - Page 45
to begin copying. Your original is divided into 9 portions. Each portion is scanned and printed one by one in the following order: Clone copying The machine by the original image and the paper size. This copy feature is available only when you place originals on the scanner glass. 1. Press Copy ( ) - Dell 1135n Multifunction Mono Laser Printer | User Guide - Page 46
feeder. Or you can use the scanner glass with a single original document face down and closed the scanner ( ) to return to ready mode. 10. Press Start to begin copying. One complete arrow until System Setup appears and press OK. 3. Press the left/right arrow until Machine Setup appears and press - Dell 1135n Multifunction Mono Laser Printer | User Guide - Page 47
directly with the machine via an USB cable (See Scanning using the WIA driver). Scanning originals and sending to your computer (Scan to PC) You can scan an image on the machine via the Dell Scan and Fax Manager program that is installed in your networked computer. For USB connected machine This - Dell 1135n Multifunction Mono Laser Printer | User Guide - Page 48
driver to scan quickly in Dell Scan and Fax Manager program. You can also scan by pressing Window's Start > Control Panel > Dell Scan and Fax Manager > Quick Scan. For network connected machine Make sure the printer driver is installed on your computer using the software CD, since the printer driver - Dell 1135n Multifunction Mono Laser Printer | User Guide - Page 49
feeder, or place a single original face down on the scanner glass. (See Loading originals). 3. Open an application, such as Adobe Photoshop. 4. Open the TWAIN window and set the scan options. 5. Scan and save your scanned image. Scanning using the WIA driver Your machine also supports the Windows - Dell 1135n Multifunction Mono Laser Printer | User Guide - Page 50
click Scan a document or picture. Windows Fax and Scan application appears. You can click on View scanners and cameras to view scanners, If there is no Scan a document or picture, open the MS paint program and from the File click From Scanner or Camera... 5. Click New Scan. Scan driver appears - Dell 1135n Multifunction Mono Laser Printer | User Guide - Page 51
the document feeder, or place a single original face down on the scanner glass. (See Loading originals). 3. Open an application, such as Adobe Photoshop. 4. Open the TWAIN window and set the scan options. 5. Scan and save your scanned image. For scanning with network: If a warning message appears - Dell 1135n Multifunction Mono Laser Printer | User Guide - Page 52
feeder, or place a single original face down on the scanner glass. (See Loading originals). 6. From the Scanner Properties window, click Preview. The document is scanned enables you to set the page size manually. If you want to use one of the preset scan option settings, select the option from the - Dell 1135n Multifunction Mono Laser Printer | User Guide - Page 53
-down list. 2. The next time you open the Scanner Properties window, the saved setting is automatically selected for the scan job. To delete a Job Type setting Allows you to scale the image size; you can enter the size manually, or set the rate to scale proportionally, vertically, or horizontally. - Dell 1135n Multifunction Mono Laser Printer | User Guide - Page 54
Properties Shows the properties of the image. For further details about the Image Manager application, refer to the on screen help. - Dell 1135n Multifunction Mono Laser Printer | User Guide - Page 55
Quick Install Guide how to make a connection. The method of making a telephone connection is varies from one country to another. Using a fax in your computer You can receive a fax from your computer without going to the machine. Receiving a fax If you have installed the printer driver, the Dell Scan - Dell 1135n Multifunction Mono Laser Printer | User Guide - Page 56
starts to scan and send a fax to destinations. When you want to cancel a fax job, press Stop/Clear ( ) before the machine start transmission. If you used the scanner glass, the machine shows the message asking to place another page. Sending a fax manually This method is sending a fax using On - Dell 1135n Multifunction Mono Laser Printer | User Guide - Page 57
goes wrong while sending your fax, an error message appears on the display. For a list of error messages and their meanings, see Understanding display messages. If you receive an error message, press Stop/Clear ( ) to clear the message and try to send the fax again. You can set your machine - Dell 1135n Multifunction Mono Laser Printer | User Guide - Page 58
10 destinations. Once you entered a group dial number, you cannot enter another group dial numbers anymore. 10. When you have finished entering fax fax will be sent at that time on the following day. The original is scanned into memory before transmission. 13. If an original is placed on the scanner - Dell 1135n Multifunction Mono Laser Printer | User Guide - Page 59
at the Another Page? prompt. The machine starts to scan and send a fax to destinations. Receiving a fax in your machine This part explains how to receive a fax, and the special receiving methods available. Changing the receive modes Your machine is preset to Fax mode at the factory. When you receive - Dell 1135n Multifunction Mono Laser Printer | User Guide - Page 60
. otherwise, the outgoing message from the answering machine will interrupt your phone conversation. Receiving faxes manually using an extension telephone see Changing the fax setup options Receiving faxes using DRPD mode Distinctive Ring is a telephone company service which enables an user to use a - Dell 1135n Multifunction Mono Laser Printer | User Guide - Page 61
shades of gray or photographs. Originals with colors. Sending a color fax is enabled only if the machine with which you are communicating supports color fax reception and you send the fax manually. In this mode, memory transmission is not available. The resolution setting is applied to the current - Dell 1135n Multifunction Mono Laser Printer | User Guide - Page 62
forwarding has been completed, select Forward & Print. 8. Enter the number of the fax machine to which faxes are to be sent and press OK. 9. Enter the starting time using left/right arrow or numeric keypad and press OK. 10. Enter the ending time using left/right arrow or numeric keypad and press OK - Dell 1135n Multifunction Mono Laser Printer | User Guide - Page 63
dial numbers 1. Press Fax ( ) on the control panel. 2. Press Address Book ( ) on the control panel. 3. Press the left/right arrow until New & Edit appears prompt. Repeat step 7 to include other speed dial numbers into the group. 10. When you have finished, press the left/right arrow to select No at - Dell 1135n Multifunction Mono Laser Printer | User Guide - Page 64
press OK. If you entered a new speed dial number, Add? appears. to add or delete the number. 10. Press OK when Yes appears to scan from A to Z sequentially, or you can search by entering the first letters of the name associated with the number. Searching sequentially through the memory 1. Press Fax - Dell 1135n Multifunction Mono Laser Printer | User Guide - Page 65
until Print appears and press OK. The machine begins printing. Printing sent fax report automatically You can set the machine to print a report with detailed ( ) on the control panel. 3. Press the left/right arrow until Fax Setup appears and press OK. 4. Press the left/right arrow until Auto Report - Dell 1135n Multifunction Mono Laser Printer | User Guide - Page 66
how many pages were sent, and more. The available options are On, Off, and On-Error, which prints only when a transmission is not successful. Image TCR This function allows users to know what fax messages have been sent by showing sent messages in the transmission report. The first page of the - Dell 1135n Multifunction Mono Laser Printer | User Guide - Page 67
has been turned on, the machine will reduce the fax to fit on the existing paper, and nothing will be discarded. Junk Fax This setting may not be available depending on your country. Using this feature, the system will not Setup accept faxes sent from remote stations whose numbers are stored in - Dell 1135n Multifunction Mono Laser Printer | User Guide - Page 68
available. Darkness You can select the default contrast mode to fax details, see Printing sent fax report automatically. Copy setup Changing the copy setup options For copy output, you Description Configuration This list shows the status of the user-selectable options. You may print this list to - Dell 1135n Multifunction Mono Laser Printer | User Guide - Page 69
or from this list, access the Junk Fax Setup menu (See Receiving). This list shows information on your machine's network connection and configuration. You can also print the machine's status information and browse status with Embedded Web Service. Open the Web browser on your networked computer and - Dell 1135n Multifunction Mono Laser Printer | User Guide - Page 70
Stamp RCV Name RCV Start Code Auto Reduction Discard Size Junk Fax Setup DRPD Mode Change Default Resolution Darkness Auto Report Copy Feature Reduce/Enlarge Darkness Original Type Layout Adjust Bkgd. Copy Setup Scan Size Change Default Copies Copy Collation Reduce/Enlarge Darkness Original Type - Dell 1135n Multifunction Mono Laser Printer | User Guide - Page 71
Schedule Jobs JunkFax Report Network Info. Maintenance CLR Empty Msg Supplies Life TonerLow Alert Serial Number Paper Stacking Clear Setting All Settings Fax Setup Copy Setup Scan Setup System Setup Network Setup Phone Book Sent Report RCV Report TCP/IP (IPv4) DHCP BOOTP Static TCP/IP (IPv6) IPv6 - Dell 1135n Multifunction Mono Laser Printer | User Guide - Page 72
number of pages scanned using the ADF. Platen Scan: Displays the number of pages scanned using the scanner glass. 6. Press Stop/Clear ( ) to return to ready mode. Using toner low alert If the amount of toner in the cartridge is low, a message informing user to change the toner cartridge appears. You - Dell 1135n Multifunction Mono Laser Printer | User Guide - Page 73
you have installed the printer driver with the provided software CD. 2. You can launch Printer Settings Utility from the Start menu, select Programs or All Programs > Dell > Dell Printers > your printer driver name > Printer Settings Utility. 3. Click Printer Setting. 4. Click Setting > Toner Low - Dell 1135n Multifunction Mono Laser Printer | User Guide - Page 74
clean the glass with a swab. 5. Reinsert the toner cartridge and close the front door. 6. Plug in the power cord and turn the machine on. Cleaning the scan unit Keeping the scan unit clean helps ensure the best possible copies. We suggest that you clean the scan unit at the start of each day and - Dell 1135n Multifunction Mono Laser Printer | User Guide - Page 75
to light, temperature, and humidity. It is recommended that users follow the these recommendations to ensure optimum performance, highest quality, and longest life from your new Dell toner cartridge. Store this cartridge in the same environment as the printer it will be used in; this should be in - Dell 1135n Multifunction Mono Laser Printer | User Guide - Page 76
help you to use your machine conveniently. Using Embedded Web Service. Using the Printer Status Monitor. Smarthru. Using the Linux Unified Driver Configurator. Using Embedded Web Service Your Embedded Web Service window that appears in this user's guide may differ depending on the machine in use. If - Dell 1135n Multifunction Mono Laser Printer | User Guide - Page 77
MFP Toner Reorder The Dell 1135n Laser MFP Toner Reorder window also displays the level of toner remaining and allows you to order replacement toner cartridge. Using the Printer Settings Utility When you install the Dell software, the Printer Settings Utility is automatically installed. To open - Dell 1135n Multifunction Mono Laser Printer | User Guide - Page 78
your machine by upgrading firmware. If you are a Windows user, you can launch Firmware Update Utility from the Start menu, select Programs or All Programs > Dell > Dell Printers > your printer driver name > Firmware Update Utility. Smarthru The supplied software CD provides you with SmarThru - Dell 1135n Multifunction Mono Laser Printer | User Guide - Page 79
Scan. Printing 1. Click Print. 2. Select the file you want to print. 3. Select the machine you want to use for printing. 4. Click Print to start the job. Using the Linux Unified Driver Configurator Unified Driver Configurator is a tool primarily intended for configuring machine devices. Opening - Dell 1135n Multifunction Mono Laser Printer | User Guide - Page 80
. You can also click the Startup Menu icon and select Dell Unified Driver > Unified Driver Configurator. 2. Click each button on the left to switch to the corresponding configuration window. 1. Printers Configuration 2. Scanners Configuration 3. Ports Configuration To use the on screen help, click - Dell 1135n Multifunction Mono Laser Printer | User Guide - Page 81
configuration. 2 Shows all of the installed machine. 3 Shows the status, model name and URI of your machine. The printer control buttons are, as follows: Refresh: Renews the available machines list. Add Printer: Allows you to add a new machines. Remove Printer: Removes the selected machine. Set as - Dell 1135n Multifunction Mono Laser Printer | User Guide - Page 82
the classes list. Add Class: Allows you to add a new machine class. Remove Class: Removes the selected machine class. Scanners configuration In this window, you can monitor the activity of scanner devices, view a list of installed Dell machine devices, change device properties, and scan images. - Dell 1135n Multifunction Mono Laser Printer | User Guide - Page 83
and type of your scanner. Properties: Allows you to change the scan properties and scan a document. Ports configuration In this window, you can view the list of available ports, check the status of each port and release a port that is stalled in a busy state when its users has terminated the job - Dell 1135n Multifunction Mono Laser Printer | User Guide - Page 84
it is necessary to organize proper access of user-installed applications to these devices via the single I/O port. The Unified Linux Driver package provides an appropriate port sharing mechanism that is used by Dell printer and scanner drivers. The drivers talk to their devices via so-called machine - Dell 1135n Multifunction Mono Laser Printer | User Guide - Page 85
sizes or weights of paper. Do not load booklets, pamphlets, transparencies, or documents with other unusual characteristics. Loading originals You can use the scanner glass or the automatic document feeder to load an original for copying, scanning, and sending a fax. On the scanner glass Make sure - Dell 1135n Multifunction Mono Laser Printer | User Guide - Page 86
the registration guide at the top left corner of the glass. 3. Close the scanner lid. Leaving the scanner lid open while copying may affect copy quality and toner consumption. Dust on the scanner glass may cause black spots on the printout. Always keep it clean (See Cleaning the scan unit). If you - Dell 1135n Multifunction Mono Laser Printer | User Guide - Page 87
it meets the requirements specified in this user's guide. Using print media that does not meet these specifications may cause problems, requiring repairs. Such repairs are not covered by the warranty or service agreements. The amount of paper put into the tray may differ according to media type used - Dell 1135n Multifunction Mono Laser Printer | User Guide - Page 88
. Fax mode Letter, A4, Legal Tray 1 Manual tray Tray 1 Manual tray Tray 1 Changing the tray size The tray is preset to Letter or A4 size, depending on your country. To change the size, you need to adjust the paper guides. 1. Support guide 2. Paper length guide 3. Guide lock 4. Paper width guide - Dell 1135n Multifunction Mono Laser Printer | User Guide - Page 89
to warp. If you do not adjust the paper width guide, it may cause paper jams. Do not use paper with more than 6 mm curl. Loading paper in the tray Tray 1 1. Pull out the paper tray. And adjust the tray size to the media size you are loading (See Changing the tray size). 2. Flex or fan the edge of - Dell 1135n Multifunction Mono Laser Printer | User Guide - Page 90
you select Manual Feeder for Source from your software application, you need to press OK each time you print a page and load only one type, size and weight of print media at a time in the manual tray. To prevent paper jams, do not add paper while printing when there is still paper in the manual tray - Dell 1135n Multifunction Mono Laser Printer | User Guide - Page 91
first and the envelope in the center of the manual tray with the stamp area entering the printer first and keeping the stamp on the left. If envelopes are printed out with wrinkles, crease or black bold lines, open the rear cover and pull down the pressure lever and try printing again. Keep the - Dell 1135n Multifunction Mono Laser Printer | User Guide - Page 92
snaps, windows, coated lining or jams, and may even damage the fuser. For laser printers. Transparencies used in the machine must be able to withstand machine's fusing temperature. Place them on a flat surface after removing them from the machine. Do not leave unused transparencies in the paper tray - Dell 1135n Multifunction Mono Laser Printer | User Guide - Page 93
can cause labels to peel off during printing, which can cause paper jams. Exposed adhesive can also cause damage to machine components. Do paper Tray1 Single-sided Face down Double-sided Face up Manual tray Face up Face down Letterhead/ Preprinted paper must be printed with heat-resistant ink - Dell 1135n Multifunction Mono Laser Printer | User Guide - Page 94
paper tray, set the paper size and type using the control panel. These settings will apply to copy and fax modes. For computer printing, select the paper size and type in the application program you use on your computer (See Opening printing preferences). The settings made from the machine driver - Dell 1135n Multifunction Mono Laser Printer | User Guide - Page 95
a small-sized printout When you have printed a small sized printout like an envelope or a custom sized printout, it may not be placed on the output support, due to its small size. In this case, get the printout pull up the scan unit, get the printout, and close the scan unit again for future use. - Dell 1135n Multifunction Mono Laser Printer | User Guide - Page 96
Network setup This chapter gives you step-by-step instructions for setting up the network connected machine and software. This chapter includes: Network environment Introducing useful network programs Using a wired network Installing network connected machine's driver IPv6 Configuration Network - Dell 1135n Multifunction Mono Laser Printer | User Guide - Page 97
a network and troubleshoot problems. 1. Press Menu see the new IP address Installing network connected machine's driver. IP setting using SetIP Program (Windows) This program is for manually setting the network IP address of your machine using its MAC address to communicate with the machine. A MAC - Dell 1135n Multifunction Mono Laser Printer | User Guide - Page 98
1. Insert the Printer Software CD-ROM provided with your machine. When the driver CD runs automatically, close that window. 2. Start Windows Explorer and open the X drive (X represents your CD-ROM drive). 3. Double-click Application > SetIP. 4. Double-click Setup.exe to install this program. 5. - Dell 1135n Multifunction Mono Laser Printer | User Guide - Page 99
using SetIP Program (Linux) SetIP program should be automatically installed during the printer driver installation. 1. Print the machine's network configuration report to find your machine's MAC address. 2. Open the /opt/Dell/mfp/share/utils/. 3. Double click the SetIPApplet.html file. 4. Click - Dell 1135n Multifunction Mono Laser Printer | User Guide - Page 100
in Windows Vista, Windows 7 and Windows 2008 Server R2, click Run Setup.exe in Install or run program field, and click Continue or Yes in the User Account Control windows. 3. Click Next. If necessary, select a language from the drop-down list. 4. Select Typical installation for a network printer - Dell 1135n Multifunction Mono Laser Printer | User Guide - Page 101
manually or find a shared printer by clicking the Browse button. If you cannot find your machine in network, please turn off the firewall and click Update. For Windows operating system, Start > Control Panel and start windows on-line guide. 6. After the installation is finished, a window asking you - Dell 1135n Multifunction Mono Laser Printer | User Guide - Page 102
will close on your computer appears. Click Continue. 10. After the installation is finished, click Quit. 11. Open the Applications folder > Utilities > Print Setup Utility. For Mac OS X 10.5~10.6, open the Applications folder > System Preferences and click Print & Fax. 12. Click Add on the Printer - Dell 1135n Multifunction Mono Laser Printer | User Guide - Page 103
. 2. Insert the supplied software CD into your CD/DVD drive. 3. Double-click CD-ROM icon that appears on your Linux desktop. 4. Double-click the Linux folder. 5. Double-click the install.sh icon. 6. The Dell Installer window opens. Click Continue. 7. The Add printer wizard window opens. Click Next - Dell 1135n Multifunction Mono Laser Printer | User Guide - Page 104
supports IPv6 addressing as a URL (See Connecting Embedded Web Service). For IPv4, enter the IPv4 address (http://xxx.xxx.xxx.xxx) in the address field and press the Enter key or click Go. 2. When the Embedded Web Service window opens, click Network Settings. 3. Click TCP/IP. 4. Enable the Manual - Dell 1135n Multifunction Mono Laser Printer | User Guide - Page 105
(document feeder) 52 dB(A) Temperature Operation 10 to 32 °C (50 to 90 °F) Storage (unpacked) 0 to 40 °C (32 to 104 °F) Humidity Operation 20 to 80% RH Storage (unpacked) 10 to 80% RH [a] Sound Pressure Level, ISO 7779. Configuration tested: machine basic installation, A4 paper, simplex - Dell 1135n Multifunction Mono Laser Printer | User Guide - Page 106
Envelope Monarch Envelope No. 10 Envelope DL Envelope C5 Envelope C6 Thick paper Refer to the Plain paper section Thin paper Refer to the Plain paper section Transparency Refer to the Plain paper section Dimensions Print media weight[a]/Capacity[b] Tray1 Manual tray 216 x 279 mm (8.50 - Dell 1135n Multifunction Mono Laser Printer | User Guide - Page 107
60 to 163 g/m2 (16 to 43 lb bond) Maximum size (custom) 216 x 356 mm (8.50 x 14.02 inches) [a] If media weight is over 120 g/m2 (32 lb), load a paper into the tray one by one. [b] Maximum capacity may differ depending on media weight, thickness, and environmental conditions. [c] Smoothness: 100 - Dell 1135n Multifunction Mono Laser Printer | User Guide - Page 108
new cart message appears on the display. The machine stops printing. Incoming faxes are saved in memory. At this stage, the toner cartridge needs to be replaced. Check the type of the toner cartridge for your machine (See Available supplies). 1. Open the front door. 2. Pull the toner cartridge - Dell 1135n Multifunction Mono Laser Printer | User Guide - Page 109
the toner cartridge. Use the handle on the cartridge to avoid touching this area. 7. Hold the toner cartridge by the handle and slowly insert the cartridge into the opening in the machine. Tabs on the sides of the cartridge and corresponding grooves within the machine will guide the cartridge into - Dell 1135n Multifunction Mono Laser Printer | User Guide - Page 110
closed. Checking replaceable's lifespan If you experience frequent paper jams or printing problems, check the number of pages the machine has printed. Replace the corresponding parts, if necessary. 1. Press Menu ( ) on the control panel. 2. Press the left/right arrow until System Setup appears - Dell 1135n Multifunction Mono Laser Printer | User Guide - Page 111
original document jams Tips for avoiding paper curls Tips for avoiding paper jams Clearing paper jams Understanding display messages Solving other problems Redistributing toner When the toner cartridge is near the end of its life: White streaks or light printing occurs. Prepare new cartridge appears - Dell 1135n Multifunction Mono Laser Printer | User Guide - Page 112
the scanner glass for thick, thin, or mixed paper-type originals. 1. Remove any remaining pages from the document feeder. 2. Open the document feeder cover. 3. Gently remove the jammed paper from the document feeder. If you see no paper in this area, go to step 5. 4. Close the document feeder cover - Dell 1135n Multifunction Mono Laser Printer | User Guide - Page 113
from the feed area by carefully pulling it to the right using both hands. 1. scanner lid 7. Close the scanner lid. Load the removed pages back into the document feeder. Tips for avoiding paper curls 1. Open the rear door. 2. Pull down the pressure lever on each side. 1. Pressure lever Keep the rear - Dell 1135n Multifunction Mono Laser Printer | User Guide - Page 114
up in the manual tray. Clearing paper jams When a paper jam occurs, a warning message appears on the display. To resume printing after clearing paper jams, you must open and close the front door. To avoid tearing the paper, pull the jammed paper out slowly and gently. Follow the instructions in the - Dell 1135n Multifunction Mono Laser Printer | User Guide - Page 115
. In the manual tray 1. If the paper is not feeding properly, pull the paper out of the machine. 2. Open and close the front door to resume printing. Inside the machine The fuser area is hot. Take care when removing paper from the machine. 1. Open the front door and pull the toner cartridge out - Dell 1135n Multifunction Mono Laser Printer | User Guide - Page 116
3. Replace the toner cartridge and close the front door. Printing automatically resumes. In exit area 1. Open and close the front door. The jammed paper is automatically ejected from the machine. If you do not see the jammed paper, go to next step. 2. Gently pull the paper out of the output tray. If - Dell 1135n Multifunction Mono Laser Printer | User Guide - Page 117
or imaging unit. Message Meaning Suggested solutions [COMM. Error] The machine has a communication problem. Ask the sender to try again. [Incompatible] The machine has received a fax from which is registered as a junk fax. The received fax data will be deleted. Reconfirm junk fax setup. See - Dell 1135n Multifunction Mono Laser Printer | User Guide - Page 118
is facing down. If the problem persists, call for service. Load paper in the tray (See Loading paper in the tray). To close the tray, lower the rear edge, align it with the slot, and slide it into the printer. Paper has jammed in the manual tray area. Paper has jammed in the tray1 area. Clear - Dell 1135n Multifunction Mono Laser Printer | User Guide - Page 119
toner cartridge. The toner cartridge has almost reached its estimated cartridge life. The life of the fuser unit has expired. The engine in your printer is checking some problems detected. Too many faxes are received. Clear the jam. See In exit area. See In the manual tray) Prepare a new cartridge - Dell 1135n Multifunction Mono Laser Printer | User Guide - Page 120
The machine is experiencing problems that require service such as LSU error or fuser error. Power problems Click this link to open an animation about solving power problems. Condition The machine is not receiving power, or the connection cable between the computer and the machine is not connected - Dell 1135n Multifunction Mono Laser Printer | User Guide - Page 121
: The front door is not closed. Close the front door. Paper is jammed. Clear the paper jam (See Clearing paper jams). No paper is loaded. Load paper (See Loading paper in the tray). The toner cartridge is not installed. Install the toner cartridge. If a system error occurs, contact your service - Dell 1135n Multifunction Mono Laser Printer | User Guide - Page 122
. printer driver help screen. The paper size and the paper size settings do not match. Ensure that the paper size in the printer driver settings matches the paper in the tray.Or, ensure that the paper size in the printer driver settings matches the paper selection in the software application - Dell 1135n Multifunction Mono Laser Printer | User Guide - Page 123
toner cartridge and, install a new one (See Replacing the toner cartridge). Parts of the machine may have toner on them. If the defects occur on the back of the page, the problem will likely correct itself after a few more pages. The fusing assembly may be damaged. Contact a service representative - Dell 1135n Multifunction Mono Laser Printer | User Guide - Page 124
(See Print media specifications ). Remove the toner cartridge and then, install a new one (See Replacing the toner cartridge). If the problem persists, the machine may require repair. Contact a service representative. Character voids are white areas within parts of characters that should be solid - Dell 1135n Multifunction Mono Laser Printer | User Guide - Page 125
is face down on the scanner glass or face up in the document feeder. Image rubs off the copy easily. Replace the paper in the tray with paper from a new package. In high humidity areas, do not leave paper in the machine for extended periods of time. Frequent copy paper jams occur. Fan the stack - Dell 1135n Multifunction Mono Laser Printer | User Guide - Page 126
document feeder rubber pad may need to be replaced. Contact a service representative. Faxes are not received automatically. The receiving mode should be set to fax. Make sure that there is paper in the tray. Check to see if the display shows any error message. If it does, clear the problem. The - Dell 1135n Multifunction Mono Laser Printer | User Guide - Page 127
error has occurred. Refer to Microsoft Windows User's Guide that came with your computer for further information on Windows error messages. Common Linux problems condition The machine does not print. Suggested solutions Check if the printer driver is installed in your system. Open Unified Driver - Dell 1135n Multifunction Mono Laser Printer | User Guide - Page 128
computer. If there is an I/O error while scanning. Refer to Linux User's Guide that came with your computer for further information on Linux error messages. Common Macintosh problems condition Suggested solutions The machine does not print PDF files correctly. Some parts of graphics, text, or - Dell 1135n Multifunction Mono Laser Printer | User Guide - Page 129
incorrectly. Refer to Macintosh User's Guide that came with your computer for further information on Macintosh error messages. - Dell 1135n Multifunction Mono Laser Printer | User Guide - Page 130
software, and hardware drivers to the original default configuration as shipped from Dell, as well as the verification of appropriate functionality of the printer and all Dell-installed hardware. In addition to this technician assisted technical support, online technical support is available at Dell - Dell 1135n Multifunction Mono Laser Printer | User Guide - Page 131
user's guide 11b supports Feeder (ADF) is a mechanism that will automatically feed an original sheet of paper so that the machine can scan some amount of the paper bit color is commonly called as monochrome or black and white. BMP A bitmapped graphics format used internally by the Microsoft Windows - Dell 1135n Multifunction Mono Laser Printer | User Guide - Page 132
is a telephone company service which enables a user to use a single telephone line to answer several different telephone numbers. Duplex A mechanism that will automatically flip over a sheet of paper so that the machine can print (or scan) on both sides of the paper. A printer equipped with a Duplex - Dell 1135n Multifunction Mono Laser Printer | User Guide - Page 133
(MAC)/data is a card installed inside the service on your machine. FTP A File Transfer Protocol (FTP) is a commonly used protocol for exchanging files over any network that supports the TCP/IP protocol (such as the Internet or an intranet). Fuser Unit The part of a laser printer that melts the toner - Dell 1135n Multifunction Mono Laser Printer | User Guide - Page 134
part of an organization's information or operations with its employees. Sometimes the term refers only to the most visible service printers, and also supports faxes, MAC address Media Access Control (MAC) address is a unique identifier associated with a network adapter. MAC address is a unique 48-bit - Dell 1135n Multifunction Mono Laser Printer | User Guide - Page 135
to run various services on a PC, and the network protocols were based on the archetypal Xerox XNS stack. Today NetWare supports TCP/IP as well as IPX/SPX. OPC Organic Photo Conductor (OPC) is a mechanism that makes a virtual image for print using a laser beam emitted from a laser printer, and it is - Dell 1135n Multifunction Mono Laser Printer | User Guide - Page 136
in an interpreter to generate an image. Printer Driver A program used to send commands and transfer data from the computer to the printer. Print Media The media like paper, envelopes, labels, and transparencies which can be used on a printer, a scanner, a fax or, a copier. PPM Pages Per Minute (PPM - Dell 1135n Multifunction Mono Laser Printer | User Guide - Page 137
for the toner. Toner Toner is a powder used in laser printers and photocopiers, which forms the text and images on the printed paper. Toner can be melted by the heat of the fuser, causing it to bind to the fibers in the paper. TWAIN An industry standard for scanners and scanner software. By using - Dell 1135n Multifunction Mono Laser Printer | User Guide - Page 138
WPA-PSK WPA-PSK (WPA Pre-Shared Key) is special mode of WPA for small business or home users. A shared key, or password, is configured in the wireless access point (WAP) and any wireless laptop or desktop devices. WPA-PSK generates a unique key for
-
 1
1 -
 2
2 -
 3
3 -
 4
4 -
 5
5 -
 6
6 -
 7
7 -
8
-
9
-
10
-
11
-
12
-
13
-
14
-
15
-
16
-
17
-
18
-
19
-
20
-
21
-
22
-
23
-
24
-
25
-
26
-
27
-
28
-
29
-
30
-
31
-
32
-
33
-
34
-
35
-
36
-
37
-
38
-
39
-
40
-
41
-
42
-
43
-
44
-
45
-
46
-
47
-
48
-
49
-
50
-
51
-
52
-
53
-
54
-
55
-
56
-
57
-
58
-
59
-
60
-
61
-
62
-
63
-
64
-
65
-
66
-
67
-
68
-
69
-
70
-
71
-
72
-
73
-
74
-
75
-
76
-
77
-
78
-
79
-
80
-
81
-
82
-
83
-
84
-
85
-
86
-
87
-
88
-
89
-
90
-
91
-
92
-
93
-
94
-
95
-
96
-
97
-
98
-
99
-
100
-
101
-
102
-
103
-
104
-
105
-
106
-
107
-
108
-
109
-
110
-
111
-
112
-
113
-
114
-
115
-
116
-
117
-
118
-
119
-
120
-
121
-
122
-
123
-
124
-
125
-
126
-
127
-
128
-
129
-
130
-
131
-
132
-
133
-
134
-
135
-
136
-
137
-
138
 |
 |

Copyright
Information in this document is subject to change without notice.
©2010 Dell Inc. All rights reserved.
Reproduction of these materials in any manner whatsoever without the written permission of Dell Inc. is strictly
forbidden.
Trademarks used in this text: Dell, the DELL logo, and Dell Toner Management System are trademarks of Dell Inc.;
Microsoft, Windows, Windows Vista, and Windows Server are registered trademarks of Microsoft Corporation in the
United States and/or other countries; Adobe and Acrobat Reader are either registered trademarks or trademarks of
Adobe Systems Incorporated in the United States and/or other countries.
Other trademarks and trade names may be used in this document to refer to the entities claiming the marks and names
of their products.
Dell Inc. disclaims any proprietary interest in trademarks and trade names other than its own.
Refer to the '
LICENSE.txt
' file in the provided CD-ROM for the open source license information.
REV. 1.02