Dell 1320c User Guide - Page 116
Adjusting Color Registration - on windows 8 1
 |
UPC - 662919013061
View all Dell 1320c manuals
Add to My Manuals
Save this manual to your list of manuals |
Page 116 highlights
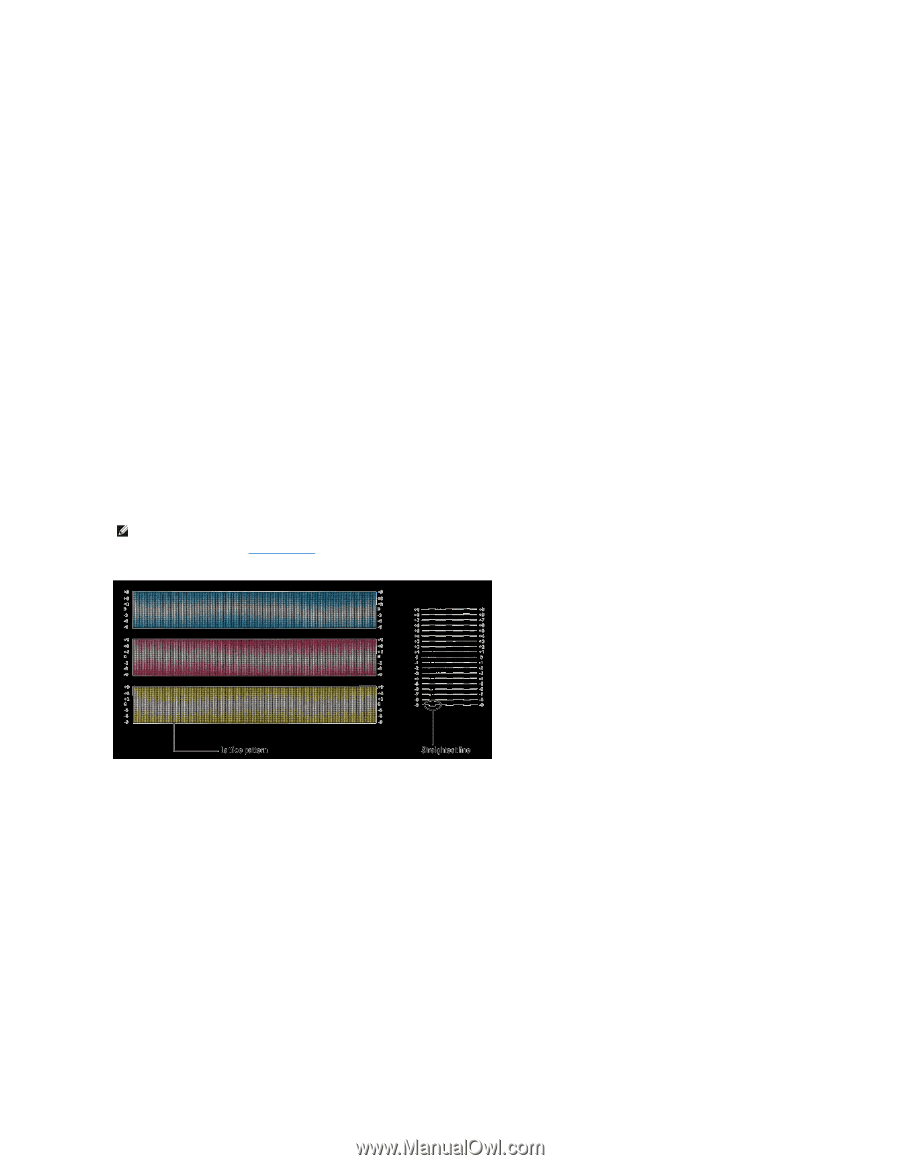
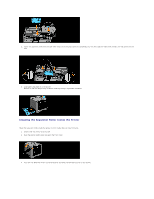
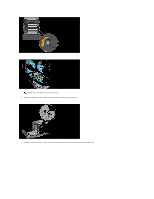
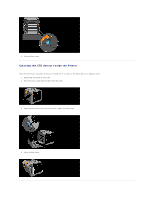
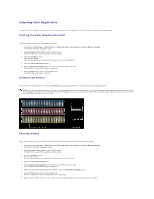
Adjusting Color Registration To adjust the color registration when you first install the printer or after moving it to a new location, follow the procedure below. Printing the Color Registration Chart Use the Tool Box to print the color registration chart. 1. Click Start® All Programs® Dell Printers® Additional Color Laser Software® Status Monitor Console. The Printer Selection dialog box opens. 2. Click Dell Color Laser 1320c listed in Printer Name. The Dell Color Laser 1320c Launcher window opens. 3. Click the Tool Box button. The Tool Box opens. You can also launch the Tool Box from the printer icon on the taskbar. 4. Click the Printer Maintenance tab. 5. Select Registration Adjustment from the list at the left side of the page. The Registration Adjustment page is displayed. 6. Click the Start button next to Color Regi Chart. The Color Regi Chart page is printed. Determining Values From the lines to the right of the Y (Yellow), M (Magenta), and C (Cyan) pattern, find the values of the straightest lines. NOTE: You can also use the densest colors of the lattice pattern to find the straightest lines. The colors printed at the highest density are those next to the straightest lines. When 0 is the value nearest the straightest line, you do not need to adjust the color registration. When the value is not 0, follow the procedure outlined in "Entering Values". Entering Values Using the Tool Box, enter the values that you found in the color registration chart to make adjustments. 1. Click Start® All Programs® Dell Printers® Additional Color Laser Software® Status Monitor Console. The Printer Selection dialog box opens. 2. Click Dell Color Laser 1320c listed in Printer Name. The Dell Color Laser 1320c Launcher window opens. 3. Click the Tool Box button. The Tool Box opens. You can also launch the Tool Box from the printer icon on the taskbar. 4. Click the Printer Maintenance tab. 5. Select Registration Adjustment from the list at the left side of the page. The Registration Adjustment page is displayed. 6. Select the value with the straight line, and then click the Apply New Settings button. 7. Click the Start button next to Color Regi Chart. The color registration chart is printed with the new values. 8. Adjust till all straight lines are at the value of 0. Show image of before and after adjustment will help.
-
 1
1 -
2
-
3
-
4
-
5
-
6
-
7
-
8
-
9
-
10
-
11
-
12
-
13
-
14
-
15
-
16
-
17
-
18
-
19
-
20
-
21
-
22
-
23
-
24
-
25
-
26
-
27
-
28
-
29
-
30
-
31
-
32
-
33
-
34
-
35
-
36
-
37
-
38
-
39
-
40
-
41
-
42
-
43
-
44
-
45
-
46
-
47
-
48
-
49
-
50
-
51
-
52
-
53
-
54
-
55
-
56
-
57
-
58
-
59
-
60
-
61
-
62
-
63
-
64
-
65
-
66
-
67
-
68
-
69
-
70
-
71
-
72
-
73
-
74
-
75
-
76
-
77
-
78
-
79
-
80
-
81
-
82
-
83
-
84
-
85
-
86
-
87
-
88
-
89
-
90
-
91
-
92
-
93
-
94
-
95
-
96
-
97
-
98
-
99
-
100
-
101
-
102
-
103
-
104
-
105
-
106
-
107
-
108
-
109
-
110
-
 111
111 -
 112
112 -
 113
113 -
 114
114 -
 115
115 -
 116
116 -
 117
117 -
 118
118 -
 119
119 -
 120
120 -
 121
121 -
122
-
123
-
124
-
125
-
126
-
127
-
128
-
129
-
130
-
131
-
132
-
133
-
134
-
135
-
136
-
137
 |
 |