Dell 1320c User Guide - Page 16
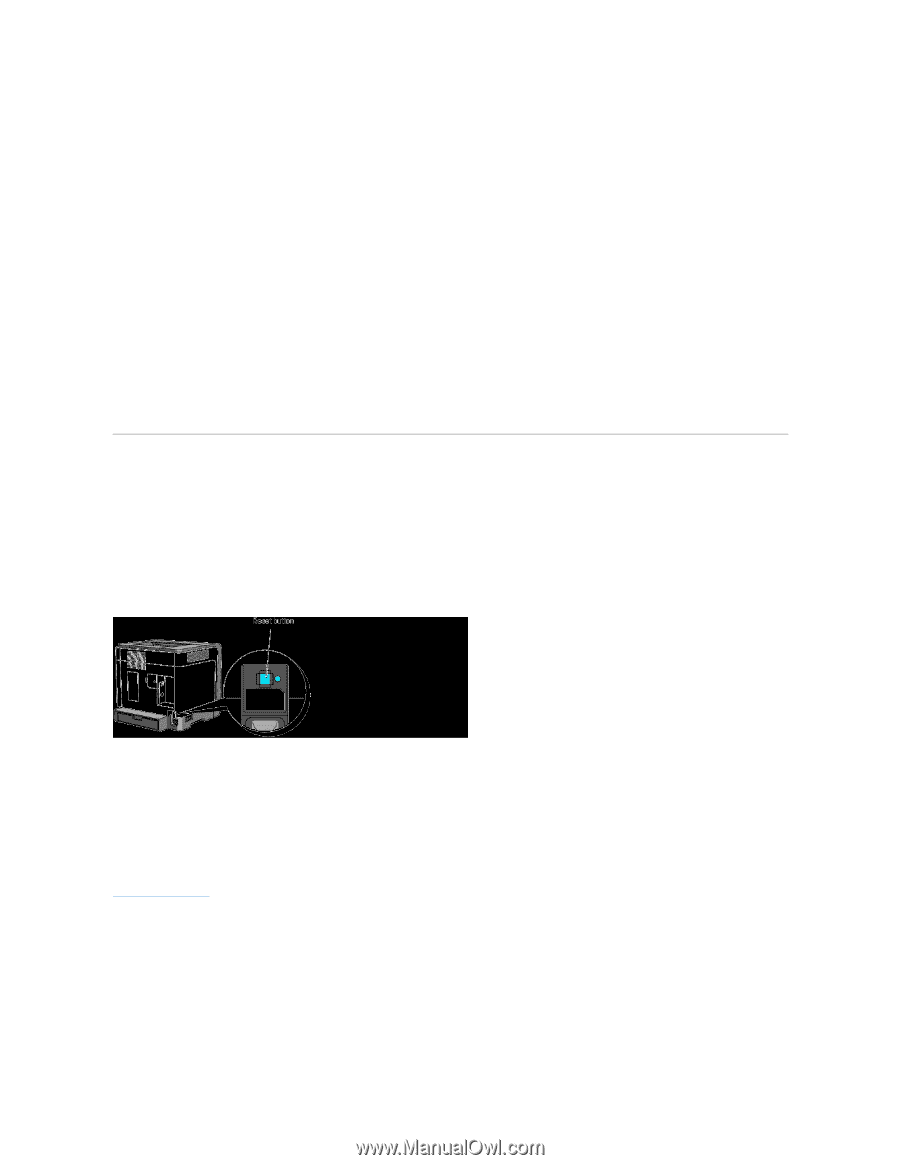
Using the Reset button - driver windows 7
 |
UPC - 662919013061
View all Dell 1320c manuals
Add to My Manuals
Save this manual to your list of manuals |
Page 16 highlights
5. Select TCP/IP Settings from the list at the left side of the page. The TCP/IP Settings page is displayed. 6. Select the mode from IP Address Mode, and then enter the values in IP Address, Subnet Mask, and Gateway Address. 7. Press the Apply New Settings button to take effect. You can also assign the IP address to the printer when installing the printer drivers with installer. When you use the Network Installation feature, you can set the IP address from 0.0.0.0 to the desired IP address on the printer selection window. Verify the IP Settings 1. Print another Printer Settings page. 2. Look under the TCP/IP heading on the Printer Settings page to ensure that the IP address, netmask, and gateway are what you expected. or Ping the printer and verify that it responds. For example, at a command prompt on a network computer, type ping followed by the new printer IP address (for example, 192.168.0.11): ping 192.168.0.11 If the printer is active on the network, you will receive a reply. Using the Reset button Your printer is supplied with an electric leakage detector, which prevents electric shock or fire due to electric leakage by automatically cutting circuits inside the printer. When electric leakage is detected, the Reset button is tripped. In this case, press the Reset button to turn the printer back on. If the Reset button is tripped again after you press the Reset button, contact Dell. Check whether or not the electric leakage detector is functioning at least once a month by following the steps below: 1. Turn on the printer, and then press the Test button. l If the Reset button is tripped and the printer is turned off, the electric leakage detector functions correctly. Press the Reset button to turn the printer back on. l If the Reset button is not tripped, contact Dell. Do not continue to use the printer if the electric leakage detector is not functioning. back to contents page
-
 1
1 -
2
-
3
-
4
-
5
-
6
-
7
-
8
-
9
-
10
-
 11
11 -
 12
12 -
 13
13 -
 14
14 -
 15
15 -
 16
16 -
 17
17 -
 18
18 -
 19
19 -
 20
20 -
 21
21 -
22
-
23
-
24
-
25
-
26
-
27
-
28
-
29
-
30
-
31
-
32
-
33
-
34
-
35
-
36
-
37
-
38
-
39
-
40
-
41
-
42
-
43
-
44
-
45
-
46
-
47
-
48
-
49
-
50
-
51
-
52
-
53
-
54
-
55
-
56
-
57
-
58
-
59
-
60
-
61
-
62
-
63
-
64
-
65
-
66
-
67
-
68
-
69
-
70
-
71
-
72
-
73
-
74
-
75
-
76
-
77
-
78
-
79
-
80
-
81
-
82
-
83
-
84
-
85
-
86
-
87
-
88
-
89
-
90
-
91
-
92
-
93
-
94
-
95
-
96
-
97
-
98
-
99
-
100
-
101
-
102
-
103
-
104
-
105
-
106
-
107
-
108
-
109
-
110
-
111
-
112
-
113
-
114
-
115
-
116
-
117
-
118
-
119
-
120
-
121
-
122
-
123
-
124
-
125
-
126
-
127
-
128
-
129
-
130
-
131
-
132
-
133
-
134
-
135
-
136
-
137
 |
 |