Dell 2335dn User Guide
Dell 2335dn - Multifunction Monochrome Laser Printer B/W Manual
 |
UPC - 884116001898
View all Dell 2335dn manuals
Add to My Manuals
Save this manual to your list of manuals |
Dell 2335dn manual content summary:
- Dell 2335dn | User Guide - Page 1
52 Dell™ 2335dn MFP User's Guide Click the links to the left for information on the features, options, and operation of your printer. For information on other documentation included with your printer, see "Finding Information". To order replacement toner cartridges or supplies from Dell: 1. Double - Dell 2335dn | User Guide - Page 2
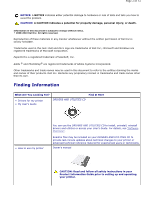
"Software Overview". Readme files may be included on your DRIVERS AND UTILITIES CD to provide last-minute updates about technical changes to your printer or advanced technical reference material for experienced users or technicians. Owner's manual CAUTION: Read and follow all safety instructions - Dell 2335dn | User Guide - Page 3
in all countries. • Latest drivers for my printer • Answers to technical service and support questions • Documentation for my printer Dell Support Website: support.dell.com The Dell Support Website provides several online tools, including: • Solutions- Troubleshooting hints and tips, articles from - Dell 2335dn | User Guide - Page 4
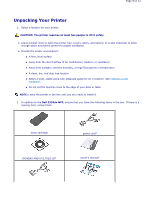
of your desk or table. NOTE: Leave the printer in the box until you are ready to install it. 2. In addition to the Dell 2335dn MFP, ensure that you have the following items in the box. If there is a missing item, contact Dell: toner cartridge DRIVERS AND UTILITIES CDb power corda owner's manualc - Dell 2335dn | User Guide - Page 5
your country's specifications. b. The DRIVERS AND UTILITIES CD contains Dell printer drivers, Scan drivers, Printer Settings Utility, Set IP, Macintosh driver, Linux driver, Dell Toner Management System, Dell ScanCenter, PaperPort® and an HTML User's Guide. c. Owner's Manual may not be provided with - Dell 2335dn | User Guide - Page 6
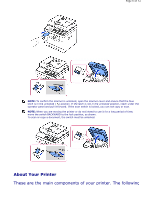
52 NOTE: To confirm the scanner is unlocked, open the scanner cover and ensure that the blue latch is in the unlocked ( ) position. If the latch is not in the unlocked position, reach under the operator panel and pull it forward. If the scan switch is locked, you can not copy or scan. NOTE: When - Dell 2335dn | User Guide - Page 7
Page 7 of 52 illustrations show the standard Dell 2335dn MFP and an optional tray 2 attached: Front View Rear View - Dell 2335dn | User Guide - Page 8
Page 8 of 52 Operator Panel Button Functions Common Keys Press: To: Scroll through available options. - Dell 2335dn | User Guide - Page 9
alphanumeric characters. Store frequently used fax numbers in memory or search for stored fax numbers or email addresses. It also allows you to print a Phonebook list. Insert a pause into a fax number in edit mode. Understanding the Status LED When the problem occurs, the Status LED indicates - Dell 2335dn | User Guide - Page 10
empty. Remove the old toner cartridge and install a new one. z A paper jam has occurred. z There is no paper in the tray. Load paper in the tray. z The machine has stopped due to a major error. Check the display message. Internal Fonts The Dell 2335dn MFP Laser printer supports the PCL and PS - Dell 2335dn | User Guide - Page 11
space to open covers and trays. The area should be well-ventilated and away from direct sunlight or sources of heat, cold, and humidity. Do not set the machine close to the edge of your desk or table. Place items. 3. Remove the tape holding the machine tightly. 4. Install both the print cartridge. - Dell 2335dn | User Guide - Page 12
it upside down. Otherwise, the inside of the printer may be contaminated by toner, which can cause damage to the printer or bad printing quality. Installing the Toner Cartridge 1. Open the front cover. CAUTION: To prevent damage, do not expose the toner cartridge to light for more than a few minutes - Dell 2335dn | User Guide - Page 13
Page 13 of 52 3. Holding the toner cartridge by the handle, slide it into the printer until it locks firmly into place. 4. Close the front cover. Loading the Paper Size" for the paper used in copying and faxing, or "Paper Tab" for Computer printing. Load the paper: 1. Pull the paper tray out of the - Dell 2335dn | User Guide - Page 14
a standard (Letter or A4) size, such as Legal paper, press and unlatch the guide lock, and then slide the paper length guide out completely to extend the paper tray to its full length. 3. Slide in the paper length guide until it rests against the end of the paper stack. For paper smaller than - Dell 2335dn | User Guide - Page 15
Page 15 of 52 4. Pinch the paper width guide, and move it towards the stack of paper until it touches the side of the stack. 5. Flex the sheets back and forth to loosen them, - Dell 2335dn | User Guide - Page 16
Page 16 of 52 NOTE: Overloading the paper tray may cause paper jams. NOTE: Improper adjustment of paper guides can result in paper jams. 8. Slide the paper tray back into the printer. 9. Set the paper type and size. For more information, see "Setting the Paper Type" and "Setting the Paper Size". - Dell 2335dn | User Guide - Page 17
17 of 52 1. Plug one end of a telephone line cord into the RJ11 telephone line socket (FAX) and the other end into an active wall jack. To connect a telephone and/or answering machine to your printer, remove the plug from the extension telephone socket (EXT) ( ) and plug the telephone or answering - Dell 2335dn | User Guide - Page 18
18 of 52 NOTE: Set rings to answer to digit greater than the "Ring To Answer" setting for the telephone answering device (TAD). If connecting a FAX using a computer modem. NOTE: Set rings to answer to digit greater than the "Ring To Answer" setting for the telephone answering device (TAD). NOTE: For - Dell 2335dn | User Guide - Page 19
UK setup, advice to buy from local market or check with telephone service provider. Terminator plug is provided along the unit. If the phone to "Connecting the printer to the Network". NOTE: USB cables are sold separately. Contact Dell to purchase a USB cable. NOTE: Connecting the printer to the USB - Dell 2335dn | User Guide - Page 20
the other end of the cable to an available USB port on the computer, not the USB keyboard. Connecting the printer to the Network 1. Ensure that the printer, computer, and any other attached devices are powered off and unplugged. 2. Connect one end of a standard category 5 Unshielded Twisted Pair - Dell 2335dn | User Guide - Page 21
and fax setup sequence. These settings may be needed also after the firmware upgrade or after the printer reset. Setting fax setup printer restores the fax settings as default. If you selected Yes. a. Your printer prints out Fax Setup Help Report. b. Enter machine ID. See "Setting the Printer - Dell 2335dn | User Guide - Page 22
52 Dell 2335dn MFP Menu Functions 1. Scan Email USB Key Fax Server PC Application Scan Defaults 4. Setup Paper Setup Tray Behaviour Directory Reports Fax Setup 2. Copy # of copies Zoom Contrast Original Size Original Type Select Tray Layout Duplex Copy Defaults Email Setup Network Setup Machine - Dell 2335dn | User Guide - Page 23
Page 23 of 52 2. Press Scroll ( or ) to highlight Reports and then press Select ( ). 3. Press Scroll ( or ) to highlight Printer Settings and then press Select ( ). 4. The Printer Settings page prints out. Printing the Op-panel Menu setting 1. Press Scroll ( or ) to highlight Setup and then press - Dell 2335dn | User Guide - Page 24
factory default setting is 30 minutes. 5. Press Select ( 6. Press Cancel ( ) to save the selection. ) to return to the Standby mode. Setting the Time and Date The time and date are printed on all faxes. NOTE: It may be necessary to reset the correct time and date if loss of power to the printer - Dell 2335dn | User Guide - Page 25
( or ) to highlight AM or PM and then press Scroll ( or ). 6. Press Select ( ) when the time and date on the display is correct. NOTE: The printer beeps and does not allow you to proceed to the next step if a wrong number is entered. Setting Daylight Savings Time If your country switches - Dell 2335dn | User Guide - Page 26
Select ( ). 4. Press Scroll ( or ) to highlight Manual and then press Select ( ). 5. Enter Start Date and return to the Standby mode. Scanner Lamp Power Save Mode The scan lamp under the document glass printer waits before it restores the default copy or fax settings, if you do not start copying or - Dell 2335dn | User Guide - Page 27
the printer does not restore the default settings until you press Start ( ) to begin copying or faxing, Default Mode Your machine is preset to Fax mode. You can switch this default mode to Copy mode or Scan Setting the Toner Save Mode Toner Save mode allows your machine to use less toner on each page - Dell 2335dn | User Guide - Page 28
the setting to On (enable) or Off (disable). Selecting Off means that the printer does not display the Toner Low message. 8. Press Scroll ( or ) to display the Almost Empty level you want. The available levels are 5, 10, and 15 (%). 9. Press Scroll ( or ) to display the Alert on Panel and then - Dell 2335dn | User Guide - Page 29
Set each option as you want and then press Select ( ). 5. Press Cancel ( ) to return to the Standby mode. Software Overview After setting up your printer and connecting it should read as to your computer, you must install the drivers and utilities from the DRIVERS AND UTILITIES CD included with your - Dell 2335dn | User Guide - Page 30
of the printer and the name of the job when you send a job to print. The Dell Toner Management System window also displays the level of toner remaining and allows you to order replacement toner cartridges. z PaperPort - enables you to scan documents, create PDFs, and turn your scanned images into - Dell 2335dn | User Guide - Page 31
page "Using the Dell Toner Management System". To launch the Dell Printer Configuration Web Tool, just type your network printer's IP address in your Web browser. If you do not know what your printer's IP address is, print a network configuration page, which lists the IP address: 1. Press Scroll - Dell 2335dn | User Guide - Page 32
. When the toner is running low, click the toner supplies link on the first screen to order additional toner cartridges. Printer Settings Change the printer settings, view the printer settings status, and update the print server firmware. NOTE: Configuration Menu blocks the user from altering the - Dell 2335dn | User Guide - Page 33
Page 33 of 52 Printer Server Settings This menu supports configuration of following items: z Basic Information about the administrator z TCP/IP z SNMP Traps z SNMP Community z SNMPv3 z SLP z UPnP (SSDP) z IPP z EtherTalk z Telnet Fax Settings Configure fax settings such as fax cover, receive mode - Dell 2335dn | User Guide - Page 34
Description IP Address or Host Name Sets the IP address or user. Up to 63 alphanumeric characters, periods, hyphens, under bars, and at symbols (@) can be used. If specifying more than one address, separate them using commas. Primary SMTP Account Password Specifies the SMTP account password - Dell 2335dn | User Guide - Page 35
period from 30 to 120 seconds. Designates the reply e-mail address sent with each Email Alert. Specifies the POP3 server address in IP address format of "aaa.bbb.ccc.ddd" or as a DNS host name up to 63 characters. POP3 User Namea POP3 User Passworda Email List 1 Email List 2 Select Alerts for List - Dell 2335dn | User Guide - Page 36
just by typing each printer's IP address. NOTE: You must be a network administrator to use this feature. Printing Statistics Keep track of printing trends, such as paper usage and the types of jobs being printed. Set Password Dell Printer Configuration Web Tool (Embedded Web Service) can be locked - Dell 2335dn | User Guide - Page 37
52 NOTE: You must be a network administrator to use this feature. NOTE: The default user name is admin and the default password is left blank (NULL). NOTE: If you forget the password, please call for service. Wireless Please refer to Wireless Quick Reference Guide for more details on wireless module - Dell 2335dn | User Guide - Page 38
Installing Dell Software for Local Printing A local printer is a printer attached to your computer using a USB cable. If your printer is attached to a network instead of your computer, skip this step and go on to "Installing Dell Software for Network Printing". A printer driver is software that - Dell 2335dn | User Guide - Page 39
when you install the DRIVERS AND UTILITIES CD, the No Printer Found screen appears. Follow the instructions on the screen to install the software. 2. Insert the DRIVERS AND UTILITIES CD. NOTE: For Windows Vista/Windows 7/Server 2008 R2, click Continue when the User Account Control screen appears - Dell 2335dn | User Guide - Page 40
founder windows will appear. 6. When the installation is complete, you may print a test page. Click Finish to complete the installation and close the wizard. You are now ready to print. Network Installation Assigning an IP Address Before using the printer on the network, you must set an IP address - Dell 2335dn | User Guide - Page 41
will automatically assign a legacy IP address 192.0.0192 or local link address 169.254.xxx.xxx. To configure the IP address manually, you can use the supplied DRIVERS AND UTILITIES CD. Print the Configuration page of the printer to see the current network configuration and MAC address. You will need - Dell 2335dn | User Guide - Page 42
Page 42 of 52 5. Select the printer you want to assign an MAC address to. The printer's MAC address can be found on the Configuration page for the printer. 6. When you finish setting the IP address for the printer, exit the program. Installing Dell Software for Network Printing When you connect your - Dell 2335dn | User Guide - Page 43
want to install the drivers on this computer for network operation, select Local Installation, and then click Next. If you want to install the Dell software on remote computers or network servers on the same network, select Remote Installation. The domain administrator's ID and password are required - Dell 2335dn | User Guide - Page 44
add your printer to the network. To add the printer to the network, enter the port name and an existing IP address for the printer. If you want to install the printer on a server, select the I am setting up this printer on a server check box. 7. The screen displays the printer drivers installed on - Dell 2335dn | User Guide - Page 45
software using the DRIVERS AND UTILITIES CD or the Windows uninstall option. NOTE: Close all programs before uninstalling software, and then restart your computer after uninstalling the software. 1. From the Start menu, select Programs Software Uninstall. Dell Printers Dell 2335dn MFP Dell MFP - Dell 2335dn | User Guide - Page 46
computer. 3. After the software is removed, click Finish. Using the Dell Toner Management System The Printer Status Monitor displays the status of printer which connect with local or network. Printer Ready, Printer Offline, and Error-Check Printer, and the toner level or Toner Low will be appeared - Dell 2335dn | User Guide - Page 47
you the printer troubleshooting guide. Click Help me to show an animation details about the error condition. Or From the Start menu, select Programs Dell Printers Dell 2335dn MFP Printer Status Monitor. Printer Settings Utility By using the Printer Settings Utility window, you can set up fax system - Dell 2335dn | User Guide - Page 48
Utility. Dell Printers Dell 2335dn MFP Printer Settings The Printer Settings Utility window opens. 2. The Printer Settings Utility window provides several features; Directory (Phonebook, Address Book), Fax Setting, and Setting. For further details, click the button. To use the default settings - Dell 2335dn | User Guide - Page 49
Setting Section Click each items underFax Setting to setup the fax configuration. The printer setup contains the printer ID and printer fax number. Your can select Printger Setup, Toll Save, and Default Output Options. . The Setting Section Click the Setting section and select the power save from - Dell 2335dn | User Guide - Page 50
the orientation from the drop-down list. Your can select Orientation, Duplex, and Duplex Margin. The Paper Option Section Click the Paper Option section and in Emulation Setting. The Network(IPv4) Section Click the Network(IPv4) section and select the network environment from the drop-down list. - Dell 2335dn | User Guide - Page 51
Update Utility. Dell Printers Dell 2335dn MFP 2. Download the latest firmware. Click http://support.dell.com. Firmware 3. If your printer is connected with an USB cable, click USB Connected Printer. Or if your printer is connected with a network cable, click Network Connected Printer. 4. Click - Dell 2335dn | User Guide - Page 52
current network configuration and MAC address. 3. From the Start menu, select Programs Utility. Dell Printers Dell 2335dn MFP Set IP Address 4. Click in the SetIP window to open the TCP/IP configuration window. 5. Enter the network card's MAC address, IP address, subnet mask, default gateway
-
 1
1 -
 2
2 -
 3
3 -
 4
4 -
 5
5 -
 6
6 -
 7
7 -
8
-
9
-
10
-
11
-
12
-
13
-
14
-
15
-
16
-
17
-
18
-
19
-
20
-
21
-
22
-
23
-
24
-
25
-
26
-
27
-
28
-
29
-
30
-
31
-
32
-
33
-
34
-
35
-
36
-
37
-
38
-
39
-
40
-
41
-
42
-
43
-
44
-
45
-
46
-
47
-
48
-
49
-
50
-
51
-
52
 |
 |

Dell™ 2335dn MFP User's Guide
Click the links to the left for information on the features, options, and operation of your printer. For
information on other documentation included with your printer, see
"Finding
Information"
.
To order replacement toner cartridges or supplies from Dell:
1.
Double-click the
Dell 2335dn MFP Toner Reorder
icon on your desktop.
OR
2.
Visit Dell's website, or order Dell printer supplies by phone.
Contacting Dell
Dell provides several online and telephone-based support and service options. Availability varies by country
and product, and some services may not be available in your area. To contact Dell for sales, technical support,
or customer service issues:
1.
Visit
www.support.dell.com
.
2.
Verify your country or region in the
Choose A Country/Region
drop-down menu at the bottom of the
page.
3.
Click
Contact Us
on the left side of the page.
4.
Select the appropriate service or support link based on your need.
5.
Choose the method of contacting Dell that is convenient for you.
Notes, Notices, and Cautions
NOTE:
If you do not have an active Internet connection, you can find contact information on your
purchase invoice, packing slip, bill, or Dell product catalog.
NOTE:
A
NOTE
indicates important information that helps you make better use of your printer.
Page 1 of 52