Dell 3110cn Color Laser Printer User Guide
Dell 3110cn Color Laser Printer Manual
 |
View all Dell 3110cn Color Laser Printer manuals
Add to My Manuals
Save this manual to your list of manuals |
Dell 3110cn Color Laser Printer manual content summary:
- Dell 3110cn Color Laser Printer | User Guide - Page 1
Dell™ Color Laser Printer 3110cn User's Guide Notes, Notices, and Cautions Click the links to the left for information on the features, options, and operation of your printer. For information on other documentation included with your printer, see "Finding Information." - Dell 3110cn Color Laser Printer | User Guide - Page 2
switch 10 Control board 11 Control board cover To order replacement print cartridges or supplies from Dell: 1. Double-click the icon on your desktop. 2. Visit Dell's website, or order Dell printer supplies by phone. www.dell.com/supplies For best service, have your Dell printer Service Tag available - Dell 3110cn Color Laser Printer | User Guide - Page 3
; The Common UNIX Printing System, CUPS, and the CUPS logo are the trademarks of Easy Software Products; PCL is a registered trademark of Hewlett-Packard in the United States; ENERGY STAR is a registered trademark of the U.S. Environmental Protection Agency. As an ENERGY STAR Partner, Dell Inc. has - Dell 3110cn Color Laser Printer | User Guide - Page 4
or disclosure by the Government is subject to restrictions as set forth in subparagraph (c)(1)(ii) of the Rights in Technical Data and Computer Software clause at DFARS 252.227-7013 and in applicable FAR provisions: Dell Inc., One Dell Way, Round Rock, Texas, 78682, USA. This equipment has been - Dell 3110cn Color Laser Printer | User Guide - Page 5
: Read and follow all safety instructions in your Owner's Manual prior to setting up and operating your printer. Setup diagram Troubleshooting Guide Troubleshooting Guide: - User Settings - Configuration - Troubleshooting Instructions - Other Problems Express Service Code and Service Tag number - Dell 3110cn Color Laser Printer | User Guide - Page 6
Express Service Code and Service Tag number The Express Service Code and Service Tag numbers are located inside the front door of your printer. · Latest drivers for my printer · Answers to technical service and support questions · Documentation for my printer Dell Support Website The Dell Support - Dell 3110cn Color Laser Printer | User Guide - Page 7
from your Web browser. To launch the Dell Printer Configuration Web Tool , just type your network printer's IP address in your Web browser. If you do not know what your printer's IP address is, print a printer settings page, which lists the IP address: 1. Press Menu . 2. Press until Report/List - Dell 3110cn Color Laser Printer | User Guide - Page 8
printing trends, such as paper usage and types of jobs being printed, and limit which users use the color mode and the maximum number of pages they can print. Printer Information Get the information you need for service calls, inventory reports, or the status of current memory and engine code levels - Dell 3110cn Color Laser Printer | User Guide - Page 9
Help to visit the Dell web page, and see the User's Guide on that page to verify configured settings. Order Supplies at: www.dell.com/supplies Contact Dell Support at: support.dell.com Using the Dell Printer Configuration Web Tool Environment Settings for Web Browsers Dell recommends configuring the - Dell 3110cn Color Laser Printer | User Guide - Page 10
(France) [fr] English [en] or English (United States) [en-us] Setting the Printer's IP Address to Non-proxy 1. Select Internet Options from Tools printer's IP address) in the URL entry field of the browser to activate the Dell Printer Configuration Web Tool . For Netscape Communicator 7.1 Setting - Dell 3110cn Color Laser Printer | User Guide - Page 11
When you select Manual proxy configuration , specify the printer's IP address in the No Proxy for: box. When you have finished setting the language and proxy, type http://nnn.nnn.nnn.nnn/ (the printer's IP address) in the URL entry field of the browser to activate the Dell Printer Configuration Web - Dell 3110cn Color Laser Printer | User Guide - Page 12
displayed in the Top Frame. Dell Color Displays the printer product name. Laser 3110cn IP Address: Displays the printer's IP address. Location: Displays the printer's location. The location can be changed in Basic Information on the Print Server Settings page. Contact Person: Displays the - Dell 3110cn Color Laser Printer | User Guide - Page 13
Alert Links to the Print Server Settings menu. Set Password Links to the Other Features menu. Online Help Links to the Dell web page. See the User's Guide on that page. Order Supplies at: Links to the Dell web page. Contact Dell Support at: Links to the Dell support page. Web address: http - Dell 3110cn Color Laser Printer | User Guide - Page 14
"Parallel Settings " "Network Settings "*4 "USB Settings "*4 "PCL Settings " "PS Settings "*4 "Panel Settings " "Printer Maintenance " "Paper Density " "Adjust BTR " "Adjust Fuser " "Auto Registration Adjustment " "Color Registration Adjustments " "Adjust Altitude " "Reset Defaults " "Clear - Dell 3110cn Color Laser Printer | User Guide - Page 15
"Non-Dell Toner " "Initialize PrintMeter " "Web Link Customization " "Print Server Settings " "Print Server Reports " "Print Server Setup Page " "NetWare Setup Page "*2 "E-Mail Alert Setup Page " "Print Server Settings " "Basic Information " "Port Settings " "Wireless LAN "*3 "TCP/IP " " - Dell 3110cn Color Laser Printer | User Guide - Page 16
when the RAM disk is set to on. *2 This item is only available when the optional multi protocol card is installed. *3 This item is only available when the optional wireless printer adapter is installed. *4 This item is only available with the printer using the postscript driver. *5 This item is only - Dell 3110cn Color Laser Printer | User Guide - Page 17
Cyan Cartridge Level Magenta Cartridge Level Yellow Cartridge Level Black Cartridge Level Displays the percent of toner remaining in each print cartridge. When a cartridge is empty, a message appears. The text Print Cartridge is linked to the Dell Printer Supplies website. Consumables Status n% - Dell 3110cn Color Laser Printer | User Guide - Page 18
Displays Dell's service tag number. Asset Tag Number Displays the printer's asset tag number. Printer Serial Number Displays the printer's serial number. Memory Capacity Displays the memory capacity. Processor Speed Displays the processing speed. Printer Revision Levels Firmware Version - Dell 3110cn Color Laser Printer | User Guide - Page 19
print job was submitted. Printer Settings Use the Printer Settings menu to display the printer settings report and to configure printer settings. print job. Alert Tone Displays whether the printer sounds an alarm when an error occurs. Time-Out Displays specify the amount of time the printer - Dell 3110cn Color Laser Printer | User Guide - Page 20
. 2 Sided Displays whether to do duplexing as the default for all print jobs.This item is only available when the optional duplexer is installed. Font Displays the default font from the registered fonts in the printer. Symbol Set Displays a symbol set for a specified font. Font Size Displays - Dell 3110cn Color Laser Printer | User Guide - Page 21
Panel Settings Paper Density Adjust BTR Adjust Fuser Hex Dump Displays whether the Hex Dump feature is on or off. Draft Mode Displays whether to print in the draft mode. Line Termination Displays whether to set the line termination. Default Color Displays the color mode setting. PS Error - Dell 3110cn Color Laser Printer | User Guide - Page 22
coated paper. Displays the temperature settings of the fuser for Japanese postcards. Displays whether to adjust the color registration automatically. Displays whether to use a refilled print cartridge. Displays the URL that Order Supplies at links to in the left frame. http://accessories.us.dell.com - Dell 3110cn Color Laser Printer | User Guide - Page 23
of reports and lists. Values: Printer Settings Panel Settings PCL Fonts List PCL Macro List Job History Error History PS Fonts List Print Meter Color Test Page Click the Start button to print the printer settings page. Click the Start button to print the panel settings page. Click the Start button - Dell 3110cn Color Laser Printer | User Guide - Page 24
to print the stored documents list. This item is only available when the Ram disk is set to on. Printer Settings The Printer Settings tab includes System Settings , Parallel Settings , Network Settings, USB Settings , PCL Settings , PS Settings , and Panel Settings pages. System Settings Purpose - Dell 3110cn Color Laser Printer | User Guide - Page 25
PostScript communication protocol for each interface. USB Settings Purpose: To change printer settings affecting a USB port. Values: Adobe Protocol Specifies PostScript communication protocol for each interface. PCL Settings Purpose: To change printer settings that only affect jobs using the PCL - Dell 3110cn Color Laser Printer | User Guide - Page 26
sent to the printer is printed in hexadecimal and character representation. Control codes are not executed. Draft Mode Specifies whether to print in the draft mode. Line Termination Sets the line termination. Default Color Specifies the color mode to Color or Black . This setting is used when - Dell 3110cn Color Laser Printer | User Guide - Page 27
Set Password on the left frame and set the password. Printer Maintenance The Printer Maintenance tab includes Paper Density , Adjust BTR , Adjust Fuser , Auto Registration Adjustment , Color Registration Adjustments , Adjust Altitude , Reset Defaults , Clear Storage , Non-Dell Toner , Initialize - Dell 3110cn Color Laser Printer | User Guide - Page 28
reference voltage settings of the transfer roller for recycled paper. JPN Coated Sets the reference voltage settings of the transfer roller for Japanese coated paper. JPN Postcard Sets the reference voltage settings of the transfer roller for Japanese postcards. Adjust Fuser Purpose: To specify - Dell 3110cn Color Laser Printer | User Guide - Page 29
registration by using the chart. This function is required after the printer is set up or moved. Values: Auto Correct Click Start to adjust color registration automatically. Color Regi Chart Click Start to print the color registration chart. Enter Number Yellow Specifies the values that are - Dell 3110cn Color Laser Printer | User Guide - Page 30
factory print cartridge setting. Non-Dell-brand print cartridges may disable some printer features, reduce print quality and reduce the reliability of your printer. Dell recommends only new Dell-brand print cartridges for your printer. Dell does not provide warranty coverage for problems caused - Dell 3110cn Color Laser Printer | User Guide - Page 31
in the Print Server Settings tab. Values: Ethernet * 1 Ethernet Settings Displays the current settings of Ethernet transmission rate and the duplex settings. Current Ethernet Settings Displays the current Ethernet settings. MAC Address Displays the printer's MAC address. Wireless Settings - Dell 3110cn Color Laser Printer | User Guide - Page 32
* 3 LPD Gateway Address Displays the gateway address. IPv6 Use Manual Address Displays whether to set the IP address manually. Manual Address Displays the IP address. Stateless Address 1-3 Displays the stateless addresses. Link Local Address Displays the link local address. Manual Gateway - Dell 3110cn Color Laser Printer | User Guide - Page 33
period. Port Status Displays the port status. Printer URI Displays the printer URI. Connection Time-Out Displays the connection timeout connections received simultaneously by the client. Unicode Support Displays the status of the Unicode Support feature. Auto Master Mode Displays the status - Dell 3110cn Color Laser Printer | User Guide - Page 34
policy policy feature. IP Filter (IPv4) * 4 Access List Displays the list of IP addresses that are permitted or denied access to the printer. *1 The Ethernet settings are not displayed when the optional wireless printer adapter is installed. *2 An optional wireless printer adapter is required - Dell 3110cn Color Laser Printer | User Guide - Page 35
. *4 This item is only available for LPD or Port9100. NetWare Setup Page Purpose: To verify the current settings of IPX/SPX and Netware. In this page, you can only verify the settings of items. If you want to change the settings, go to the pages in the Print Server Settings tab. Values: IPX/SPX - Dell 3110cn Color Laser Printer | User Guide - Page 36
receive an E-Mail Alert for paper handling. Service Call Displays the status, and whether to receive an E-Mail Alert for Service Calls. Print Server Settings The Print Server Settings tab includes Basic Information , Port Settings , Wireless LAN , TCP/IP , NetWare , SMB , AppleTalk , E-Mail Alert - Dell 3110cn Color Laser Printer | User Guide - Page 37
Selects 100Base-T Half-Duplex as the default value. Half-Duplex 100BASE-TX Selects 100Base-T Full-Duplex as the default value. Full-Duplex Current Ethernet Settings Displays the current settings of Ethernet. MAC Address Displays the printer's MAC address. Port Status LPD Port9100 Select the - Dell 3110cn Color Laser Printer | User Guide - Page 38
also configure the transport protocol to be used. IPX/SPX and TCP/IP can be selected simultaneously as the transport protocol. Select the check box to only available when the multi protocol card is installed. *1 The Ethernet settings are not displayed when the optional wireless printer adapter is - Dell 3110cn Color Laser Printer | User Guide - Page 39
Wireless Settings SSID Specifies the name that identifies the wireless network. Up to 32 alphanumeric characters. Network Type Specifies the network type from either Ad-Hoc or Infrastructure . MAC Address Displays the MAC address of the printer's wireless network adapter. Link Channel - Dell 3110cn Color Laser Printer | User Guide - Page 40
DNS WINS* 1 Manual Address Sets the IP address. Manual Gateway Address DNS Domain Name * 1 Sets the gateway address. Specifies lite Manual DNS Sets the DNS server address. Server Address DNS Dynamic Update (IPv4) * 1 Select the check box to enable dynamic updates to DNS. DNS Dynamic Update - Dell 3110cn Color Laser Printer | User Guide - Page 41
the connection timeout period between 1 and 1000 seconds. IP Filter (IPv4) To set the IP Filter settings, click IP Filter . The IP Filter page is displayed. IPP* 1 Printer URI Displays the printer URI. Connection Time-Out Sets the connection timeout period from 1 to 1000 seconds. Port Number - Dell 3110cn Color Laser Printer | User Guide - Page 42
address. Permits printing from specified network address. Disables the IP Filter feature for the specified IP address. *1 An optional multi protocol card is required to display the item. *2 This item is only available for LPD or Port9100. NetWare Purpose: To configure detailed settings for IPX/SPX - Dell 3110cn Color Laser Printer | User Guide - Page 43
burst. Does not use NCP packet burst. Sets the print server password up to 32 alphanumeric characters. Configure this item only when settings in the NetWare page will be valid only when NetWare or the printer is rebooted. Click the Restart printer to apply new settings button to apply new settings - Dell 3110cn Color Laser Printer | User Guide - Page 44
original setting will remain valid if no input is made. The default password is password . Confirm Administrator Allows you to confirm the configured administrator password by re-entering the Password same password. Maximum Sessions Displays the maximum sessions. Unicode Support On Notifies - Dell 3110cn Color Laser Printer | User Guide - Page 45
Printer Specifies the printer name in the AppleTalk network up to 32 alphanumeric characters and symbol sets. AppleTalk Zone Specifies the AppleTalk zone name up to 32 alphanumeric characters and symbol sets using commas. POP User Password* 1 Specifies the POP3 account password up to 31 - Dell 3110cn Color Laser Printer | User Guide - Page 46
Alert for paper handling. Service Call Select the check box to receive an E-Mail Alert for Service Calls. E-Mail List 2 Sets acceptable e- setting will remain valid if no input is made. Printer Name Specifies the printer name up to 63 alphanumeric characters and symbol sets. The original setting - Dell 3110cn Color Laser Printer | User Guide - Page 47
Authenticate Error Trap. *1 The default value of each items can be changed by using Dell Printer Configuration Web Tool. *2 An optional multi protocol card is required to display the item. IP Filter (IPv4) Purpose: To configure the detailed settings for the IP Filter used for LPD and Port9100 - Dell 3110cn Color Laser Printer | User Guide - Page 48
255.255 " in the Address Mask field. 3. Select Permit . 4. Click Apply New Settings . Disabling Printing From a Specified User The following describes the procedure to disable printing only from the "192.168.100.10 " IP address. Procedures: 1. Click the first column of Access List row 1 . 2. Enter - Dell 3110cn Color Laser Printer | User Guide - Page 49
. 10. Click Apply New Settings . Other Features The Other Features tab includes Set Password , Security , IPsec and Reset Print Server pages. Set Password Purpose: To set or change the password that is required to access the printer setup parameters from the Dell Printer Configuration Web Tool . Set - Dell 3110cn Color Laser Printer | User Guide - Page 50
Password Sets the password up to 10 alphanumeric characters. The password will appear as asterisks (*) in the field when it is entered. Confirm Administrator Enter the password again to confirm it. Password Security Purpose: To specify the settings for the SSL encryption communication to the printer - Dell 3110cn Color Laser Printer | User Guide - Page 51
are copied. Printer settings are simultaneously copied to printers of up to 10 IP addresses. Copy Printer Settings Report Purpose: To verify the histories of copying after turning on the printer. Print Volume The Printer Volume menu includes the Print Volume and Dell ColorTrack pages. Print Volume - Dell 3110cn Color Laser Printer | User Guide - Page 52
of pages for each paper size. Dell ColorTrack Purpose: To specify which users have access to color printing and to limit print volume per user. Values: Print User Limitation Select the check box to restrict users from using the printer. Permit printing without specifying user Select the check - Dell 3110cn Color Laser Printer | User Guide - Page 53
is loaded in the multipurpose feeder. Display Popup Sets the paper size and type when paper is loaded in the multipurpose feeder. MPF Paper Type Sets the type of paper loaded in the multipurpose feeder. MPF Paper Size Sets the size of paper loaded in the multipurpose feeder. MPF Custom Size - Dell 3110cn Color Laser Printer | User Guide - Page 54
About Your Printer The following illustrations show the standard Dell™ Color Laser Printer 3110cn, with an optional 550-sheet feeder and duplexer. - Dell 3110cn Color Laser Printer | User Guide - Page 55
Optional duplexer feeder 3 Side button 4 Belt unit 5 Operator panel 6 Front cover NOTE: When you use the printer with the multipurpose feeder opened, do not locate the printer in direct sunlight. Doing so may cause a malfunction or unnatural screen image. Leave enough room to open the printer trays - Dell 3110cn Color Laser Printer | User Guide - Page 56
protect the drums of the print cartridges against bright light, close the front cover within 5 minutes. If the front cover remains open for more than 5 minutes, print quality may deteriorate. NOTICE: Make sure nothing touches or scratches the surface (black-colored film) of the belt unit. Scratches - Dell 3110cn Color Laser Printer | User Guide - Page 57
3. Pull up the tag to remove the seal from the fuser. NOTE: Make sure to lock both levers at ends of the fuser, after removing the seal. 4. Hold one print cartridge firmly and shake it 5 or 6 times to distribute the toner evenly. 5. - Dell 3110cn Color Laser Printer | User Guide - Page 58
NOTE: To protect the drum against bright light, do not remove the orange protective cover of the print cartridge before the cartridge is inserted into its slot in the printer. 6. Completely remove the seal from the print cartridge by pulling the tab on the end of the print cartridge. NOTE: Pull the - Dell 3110cn Color Laser Printer | User Guide - Page 59
7. 8. Repeat steps 4, 5, 6, and 7 to install the other print cartridges. 9. Remove the orange protective covers of the each of the installed print cartridges. 10. After installing all of the print cartridges, close the front cover. - Dell 3110cn Color Laser Printer | User Guide - Page 60
- Dell 3110cn Color Laser Printer | User Guide - Page 61
Printer Locally Connecting the Printer to the Network Choosing the Right Cable Your Dell™ Color Laser Printer 3110cn interconnection cable must meet the following requirements: Connection type Connection specifications Parallel IEEE 1284 USB USB 2.0 Ethernet 10 Base-T/100 Base-TX Wireless - Dell 3110cn Color Laser Printer | User Guide - Page 62
this step and go on to "Connecting the Printer to the Network." Microsoft® Windows® 2000, XP, Server 2003, XP x64, Server 2003 x64, Vista and Mac® OS X or later operating systems support USB connections. Some UNIX® and Linux computers also support USB connections. See your computer operating system - Dell 3110cn Color Laser Printer | User Guide - Page 63
A USB/parallel port requires a USB/parallel cable. Be sure to match the USB/parallel symbol on the cable to the USB/parallel symbol on the printer. Plug the other end of the cable into a USB or parallel port on the back of the computer. For a USB cable, do not plug it - Dell 3110cn Color Laser Printer | User Guide - Page 64
other attached devices are turned off and unplugged. 2. Connect the printer to the network using an Ethernet cable or the wireless printer adapter. To use a wireless printer adapter, you must install the Multi Protocol Card first. To install the card, see "Installing the Dell Multi Protocol Card". - Dell 3110cn Color Laser Printer | User Guide - Page 65
end into a LAN drop or hub. For a wireless connection, insert the wireless printer adapter into the wireless printer socket on the back of the printer. Turn On the Printer 1. Plug one end of the printer power cable into the socket at the back of the printer and the other end into a properly grounded - Dell 3110cn Color Laser Printer | User Guide - Page 66
settings page is printed. 4. If the IP address shows anything other than 0.0.0.0 (the factory default) or 169.254.xx.xx, the printer has an IP address assigned and stored. Go to "Verify the IP Settings." Assign an IP Address NOTE: When you assign an IP address manually in IPv6 Mode, use the Dell - Dell 3110cn Color Laser Printer | User Guide - Page 67
and the Get IP Address is set to AutoIP on the operator panel menu, you can set the IP address from 0.0.0.0 to the desired IP address on the printer selection window. Verify the IP Settings 1. Print another printer settings page. 2. Look under the TCP/IP heading on the printer settings page to make - Dell 3110cn Color Laser Printer | User Guide - Page 68
2. or Ping the printer and verify that it responds. For example, at a command prompt on a network computer, type ping followed by the new printer IP address (for example, 192.168.0.11): ping 192.168.0.11 If the printer is active on the network, you will receive a reply. - Dell 3110cn Color Laser Printer | User Guide - Page 69
Enterprise Console Management Modules The following enterprise console management modules and user's manuals are available on your Drivers and Utilities CD: IBM Tivoli® NetView® CA Unicenter® HP OpenView® To use the modules, go to the following directory on your CD and run each . - Dell 3110cn Color Laser Printer | User Guide - Page 70
550-Sheet Feeder Installing a Duplexer Installing a Memory Card Installing the Dell Multi Protocol Card Installing the Dell Wireless Printer Adapter 3310 USB Installing the Optional 550-Sheet Feeder CAUTION: If you are adding an optional 550-sheet feeder after setting up the printer, be sure to turn - Dell 3110cn Color Laser Printer | User Guide - Page 71
onto the optional 550-sheet feeder. 4. Pull the tray out of the printer until it stops. Hold the tray with both hands, lift the front slightly, and remove it from the printer. 5. Join the 550-sheet feeder and the printer by tightening the two screws provided with the feeder with a coin or similar - Dell 3110cn Color Laser Printer | User Guide - Page 72
will not detect the paper type. 8. Print a printer settings page to verify that the optional 550-sheet feeder is installed correctly. a. Press Menu. b. Press until Report/List appears, and then press . c. Printer Setting is displayed. Press . The printer settings page is printed. d. Verify 550 Sheet - Dell 3110cn Color Laser Printer | User Guide - Page 73
then press Menu. 10. If you installed the optional 550-sheet feeder after installing the printer driver, update your driver by following the instructions for each operating system. If the printer is on a network, update the driver for each client. When Using PCL Driver Windows Vista™ 1. Click Start - Dell 3110cn Color Laser Printer | User Guide - Page 74
2. Select Available for the 550-sheet feeder setting. 3. Click Apply, and then click OK. 4. Close the Printers and Faxes (or Printers) dialog box. When Using PS Driver Windows Vista 1. Click Start Control Panel Hardware and Sound Printers. 2. Right-click the printer that is using the PS driver, and - Dell 3110cn Color Laser Printer | User Guide - Page 75
sure nothing touches or scratches the surface (black-colored film) of the belt unit. Scratches, dirt, or oil from your hands on the film of the belt unit may reduce print quality. 1. Make sure that the printer is turned off. 2. Remove all packaging from duplex module. 3. Push the side button and - Dell 3110cn Color Laser Printer | User Guide - Page 76
4. Pull up on the belt release levers and rotate the belt unit up as shown in the illustration. 5. Remove the connector cap. - Dell 3110cn Color Laser Printer | User Guide - Page 77
NOTE: The connector cap in your printer may look different from illustration. 6. With the connector of the duplexer toward the slot, push the duplexer into the slot. - Dell 3110cn Color Laser Printer | User Guide - Page 78
NOTE: Make sure that the duplexer is correctly connected to the printer with connectors and cannot be moved easily. 7. Close the belt unit by pulling it down. 8. Close the front cover. - Dell 3110cn Color Laser Printer | User Guide - Page 79
. 11. If you installed the optional duplexer after installing the printer driver, update your driver by following the instructions for each operating system. If the printer is on a network, update the driver for each client. When Using PCL Driver Windows Vista 1. Click Start Control Panel Hardware - Dell 3110cn Color Laser Printer | User Guide - Page 80
. 2. Select Available for the duplexer setting. 3. Click Apply, and then click OK. 4. Close the Printers and Faxes (or Printers) dialog box. When Using PS Driver Windows Vista 1. Click Start Control Panel Hardware and Sound Printers. 2. Right-click the printer that is using the PS driver, and then - Dell 3110cn Color Laser Printer | User Guide - Page 81
Settings tab, and then select Available for the Duplexer item under Installable Options. 4. Click OK. 5. Close the Printers dialog box. Mac OS X 1. Select the printer from the Printer List screen in Print Center (or Printer Setup Utility). 2. Click Printers on the Print Center (or Printer Setup - Dell 3110cn Color Laser Printer | User Guide - Page 82
3. With the connector of the memory card toward the slot, insert the memory card at an angle into the slot. 4. Push the memory card into the slot firmly. - Dell 3110cn Color Laser Printer | User Guide - Page 83
5. Pivot the memory card downward until it clicks into place. NOTE: Make sure that the memory card is firmly fixed in the slot and cannot be moved easily. 6. Close the control board cover and turn the screw clockwise. - Dell 3110cn Color Laser Printer | User Guide - Page 84
9. If you installed the additional print memory after installing the printer driver, update your driver by following the instructions for the operating system you are using. If the printer is on a network, update the driver for each client. When Using PCL Driver Windows Vista 1. Click Start Control - Dell 3110cn Color Laser Printer | User Guide - Page 85
memory for the memory capacity setting. 3. Click Apply, and then click OK. 4. Close the Printers and Faxes (or Printers) dialog box. When Using PS Driver Windows Vista 1. Click Start Control Panel Hardware and Sound Printers. 2. Right-click the printer that is using the PS driver, and then select - Dell 3110cn Color Laser Printer | User Guide - Page 86
Click the Device Settings tab, and then select the total amount of the installed print memory for the Memory Capacity item under Installable Options. 4. Click OK. 5. Close the Printers dialog box. Mac OS X 1. Select the printer from the Printer List screen in Print Center (or Printer Setup Utility - Dell 3110cn Color Laser Printer | User Guide - Page 87
2003 x64/2000/ NT 4.0 IPX/SPX NetWare3.12/3.2/4.1/4.11/4.2/5/6/6.5* AppleTalk Mac OS X 10.2.8/10.3.9/10.4.3 Bonjour Mac OS X 10.2.8/10.3.9/10.4.3 IPv6 Windows Vista *Only compatible with Support Pack 1.1 or later. 1. Make sure that the printer is turned off and unplug all cables including the - Dell 3110cn Color Laser Printer | User Guide - Page 88
4. Press the printed circles with your fingers to secure the multi protocol card to the connector. NOTE: Avoid pressing down on the multi protocol card's connector. NOTE: Make - Dell 3110cn Color Laser Printer | User Guide - Page 89
. Press . The printer settings page is printed. d. Verify Multi-Protocol Card is listed in the printer settings under Printer Options. If it is not listed, turn off the printer, unplug the power cable, and reinstall the optional multi protocol card. Installing the Dell Wireless Printer Adapter 3310 - Dell 3110cn Color Laser Printer | User Guide - Page 90
/802.11g Bandwidth 2.4GHz Data Transfer Rate 11g mode: 54, 48, 36, 24, 18, 12, 9, 6 Mbps 11b mode: 11, 5.5, 2, 1 Mbps Device Type Wireless Printer Adapter Security 64(40-bit key)/128(104-bit key) WEP Encryption/WPA/WPA2 NOTE: To use the wireless printer adapter, you must install the multi - Dell 3110cn Color Laser Printer | User Guide - Page 91
The optional multi protocol card with the Wireless Printer Adapter attached must be installed on the printer. Scene 1. Install a printer to the already-operating wireless network (When wireless setting is already set to your computer) 1. Insert the Drivers and Utilities CD into your computer. 2. The - Dell 3110cn Color Laser Printer | User Guide - Page 92
, no operation is necessary on this screen. 10. On the Setting-Ready Printer screen, verify that the correct IP address is assigned to the printer to which the wireless setting is set, and then click Install. 11. If you select the I am setting up this printer on server check box on the Select - Dell 3110cn Color Laser Printer | User Guide - Page 93
the Enter Wireless Network Settings screen, set each wireless setting item, and then click Next. When you select the Fixed IP option button for IP address assignment, click Settings... and enter the IP address and subnet mask on the screen. 8. Set each item on the Enter Printer Settings screen, and - Dell 3110cn Color Laser Printer | User Guide - Page 94
the printer configuration settings, monitor toner level, and when it is time to order replacement consumables, just click the Dell supplies link right from your Web browser. NOTE: The Dell Printer Configuration Web Tool is not available when the printer is locally attached to a computer or a print - Dell 3110cn Color Laser Printer | User Guide - Page 95
and installation path, and then click Next. At this point, the wireless setting specified on the Enter Wireless Network Settings screen is sent to the printer. 10. On the Wireless configuration is now complete screen, change the wireless setting of your computer to the same as that sent to the - Dell 3110cn Color Laser Printer | User Guide - Page 96
the correct IP address is assigned to the printer to which the wireless setting is set, and then click Install. 12. If you select the I am setting up this printer on server check box on the Select Printer screen and also select the PostScript Driver check box on the Enter Printer Settings screen - Dell 3110cn Color Laser Printer | User Guide - Page 97
with Printer screen, and then click Next. The steps are as follows. NOTE: If your computer provides a wireless LAN adapter tool, change the wireless settings using this tool. Or you can change the wireless settings using the tool provided by the operating system. See the instructions below - Dell 3110cn Color Laser Printer | User Guide - Page 98
the correct IP address is assigned to the printer to which the wireless setting is set, and then click Install. 12. If you select the I am setting up this printer on server check box on the Select Printer screen and also select the PostScript Driver check box on the Enter Printer Settings screen - Dell 3110cn Color Laser Printer | User Guide - Page 99
the printer configuration settings, monitor toner level, and when it is time to order replacement consumables, just click the Dell supplies link right from your Web browser. NOTE: The Dell Printer Configuration Web Tool is not available when the printer is locally attached to a computer or a print - Dell 3110cn Color Laser Printer | User Guide - Page 100
than Windows 2000, create settings according to the manual of the wireless setting tool provided by your wireless device manufacturer. 2. Check the IP address assigned by AutoIP on the printer. e.g.: 168.254.1.1 3. Check that the IP address on your computer is assigned by DHCP. 4. Open Dell Printer - Dell 3110cn Color Laser Printer | User Guide - Page 101
h. NOTE: When your operating system is earlier than Windows 2000, create settings according to the manual of the wireless setting tool provided by your wireless device manufacturer. For Fixed IP network: 1. Create wireless setting of your computer following the steps below. NOTE: If your computer - Dell 3110cn Color Laser Printer | User Guide - Page 102
system is earlier than Windows 2000, create settings according to the manual of the wireless setting tool provided by your wireless device manufacturer. Scene 2. Construct new wireless network environment for both computer and printer (When wireless setting needs to be set to your computer) 1. - Dell 3110cn Color Laser Printer | User Guide - Page 103
than Windows 2000, create settings according to the manual of the wireless setting tool provided by your wireless device manufacturer. 2. Check the IP address assigned by AutoIP on the printer. e.g.: 168.254.1.1 3. Check that the IP address on your computer is assigned by DHCP. 4. Open Dell Printer - Dell 3110cn Color Laser Printer | User Guide - Page 104
Property dialog box. NOTE: WhenWhen your operating system is earlier than Windows 2000, create settings according to the manual of the wireless setting tool provided by your wireless device manufacturer. For Fixed IP network: 1. Create wireless setting of your computer following the steps below. a. - Dell 3110cn Color Laser Printer | User Guide - Page 105
is earlier than Windows 2000, create settings according to the manual of the wireless setting tool provided by your wireless device manufacturer. 2. Check the IP address on your computer. e.g.: 1.2.3.4 3. Set the IP address on the printer. e.g.: 1.2.3.5 4. Open Dell Printer Configuration Web Tool - Dell 3110cn Color Laser Printer | User Guide - Page 106
your operating system is earlier than Windows 2000, create settings according to the manual of the wireless setting tool provided by your wireless device manufacturer. Wireless Setting through Dell Printer Configuration Web Tool - Advanced setup Access point (Infrastructure, DHCP network) 1. Create - Dell 3110cn Color Laser Printer | User Guide - Page 107
is earlier than Windows 2000, create settings according to the manual of the wireless setting tool provided by your wireless device manufacturer. 2. Set up the printer wireless adapter IP address. a. Reset the settings for the wireless adapter to the default. i. Press Menu on printer control panel - Dell 3110cn Color Laser Printer | User Guide - Page 108
://169.254.xxx.yyy/ (Your wireless adapter IP address) d. Change wireless settings (SSID/ communication mode) from Dell Printer Configuration Web Tool. i. Click Print server setting on the left navigational bar. ii. Click the Print server setting tab. iii. Click the TCP/IP sub-tab. iv. Select DHCP - Dell 3110cn Color Laser Printer | User Guide - Page 109
dialog box. NOTE: When your operating system is earlier than Windows 2000, create settings according to the manual of the wireless setting tool provided by your wireless device manufacturer. Access point (Infrastructure, Fixed IP network) 1. Ensure that the addresses of your computer and access - Dell 3110cn Color Laser Printer | User Guide - Page 110
than Windows 2000, create settings according to the manual of the wireless setting tool provided by your wireless device manufacturer. 3. Check the IP, subnet mask and gateway address on your computer. e.g. IP: 192.168.1.1 Subnet mask: 255.255.0.0 4. Set the IP address from the printer control - Dell 3110cn Color Laser Printer | User Guide - Page 111
e.g.: http://:192.168.1.2 6. Change wireless settings of the printer from Dell Printer Configuration Web Tool. a. Click Print server setting on the left navigational bar. b. Click Print server setting tab. c. Click Wireless LAN sub-tab. d. Change the SSID setting (according to your access point SSID - Dell 3110cn Color Laser Printer | User Guide - Page 112
until Report/List appears, and then press . c. Printer Setting is displayed. Press . The printer settings page is printed. d. Verify Wireless LAN Adapter is listed in the printer settings under Printer Options. If it is not listed, turn off the printer, unplug the power cable, and reinstall the - Dell 3110cn Color Laser Printer | User Guide - Page 113
properly, and could cause paper jams. For best performance, use 75 g/m2 (20 lb bond) grain long paper. Curl Curl is the tendency of print media to curve at its edges. Excessive curl can cause paper feeding problems. Curl usually occurs after the paper passes through the printer, where it is exposed - Dell 3110cn Color Laser Printer | User Guide - Page 114
discoloring, bleeding, or releasing hazardous emissions. The laser printing process heats paper to high temperatures. Check with the manufacturer or vendor to determine whether the paper you have chosen is acceptable for laser printers. Always print several samples before buying large quantities of - Dell 3110cn Color Laser Printer | User Guide - Page 115
source. This may result in a paper jam. Do not remove trays while a job is printing or Printing is displayed on the operator panel. Make sure the Paper Type setting is correct. (See "Tray Settings" for detailed information about these settings.) Make sure the paper is properly loaded in the tray - Dell 3110cn Color Laser Printer | User Guide - Page 116
should meet these requirements; latex inks might not. If you are in doubt, contact your paper supplier. Printing on Letterhead Check with the manufacturer or vendor to determine whether the preprinted letterhead you have selected is acceptable for laser printers. Page orientation is important when - Dell 3110cn Color Laser Printer | User Guide - Page 117
and not drilled into paper already packaged in a ream. Drilled paper can cause jams when multiple sheets feed through the printer. This may result in a paper jam. Pre-punched paper can include more paper dust than standard paper. Your printer may require more frequent cleaning and feed reliability - Dell 3110cn Color Laser Printer | User Guide - Page 118
, Dell recommends trying a sample first. See "Loading the Multipurpose Feeder" for instructions on loading an envelope. When printing on envelopes: Use only high-quality envelopes that are designed for use in laser printers. Set the print media source to the multipurpose feeder. Set the paper type - Dell 3110cn Color Laser Printer | User Guide - Page 119
quantities of any print media, Dell recommends trying a sample first. When printing on labels: Set the paper type to Label in the Tray Settings. Set the paper type to Label from the printer driver. Do not load labels together with paper or transparencies in the same tray. This may result in a jam. - Dell 3110cn Color Laser Printer | User Guide - Page 120
from peeling inside the printer. Portrait orientation is preferred, especially when printing bar codes. Do not use labels that have exposed adhesive. Storing Print Media For proper print media storage, the following guidelines help avoid media feeding problems and uneven print quality. For best - Dell 3110cn Color Laser Printer | User Guide - Page 121
(3.87 in.) to 355.6 mm (14.00 in.) long. *2 The tray supports user-specified print media that are 148.5 mm (5.85 in.) to 215.9 mm (8.50 in.) wide mm (8.27 in.) to 355.6 mm (14.00 in.) long. *3 The duplexer supports user-specified print media that are 148.5 mm (5.85 in.) to 215.9 mm (8.50 in.) wide - Dell 3110cn Color Laser Printer | User Guide - Page 122
Recycled Multipurpose feeder Y Y Y Y Y Y Y Y Y Y Y Y Y Y Y Y Y Y Standard 250-sheet Optional 550-sheet tray feeder Y Y N N Y Y N N Y Y N N Y Y N N N N Y Y Y Y N N Y Y N N N N N N N N Y Y Optional duplexer Y N Y N Y N N N N N Y N N N N N N Y Setup Paper Type - Dell 3110cn Color Laser Printer | User Guide - Page 123
-216 - JPN Coated 95-105 Inkjet Printer paper cannot be used. Coated 106-163 Inkjet Printer paper cannot be used. Coated Thick 164-216 Inkjet Printer paper cannot be used. Transparency - Inkjet Printer paper cannot be used. Label - Inkjet Printer paper cannot be used. Envelopes - - - Dell 3110cn Color Laser Printer | User Guide - Page 124
Media in Standard and Optional Trays NOTE: To avoid paper jams, do not remove trays while a job prints. NOTE: Use only laser print media. Do not use ink jet paper in the printer. All trays are loaded the same way. 1. Pull the tray out of the printer until it stops. Hold the tray with both hands - Dell 3110cn Color Laser Printer | User Guide - Page 125
2. Slide the width guides to the edge of the tray. The width guides should be fully extended. NOTE: For Letter paper, push the lever to the 8.5" position. 3. Slide the tray to the size of the paper to be loaded by using the length guide. - Dell 3110cn Color Laser Printer | User Guide - Page 126
Straighten the edges of the stack on a level surface. 5. Place the print media into the tray with the recommended print side face up. NOTE: Do not exceed the maximum fill line in the tray. Overfilling the tray may cause paper jams. 6. Adjust the width guides until they rest lightly against the edges - Dell 3110cn Color Laser Printer | User Guide - Page 127
7. Insert the tray into the printer, and push until it stops. 8. Select the paper type from the operator panel if any print media other than plain print media is loaded. If a user-specified print media is loaded, you must specify the paper size setting by using the operator panel. Loading - Dell 3110cn Color Laser Printer | User Guide - Page 128
print media within the following dimensions: Width -- 76.2 mm (3.00 in.) to 220.0 mm (8.66 in.) Length -- 98.4 mm (3.87 in.) to 355.6 mm (14.00 in.) Loading the Multipurpose Feeder In addition to plain paper , the multipurpose feeder can use various other sizes and types of print media - Dell 3110cn Color Laser Printer | User Guide - Page 129
media. 5. Make sure the type setting for the multipurpose feeder is set to the correct value for the print media you have loaded. 6. Select print media source, size, and type in your software program and select the print media size and type on the printer operator panel. Loading Envelopes To load - Dell 3110cn Color Laser Printer | User Guide - Page 130
sure to set the envelopes with the flaps completely closed. NOTICE: Never use envelopes with windows, coated linings, or self-stick adhesives. These lead to paper jams and damage to the printer. Using the Multipurpose Feeder Load only one size and type of print media during a single print job. To - Dell 3110cn Color Laser Printer | User Guide - Page 131
the Duplex Function Duplex printing (or two-sided printing) allows you to print on both sides of a sheet of paper. For sizes that are acceptable for duplex printing, see "Print Media Sizes and Support." Duplex printing is only available when the optional duplexer is installed on the printer. For - Dell 3110cn Color Laser Printer | User Guide - Page 132
for portrait and landscape pages: Using the Center Output Tray The center output tray holds up to: 250 sheets (20 lb (75 g/m2)) of plain paper - Dell 3110cn Color Laser Printer | User Guide - Page 133
Using the Output Tray Extension The output tray extension is designed to prevent print media from falling from the printer after the print job is complete. Before printing a document, make sure the output tray extension is fully extended. - Dell 3110cn Color Laser Printer | User Guide - Page 134
the Operator Panel Buttons Printing a Panel Settings Page Using the Operator Panel Buttons The printer operator panel has a 2-line by 16-character liquid crystal display (LCD), seven buttons, and two indicators that flash when the printer is ready to print, and when an error occurs. 1. LCD display - Dell 3110cn Color Laser Printer | User Guide - Page 135
mode, displays the selected menu or item and determines the selected value. In the Print mode, prints data that is in the printer. Printing a Panel Settings Page The Panel Settings page shows current settings for the operator panel menus. 1. Press Menu. 2. Press until Report/List appears, and then - Dell 3110cn Color Laser Printer | User Guide - Page 136
program, use the printer operator panel or the Dell Printer Configuration Web Tool. Changing a printer setting from the printer operator panel or from the Dell Printer Configuration Web Tool makes that setting the user default. Printing a Printer Settings Page The printer settings page lists all - Dell 3110cn Color Laser Printer | User Guide - Page 137
, press Cancel. Driver settings may override changes previously made and may require you to change the operator panel defaults. NOTE: Driver settings you choose from your software program may override the settings you select from the operator panel. Using the Dell Printer Configuration Web Tool - Dell 3110cn Color Laser Printer | User Guide - Page 138
until Maintenance appears, and then press . 4. Press until Reset Defaults appears, and then press . 5. The Are you sure? message appears on the operator panel. Press . 6. Turn off the printer, and then on again to apply the settings. Initializing NVRAM for Network Settings You can initialize the IP - Dell 3110cn Color Laser Printer | User Guide - Page 139
Menu appears, and then press . 3. Press until Wired Network or Wireless Net appears, and then press . 4. Press until Reset LAN or Reset MPC appears, and then press . 5. The Are you sure? message appears on the operator panel. Press . 6. Turn off the printer, and then on again to apply the settings. - Dell 3110cn Color Laser Printer | User Guide - Page 140
printer available to a number of users, the access to the Admin Menu menus can be limited. This prevents other users from using the operator panel to inadvertently change a printer user default that has been set by the administrator. In this case, you can access the Stored Print, and Tray Settings - Dell 3110cn Color Laser Printer | User Guide - Page 141
the processed print jobs. This list contains the latest 20 print jobs. Error History Purpose: To print a detailed list of paper jam and fatal errors. Print Meter Purpose: To print the reports for the total number of pages printed. When printed using either the printer control panel or Dell Printer - Dell 3110cn Color Laser Printer | User Guide - Page 142
the Wired Network menu to change printer settings affecting jobs sent to the printer through the wired network. NOTE: Values marked by an asterisk (*) are the factory default menu settings. Ethernet Purpose: To specify the communication speed and the duplex settings of Ethernet. The change becomes - Dell 3110cn Color Laser Printer | User Guide - Page 143
full-duplex. 100Base Full TCP/IP Purpose: To specify the TCP/IP settings for the wired network. The change becomes effective after the printer is turned off and then on again. Values: IP Mode*1 Dual Stack Uses both IPv4 and IPv6 to set the IP address. IPv4 Mode Uses IPv4 to set the IP address - Dell 3110cn Color Laser Printer | User Guide - Page 144
or later and network (MPC) firmware version 16.03 or later are installed. Since you cannot set IPsec in Windows Vista in this mode, use the Dell Printer Configuration Web Tool. The Get Information from Printer function on the Options tab of the printer driver is not available when using this mode - Dell 3110cn Color Laser Printer | User Guide - Page 145
Disables the FTP port. Disable Uses IP for NetWare. NetWare*1 NetWare IP Enable* Does not use IP for NetWare. Disable NetWare IPX Uses Dell Printer Configuration Web Tool Enable* embedded in the printer. Disables an access to Dell Printer Configuration Web Tool Disable embedded in the printer - Dell 3110cn Color Laser Printer | User Guide - Page 146
protocol card is installed on the printer and the optional wireless printer adapter is not installed on the card. IP Filter (IPv4) Purpose: To specify that data received from certain IP addresses through the wired network is blocked. You can set up to 5 IP addresses. The change becomes effective - Dell 3110cn Color Laser Printer | User Guide - Page 147
from specified IP address. Reject *1 This item is only available for LPD or Port9100. Reset LAN Purpose: To initialize wired network data stored in NV (non-volatile) memory. After executing this function and rebooting the printer, all wired network settings are reset to their default values - Dell 3110cn Color Laser Printer | User Guide - Page 148
. No Reception Reset Wireless Purpose: To initialize wireless network settings. After executing this function and rebooting the printer, all wireless network settings are reset to their default values. TCP/IP Purpose: To specify the TCP/IP settings for the wireless network. The change becomes - Dell 3110cn Color Laser Printer | User Guide - Page 149
or later and network (MPC) firmware version 16.03 or later are installed. Since you cannot set IPsec in Windows Vista in this mode, use the Dell Printer Configuration Web Tool. The Get Information from Printer function on the Options tab of the printer driver is not available when using this mode - Dell 3110cn Color Laser Printer | User Guide - Page 150
Values: LPD Enables the LPD port. Enable* Disables the LPD port. Disable Port9100 Enables the Port9100 port. Enable* Disables the Port9100 port. Disable IPP Enables the IPP port. Enable* Disables the IPP port. Disable SMB TCP/IP Uses TCP/IP for SMB. Enable* Does not use TCP/IP for SMB. - Dell 3110cn Color Laser Printer | User Guide - Page 151
Dell Printer Configuration Web Tool Enable* embedded in the printer. Disables an access to Dell Printer Configuration Web Tool Disable embedded in the printer the IPX/SPX settings for the wireless network. The change becomes effective after the printer is turned off and then on again. Values: - Dell 3110cn Color Laser Printer | User Guide - Page 152
that data received from certain IP addresses through the wireless network is blocked. You can set up to 5 IP addresses. The change becomes effective after the printer is turned off and then on again. Values: IP Filter*1 No. n/Address (n is 1 to 5.) Sets the IP address for Filter n. No. n/Mask - Dell 3110cn Color Laser Printer | User Guide - Page 153
settings for the wireless network. The change becomes effective after the printer code. Binary Used when no special processing is required. Parallel The Parallel menu can be adjusted to configure the parallel interface. NOTE: Values marked by an asterisk (*) are the factory default menu settings - Dell 3110cn Color Laser Printer | User Guide - Page 154
according to the specified control code. Binary Used when no special processing is required. USB Settings Use the USB Settings menu to change printer settings affecting a USB port. NOTE: Values marked by an asterisk (*) are the factory default menu settings. Adobe Protocol Purpose: To specify - Dell 3110cn Color Laser Printer | User Guide - Page 155
according to the specified control code. Binary Used when no special processing is required. System Settings Use the System Settings menu to configure the basic printer settings. NOTE: Values marked by an asterisk (*) are the factory default menu settings. PowerSaver Time Purpose: To specify - Dell 3110cn Color Laser Printer | User Guide - Page 156
data from the computer. You can also return the printer to the print mode by pressing any button on the operator panel. Alert Tone Purpose: To establish whether the printer sounds an alarm when an error occurs. Values: Does not sound an alarm when an error occurs. Off* Sounds an alarm when an - Dell 3110cn Color Laser Printer | User Guide - Page 157
Values: Does not print the logs. Off* Prints the logs. On Print logs can also be printed using the Report/List menu. See also: "USB Settings" Print ID Purpose: To specify a location where the user ID is printed. This feature is available for the PCL driver and unavailable for the PS driver. Values: - Dell 3110cn Color Laser Printer | User Guide - Page 158
page. Bottom Right NOTE: When printing on DL size paper, a part of the user ID may not be printed correctly. Print Text Purpose: To specify whether the printer outputs PDL data, which is not supported by the printer, as text when the printer receives it. Text data is printed on A4 or Letter size - Dell 3110cn Color Laser Printer | User Guide - Page 159
displayed when 256 MB or more of additional print memory is installed on the printer. NOTE: Restart your printer when you change the settings for the RAM Disk menu. Substitute Tray Purpose: Specifies whether or not to use another size paper when the paper that is loaded in the specified tray does - Dell 3110cn Color Laser Printer | User Guide - Page 160
as the default measurement unit. Maintenance Use the Maintenance menu to initialize the NV (non-volatile) memory, configure the plain paper quality adjustment settings, and configure the security settings. NOTE: Values marked by an asterisk (*) are the factory default menu settings. Paper Density - Dell 3110cn Color Laser Printer | User Guide - Page 161
Normal* Light Label Normal* Light Adjust BTR NOTICE: The print quality changes depending on the setting values you select for this item. Purpose: To specify the reference voltage settings for the transfer roller. Values: Plain -3 - +3 0* Plain Thick -3 - +3 0* Transparency -3 - +3 0* Covers - Dell 3110cn Color Laser Printer | User Guide - Page 162
-3 - +3 0* Coated -3 - +3 0* Coated Thick -3 - +3 0* Envelope -3 - +3 0* Recycled -3 - +3 0* JPN Coated -3 - +3 0* JPN Postcard -3 - +3 0* Adjust Fuser NOTICE: The print quality changes depending on the setting values you select for this item. Purpose: To specify the temperature - Dell 3110cn Color Laser Printer | User Guide - Page 163
Plain -2 - +2 0 Plain Thick -2 - +2 0 Transparency -2 - +2 0 Covers -2 - +2 0 Covers Thick -2 - +2 0 Label -2 - +2 0 Coated -2 - +2 0 Coated Thick -2 - +2 0 Envelope -2 - +2 Recycled 0 -2 - +2 0 - Dell 3110cn Color Laser Printer | User Guide - Page 164
. Off Color Reg Adj Purpose: To print the color registration chart and to adjust the color registration by using the chart. This function is required after the printer is set up or moved. Values: Auto Correct Adjusts color registration automatically. Prints the color registration chart - Dell 3110cn Color Laser Printer | User Guide - Page 165
Disk menu is set to Enable. Non-Dell Toner NOTICE: When Non-Dell toner is used, the printer may be severely damaged and may not be covered by your warranty. Purpose: To specify whether to use the refilled print cartridge or not. When this setting is on, you can use print cartridges provided by other - Dell 3110cn Color Laser Printer | User Guide - Page 166
the PCL emulation printer language. NOTE: Values marked by an asterisk (*) are the factory default menu settings. Paper Tray Purpose: To specify the input tray. Values: Auto* Automatically selects a tray according to the paper size and type settings of the printing job. Tray 1 The paper is fed - Dell 3110cn Color Laser Printer | User Guide - Page 167
on the page. Values: Prints text and graphics parallel to the short edge of the paper. Portrait* Prints text and graphics parallel to the long edge of the paper. Landscape 2 Sided Purpose: To set duplexing as the default for all print jobs. (Select Duplex from the printer driver to duplex only - Dell 3110cn Color Laser Printer | User Guide - Page 168
marked by an asterisk (*) are the factory default menu settings. NOTE: The 2 Sided menu is only available when the optional duplexer is installed on the printer. Values: 2 Sided Print Binding Edge Off* On Flip Long Edge* Flip Short Edge Prints on one side of the paper. Prints on both sides of the - Dell 3110cn Color Laser Printer | User Guide - Page 169
Coronet Marigold Arial Arial It Arial Bd Arial BdIt Times New Times New It Times New Bd Times New BdIt Symbol Wingdings Line Printer Times Roman Times It Times Bd Times BdIt Helvetica Helvetica Ob Helvetica Bd Helvetica BdOb CourierPS CourierPS Ob CourierPS Bd CourierPS BdOb - Dell 3110cn Color Laser Printer | User Guide - Page 170
: To specify a symbol set for a specified font. Values: ROMAN-8* ISO L1 ISO L2 ISO L5 ISO L6 PC-8 PC-8 DN PC-775 PC-850 PC-852 PC-1004 PC-8 TK WIN L1 WIN L2 WIN L5 DESKTOP PS TEXT MC TEXT MS PUB MATH-8 PS MATH PI FONT LEGAL ISO-4 ISO-6 ISO-11 - Dell 3110cn Color Laser Printer | User Guide - Page 171
pitch for scalable monospaced fonts. Values: The values are in steps of 0.01. 6.00 - 24.00 10.00* Font pitch refers to the number of fixed-space characters in a horizontal inch of type. For monospaced, fonts. See also: "Pitch and Point Size" Form Line Purpose: To set the number of lines in a page. - Dell 3110cn Color Laser Printer | User Guide - Page 172
5 - 128 The values are in steps of 1. 64* or 64*1 *1 Denotes country-specific factory default values. The printer sets the amount of space between each line (vertical line spacing) based on the Form Line and Orientation menu items. Select the correct Form Line and Orientation before changing Form - Dell 3110cn Color Laser Printer | User Guide - Page 173
feature. On* Disables to perform the image enhancement feature. Off Hex Dump Purpose: To help isolate the source of a print job problem. With Hex Dump selected, all data sent to the printer is printed in hexadecimal and character representation. Control codes are not executed. Values: Disables the - Dell 3110cn Color Laser Printer | User Guide - Page 174
line Prints in the black and white mode. Black* Prints in the color mode. Color PostScript Use the PostScript menu to change printer settings that only affect jobs using the PostScript emulation printer language. NOTE: Values marked by an asterisk (*) are the factory default menu settings. PS Error - Dell 3110cn Color Laser Printer | User Guide - Page 175
before it discards the job. On* Discards the print job without printing an error message. Off NOTE: This instructions from the PS driver override the settings specified on the operator panel. PS Job Time-Out Purpose: To specify the execution time for one PostScript job. The change becomes effective - Dell 3110cn Color Laser Printer | User Guide - Page 176
limit access to the menus. Disable* Limits access to the menus. Enable Change Password Purpose: To set a password to limit access to the menus. Values: 0000-9999 0000* Tray Settings Use the Tray Settings menu to define the print media loaded in each tray. NOTE: Values marked by an asterisk (*) are - Dell 3110cn Color Laser Printer | User Guide - Page 177
MPF Purpose: To specify the paper loaded in the multipurpose feeder. Values: Plain* Paper Type Plain Thick Transparency Covers Covers Thick Label Coated Coated Thick Envelope Recycled JPN Coated JPN Postcard Plain S2 Plain Thick S2 Covers S2 Covers - Dell 3110cn Color Laser Printer | User Guide - Page 178
Monarch DL C5 Envelope #10 JPN Postcard Youkei 2 Env Youkei 3 Env Youkei 4 Env Youchou 3 Env Choukei 3 Env Custom Size MPF Mode Stop printing and show an error on the operation panel if the paper Panel Specified specified from the printer driver does not match the paper configured for the MFP - Dell 3110cn Color Laser Printer | User Guide - Page 179
Optimize print quality for the specified paper. Select paper source through your software program by selecting type and size. Automatically link trays. The printer automatically links any trays containing the same type and size of paper, if you have set the Paper Type to the correct values. Tray 1 - Dell 3110cn Color Laser Printer | User Guide - Page 180
JPN Coated Auto* Paper Size Custom Size Stored Print This Stored Print menu provides applicable printing services such as Secure Print and Proof Print. NOTE: The Stored Print menu is only displayed when 256 MB or more of optional memory card is installed on the printer. Secure Print Purpose: To - Dell 3110cn Color Laser Printer | User Guide - Page 181
then deletes it from print memory. Del after Print Prints the job, and then saves it in print memory. Print and Save Delete Deletes the job from print memory. Setting of Panel Lock This feature prevents unauthorized personnel from changing settings made by the printer administrator. For regular - Dell 3110cn Color Laser Printer | User Guide - Page 182
. This will recover the factory default panel password. NOTE: If panel lock is Enable, the factory-default panel password is 0000. See also: "Change Password" Disabling Panel Lock 1. Press Menu. 2. Press until Admin Menu appears, and then press . 3. Press until Panel Settings appears, and then press - Dell 3110cn Color Laser Printer | User Guide - Page 183
to display the Printing Status Window when printing. When an error occurs, the error message appears on the Printing Status Window. Status Window On the Status Window, you can check how much toner and paper are remaining or the configuration of options for the local printer. Status Monitor Console - Dell 3110cn Color Laser Printer | User Guide - Page 184
that you have created will reduce the amount of work required when installing the printer driver. Install in advance the Dell™ Color Laser Printer 3110cn printer driver in the computer on which the setup disk is to be created. The setup disk can only be used on the operating system on which the disk - Dell 3110cn Color Laser Printer | User Guide - Page 185
Software Update The firmware and/or driver updates can be downloaded from http://support.dell.com. - Dell 3110cn Color Laser Printer | User Guide - Page 186
" If you experience a jam, see "Clearing Jams" for instructions. Sending a Job to Print To support all of the printer features, use the printer driver. When you choose Print from a software program, a window representing the printer driver opens. Select the appropriate settings for the specific job - Dell 3110cn Color Laser Printer | User Guide - Page 187
from the driver override the default menu settings selected from the printer operator panel. You may need to click Properties or Setup from the initial Print box to see all of the available printer settings you can change. If you are not familiar with a feature in the printer driver window, open the - Dell 3110cn Color Laser Printer | User Guide - Page 188
A list of available printers appears. Printers (for Windows Vista™). 3. Double-click the printer you selected when you sent the job. A list of print jobs appears in the printer window. 4. Select the job you want to cancel. 5. Press on the keyboard. Printing a Printer Settings Page To - Dell 3110cn Color Laser Printer | User Guide - Page 189
to configure the RAM disk settings on both the operator panel and the printer driver. NOTE: Depending on the documents, its job may be too big for the available memory. In this case, an error occurs. NOTE: If a document name is not assigned to your print job in the print driver, the job's name will - Dell 3110cn Color Laser Printer | User Guide - Page 190
is displayed. Press . 4. Press until your user name appears, and then press . 5. If you print confidential jobs (Secure Print jobs), enter the password you have specified on the printer driver, and then press . 6. Press until the job you want to print appears, and then press . 7. Press until the - Dell 3110cn Color Laser Printer | User Guide - Page 191
This ensures that the job does not print until you are there to retrieve it, and no one else using the printer can print the job. When you select Secure Print from Stored Print after selecting your user name, the following prompt is displayed: Password [xxxxxxxxxxxx] Use the buttons on the operator - Dell 3110cn Color Laser Printer | User Guide - Page 192
NOTE: The printer holds the job until you delete it by using the operator panel or you turn off the printer. The data on memory is cleared when the printer is turned off. NOTE: When you select Del after Print, the held job is automatically deleted after printing. - Dell 3110cn Color Laser Printer | User Guide - Page 193
name text box. 6. Click OK. The PCL driver supports an Additional Driver for Windows Vista (not including Itanium). To register the Additional Driver, follow the instructions below. 1. Click Start Control Panel Hardware and Sound Printers. 2. Right-click the printer's icon and select Sharing. 3. 4. - Dell 3110cn Color Laser Printer | User Guide - Page 194
and other factors. Close My Network Places (Network Neighborhood for Windows 2000). 4. Print a test page to verify print installation. 5. Click Start Settings Printers and Faxes (Printers for Windows 2000). 6. Select the printer you just created. 7. Click File Properties. 8. From the General tab - Dell 3110cn Color Laser Printer | User Guide - Page 195
computer handles the print job processing. 1. Click Start Settings Printers and Faxes (Printers for Windows 2000). 2. Click Add Printer to launch the Add Printer wizard. 3. Click Next (Network Print Server for Windows 2000). 4. Select A network printer or a printer attached to another computer - Dell 3110cn Color Laser Printer | User Guide - Page 196
to the printer during the server installation process. 4. If this is a new printer, you may be prompted to install a printer driver. If no system driver is available, then you will need to provide a path to available drivers. 5. Select whether you want this printer to be the default printer for the - Dell 3110cn Color Laser Printer | User Guide - Page 197
printer has numerous resident fonts in PCL 5/PCL 6 and PostScript 3. See "Resident Fonts" for a listing of all resident fonts. Weight and style Typefaces are often available lines result in darker characters. Some words commonly used to describe the weight of a typeface are bold, medium, light, black - Dell 3110cn Color Laser Printer | User Guide - Page 198
of fixed space fonts. It is a measure of the number of characters that will print in one horizontal inch of type. For example, all 10pitch fonts print 10 characters per inch (cpi) and all 12-pitch fonts print 12 cpi: In proportional (or typographic) fonts, every character can have a different width - Dell 3110cn Color Laser Printer | User Guide - Page 199
of printing in many different point sizes. Your printer uses different scalable font formats for downloading fonts to the printer. PCL 5/PCL 6 uses Intellifont and TrueType scalable fonts. PostScript 3 uses Type 1 and TrueType scalable fonts. There are thousands of different scalable fonts available - Dell 3110cn Color Laser Printer | User Guide - Page 200
Courier and TimesNew (PCL 5/PCL 6)/Times New Roman (PostScript 3), are available for all printer languages. The following table lists all the fonts resident in your printer. See "Printing a Font Sample List" for instructions on how to print samples of the fonts. You can select the resident fonts - Dell 3110cn Color Laser Printer | User Guide - Page 201
Demi Italic Carta Courier Chicago Courier It Clarendon Roman Courier Bd Clarendon Bold Courier BdIt Clarendon Light Cooper Black LetterGothic Cooper Black Italic LetterGothic It Cooper Gothic 32BC LetterGothic Bd Cooper Gothic 33BC Coronet Albertus Md Courier Albertus XBd Courier - Dell 3110cn Color Laser Printer | User Guide - Page 202
Marigold Arial Arial It Arial Bd Arial BdIt TimesNew TimesNew It TimesNew Bd TimesNew BdIt Symbol Wingdings Line Printer Times Roman Times It Times Bd Times BdIt Helvetica Helvetica Ob Helvetica Bd Helvetica BdOb Eurostile Bold Extended No. 2 Geneva Gill Sans Gill Sans Italic - Dell 3110cn Color Laser Printer | User Guide - Page 203
CourierPS Hoefler Text CourierPS Ob Hoefler Text Italic CourierPS Bd Hoefler Text Black CourierPS BdOb Hoefler Text Black Italic Hoefler Ornaments SymbolPS Joanna Joanna Italic Palatino Roman Joanna Bold Palatino It Joanna Bold Italic Palatino Bd Letter Gothic Palatino BdIt Letter - Dell 3110cn Color Laser Printer | User Guide - Page 204
ITC A G Go BkOb Optima Bold Italic ITC A G Go Dm Oxford ITC A G Go DmOb Palatino Roman Palatino Italic ZapfC MdIt Palatino Bold Palatino Bold Italic ZapfDingbats Stempel Garamond Roman Stempel Garamond Italic Stempel Garamond Bold Stempel Garamond Bold Italic Symbol Tekton Regular - Dell 3110cn Color Laser Printer | User Guide - Page 205
5/PCL 6, a symbol set also defines which character will print for each key on the keyboard (or more specifically, for each code point). Some applications require different characters at some code points. To support multiple applications and languages, your printer has 36 symbol sets for the resident - Dell 3110cn Color Laser Printer | User Guide - Page 206
Default) ISO 8859-1 Latin 1 ISO 8859-2 Latin 2 ISO 8859-9 Latin 5 ISO 8859-10 Latin 6 PC-8 PC-8 DN PC-775 Baltic PC-850 Multilingual PC-852 Latin 2 PC-1004 OS/2 PC Turkish Windows 3.1 Latin 1 Windows 3.1 Latin 2 Windows 3.1 Latin 5 DeskTop PS Text MC Text Microsoft Publishing Math 8 PS - Dell 3110cn Color Laser Printer | User Guide - Page 207
Memory Contact Support What this message means What you can do Error NNN-NNN relates to printer problems. Turn off the printer, and then on. If this does not solve the problem, contact Dell. See "Contacting Dell" in the Owner's Manual. The outer levers on both sides of the fuser unit are not - Dell 3110cn Color Laser Printer | User Guide - Page 208
. If this does Error NNN-NNN relates not solve the problem, contact Dell. to printer problems. See "Contacting Dell" in the Owner's Manual. Paper Jam 077-901 Open Front Cover Remove Paper Paper Jam 077-907 Open Front Cover & Belt Unit Remove Paper The printer detects a paper jam. XXX and YYY - Dell 3110cn Color Laser Printer | User Guide - Page 209
supplies or www.euro.dell.com/supplies). See "Replacing Print Cartridges" Error NNN-NNN relates to printer problems. The density of the print cartridge is not enough. XXX is one of the following: · Yellow Print · Cyan Print · Magenta Print · Black Print Confirm that the toner seal is removed from - Dell 3110cn Color Laser Printer | User Guide - Page 210
From the Operator Panel" Error relating to PDL emulation problems occurs. · Press to clear the message, cancel the current print job, and conduct the next print job, if any. · Press Cancel to cancel the print job. When the configuration of the printer on the printer driver does not conform to - Dell 3110cn Color Laser Printer | User Guide - Page 211
of Paper Jams Removing Print Jams From the Multipurpose Feeder Removing Print Jams From the Standard Tray Removing Print Jams From the Fuser Removing Print Jams From the Optional Duplexer Removing Print Jams From the Optional Feeder NOTE: Before buying large quantities of any print media, Dell - Dell 3110cn Color Laser Printer | User Guide - Page 212
shows where paper jams may occur along the print media path. CAUTION: Do not attempt to clear any jams using tools or instruments. This may permanently damage the printer. 1 Standard 250-sheet tray 2 Optional 550-sheet feeder 3 Multipurpose feeder 4 Optional duplexer 5 Fuser 6 Front cover - Dell 3110cn Color Laser Printer | User Guide - Page 213
Removing Print Jams From the Multipurpose Feeder NOTICE: To protect the drums of the print cartridges against bright light, close the front cover within 5 minutes. If the front cover remains open for more than 5 minutes, print quality may deteriorate. NOTE: To resolve the error displayed on the - Dell 3110cn Color Laser Printer | User Guide - Page 214
3. there are no scraps of paper remaining inside the printer. 4. Insert the tray back into the printer, and push until it stops. 5. Open and close the front cover. Removing Print Jams From the Standard Tray NOTICE: To protect the drums of the print cartridges against bright light, close the front - Dell 3110cn Color Laser Printer | User Guide - Page 215
1. 2. Remove all the jammed and/or creased paper from the tray. 3. Pull the jammed paper out carefully to avoid tearing it. If it is still hard to remove the paper, go to the next step to remove the jammed paper from the inside of the printer. 4. - Dell 3110cn Color Laser Printer | User Guide - Page 216
4. Open the front cover by pushing the side button and remove the jammed paper. Then, confirm that there are no scraps of paper remaining inside the printer. 5. Close the front cover. 6. Insert the tray into the printer, and push until it stops. - Dell 3110cn Color Laser Printer | User Guide - Page 217
printer. Removing Print Jams From the Fuser NOTICE: Make sure nothing touches or scratches the surface (black-colored film) of the belt unit. Scratches, dirt, or oil from your hands on the film of the belt unit may reduce print quality. NOTICE: To protect the drums of the print cartridges against - Dell 3110cn Color Laser Printer | User Guide - Page 218
3. CAUTION: The fuser is hot. Do not touch it, doing so may cause burns. 4. Open the cover of the fuser and remove the jammed paper. 5. Close the cover of the fuser and press down the levers at both ends of the fuser. - Dell 3110cn Color Laser Printer | User Guide - Page 219
Removing Print Jams From the Optional Duplexer NOTICE: Make sure nothing touches or scratches the surface (black-colored film) of the belt unit. Scratches, dirt, or oil from your hands on the film of the belt unit may reduce print quality. NOTICE: To protect the drums of the print cartridges against - Dell 3110cn Color Laser Printer | User Guide - Page 220
2. Pull out the jammed paper from the duplexer. If jammed paper cannot be found, go to the next step. 3. Pull up on the belt release levers and rotate the belt unit up as shown in the illustration. 4. Remove the jammed paper and close the belt unit. - Dell 3110cn Color Laser Printer | User Guide - Page 221
cover. Removing Print Jams From the Optional Feeder NOTICE: To protect the drums of the print cartridges against bright light, close the front cover within 5 minutes. If the front cover remains open for more than 5 minutes, print quality may deteriorate. NOTE: To resolve the error displayed on the - Dell 3110cn Color Laser Printer | User Guide - Page 222
2. Remove all jammed and/or creased paper from the tray. 3. Pull the jammed paper out carefully to avoid tearing it. If it is still hard to remove the paper, go to the next step to remove the jammed paper from the inside of the printer. 4. - Dell 3110cn Color Laser Printer | User Guide - Page 223
4. Open the front cover by pushing the side button and remove the jammed paper. Then, confirm that there are no scraps of paper remaining inside the printer. 5. Close the front cover. - Dell 3110cn Color Laser Printer | User Guide - Page 224
NOTE: If the paper jam message is not cleared after closing the front cover, pull out the 250-sheet tray from the printer and remove the jammed paper. 6. Insert the tray back into the printer, and push until it stops. CAUTION: Do not use excessive force on the tray. Doing so could damage the tray or - Dell 3110cn Color Laser Printer | User Guide - Page 225
Troubleshooting Troubleshooting Guide This section consists of the following instructions. Configuration of your printer instructions User Settings Menu Map Setup printing Letter Plain 1 from Multipurpose Feeder Setup printing Letter Plain 1 from Tray1 Setup printing Letter Plain 1 from Tray2 Setup - Dell 3110cn Color Laser Printer | User Guide - Page 226
to replace Print cartridges How to replace the Fuser How to replace Rollers Removing the Used Belt Unit The section will help you solve problems with the printer, options, or print quality. Troubleshooting Guide Basic Printer Problems Display Problems Printing Problems Print Quality Problems Option - Dell 3110cn Color Laser Printer | User Guide - Page 227
Problem Operator panel displays only diamonds or is blank. Menu settings changed from the operator panel have no effect. Action · Turn off the printer, wait for 10 seconds, and turn on the printer. · Self Test Message appears on the operator panel. When the test is completed, Ready to Print - Dell 3110cn Color Laser Printer | User Guide - Page 228
printer driver. Make sure you have enough print memory installed. Print Quality Problems Problem Print is too light. Action · The print cartridges may be low or need to be replaced. Confirm the amount of toner in each print cartridge and replace it with a new one if necessary. · Set the Toner - Dell 3110cn Color Laser Printer | User Guide - Page 229
Paper Type settings in the Tray Settings menu. See "System Settings". · Verify that the print media is within the printer specifications. · The fuser is old or damaged. Replace the fuser. See "Replacing the Fuser". Toner spots appear on the page/printing is blurred. · Check the print cartridges - Dell 3110cn Color Laser Printer | User Guide - Page 230
in the Advanced tab in the printer properties dialog box. · If you are using downloaded fonts, verify that the fonts are supported by the printer, the host computer, and the software program. Part or all of the page prints in black. · Check the print cartridges to make sure they are installed - Dell 3110cn Color Laser Printer | User Guide - Page 231
the printer to an appropriate environment. Color registration is out of alignment. · Print the color registration chart and adjust the color registration from the operator panel by using the chart. See "Color Reg Adj" for more details. Colored dots are printed · Replace the print cartridge that - Dell 3110cn Color Laser Printer | User Guide - Page 232
mode. If the problems still occur, contact Dell. See "Contacting Dell" in the Owner's Manual. · This occurs when you print on talc paper or acid paper. Use neutralized paper. Vertical blanks · A print cartridge is damaged. Replace the print cartridge with a new one. Option Problems If an option - Dell 3110cn Color Laser Printer | User Guide - Page 233
Turn off the printer, wait for 10 seconds, and then turn on the printer. If this does not fix the problem, unplug the printer, and check the connection between the option and the printer. Print the printer settings page to see if the option is listed in the Installed Options list. If the option is - Dell 3110cn Color Laser Printer | User Guide - Page 234
Troubleshooting Guide Configuration of your printer instructions User Settings Menu Map - Dell 3110cn Color Laser Printer | User Guide - Page 235
Setup printing Letter Plain 1 from Multipurpose Feeder 1. On the printer operator panel press MENU. 2. Press to get to Tray Settings. 3. Press to select Tray Settings. 4. Press to get to Paper Size. (ONLY ON 3x00cn) 5. 6. - Dell 3110cn Color Laser Printer | User Guide - Page 236
However if in any application, you go File Print and then click the Properties button, you will get this same driver properties window. 26. Open up Word and create a new document. 27. Go to File Print. 28. Select the Dell Color Laser Printer from the printers list 29. Click the Properties button to - Dell 3110cn Color Laser Printer | User Guide - Page 237
Size. 36. Click OK. 37. Click Close. 38. Now the printer driver is setup correctly. 39. Now go to File Page Setup. 40. Click the Paper Tab. 41. Change Paper Size to Legal. 42. Change the Paper source settings BOTH to "DEFAULT TRAY AS PER PRINTER". 43. Click OK. 44. Type in some gibberish in the body - Dell 3110cn Color Laser Printer | User Guide - Page 238
this same driver properties window. 26. Open up Word and create a new document. 27. Go to File Print. 28. Select the Dell Color Laser Printer from the printers list. 29. Click the Properties button to the right. 30. This brings up Driver Properties. 31. Click on the Paper Tray Tab. 32. Change the - Dell 3110cn Color Laser Printer | User Guide - Page 239
printer driver is setup correctly. 39. Now go to File Page Setup. 40. Click the Paper Tab. 41. Change Paper Size to Legal. 42. Change the Paper source settings BOTH to "DEFAULT TRAY AS PER PRINTER". 43. Click OK. 44. Type in some gibberish in the body of the document and click Print! Setup printing - Dell 3110cn Color Laser Printer | User Guide - Page 240
get this same driver properties window. 26. Open up Word and create a new document. 27. Go to File Print. 28. Select the Dell Color Laser Printer from the printers list 29. Click the Properties button to the right. 30. This brings up Driver Properties. 31. Click on the Paper Tray Tab. 32. Change the - Dell 3110cn Color Laser Printer | User Guide - Page 241
44. Setup printing Transparency from Multipurpose Feeder 1. On the printer operator panel press MENU. 2. Press to get to Tray Settings. 3. Press to select Tray Settings. 4. Press to get to Paper Size. (ONLY ON 3x00cn) 5. Press to select Paper Size. (ONLY ON 3x00cn) 6. Press to get to MPF. (ONLY ON - Dell 3110cn Color Laser Printer | User Guide - Page 242
get this same driver properties window. 26. Open up Word and create a new document. 27. Go to File Print. 28. Select the Dell Color Laser Printer from the printers list 29. Click the Properties button to the right. 30. This brings up Driver Properties. 31. Click on the Paper Tray Tab. 32. Change the - Dell 3110cn Color Laser Printer | User Guide - Page 243
will get this same driver properties window. 26. Open up Word and create a new document. 27. Go to File Print. 28. Select the Dell Color Laser Printer from the printers list 29. Click the Properties button to the right. 30. This brings up Driver Properties. 31. Click on the Paper Tray Tab. 32. 33. - Dell 3110cn Color Laser Printer | User Guide - Page 244
Size. 36. Click OK. 37. Click Close. 38. Now the printer driver is setup correctly. 39. Now go to File Page Setup. 40. Click the Paper Tab. 41. Change Paper Size to Legal. 42. Change the Paper source settings BOTH to "DEFAULT TRAY AS PER PRINTER". 43. Click OK. 44. Type in some gibberish in the body - Dell 3110cn Color Laser Printer | User Guide - Page 245
document. 28. Go to File Print. 29. Select the Dell Color Laser Printer from the printers list 30. Click the Properties button to the right. 31. This brings up Driver Properties. 32. Click on the Paper Tray Tab. 33. Change the Paper Source to MPF. 34. Click the MPF Settings button. 35. Select Plain - Dell 3110cn Color Laser Printer | User Guide - Page 246
to a network and not your computer, see "Setting Up Network Printing" in the Owner's Manual. Installing Printer Drivers Microsoft® Windows Vista™ 1. Insert the Drivers and Utilities CD into your computer. NOTE: Click Continue when the User Account Control dialog box appears. 2. Click Personal - Dell 3110cn Color Laser Printer | User Guide - Page 247
to install. 5. When the Congratulations! screen appears, click Print Test Page if necessary. Click Finish. Windows XP, Windows XP 64-bit Edition, Windows Server ® 2003, Windows Server 2003 64-bit Edition, and Windows 2000 1. Connect the printer to your computer with a USB cable or a parallel cable - Dell 3110cn Color Laser Printer | User Guide - Page 248
not your computer, see "Setting Up Network Printing" in the Owner's Manual. Setup Network NOTE: To use this printer in a UNIX or Linux environment, you need to install a UX Filter or Linux Driver. For more information on how to install and use these, refer to your User's Guide. NOTE: When using a CD - Dell 3110cn Color Laser Printer | User Guide - Page 249
the Printer Settings page again. Printer Setup NOTE: When you use IPv6 Mode for network printing, you cannot install the printer driver from the Drivers and Utilities CD. Use the Add Printer wizard in Windows Vista. For details, see " Printing With Web Services for Devices (WSD)" in the User's Guide - Dell 3110cn Color Laser Printer | User Guide - Page 250
to set a printer as the default, select the Set this printer as default check box. d. If you want to restrict color printing, select the appropriate Dell ColorTrack option. Enter the password when Color-Password Enabled is selected for Dell ColorTrack. e. If the postscript driver is available and - Dell 3110cn Color Laser Printer | User Guide - Page 251
display Connection in Progress until an error occurs. Determining the Wireless Network Settings You need to know the settings for the wireless network to set up the wireless printer. For details of the settings, contact your network administrator. Wireless Settings SSID Specifies the name that - Dell 3110cn Color Laser Printer | User Guide - Page 252
this screen. 10. On the Setting-Ready Printer screen, verify that the correct IP address is assigned to the printer to which the wireless setting is set, and then click Install. NOTE: If your system has any of the following operating systems: Windows XP x64 Windows Server® 2003 x64 Windows Vista x64 - Dell 3110cn Color Laser Printer | User Guide - Page 253
Windows Vista, click Continue when the User Account Control dialog box appears. 3. Select the Network Installation option button, and then click Next. 4. Select the Configure Wireless Printer using a USB connection (Recommended) option button, and then click Next. 5. Reset the wireless setting of - Dell 3110cn Color Laser Printer | User Guide - Page 254
Print Test Page button. Use the Dell Printer Configuration Web Tool to monitor the status of your network printer without leaving your desk. You can view and/or change the printer configuration settings, monitor toner level, and when it is time to order replacement consumables, just click the Dell - Dell 3110cn Color Laser Printer | User Guide - Page 255
. NOTE: The Dell Printer Configuration Web Tool is not available when the printer is locally attached to a computer or a print server. Wireless Installation using wireless connection Scene 1. Install a printer to the already-operating wireless network (When wireless setting is already set to your - Dell 3110cn Color Laser Printer | User Guide - Page 256
and installation path, and then click Next. At this point, the wireless setting specified on the Enter Wireless Network Settings screen is sent to the printer. 10. On the Wireless configuration is now complete screen, change the wireless setting of your computer to the same as that sent to the - Dell 3110cn Color Laser Printer | User Guide - Page 257
10. NOTE: If your computer provides a wireless LAN adapter tool, change the wireless settings using this tool. Or you can change the wireless settings using the tool provided by the operating system. See the instructions below. For Windows XP and Windows Server 2003: a. Select Network Connections - Dell 3110cn Color Laser Printer | User Guide - Page 258
Printer screen, and then click Next. The steps are as follows. NOTE: If your computer provides a wireless LAN adapter tool, change the wireless settings using this tool. Or you can change the wireless settings using the tool provided by the operating system. See the instructions below. For Windows - Dell 3110cn Color Laser Printer | User Guide - Page 259
Click OK to close the Property dialog box. For Windows Vista: a. Open Control Panel. b. Select Network and Wireless Network Settings screen, set each wireless setting item, and then click Next. 7. When you select the Fixed IP option button for IP Address assignment, click Change... and enter the IP - Dell 3110cn Color Laser Printer | User Guide - Page 260
. NOTE: If your computer provides a wireless LAN adapter tool, change the wireless settings using this tool. Or you can change the wireless settings using the tool provided by the operating system. See the instructions below. For Windows XP and Windows Server 2003: a. Select Network Connections from - Dell 3110cn Color Laser Printer | User Guide - Page 261
the printer configuration settings, monitor toner level, and when it is time to order replacement consumables, just click the Dell supplies link right from your Web browser. NOTE: The Dell Printer Configuration Web Tool is not available when the printer is locally attached to a computer or a print - Dell 3110cn Color Laser Printer | User Guide - Page 262
the Property dialog box. NOTE: When your operating system is earlier than Windows 2000, create settings according to the manual of the wireless setting tool provided by your wireless device manufacturer. For Windows Vista: a. Open Control Panel. b. Select Network and Internet. c. Select Network and - Dell 3110cn Color Laser Printer | User Guide - Page 263
the printer. 7. Restore the wireless setting on your computer. NOTE: If your computer provides a wireless LAN adapter tool, change the wireless settings using this tool. Or you can change the wireless settings using the tool provided by the operating system. See the instructions below. For Windows - Dell 3110cn Color Laser Printer | User Guide - Page 264
. NOTE: If your computer provides a wireless LAN adapter tool, change the wireless settings using this tool. Or you can change the wireless settings using the tool provided by the operating system. See the instructions below. For Windows XP and Windows Server 2003: a. Select Network Connections from - Dell 3110cn Color Laser Printer | User Guide - Page 265
the printer. 7. Restore the wireless setting on your computer. NOTE: If your computer provides a wireless LAN adapter tool, change the wireless settings using this tool. Or you can change the wireless settings using the tool provided by the operating system. See the instructions below. For Windows - Dell 3110cn Color Laser Printer | User Guide - Page 266
the printer in the list in Preferred Network group. g. Click Move up to move the setting to the top of the list. h. Click OK to close the Property dialog box. NOTE: When your operating system is earlier than Windows 2000, create settings according to the manual of the wireless setting tool provided - Dell 3110cn Color Laser Printer | User Guide - Page 267
the Property dialog box. NOTE: When your operating system is earlier than Windows 2000, create settings according to the manual of the wireless setting tool provided by your wireless device manufacturer. For Windows Vista: a. Open Control Panel. b. Select Network and Internet. c. Select Network and - Dell 3110cn Color Laser Printer | User Guide - Page 268
the printer. 7. Restore the wireless setting on your computer. NOTE: If your computer provides a wireless LAN adapter tool, change the wireless settings using this tool. Or you can change the wireless settings using the tool provided by the operating system. See the instructions below. For Windows - Dell 3110cn Color Laser Printer | User Guide - Page 269
settings according to the manual of the wireless setting tool provided by your wireless device manufacturer. For Windows Vista: a. Open Control Panel. b. Select Network and Internet. c. Select Network and Sharing Center. d. Select Connect to a network. e. Select the setting you send to the printer - Dell 3110cn Color Laser Printer | User Guide - Page 270
is a success. 2. Check the IP address on your computer. e.g.: 1.2.3.4 3. Set the IP address on the printer. e.g.: 1.2.3.5 4. Open Dell Printer Configuration Web Tool using WEB browser. e.g.: http://1.2.3.5 5. Change the wireless setting of the printer on Dell Printer Configuration Web Tool. 6. 7. - Dell 3110cn Color Laser Printer | User Guide - Page 271
the printer. 7. Restore the wireless setting on your computer. NOTE: If your computer provides a wireless LAN adapter tool, change the wireless settings using this tool. Or you can change the wireless settings using the tool provided by the operating system. See the instructions below. For Windows - Dell 3110cn Color Laser Printer | User Guide - Page 272
is a success. Wireless Setting through Dell Printer Configuration Web Tool - Advanced setup Access point (Infrastructure, DHCP network) 1. Create new wireless settings for your computer. NOTE: If your computer provides a wireless LAN adapter tool, change the wireless settings using this tool - Dell 3110cn Color Laser Printer | User Guide - Page 273
Windows 2000, create settings according to the manual of the wireless setting tool provided by your wireless device manufacturer. For Windows wireless net. iv. Scroll down and select TCP/IP. v. Scroll down and select IP Address. (Default IP address range: 169.254.xxx.yyy ) 3. Access Dell Printer - Dell 3110cn Color Laser Printer | User Guide - Page 274
://169.254.xxx.yyy/ (Your wireless adapter IP address) d. Change wireless settings (SSID/ communication mode) from Dell Printer Configuration Web Tool. i. Click Print server setting on the left navigational bar. ii. Click the Print server setting tab. iii. Click the TCP/IP sub-tab. iv. Select DHCP - Dell 3110cn Color Laser Printer | User Guide - Page 275
settings according to the manual of the wireless setting tool provided by your wireless device manufacturer. For Windows Vista: a. Open Control Panel. b. Select Network and Internet. c. Select Network and Sharing Center. d. Select Connect to a network. e. Select the setting you send to the printer - Dell 3110cn Color Laser Printer | User Guide - Page 276
Windows 2000, create settings according to the manual of the wireless setting tool provided by your wireless device manufacturer. For Windows Vista the IP, subnet mask and gateway address on your computer. e.g. IP: 192.168.1.1 Subnet mask: 255.255.0.0 4. Set the IP address from the printer control - Dell 3110cn Color Laser Printer | User Guide - Page 277
printer. 5. Open Dell Printer Configuration Web Tool using the WEB browser. e.g.: http://:192.168.1.2 6. Change wireless settings of the printer from Dell Printer Configuration Web Tool. a. Click Print server setting on the left navigational bar. b. Click Print server setting tab. c. Click Wireless - Dell 3110cn Color Laser Printer | User Guide - Page 278
7. NOTE: If your computer provides a wireless LAN adapter tool, change the wireless settings using this tool. Or you can change the wireless settings using the tool provided by the operating system. See the instructions below. For Windows XP and Windows Server 2003: a. Select Network Connections - Dell 3110cn Color Laser Printer | User Guide - Page 279
lock the operator panel. When changing the password for the Dell Printer Configuration Web Tool, click Set Password on the left frame and set the password. Troubleshooting Instructions Use the Customer Mode to locate the unit in the printer that causes a problem. Diagnostic Menu Map (Customer Mode - Dell 3110cn Color Laser Printer | User Guide - Page 280
Quality" is used to diagnose print quality defects. 1. On the Customer Mode menu, go down to Cyan20%, Magenta20%, Yellow20%, or Black20% and press . Cyan20% Outputs cyan toner at 20% density on the whole area of the paper. Magenta20% Outputs magenta toner at 20% density on the whole area of the - Dell 3110cn Color Laser Printer | User Guide - Page 281
you sure? message appears on the operator panel. Press . Turn off the printer, and then on again. Others How to replace Print cartridges CAUTION: Before performing any of the following procedures, read and follow the safety instructions in your Owner's Manual. NOTICE: To protect the drums of the - Dell 3110cn Color Laser Printer | User Guide - Page 282
Dell recommends Dell print cartridges for your printer. Dell does not provide warranty coverage for problems caused by using accessories, parts, or components not supplied by Dell. CAUTION: Never throw used print cartridges into a fire. The residual toner could explode resulting in burns and - Dell 3110cn Color Laser Printer | User Guide - Page 283
1. be replaced and shake it 5 or 6 times to distribute the toner evenly. 2. Remove the print cartridge from its packaging. NOTE: To protect the drum against bright light, do not remove the orange protective cover of the print cartridge before the cartridge is inserted into its slot in the printer. - Dell 3110cn Color Laser Printer | User Guide - Page 284
diagonally may tear it. 4. Grasp both handles of the print cartridge with the label facing up and slide the cartridge into the same color slot. Make sure the cartridge is fully inserted. 5. Remove the orange protective cover of the installed print cartridge and discard. 6. Close the front cover. - Dell 3110cn Color Laser Printer | User Guide - Page 285
your Owner's Manual. Dell recommends Dell fuser for your printer. Dell does not provide warranty coverage for problems caused by using accessories, parts, or components not supplied by Dell. Removing the Used Fuser CAUTION: To avoid burns, do not replace the fuser immediately after printing, as the - Dell 3110cn Color Laser Printer | User Guide - Page 286
3. Lift the chute gate to its upright position. 4. Release the levers at both ends of the fuser. - Dell 3110cn Color Laser Printer | User Guide - Page 287
pull it towards the front of the printer to release the connection on the right side, then lift upward to remove. Installing a New Fuser 1. Unpack a new fuser and hold both sides of the fuser with both hands. 2. With the connector of the fuser toward the slot, push the connector into the slot firmly - Dell 3110cn Color Laser Printer | User Guide - Page 288
NOTE: Make sure that the fuser connector is firmly seated. 3. Lock both levers at the ends of the fuser. 4. Lower the chute gate to its horizontal position. - Dell 3110cn Color Laser Printer | User Guide - Page 289
and follow the safety instructions in your Owner's Manual. Dell separator rollers are available only through Dell. To order by phone, see your Owner's Manual. Dell recommends Dell separator rollers for your printer. Dell does not provide warranty coverage for problems caused by using accessories - Dell 3110cn Color Laser Printer | User Guide - Page 290
the Used Separator Roller in Tray NOTE: Remove any print jobs from the tray before pulling the tray out of the printer. 1. Pull the tray out of the printer until it stops. Hold the tray with both hands, lift the front slightly, and remove it from the printer. NOTE: Remove all paper from the tray - Dell 3110cn Color Laser Printer | User Guide - Page 291
4. Pull the separator roller hook out of the groove in the axle, and then slide the separator roller to the right. Installing the New Separator Roller in the Tray 1. Align the hole of the new separator roller with the axle. - Dell 3110cn Color Laser Printer | User Guide - Page 292
2. Slide the separator roller along the axle so the protrusions fit completely into the slots and the roller hook re-seats into the groove on the axle. 3. Close the separator roller cover until both sides click into place. 4. Load paper into the tray and replace it into the printer. - Dell 3110cn Color Laser Printer | User Guide - Page 293
4. Removing the Used Separator Roller Inside the Printer 1. Pull the tray out of the printer until it stops. Hold the tray with both hands, lift the front slightly, and remove it from the printer. 2. Turn the separator roller until the roller hook can be seen. - Dell 3110cn Color Laser Printer | User Guide - Page 294
165 mm (6.5 in.) inside the machine as measured from the face of the paper tray opening. 3. Pull the separator roller hook out of the groove on the axle, and then slide the separator roller to the left. 4. Repeat steps 2 and 3 to remove the other separator roller from the inside of the printer. - Dell 3110cn Color Laser Printer | User Guide - Page 295
Installing the New Separator Roller Inside the Printer 1. Align the hole of the new separator roller with the axle. 2. Slide the separator roller along the axle so the protrusions fit completely into the slots and the roller hook re-seats into the groove on the axle. 3. - Dell 3110cn Color Laser Printer | User Guide - Page 296
safety instructions in your Owner's Manual. NOTICE: Make sure nothing touches or scratches the surface (black-colored film) of the belt unit. Scratches, dirt, or oil from your hands on the film of the belt unit may reduce print quality. NOTICE: To protect the drums of the print cartridges against - Dell 3110cn Color Laser Printer | User Guide - Page 297
Pull up on the belt release levers and rotate the belt unit up as shown in the illustration. CAUTION: Do not touch the inside of the printer. Some parts may be hot. Allow time for the printer to cool before attempting to remove parts in this area. 4. Hold both sides of the belt unit with both hands - Dell 3110cn Color Laser Printer | User Guide - Page 298
Installing a New Belt Unit 1. Unpack a new belt unit. 2. Insert the left peg into the corresponding left side belt unit hole, then align the right peg with the groove, and then push down on the right side of the belt unit to seat into place. 3. Close the belt unit by pulling it down until it clicks. - Dell 3110cn Color Laser Printer | User Guide - Page 299
4. Remove the film cover from the installed belt unit and discard 5. Close the front cover. - Dell 3110cn Color Laser Printer | User Guide - Page 300
With Web Services for Devices (WSD) This section provides information for network printing with WSD, Microsoft's new Windows Vista protocol. Printer Setup Printer Setup You can install your new printer on the network using the Drivers and Utilities CD that shipped with your printer, or using - Dell 3110cn Color Laser Printer | User Guide - Page 301
Print Cartridges Replacing the Fuser Replacing Separator Rollers Replacing the Belt Unit Adjusting Color Registration Determining the Status of Supplies If your printer is connected to the network, the Dell Printer Configuration Web Tool can provide instant feedback on remaining toner levels - Dell 3110cn Color Laser Printer | User Guide - Page 302
duplex setting, Multiple Up allows you to print up to 64 pages on one sheet of paper. (32 images on the front and 32 on the back) Duplex This allows you to print on both sides of a sheet of paper. Duplex printing is only available when the optional duplexer is installed on the printer. Ordering - Dell 3110cn Color Laser Printer | User Guide - Page 303
the safety instructions in your Owner's Manual. NOTICE: To protect the drums of the print cartridges against bright light, close the front cover within 5 minutes. If the front cover remains open for more than 5 minutes, print quality may deteriorate. Dell print cartridges are available only through - Dell 3110cn Color Laser Printer | User Guide - Page 304
of the print cartridge that you want to replace and pull it out. CAUTION: Since the used print cartridge may spill some toner, do not shake it. Installing a New Print Cartridge 1. Select the new print cartridge which color matches the color of the handles on the printer cartridge to be replaced and - Dell 3110cn Color Laser Printer | User Guide - Page 305
NOTE: To protect the drum against bright light, do not remove the orange protective cover of the print cartridge before the cartridge is inserted into its slot in the printer. 3. Completely remove the seal from the print cartridge by pulling the tab on the end of the print cartridge. NOTE: Pull the - Dell 3110cn Color Laser Printer | User Guide - Page 306
4. 5. Remove the orange protective cover of the installed print cartridge and discard. 6. Close the front cover. - Dell 3110cn Color Laser Printer | User Guide - Page 307
your Owner's Manual. Dell recommends Dell fuser for your printer. Dell does not provide warranty coverage for problems caused by using accessories, parts, or components not supplied by Dell. Removing the Used Fuser CAUTION: To avoid burns, do not replace the fuser immediately after printing, as the - Dell 3110cn Color Laser Printer | User Guide - Page 308
4. Release the levers at both ends of the fuser. 5. Hold both sides of the installed fuser, pull it towards the front of the printer to release the connection on the right side, then lift upward to remove. - Dell 3110cn Color Laser Printer | User Guide - Page 309
Installing a New Fuser 1. Unpack a new fuser and hold both sides of the fuser with both hands. 2. With the connector of the fuser toward the slot, push the connector into the slot firmly. NOTE: Make sure that the fuser connector is firmly seated. 3. Lock both levers at the ends of the fuser. - Dell 3110cn Color Laser Printer | User Guide - Page 310
4. Lower the chute gate to its horizontal position. 5. Close the front cover. - Dell 3110cn Color Laser Printer | User Guide - Page 311
and follow the safety instructions in your Owner's Manual. Dell separator rollers are available only through Dell. To order by phone, see your Owner's Manual. Dell recommends Dell separator rollers for your printer. Dell does not provide warranty coverage for problems caused by using accessories - Dell 3110cn Color Laser Printer | User Guide - Page 312
NOTE: Remove all paper from the tray before opening the separator roller cover. 2. Push back the handles on each side of the separator roller cover as shown in the following illustration and open the cover. 3. Turn the separator roller until the roller hook can be seen. - Dell 3110cn Color Laser Printer | User Guide - Page 313
4. Pull the separator roller hook out of the groove in the axle, and then slide the separator roller to the right. Installing the New Separator Roller in the Tray 1. Align the hole of the new separator roller with the axle. - Dell 3110cn Color Laser Printer | User Guide - Page 314
2. Slide the separator roller along the axle so the protrusions fit completely into the slots and the roller hook re-seats into the groove on the axle. 3. Close the separator roller cover until both sides click into place. 4. Load paper into the tray and replace it into the printer. - Dell 3110cn Color Laser Printer | User Guide - Page 315
4. Removing the Used Separator Roller Inside the Printer 1. Pull the tray out of the printer until it stops. Hold the tray with both hands, lift the front slightly, and remove it from the printer. 2. Turn the separator roller until the roller hook can be seen. - Dell 3110cn Color Laser Printer | User Guide - Page 316
165 mm (6.5 in.) inside the machine as measured from the face of the paper tray opening. 3. Pull the separator roller hook out of the groove on the axle, and then slide the separator roller to the left. 4. Repeat steps 2 and 3 to remove the other separator roller from the inside of the printer. - Dell 3110cn Color Laser Printer | User Guide - Page 317
Installing the New Separator Roller Inside the Printer 1. Align the hole of the new separator roller with the axle. 2. Slide the separator roller along the axle so the protrusions fit completely into the slots and the roller hook re-seats into the groove on the axle. 3. - Dell 3110cn Color Laser Printer | User Guide - Page 318
safety instructions in your Owner's Manual. NOTICE: Make sure nothing touches or scratches the surface (black-colored film) of the belt unit. Scratches, dirt, or oil from your hands on the film of the belt unit may reduce print quality. NOTICE: To protect the drums of the print cartridges against - Dell 3110cn Color Laser Printer | User Guide - Page 319
Pull up on the belt release levers and rotate the belt unit up as shown in the illustration. CAUTION: Do not touch the inside of the printer. Some parts may be hot. Allow time for the printer to cool before attempting to remove parts in this area. 4. Hold both sides of the belt unit with both hands - Dell 3110cn Color Laser Printer | User Guide - Page 320
Installing a New Belt Unit 1. Unpack a new belt unit. 2. Insert the left peg into the corresponding left side belt unit hole, then align the right peg with the groove, and then push down on the right side of the belt unit to seat into place. 3. Close the belt unit by pulling it down until it clicks. - Dell 3110cn Color Laser Printer | User Guide - Page 321
4. Remove the film cover from the installed belt unit and discard. 5. Close the front cover. Adjusting Color Registration - Dell 3110cn Color Laser Printer | User Guide - Page 322
until Maintenance appears, and then press . 4. Press until Color Reg Adj appears, and then press . 5. Press until ColorRegi Chart appears, and then press . The color registration chart is printed. Determining Values From the lines to the right of the Y (Yellow), M (Magenta), and C (Cyan) pattern - Dell 3110cn Color Laser Printer | User Guide - Page 323
then press . The color registration chart is printed with the new values. 10. Color registration adjustment is complete when the straightest Y (Yellow), M (Magenta), and C (Cyan) lines are next to the 0 line. CAUTION: After printing the color registration chart, do not turn off the printer until the - Dell 3110cn Color Laser Printer | User Guide - Page 324
NOTE: If 0 is not next to the straightest lines, determine the values and adjust the printer again. - Dell 3110cn Color Laser Printer | User Guide - Page 325
For shipping, pack the printer and print media handling options securely to avoid damage. Removing the Optional 550-Sheet Feeder Removing the Optional Duplexer Removing the Optional Memory Card Removing the Optional Multi Protocol Card Removing the Wireless Printer Adapter Removing the Optional 550 - Dell 3110cn Color Laser Printer | User Guide - Page 326
the tray module, and place it on a level surface. CAUTION: To lift the printer safely, remove the print cartridges and lift it with two people facing the front and back. Never try to lift the printer while facing its right and left sides. 5. Insert the tray into the printer, and push until it stops. - Dell 3110cn Color Laser Printer | User Guide - Page 327
Removing the Optional Duplexer NOTICE: Make sure nothing touches or scratches the surface (black-colored film) of the belt unit. Scratches, dirt, or oil from your hands on the film of the belt unit may reduce print quality. NOTICE: To protect the drums of the print cartridges against bright light, - Dell 3110cn Color Laser Printer | User Guide - Page 328
4. Hold the latch of the duplexer as shown in the following illustration and pull out the duplexer from the printer. 5. Close the belt unit by pulling it down. 6. - Dell 3110cn Color Laser Printer | User Guide - Page 329
6. Close the front cover. Removing the Optional Memory Card 1. Make sure that the printer is turned off and unplug all cables including the power cord from the rear of the printer. 2. Turn the screw on the control board cover gently in a counterclockwise direction and open the cover. - Dell 3110cn Color Laser Printer | User Guide - Page 330
3. Pull the latches on both edges of the socket outward at the same time to raise the memory card up. 4. Hold the memory card and pull it out. - Dell 3110cn Color Laser Printer | User Guide - Page 331
the control board cover and turn the screw clockwise. Removing the Optional Multi Protocol Card NOTE: If the optional wireless printer adapter is also installed, it must be removed first. 1. Make sure that the printer is turned off and unplug all cables including the power cord from the rear of the - Dell 3110cn Color Laser Printer | User Guide - Page 332
3. Remove the two screws from the multipurpose card on the back side of the control board. 4. Hold the multi protocol card and remove it from the control board. 5. Close the control board cover and turn the screw clockwise. - Dell 3110cn Color Laser Printer | User Guide - Page 333
5. Removing the Wireless Printer Adapter 1. Make sure that the printer is turned off. 2. Turn the screw on the control board cover gently in a counterclockwise direction and open the cover. 3. Remove the wireless printer adapter cap from the control board by releasing the cap's hooks. - Dell 3110cn Color Laser Printer | User Guide - Page 334
4. Remove the wireless printer adapter from the printer. 5. Attach the plate by tightening the screw on the back side of the printer to cover the wireless printer adapter socket. - Dell 3110cn Color Laser Printer | User Guide - Page 335
6. Close the control board cover and turn the screw clockwise. - Dell 3110cn Color Laser Printer | User Guide - Page 336
, NT 4.0); Mac OS X (10.2.8/10.3.9/10.4.x); Novell® (3.X, 4.X, 5.X, 6, 6.5) but not supported1; Linux (RedHat ES4 (English), SuSE 9.2/9.3 (English), TurboLinux 10 Desktop (English)) but not supported2; Unix (RedHat AS 2.1, HP-UX 11.i, Solaris 9/10) (English). 1 Dell networked Printers are compatible - Dell 3110cn Color Laser Printer | User Guide - Page 337
helps network administrators manage the network (analyze performance, traffic, errors, and so on). The 3110cn complies with standard industry MIB specifications, allowing the printer to be recognized and managed by various printer and network management software systems, such as IBM Tivoli, Hewlett - Dell 3110cn Color Laser Printer | User Guide - Page 338
Environmental Operation Temperature 5°C to 32°C Relative humidity 15% RH to 85% RH (no-condensation) Print Quality Guarantee Temperature Relative humidity 10°C to 28°C 15% RH to 85% RH (no-condensation) (Temperature should be 28°C or below at 85% RH.) Storage Temperature range -20°C to 40°C - Dell 3110cn Color Laser Printer | User Guide - Page 339
Connection specifications and symbols Connection type 1 Parallel IEEE 1284 2 USB USB2.0 3 Ethernet 10 Base-T/100 Base-TX 4 Wireless IEEE802.11b/802.11g - Dell 3110cn Color Laser Printer | User Guide - Page 340
files (for Sun/Solaris only), TIFF image files and XWD image files into the PostScript language program. Also, it makes use of the printer features to output in the following manner. Input paper selection Double-sided printing Output paper selection NOTICE: Depending on the configurations of the - Dell 3110cn Color Laser Printer | User Guide - Page 341
be used, make sure these are working. (Mandatory) 2. Set up IP address and subnet mask when the printer is used in the network environment. (Mandatory) 3. Make TBCPFilter function available if TBCPFilter function is installed on the printer. See "Adobe Protocol" for more information. Installing the - Dell 3110cn Color Laser Printer | User Guide - Page 342
installation. Supported operating system for registration of output printer. For more information, see the HP-UX related manual. Files Added by print tool Source file of the model interface program (stored as the printer name during registration) Interface program for PRINTER (stored as the printer - Dell 3110cn Color Laser Printer | User Guide - Page 343
Dell3110cn filter description file for Dell™ Color Laser Printer 3110cn postio3110.fd Dellpostio filter description file download3110cn.fd Delldownload filter description file /usr/share/man/man1 txt2ps23110cn.1 Manual page file for txt2ps2 sunras2ps23110cn.1 Manual page file for sunras2ps2 - Dell 3110cn Color Laser Printer | User Guide - Page 344
xwd2ps23110cn.1 Manual page file for xwd2ps2 NOTE: The directories listed are default directories. Installation Procedure Overview This section provides information on the installation of the UX filter using the UNIX workstation. Linux 1. Setup the printer and network. 2. Insert the drivers and - Dell 3110cn Color Laser Printer | User Guide - Page 345
install.sh 4. Select the printer model to install. Printer Model? 1. Dell Color Laser Printer 3110cn 2. Exit Enter Process No(1/2)? : 1 5. It asks whether you want to install the filter. Type . Install Filter? (y/n) [y] : y NOTE: If [ ] appears in a message, the default value will appear inside - Dell 3110cn Color Laser Printer | User Guide - Page 346
: The account files or logging files can be created with the file name specified in the directory path specified. Operation on Solaris Installation/Printer Setting 1. Insert the drivers and utilities CD in the CD-ROM drive of the local workstation. If CD-ROM drive is not mounted on your workstation - Dell 3110cn Color Laser Printer | User Guide - Page 347
for Dell Color Laser Printer 3110cn Type Printer 1. Set Local Printer 2. Set Remote Printer Enter Process No (1/2)? : 1 6. Type the device name of the connection port. Enter port-device-name? [/dev/ecpp0] : /dev/bpp0 NOTICE: Specify the device file in the communication port available. 7. When Set - Dell 3110cn Color Laser Printer | User Guide - Page 348
by the network, type . If the server and the printer are connected locally, type . 'dell3110cn'is network printer?:(y/n)[y] : y The software installation is complete. NOTICE: When the printing settings are modified or changed by the Administration Tool (admintool) after the installation - Dell 3110cn Color Laser Printer | User Guide - Page 349
for all workstations. 3. Type ./install.sh and run the installer. # ./install.sh 4. Select the printer model to install. Printer Model ? 1. Dell Color Laser Printer 3110cn 2. Exit Enter Process No (1/2)? : 1 5. Specify the directory to install the utility. Enter install directory name /usr/local - Dell 3110cn Color Laser Printer | User Guide - Page 350
system. Delete the filters registered during the installation using the lpfilter command. # lpfilter -f dell3110cn -x (for Dell Color Laser Printer 3110cn) # lpfilter -f download3110 -x # lpfilter -f postio3110cn -x # lpfilter -f posttxt3110cn -x 3. Delete the symbolic files required to call up the - Dell 3110cn Color Laser Printer | User Guide - Page 351
lp/fd. Filter description files for various printers. dell3110cn.fd (for Dell™ Color Laser Printer 3110cn) download3110.fd postio3110cn.fd posttxt3110cn.fd HP-UX 1. Delete the printer that was registered with the system. Use the sam command to delete the printer set up during the installation. # sam - Dell 3110cn Color Laser Printer | User Guide - Page 352
) for printing, execute the .dellpsdefault3110 file and define the printer so that it feeds paper from tray 2. Specify tray2, which is the defined printer name, as follows. % lpr -Ptray2 filename About /usr/local/dellbin3110/.dellpsdefault3110: This is the file for system default settings when using - Dell 3110cn Color Laser Printer | User Guide - Page 353
been set up correctly (enabled, available) using the lpstat command (lpstat-p all). For details on the options of the lp command and the lpstat command or how to make use of them, see the related manuals of Solaris. Printing From Solaris To print to the default printer: If the printer is registered - Dell 3110cn Color Laser Printer | User Guide - Page 354
NOTE: Using this method, a default printer can be set up for each user. NOTE: The above example describes the setup method executed when csh is used. To select a paper tray for printing: To select a paper tray for printing, specify the paper tray after the -y option of the lp command. NOTE: - Dell 3110cn Color Laser Printer | User Guide - Page 355
-y ps The input file will be processed as the PostScript file. If the file does not begin with "%!", "%!" will be output to the beginning line. Whether the file contains "%!" will be ignored. To print text/PostScript files: -y DuplexBook Enables the long-edge binding feature. When it is specified, - Dell 3110cn Color Laser Printer | User Guide - Page 356
MxNinches defined by users. Possible range specified: Width: 3.00 to 8.66 inches Length: 3.86 to 14.0 inches If this option is not specified or the tray specified tray is not available, feed paper from the default tray. -y toner_save Turns on the save toner mode for printing. The print result will - Dell 3110cn Color Laser Printer | User Guide - Page 357
Coated Thick/Coated 3/Coated Paper 3 C3B Coated Thick Back/Coated 3/Coated Paper 3- Side 2 E Envelope If this option is not specified, multipurpose feeder Paper Type for the printer can be used. -y mfo=mode Specifies orientation for multipurpose feeder. Available orientations for multipurpose feeder - Dell 3110cn Color Laser Printer | User Guide - Page 358
Portrait (Rotated) -y po=n Specifies alternate tray. Available alternate trays are as follows. 0 Use printer settings 1 Display message 2 Feed from multipurpose feeder 3 Use nearest size (Adjust to fit) 4 Use larger size (Adjust to fit) 5 Use nearest size (No zoom) 6 Use larger size (No - Dell 3110cn Color Laser Printer | User Guide - Page 359
) k Black -y pr=mode Specifies print mode. Available print modes are as follows. hs High speed hq High quality sf Super fine -y cc=mode Specifies image types. Available image types are as follows. 0 Off 1 Photo 2 sRGB 3 Standard/ Normal 4 Presentation This option is available only for color printing - Dell 3110cn Color Laser Printer | User Guide - Page 360
gray guaranteed modes are as follows. on On off Off This option is available only for color printing. -y ct Specifies color transformation. This option is available only for color printing. -y br=mode Specifies brightness adjustment. Available brightness adjustment option value are as follows. +5 - Dell 3110cn Color Laser Printer | User Guide - Page 361
Dark 1 -2 Dark 2 -3 Dark 3 -4 Dark 4 -5 Dark 5 -y rgbc=mode Specifies RGB color correction. Available RGB color corrections are as follows. 10 Perceptual 11 Saturation 12 RelativeC 13 AbsoluteC This option is available only for color printing and when entry data is RGB data. -y rgbpr=mode Specifies - Dell 3110cn Color Laser Printer | User Guide - Page 362
only for color printing and when entry data is RGB data. -y cb=cyan-low:cyan-middle:cyan-high:magenta-low:magenta-middle:magenta-high:yellowlow:yellow-middle:yellow high:black-low:black-middle:black-high Specifies adjustment value for color balance of each color/density. Available adjustment values - Dell 3110cn Color Laser Printer | User Guide - Page 363
for Cyan medium density, "Dark 3" for Yellow high density, and "Dark 2" for Black low density, it can be specified using either of the following: -Cb=0:-2:0:0:0:0:0:0:+3:+2:0:0 -Cb=:-2:::::::+3:+2:: -y -hld=PrintType:UserID:Password:DocumentName Secure Print PrintType store Secure Print/Store Print - Dell 3110cn Color Laser Printer | User Guide - Page 364
variable, it is used as setting information. Printing (HP-UX) This section provides information on printing from the registered logical printer during the installation. Printing From HP-UX To print to the default printer: If the printer is registered as the default printer, the name of the - Dell 3110cn Color Laser Printer | User Guide - Page 365
environment variable PRINTER. To set a printer named dell3110cn as the default printer for printing, type as follows. % setenv PRINTER dell3110cn % lp filename To print with added options: To print with the options, specify the option of the lp command using -o as follows. The available options are - Dell 3110cn Color Laser Printer | User Guide - Page 366
ignored. NOTE: If you specify the filter option when authentication printing is already specified, the filter option has the higher priority over authentication printing. NOTE: If you only specify the password without specifying the user name in the environment variable, the login name is assumed - Dell 3110cn Color Laser Printer | User Guide - Page 367
reason, the user need not be aware of the paper size. If there is an option to specify the line/column, automatic line feed according to the paper size will not be executed. Printing will be output according to the line/column specified. txt2ps2 interprets the following control codes. Other control - Dell 3110cn Color Laser Printer | User Guide - Page 368
or position will be adjusted and both sides of the paper printed so that the longer edge of the pages can be bound. This option is available only when optional duplexer is installed on the printer. -Itray-input Specifies the paper tray. A paper tray can be selected by directly specifying a tray or - Dell 3110cn Color Laser Printer | User Guide - Page 369
.2 to 220.0 mm Length: 98.0 to 355.6 mm MxNin Feed paper from the tray loaded with MxNinches defined by users. Possible range specified: Width: 3.00 to 8.66 inches Length: 3.86 to 14.0 inches If this option is not specified or the tray specified is not available, feed paper from the default tray. -t - Dell 3110cn Color Laser Printer | User Guide - Page 370
the save toner mode for printing. The print result will be fainter than that of normal printing. In some cases, this option will be ignored. -2 Sets printing to 2-column printing. -r Rotates the image by 90° and uses the paper in the landscape orientation. -F Ignores the form feed code (FF). -llines - Dell 3110cn Color Laser Printer | User Guide - Page 371
Sets the font. NOTE: The available fonts are limited to the font in the printer. For more information, see "Understanding Fonts." -Nc=copies Specifies the number of output copies (the value of copies must be a positive integer). -cl Specifies that printing be collated. If the copies option is not - Dell 3110cn Color Laser Printer | User Guide - Page 372
name following the user name on the upper right corner of the paper, output all pages. (User name, Host name, all page output are default) -Hd=ur paper size specified by txt2ps2. Specify the paper size at the same time when the header and footer option is used. Sometimes all pages are not printed - Dell 3110cn Color Laser Printer | User Guide - Page 373
, the default European font of the printer can be used. If the header/footer output option is specified, the font specification for the header/footer is ignored. -MSI Specifies multipurpose feeder. -M=type Specifies multipurpose feeder Paper Type. Available multipurpose feeder Paper Types are - Dell 3110cn Color Laser Printer | User Guide - Page 374
/Japanese Postcard/Japanese Postcard - Side 2 E Envelope If this option is not specified, multipurpose feeder Paper Type of the printer can be used. -Mfo=mode Specifies orientation for multipurpose feeder. Available orientations for multipurpose feeder are as follows. le Landscape ler - Dell 3110cn Color Laser Printer | User Guide - Page 375
Landscape (Rotated) se Portrait ser Portrait (Rotated) -Pon Specifies alternate tray. Available alternate trays are as follows. 0 Use printer settings 1 Display message 2 Feed from multipurpose feeder 3 Use nearest size (Adjust to fit) 4 Use larger size (Adjust to fit) 5 Use nearest size (No zoom) 6 - Dell 3110cn Color Laser Printer | User Guide - Page 376
Pages. -Cm=mode Specifies output color. Available output colors are as follows. c Color (CMYK) k Black -Pr=mode Specifies print mode. Available print modes are as follows. hs High Speed hq High Quality -Cc=mode Specifies RGB Color Correction. Available RGB Color Corrections are as follows. 0 Off - Dell 3110cn Color Laser Printer | User Guide - Page 377
Presentation This option is available only for color printing and when entry data is RGB data. -Gc=mode Specifies RGB gamma correction. Available RGB gamma corrections are as follows. 1.0 1.0 1.4 1.4 1.8 1.8 2.2 2.2 2.6 2.6 off Off This option is available only for color printing and when entry data - Dell 3110cn Color Laser Printer | User Guide - Page 378
options are as follows. on On off Off This option is available only for color printing. -Ct Specifies color transformation. This option is available only for color printing. -Br=mode Specifies brightness adjustment. Available brightness adjustment option value are as follows. +5 Bright 5 +4 Bright - Dell 3110cn Color Laser Printer | User Guide - Page 379
Dark 1 -2 Dark 2 -3 Dark 3 -4 Dark 4 -5 Dark 5 -RGBc=mode Specifies RGB color correction. Available RGB color corrections are as follows. 10 Perceptual 11 Saturation 12 RelativeC 13 AbsoluteC This option is available only for color printing and when entry data is RGB data. -RGBPr=mode Specifies RGB - Dell 3110cn Color Laser Printer | User Guide - Page 380
only for color printing and when entry data is RGB data. -Cb=cyan-low:cyan-middle:cyan-high:magenta-low:magenta-middle:magenta-high:yellowlow:yellow-middle:yellow high:black-low:black-middle:black-high Specifies adjustment value for color balance of each color/density. Available adjustment values - Dell 3110cn Color Laser Printer | User Guide - Page 381
Cyan medium density, "Dark 3" for Yellow high density, and "Dark 2" for Black low density, it can be specified using either of the following: -Cb=0:-2:0:0:0:0:0:0:+3:+2:0:0 -Cb=:-2:::::::+3:+2:: -Hld=PrintType:UserID:Password:DocumentName Secure Print PrintType store Secure Print/Store Print proof - Dell 3110cn Color Laser Printer | User Guide - Page 382
-Hld=store:UserID:Password: Store Print -Hld=store:UserID::DocumentName -Hld=store:UserID:: Proof Print -Hld=proof:UserID::DocumentName -Hld=proof:UserID:: NOTICE: Make sure you specify Secure Print only when you directly print data to a printer. Secure Print may not be available if you specify it - Dell 3110cn Color Laser Printer | User Guide - Page 383
/usr/local/dellbin3110/.dellpsdefault3110 This is the default command option setting file for individual users. Important When the same option is specified twice, the later setting will prevail. As TXT2PS2OPTION is analyzed before the option of the command line, it is possible to temporarily modify - Dell 3110cn Color Laser Printer | User Guide - Page 384
. Option -d Enables the short-edge binding feature. When it is specified, the printing direction or position will be adjusted and both sides of the paper printed so that the shorter edge of the pages can be bound. This option is available only when the optional duplexer is installed on the printer. - Dell 3110cn Color Laser Printer | User Guide - Page 385
position will be adjusted and both sides of the paper printed so that the longer edge of the pages can be bound. This option is available only when the optional duplexer is installed on the printer. -Itray-input Specifies the paper tray. A paper tray can be selected by directly specifying a tray or - Dell 3110cn Color Laser Printer | User Guide - Page 386
with Legal (8.5 x 14 inches). EX Feed paper from the tray loaded with Executive (7.25 x 10.5 inches). MO Feed paper from the tray loaded with Monarch (3.875 x 7.5 inches). COM10 Feed paper from the tray loaded with Envelope #10 (4.125 x 9.5 inches). DL Feed paper from the tray loaded with DL (110 - Dell 3110cn Color Laser Printer | User Guide - Page 387
with MxN inches defined by users. Possible range specified: Width: 3.00 to 8.66 inches Length: 3.86 to 14.0 inches If this option is not specified or the tray specified is not available, feed paper from the default tray. -t Turns on the save toner mode for printing. The print result will be fainter - Dell 3110cn Color Laser Printer | User Guide - Page 388
case that convert text file, output the host name following the user name on the upper right corner of the paper, output all pages. (User name, Host name, all page output are default) -Hd=ur -Hd=ur:uh -Hffont Specify the font to print the header and footer. European fonts the same as half size - Dell 3110cn Color Laser Printer | User Guide - Page 389
feeder Paper Type. Available multipurpose feeder Paper Types are as follows. B FinePaper/Bond/Plain Paper 2 BB FinePaperBack/Bond/Plain Paper 2 - Side 2 P Stationary/Plain/Plain Paper 1 PB StationaryBack/Plain/Plain Paper 1 - Side 2 R Recycled Paper RB RecycledPaperBack/ Recycled Paper - Side - Dell 3110cn Color Laser Printer | User Guide - Page 390
Postcard/Japanese Postcard - Side 2 E Envelope If this option is not specified, multipurpose feeder Paper Type of the printer can be used. -Mfo=mode Specifies orientation for multipurpose feeder. Available orientations for multipurpose feeder are as follows. le Landscape ler Landscape (Rotated) se - Dell 3110cn Color Laser Printer | User Guide - Page 391
Portrait (Rotated) -Pon Specifies alternate tray. Available alternate trays are as follows. 0 Use printer settings 1 Display message 2 Feed from multipurpose feeder 3 Use nearest size (Adjust to fit) 4 Use larger size (Adjust to fit) 5 Use nearest size (No zoom) 6 Use larger size (No - Dell 3110cn Color Laser Printer | User Guide - Page 392
Blank Pages. -Cm=mode Specifies output color. Available output colors are as follows. c Color (CMYK) k Black -Pr=mode Specifies print mode. Available print modes are as follows. hs High speed hq High quality sf Super fine -Cc=mode Specifies image types. Available image types are as follows. 0 Off - Dell 3110cn Color Laser Printer | User Guide - Page 393
Presentation This option is available only for color printing and when entry data is RGB data. -Gc=mode Specifies RGB gamma correction. Available RGB gamma corrections are as follows. 1.0 1.0 1.4 1.4 1.8 1.8 2.2 2.2 2.6 2.6 off Off This option is available only for color printing and when entry data - Dell 3110cn Color Laser Printer | User Guide - Page 394
options are as follows. on On off Off This option is available only for color printing. -Ct Specifies color transformation. This option is available only for color printing. -Br=mode Specifies brightness adjustment. Available brightness adjustment option value are as follows. +5 Bright 5 +4 Bright - Dell 3110cn Color Laser Printer | User Guide - Page 395
Dark 1 -2 Dark 2 -3 Dark 3 -4 Dark 4 -5 Dark 5 -RGBc=mode Specifies RGB color correction. Available RGB color corrections are as follows. 10 Perceptual 11 Saturation 12 RelativeC 13 AbsoluteC This option is available only for color printing and when entry data is RGB data. -RGBPr=mode Specifies RGB - Dell 3110cn Color Laser Printer | User Guide - Page 396
only for color printing and when entry data is RGB data. -Cb=cyan-low:cyan-middle:cyan-high:magenta-low:magenta-middle:magenta-high:yellowlow:yellow-middle:yellow high:black-low:black-middle:black-high Specifies adjustment value for color balance of each color/density. Available adjustment values - Dell 3110cn Color Laser Printer | User Guide - Page 397
Cyan medium density, "Dark 3" for Yellow high density, and "Dark 2" for Black low density, it can be specified using either of the following: -Cb=0:-2:0:0:0:0:0:0:+3:+2:0:0 -Cb=:-2:::::::+3:+2:: -Hld=PrintType:UserID:Password:DocumentName Secure Print PrintType store Secure Print/Store Print proof - Dell 3110cn Color Laser Printer | User Guide - Page 398
may not be available if you specify it when data need to be printed through another server or data need to be handled by another program such as PostScript files. Collate is automatically specified when you specify Proof Print. -Jown= jobownername: Password Authentication Setting Specifies job owner - Dell 3110cn Color Laser Printer | User Guide - Page 399
setting will prevail. If the output size option (-s, -S) is not specified, scaling will be executed taking one pixel of the raster data as one pixel of the printer. If the print 1, 4, 8, 24, and 32 bits can be specified. There are four types of supported compression formats. Huffman compression ( - Dell 3110cn Color Laser Printer | User Guide - Page 400
position will be adjusted and both sides of the paper printed so that the longer edge of the pages can be bound. This option is available only when the optional duplexer is installed on the printer. -Itray-input Specifies the paper tray. A paper tray can be selected by directly specifying a tray or - Dell 3110cn Color Laser Printer | User Guide - Page 401
with Legal (8.5 x 14 inches). EX Feed paper from the tray loaded with Executive (7.25 x 10.5 inches). MO Feed paper from the tray loaded with Monarch (3.875 x 7.5 inches). COM10 Feed paper from the tray loaded with Envelope #10 (4.125 x 9.5 inches). DL Feed paper from the tray loaded with DL (110 - Dell 3110cn Color Laser Printer | User Guide - Page 402
the tray specified is not available, feed paper from the default tray. -t Turns on the save toner mode for printing. The print result will be fainter than that of normal printing. In some cases, this option will be ignored. -r Rotates the image by 90° and uses the paper in the landscape orientation - Dell 3110cn Color Laser Printer | User Guide - Page 403
Output on the lower left corner of the paper. dr Output on the lower right corner of the paper. format specifies the contents and the order to output. This option is omissible. If this option is omitted, uh is specified as the default value. u User name h Host name t Date and time If the output - Dell 3110cn Color Laser Printer | User Guide - Page 404
font is specified, default European font of the printer can be used. If header/footer output option is specified, the font specification of header/footer is ignored. -MSI Specifies multipurpose feeder. -M=type Specifies multipurpose feeder Paper Type. Available multipurpose feeder Paper Types are as - Dell 3110cn Color Laser Printer | User Guide - Page 405
/Japanese Postcard/Japanese Postcard - Side 2 E Envelope If this option is not specified, multipurpose feeder Paper Type of the printer can be used. -Mfo=mode Specifies orientation for multipurpose feeder. Available orientations for multipurpose feeder are as follows. le Landscape ler - Dell 3110cn Color Laser Printer | User Guide - Page 406
Landscape (Rotated) se Portrait ser Portrait (Rotated) -Pon Specifies alternate tray. Available alternate trays are follows. 0 Use printer settings 1 Display message 2 Feed from multipurpose feeder 3 Use nearest size (Adjust to fit) 4 Use larger size (Adjust to fit) 5 Use nearest size (No zoom) 6 - Dell 3110cn Color Laser Printer | User Guide - Page 407
Skip Blank Pages. -Cm=mode Specifies output color. Available output colors are as follows. c Color (CMYK) k Black -Pr=mode Specifies print mode. Available print modes are as follows. hs High speed hq High quality sf Super fine -Cc=mode Specifies image types. Available image types are as follows. 0 - Dell 3110cn Color Laser Printer | User Guide - Page 408
Presentation This option is available only for color printing and when entry data is RGB data. -Gc=mode Specifies RGB gamma correction. Available RGB gamma corrections are as follows. 1.0 1.0 1.4 1.4 1.8 1.8 2.2 2.2 2.6 2.6 off Off This option is available only for color printing and when entry data - Dell 3110cn Color Laser Printer | User Guide - Page 409
options are as follows. on On off Off This option is available only for color printing. -Ct Specifies color transformation. This option is available only for color printing. -Br=mode Specifies brightness adjustment. Available brightness adjustment option value are as follows. +5 Bright 5 +4 Bright - Dell 3110cn Color Laser Printer | User Guide - Page 410
1 +0 Normal -1 Dark 1 -2 Dark 2 -3 Dark 3 -4 Dark 4 -5 Dark 5 -RGBc=mode Specifies RGB color correction. Available RGB color corrections are as follows. 10 Perceptual 11 Saturation 12 RelativeC 13 AbsoluteC This option is available only for color printing and when entry data is RGB data. -RGBPr=mode - Dell 3110cn Color Laser Printer | User Guide - Page 411
only for color printing and when entry data is RGB data. -Cb=cyan-low:cyan-middle:cyan-high:magenta-low:magenta-middle:magenta-high:yellowlow:yellow-middle:yellow high:black-low:black-middle:black-high Specifies adjustment value for color balance of each color/density. Available adjustment values - Dell 3110cn Color Laser Printer | User Guide - Page 412
Cyan medium density, "Dark 3" for Yellow high density, and "Dark 2" for Black low density, it can be specified using either of the following: -Cb=0:-2:0:0:0:0:0:0:+3:+2:0:0 -Cb=:-2:::::::+3:+2:: -Hld=PrintType:UserID:Password:DocumentName Secure Print PrintType store Secure Print/Store Print proof - Dell 3110cn Color Laser Printer | User Guide - Page 413
-Hld=store:UserID:Password: Store Print -Hld=store:UserID::DocumentName -Hld=store:UserID:: Proof Print -Hld=proof:UserID::DocumentName -Hld=proof:UserID:: NOTICE: Make sure you specify Secure Print only when you directly print data to a printer. Secure Print may not be available if you specify it - Dell 3110cn Color Laser Printer | User Guide - Page 414
command input. XWD files with a pixel depth of 1, 4, 8, 24, and 32 bits can be specified. There are three types of supported compression formats. The visual class is Static Gray and the pixel is 1 bit. The visual class is Pseudo Color and the pixel is 4 bits or 8 bit. The image format is Zpixmap. - Dell 3110cn Color Laser Printer | User Guide - Page 415
The visual class is True Color and the pixel is 24 bits or 32 bit. The image format is Zpixmap. xwd2ps2 paper printed so that the longer edge of the pages can be bound. This option is available only when the optional duplexer is installed on the printer. -Itray-input Specifies the paper tray. A paper - Dell 3110cn Color Laser Printer | User Guide - Page 416
with Legal (8.5 x 14 inches). EX Feed paper from the tray loaded with Executive (7.25 x 10.5 inches). MO Feed paper from the tray loaded with Monarch (3.875 x 7.5 inches). COM10 Feed paper from the tray loaded with Envelope #10 (4.125 x 9.5 inches). DL Feed paper from the tray loaded with DL (110 - Dell 3110cn Color Laser Printer | User Guide - Page 417
the tray specified is not available, feed paper from the default tray. -t Turns on the save toner mode for printing. The print result will be fainter than that of normal printing. In some cases, this option will be ignored. -r Rotates the image by 90° and uses the paper in the landscape orientation - Dell 3110cn Color Laser Printer | User Guide - Page 418
option is omitted, uh is specified as the default value. u User name h Host name t Date and time If the output contents are specified as tuh, it is output as follows. Date and Time User: username Host: hostname. -Hffont Specify the font to print header and footer. European fonts the same as half - Dell 3110cn Color Laser Printer | User Guide - Page 419
font is specified, default European font of the printer can be used. If header/footer output option is specified, the font specification of header/footer is ignored. -MSI Specifies multipurpose feeder. -M=type Specifies multipurpose feeder Paper Type. Available multipurpose feeder Paper Types are as - Dell 3110cn Color Laser Printer | User Guide - Page 420
Postcard/Japanese Postcard - Side 2 E Envelope If this option is not specified, multipurpose feeder Paper Type of the printer can be used. -Mfo=mode Specifies orientation for multipurpose feeder. Available orientations for multipurpose feeder are as follows. le Landscape ler Landscape (Rotated) se - Dell 3110cn Color Laser Printer | User Guide - Page 421
Portrait ser Portrait (Rotated) -Pon Specifies alternate tray. Available alternate trays are as follows. 0 Use printer settings 1 Display message 2 Feed from multipurpose feeder 3 Use nearest size (Adjust to fit) 4 Use larger size (Adjust to fit) 5 Use nearest size (No zoom) 6 Use larger size (No - Dell 3110cn Color Laser Printer | User Guide - Page 422
Blank Pages. -Cm=mode Specifies output color. Available output colors are as follows. c Color (CMYK) k Black -Pr=mode Specifies print mode. Available print modes are as follows. hs High speed hq High quality sf Super fine -Cc=mode Specifies image types. Available image types are as follows. 0 Off 1 - Dell 3110cn Color Laser Printer | User Guide - Page 423
Presentation This option is available only for color printing and when entry data is RGB data. -Gc=mode Specifies RGB gamma correction. Available RGB gamma corrections are as follows. 1.0 1.0 1.4 1.4 1.8 1.8 2.2 2.2 2.6 2.6 off Off This option is available only for color printing and when entry data - Dell 3110cn Color Laser Printer | User Guide - Page 424
options are as follows. on On off Off This option is available only for color printing. -Ct Specifies color transformation. This option is available only for color printing. -Br=mode Specifies brightness adjustment. Available brightness adjustment option value are as follows. +5 Bright 5 +4 Bright - Dell 3110cn Color Laser Printer | User Guide - Page 425
Dark 1 -2 Dark 2 -3 Dark 3 -4 Dark 4 -5 Dark 5 -RGBc=mode Specifies RGB color correction. Available RGB color corrections are as follows. 10 Perceptual 11 Saturation 12 RelativeC 13 AbsoluteC This option is available only for color printing and when entry data is RGB data. -RGBPr=mode Specifies RGB - Dell 3110cn Color Laser Printer | User Guide - Page 426
only for color printing and when entry data is RGB data. -Cb=cyan-low:cyan-middle:cyan-high:magenta-low:magenta-middle:magenta-high:yellowlow:yellow-middle:yellow high:black-low:black-middle:black-high Specifies adjustment value for color balance of each color/density. Available adjustment values - Dell 3110cn Color Laser Printer | User Guide - Page 427
Cyan medium density, "Dark 3" for Yellow high density, and "Dark 2" for Black low density, it can be specified using either of the following: -Cb=0:-2:0:0:0:0:0:0:+3:+2:0:0 -Cb=:-2:::::::+3:+2:: -Hld=PrintType:UserID:Password:DocumentName Secure Print PrintType store Secure Print/Store Print proof - Dell 3110cn Color Laser Printer | User Guide - Page 428
-Hld=store:UserID:Password: Store Print -Hld=store:UserID::DocumentName -Hld=store:UserID:: Proof Print -Hld=proof:UserID::DocumentName -Hld=proof:UserID:: NOTICE: Make sure you specify Secure Print only when you directly print data to a printer. Secure Print may not be available if you specify it - Dell 3110cn Color Laser Printer | User Guide - Page 429
when the same option is specified twice, the later setting will prevail. When the output size option (-s, -S) is not specified, scaling will be executed taking one pixel of the TIFF data as one pixel of the printer. If the print position option (-lleft bottom) specifies a point beyond the printable - Dell 3110cn Color Laser Printer | User Guide - Page 430
specified by /etc/printcap. The lpd daemon will specify the following available only when the optional duplexer is installed on the printer. -Itray-input Specifies the paper tray. The parameters to be able to specify are the same as txt2ps2. -t Turns on the save toner mode for printing. The print - Dell 3110cn Color Laser Printer | User Guide - Page 431
, multipurpose feeder Paper Type of the printer can be used. -Mfo=mode Specifies orientation for multipurpose feeder. -Pon Specifies alternate tray. -St=mode Specifies feed separators from. -Sp Specifies printed separators. -Sb Specifies Skip Blank Pages. -Cm=mode Specifies output color. -Pr=mode - Dell 3110cn Color Laser Printer | User Guide - Page 432
-RGBTp= mode Specifies RGB color temperature. This option is available only for color printing and when entry data is RGB data. -Cb=cyan-low:cyan-middle:cyan-high:magenta-low:magenta-middle:magenta-high:yellow-low;yellowmiddle:yellow high:black-low:black-middle:black-high Specifies adjustment value - Dell 3110cn Color Laser Printer | User Guide - Page 433
Normal). File /usr/local/dellbin3110/.dellpsdefault3110 This is the default command option setting. Important The dellpsif filter ignores the pw and pl paper selection, it will be ignored. Use the -ps option only when a PostScript file that contains no %! at the beginning of the file is processed as - Dell 3110cn Color Laser Printer | User Guide - Page 434
on the screen. Using Linux, the error message is written into the error log file specified by printcap.) In text printing, the environmental variable TXT2PS2OPTION will be ignored. In text printing, if a BS code is found at the beginning of a line, the print position of the next character will be - Dell 3110cn Color Laser Printer | User Guide - Page 435
HP-UX) There are three types of supported compression formats. The visual class is Static Gray and the pixel is 1 bit. The visual class is Pseudo Color and the pixel is 4 bits or 8 bit. The image format is Zpixmap. The visual class is True Color and the pixel is 24 bits. The image format is Zpixmap. - Dell 3110cn Color Laser Printer | User Guide - Page 436
file that contains options, such as paper size, are specified using dellpsif (Linux) or the lp command (Solaris/HP-UX), the specified option will be ignored. Printing Image Files (Solaris) To print image files from Solaris the user cannot specify the image file directly with the lp command for - Dell 3110cn Color Laser Printer | User Guide - Page 437
output all page is specified. In such a case, specify print the only top page. It's impossible to use lp command in Solaris. TBCPFilter (Solaris/Linux/HP-UX) Make sure the TBCPFilter is available so the printer can specify the availability of the TBCPFilter. As for libtiff Copyright © 1988-1997 Sam - Dell 3110cn Color Laser Printer | User Guide - Page 438
1. Install the printer driver. 2. Set up the print queue. 3. Specify the default queue. 4. Specify the printing options. Installing the Printer Driver 1. Double-click Dell-Color-Laser-3110cn-x.x-x.noarch.rpm in the Drivers and Utilities CD. 2. Type the administrator's password. 3. Click Continue - Dell 3110cn Color Laser Printer | User Guide - Page 439
IP address) 8. Select Dell from the Make menu, and then click Continue. 9. Select Dell™ Color Laser 3110cn... from the Model menu, and then click Continue. The message Printer xxx has been added successfully. appears. The set up is complete. When you have finished setting up the queue you can print - Dell 3110cn Color Laser Printer | User Guide - Page 440
The setting is complete. Execute printing from the software program. Uninstalling the Printer Driver 1. Select Main Menu System Tools Terminal. 2. Type the following command in the terminal window. su (Type the administrator's password) rpm -e Dell-Color-Laser-3110cn The printer driver is - Dell 3110cn Color Laser Printer | User Guide - Page 441
. Select Color Laser 3110cn in Select Model, and then click Next. g. Confirm the settings in Edit configuration, and then click OK. For network connections: a. Select Other (not detected) as Available are in Printers to configure, and then click Configure.... b. Select the Print via LPD-Style - Dell 3110cn Color Laser Printer | User Guide - Page 442
administrator's password. YaST Control Center is activated. c. Select Hardware from Printer. 2. Printer setup: Autodetected printers is activated. 3. Click Change.... 4. Select the printer you wan to set to default, and then click Set as default. 5. Click Finish. Specifying the Printing Options You - Dell 3110cn Color Laser Printer | User Guide - Page 443
as the printer administrator after the Enter password again prompt.) Uninstalling the Printer Driver 1. Select Start Applications System Terminal Konsole. 2. Type the following command on the terminal window. su (Type the administrator's password) rpm -e Dell-Color-Laser-3110cn The printer driver is - Dell 3110cn Color Laser Printer | User Guide - Page 444
instructions in your Owner's Manual prior to setting up and operating your printer. Regulatory Information Federal Communications Commission (FCC) Compliance Information Statement (US Only) The Dell™ Color Laser Printer 3110cn the equipment off and on, the user is encouraged to try to correct the - Dell 3110cn Color Laser Printer | User Guide - Page 445
to this equipment. Unauthorized changes or modifications could void the user's authority to operate this equipment. NOTE: To assure compliance in compliance with FCC regulations: Model number: Dell™ Color Laser Printer 3110cn Company name: Dell Inc. One Dell Way Round Rock, Texas 78682 USA 512-338 - Dell 3110cn Color Laser Printer | User Guide - Page 446
B domestic environment. A Declaration of Conformity in accordance with the preceding directives and standards has been made and is on file at Dell Inc. Products Europe BV, Limerick, Ireland. CE Mark Notice This equipment complies with the essential requirements of the European Union Directive 1999 - Dell 3110cn Color Laser Printer | User Guide - Page 447
2620 - 11° Piso Col. Lomas Altas 11950 México, D.F. Enviar a: Dell Computer de México, S.A. de C.V. al Cuidado de Kuehne & Nagel de México S. de R.L. Avenida Soles No. 55 Col. Peñon de los Baños 15520 México, D.F. Número del modelo: Dell Laser Printer 5100cn Tensión de alimentación: 110-127 VAC - Dell 3110cn Color Laser Printer | User Guide - Page 448
is never any human access to laser radiation above a Class I level during normal operation, user maintenance, or prescribed service condition. Energy Star ENERGY STAR® Compliance Certain configurations of Dell printers comply with the requirements set forth by the Environmental Protection Agency - Dell 3110cn Color Laser Printer | User Guide - Page 449
estimates that use of ENERGY STAR® computer products can save computer users up to two billion dollars annually in electricity costs. In weekends. MSDS Materials for Dell Printer All MSDS materials for Dell Printers can be found at the following URL: http://www1.us.dell.com/content/topics/global. - Dell 3110cn Color Laser Printer | User Guide - Page 450
customer in the troubleshooting process and provides for restoration of the operating system, software program and hardware drivers to the original default configuration as shipped from Dell, as well as the verification of appropriate functionality of the printer and all Dell-installed hardware. In - Dell 3110cn Color Laser Printer | User Guide - Page 451
Service Warranty and Return Policy Dell Computer Corporation ("Dell") manufactures its hardware products from parts and components that are new or equivalent to new in accordance with industry-standard practices. For information about the Dell warranty for your printer, see the Owner's Manual
-
 1
1 -
 2
2 -
 3
3 -
 4
4 -
 5
5 -
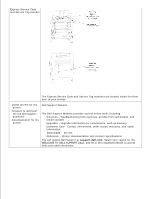 6
6 -
 7
7 -
8
-
9
-
10
-
11
-
12
-
13
-
14
-
15
-
16
-
17
-
18
-
19
-
20
-
21
-
22
-
23
-
24
-
25
-
26
-
27
-
28
-
29
-
30
-
31
-
32
-
33
-
34
-
35
-
36
-
37
-
38
-
39
-
40
-
41
-
42
-
43
-
44
-
45
-
46
-
47
-
48
-
49
-
50
-
51
-
52
-
53
-
54
-
55
-
56
-
57
-
58
-
59
-
60
-
61
-
62
-
63
-
64
-
65
-
66
-
67
-
68
-
69
-
70
-
71
-
72
-
73
-
74
-
75
-
76
-
77
-
78
-
79
-
80
-
81
-
82
-
83
-
84
-
85
-
86
-
87
-
88
-
89
-
90
-
91
-
92
-
93
-
94
-
95
-
96
-
97
-
98
-
99
-
100
-
101
-
102
-
103
-
104
-
105
-
106
-
107
-
108
-
109
-
110
-
111
-
112
-
113
-
114
-
115
-
116
-
117
-
118
-
119
-
120
-
121
-
122
-
123
-
124
-
125
-
126
-
127
-
128
-
129
-
130
-
131
-
132
-
133
-
134
-
135
-
136
-
137
-
138
-
139
-
140
-
141
-
142
-
143
-
144
-
145
-
146
-
147
-
148
-
149
-
150
-
151
-
152
-
153
-
154
-
155
-
156
-
157
-
158
-
159
-
160
-
161
-
162
-
163
-
164
-
165
-
166
-
167
-
168
-
169
-
170
-
171
-
172
-
173
-
174
-
175
-
176
-
177
-
178
-
179
-
180
-
181
-
182
-
183
-
184
-
185
-
186
-
187
-
188
-
189
-
190
-
191
-
192
-
193
-
194
-
195
-
196
-
197
-
198
-
199
-
200
-
201
-
202
-
203
-
204
-
205
-
206
-
207
-
208
-
209
-
210
-
211
-
212
-
213
-
214
-
215
-
216
-
217
-
218
-
219
-
220
-
221
-
222
-
223
-
224
-
225
-
226
-
227
-
228
-
229
-
230
-
231
-
232
-
233
-
234
-
235
-
236
-
237
-
238
-
239
-
240
-
241
-
242
-
243
-
244
-
245
-
246
-
247
-
248
-
249
-
250
-
251
-
252
-
253
-
254
-
255
-
256
-
257
-
258
-
259
-
260
-
261
-
262
-
263
-
264
-
265
-
266
-
267
-
268
-
269
-
270
-
271
-
272
-
273
-
274
-
275
-
276
-
277
-
278
-
279
-
280
-
281
-
282
-
283
-
284
-
285
-
286
-
287
-
288
-
289
-
290
-
291
-
292
-
293
-
294
-
295
-
296
-
297
-
298
-
299
-
300
-
301
-
302
-
303
-
304
-
305
-
306
-
307
-
308
-
309
-
310
-
311
-
312
-
313
-
314
-
315
-
316
-
317
-
318
-
319
-
320
-
321
-
322
-
323
-
324
-
325
-
326
-
327
-
328
-
329
-
330
-
331
-
332
-
333
-
334
-
335
-
336
-
337
-
338
-
339
-
340
-
341
-
342
-
343
-
344
-
345
-
346
-
347
-
348
-
349
-
350
-
351
-
352
-
353
-
354
-
355
-
356
-
357
-
358
-
359
-
360
-
361
-
362
-
363
-
364
-
365
-
366
-
367
-
368
-
369
-
370
-
371
-
372
-
373
-
374
-
375
-
376
-
377
-
378
-
379
-
380
-
381
-
382
-
383
-
384
-
385
-
386
-
387
-
388
-
389
-
390
-
391
-
392
-
393
-
394
-
395
-
396
-
397
-
398
-
399
-
400
-
401
-
402
-
403
-
404
-
405
-
406
-
407
-
408
-
409
-
410
-
411
-
412
-
413
-
414
-
415
-
416
-
417
-
418
-
419
-
420
-
421
-
422
-
423
-
424
-
425
-
426
-
427
-
428
-
429
-
430
-
431
-
432
-
433
-
434
-
435
-
436
-
437
-
438
-
439
-
440
-
441
-
442
-
443
-
444
-
445
-
446
-
447
-
448
-
449
-
450
-
451
 |
 |
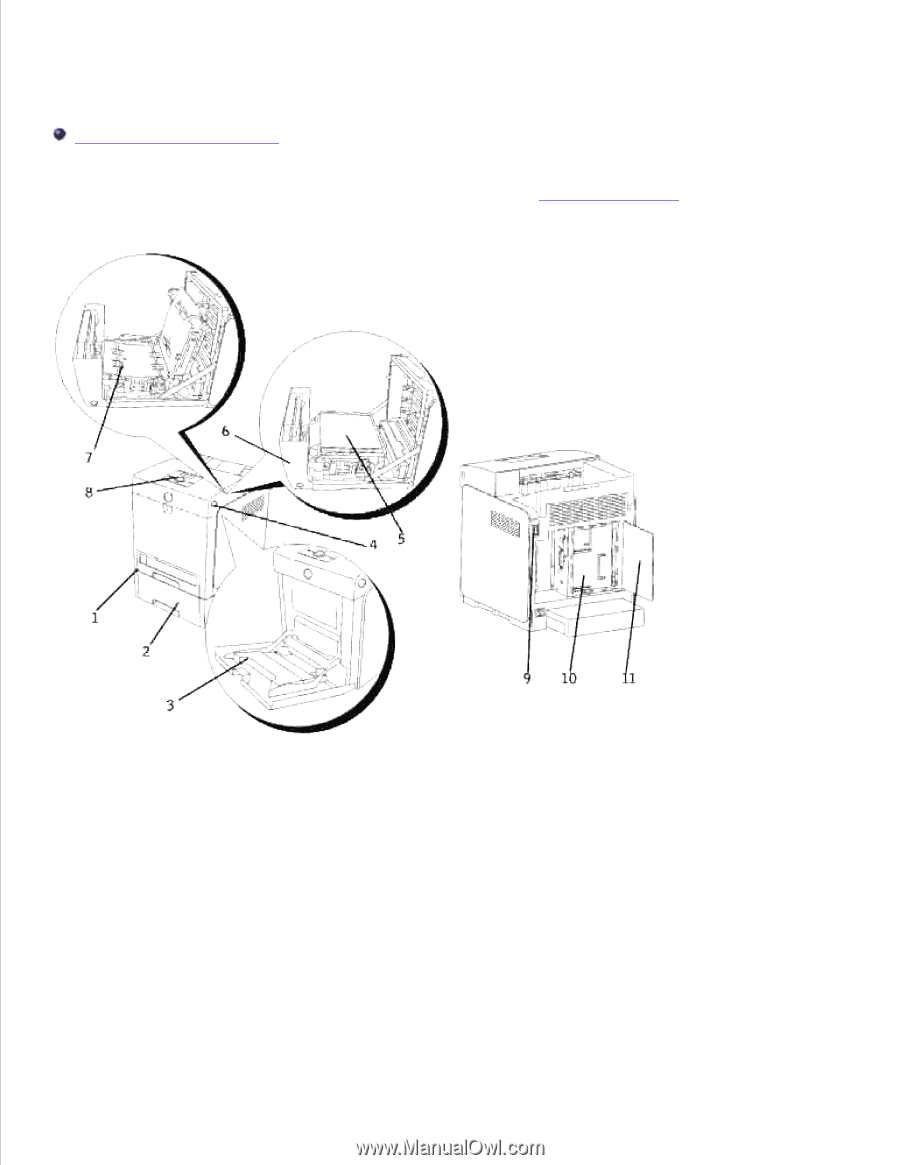
Dell™ Color Laser Printer 3110cn User's Guide
Notes, Notices, and Cautions
Click the links to the left for information on the features, options, and operation of your printer. For
information on other documentation included with your printer, see "
Finding Information
."