Dell 5210n User's Guide
Dell 5210n Manual
 |
View all Dell 5210n manuals
Add to My Manuals
Save this manual to your list of manuals |
Dell 5210n manual content summary:
- Dell 5210n | User's Guide - Page 1
information about installing input options, see Installing and Removing Options or the instructions that came with the option. To purchase any of the options below, go to www.dell.com or contact your Dell Sales Representative. Standard Network Number: 1 2 3 4 Fully Configured Part: Standard output - Dell 5210n | User's Guide - Page 2
You can install up to four optional paper trays, or three trays and a duplex unit. Number: 1 2 3 4 5 6 7 Part: Output expander (650 sheets) Tray 1/Standard tray (500 sheets) Duplex unit (500 sheets) Envelope feeder (85 envelopes) Tray 2 (250 or 500 sheets) Tray 3 (250 or 500 sheets) Tray 4 (250 or - Dell 5210n | User's Guide - Page 3
printer and indicating possible printer problems you must resolve. The operator panel display is a 4-line, back- Paper Menu Reports Settings Security Network/Ports Menu Item l Default Source l Paper Size/Type l Configure MP l Envelope Enhance l Substitute Size l Paper Texture l Paper Weight l Paper - Dell 5210n | User's Guide - Page 4
in the troubleshooting process and provides for restoration of the Operating System, application software and hardware drivers to the original default configuration as shipped from Dell, as well as the verification of appropriate functionality of the printer and all Dell-installed hardware. In - Dell 5210n | User's Guide - Page 5
list of conditions and the following disclaimer in the documentation and/or other materials provided with the distribution. 3. The name of the author may not be used to endorse or promote products derived from this software without specific OF SUBSTITUTE GOODS OR SERVICES; LOSS OF USE, DATA - Dell 5210n | User's Guide - Page 6
repair information l Downloads - Drivers l Reference - Printer documentation and product specifications l How to use Windows XP l Documentation for my printer Windows XP Help and Support Center 1. Click Start® Help and Support. 2. Type a word or phrase that describes your problem, and then click - Dell 5210n | User's Guide - Page 7
software--to make sure the software is free for all its users. This General Public License applies to most of the Free Software Foundation's software sure that you have the freedom to distribute copies of free software (and charge for this service if you wish), that you receive source code or can - Dell 5210n | User's Guide - Page 8
users may redistribute the program under these conditions, and telling the user you distribute the same sections as part of a whole which is a and installation of the License. 10. The Free Software Foundation may publish revised and in detail to address new problems or concerns. Each version is - Dell 5210n | User's Guide - Page 9
Software Foundation. 11. If you wish to incorporate parts software which is copyrighted by the Free Software Foundation, write to the Free Software Foundation; we sometimes make exceptions for this. Our decision will be guided NECESSARY SERVICING, REPAIR free software which Software most software are - Dell 5210n | User's Guide - Page 10
freedom to distribute copies of free software (and charge for this service if you wish); that you receive not be affected by problems that might be introduced by others. Finally, software patents pose a is Less protective of the users' freedom, it does ensure that the user of a program that is - Dell 5210n | User's Guide - Page 11
scripts used to control compilation and installation of the library. Activities other than conditions: a. The modified work must itself be a software library. b. You must cause the files modified to copy. This option is useful when you wish to copy part of the code of the Library into a program that - Dell 5210n | User's Guide - Page 12
the user installs one side-by-side in to address new problems or concerns. Software Foundation. 14. If you wish to incorporate parts software which is copyrighted by the Free Software Foundation, write to the Free Software Foundation; we sometimes make exceptions for this. Our decision will be guided - Dell 5210n | User's Guide - Page 13
YOU ASSUME THE COST OF ALL NECESSARY SERVICING, REPAIR OR CORRECTION. 16. IN NO EVENT UNLESS REQUIRED LOSSES SUSTAINED BY YOU OR THIRD PARTIES OR A FAILURE OF THE LIBRARY TO OPERATE WITH ANY OTHER SOFTWARE), EVEN IF SUCH HOLDER OR OTHER PARTY HAS BEEN ADVISED OF THE POSSIBILITY OF SUCH DAMAGES. END - Dell 5210n | User's Guide - Page 14
Dell™ Laser Printer 5210n / 5310n User's Guide Click the links to the left for information on the features and operation of your printer. For information on other documentation included with your printer, see Finding Information. To order supplies from Dell: 1. Double-click the icon on your desktop. - Dell 5210n | User's Guide - Page 15
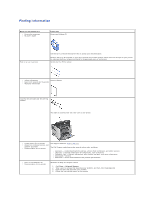
the printer, and then remove the jam. 3 201 Paper Jam Remove Cartridge Open the top front cover, remove the print cartridge, and then remove the jam. 4 200 Paper Jam Remove Cartridge Open the top front cover, remove the print cartridge, and then remove the jam. 5 23x Paper Jam Open Duplex - Dell 5210n | User's Guide - Page 16
. Paper jams can occur in three areas: the front of the printer, inside the printer, and at the rear of the printer. Jams in the front of the printer occur in the input options or the duplex tray. Jams inside the printer occur in two locations and require the removal of the print cartridge. Jams can - Dell 5210n | User's Guide - Page 17
pulling. You need to access the print media from the printer rear door. CAUTION: Do not use any pointed objects to remove the paper. This could cause personal injury or damage to the printer. 6. Align and reinstall the toner cartridge. 7. Close the top front cover. 8. Close the multipurpose feeder - Dell 5210n | User's Guide - Page 18
the Select button . 202 Paper Jam Open Rear Door 1. If the paper is exiting the printer, pull the media straight out, and press the Select button . Otherwise, continue with step 2. 2. Open the printer rear door. CAUTION: The inside of the printer may be hot. Allow the printer to cool before touching - Dell 5210n | User's Guide - Page 19
media either up or down. 3. Close the duplex rear door. Make sure it snaps into place. 4. Press the Select button . 23x and 24x Jams Paper jams in these areas can occur on the incline surface of a tray or across more than one tray. To clear these areas: 1. Open the printer paper tray, and remove any - Dell 5210n | User's Guide - Page 20
2. Open the duplex tray, and remove the media by pulling up. 3. Open any optional trays beginning at the top, and remove any jammed media. Pull the print media either up or down. If it does not pull easily one way, try the other way. 4. Press the Select button . 250 Paper Jam Check MP Feeder 1. - Dell 5210n | User's Guide - Page 21
2. Flex, fan, and restack the media. 3. Load the print media. 4. Slide the side guide toward the inside of the tray until it lightly rests against the edge of the media. 5. Press the Select button . 260 Paper Jam Check Env Feeder The envelope feeder feeds envelopes from the bottom of the stack; the - Dell 5210n | User's Guide - Page 22
, and then set it aside. b. Remove the envelope from the printer. NOTE: If you cannot remove the envelope, the print cartridge will have to be removed. See 200 and 201 Paper Jam Remove Cartridge for more information. c. Reinstall the envelope feeder. Make sure it snaps into place. 3. Flex and stack - Dell 5210n | User's Guide - Page 23
6. Lower the envelope weight. 7. Press the Select button . 27x Paper Jam Check Bin x To clear a jam in the output expander: 1. If the paper is exiting into the bin, pull the media straight out, and press the Select button . Otherwise, continue with step 2. 2. Push the output bin rear door - Dell 5210n | User's Guide - Page 24
3. Remove the jammed media. 4. Close the output bin rear doors, and make sure all doors are secure. 5. Press the Select button . - Dell 5210n | User's Guide - Page 25
printer and click Contact Dell, or refer to the "Contacting Dell" section of your Owner's Manual. For source code that is required to be made available with the product, see the Drivers and Utilities CD in the \Install\licenses folder. This product includes software developed by the Apache Software - Dell 5210n | User's Guide - Page 26
XP Windows 2003 Server Windows 2000 Windows Me Windows 98 SE Windows NT Use this type of cable: USB or Parallel Parallel Installing the Printer Software NOTE: Windows XP Professional x64, Windows XP Professional, and Windows NT require that you have administrative access to install printer drivers - Dell 5210n | User's Guide - Page 27
the printer to your computer, the PCL driver for your operating system was installed by default. Operating System Windows XP Professional x64 Windows XP Windows 2003 Server Windows 2000 Windows NT Windows Me Windows 98 SE Driver Type PCL PS PCL PS PCL PS PCL PS Driver Name D:\Drivers\Print - Dell 5210n | User's Guide - Page 28
. The printer drivers package can be installed in various arrangements. You can install printer drivers on: l Each workstation you want to run printer drivers. l One host, while other workstations can NFS mount the printer drivers package files. For help, see NFS mount printer drivers. Supported - Dell 5210n | User's Guide - Page 29
ROM to /mnt/cdrom: # cd /mnt/cdrom/unix/packages 4. Install the package file: # rpm -ivh print-drivers-linux-glibc2-x86.rpm 5. Run the following setup script to complete the installation: # /usr/local/dell/setup.dellprint NOTE: Your specific printer driver may not be included in the standard package - Dell 5210n | User's Guide - Page 30
the printer drivers packages, some directories may need to be removed manually. To see if any directories remain after removing all the packages, check the directory where you installed printer drivers. By default, printer drivers installs in the following location: /usr/local/dell/unix_prt_drivers - Dell 5210n | User's Guide - Page 31
the Printer Moving the Printer Maintaining Printer Supplies Replacing the Toner Cartridge Replacing Maintenance Kit Items Periodically, you need to complete certain tasks to maintain optimum print quality. These tasks are covered in this chapter. If several people are using the printer, you - Dell 5210n | User's Guide - Page 32
: Replacing the Toner Cartridge Maintenance kit The maintenance kit contains all the items necessary to replace the charge rolls, transfer roller, pick rollers, and fuser. NOTE: Replacement of the fuser must be performed by an authorized service technician. Charge rolls Transfer roller Pick Rollers - Dell 5210n | User's Guide - Page 33
software application or printer driver to send a Verify Print job. Duplex printing is available when you install an optional duplex unit. It lets you print on both sides of a sheet of paper toner cartridge. Thoroughly shake it side-to-side and front-to-back several times to redistribute the toner, - Dell 5210n | User's Guide - Page 34
print quality problems. 4. Unpack the new toner cartridge. Remove and discard the print cartridge's protective foam, red plastic strap, and tape. 5. Thoroughly shake the cartridge side-to-side and front-to-back several times to distribute toner evenly. 6. Insert the print cartridge into the printer. - Dell 5210n | User's Guide - Page 35
the top front cover. 8. Close the multipurpose feeder. Replacing Maintenance Kit Items Replacing the Charge Rolls Order a new charge roll kit when toner fog or background shading appears on printed pages. 1. Turn the printer off, and unplug the printer power cord. 2. Pull on the notch on the front - Dell 5210n | User's Guide - Page 36
to open the top front cover. 4. Pull the print cartridge up and out of the printer. 5. Attach the cardboard cover retainer to the hook on the printer. 6. Insert the hook on the bottom of the cardboard cover retainer into the slot on the printer. You will need to lower the top front cover to - Dell 5210n | User's Guide - Page 37
the right and out of the printer. 10. Align the blue tab on the left side of the charge roll with its hole in the arm marked with the corresponding blue arrow, and insert it. Pull the charge roll to the left. 11. Lift the right side of the charge roll and insert - Dell 5210n | User's Guide - Page 38
13. Remove the cardboard cover retainer. 14. Reinstall the print cartridge into the printer. 15. Close the top front cover. 16. Close the multipurpose feeder. - Dell 5210n | User's Guide - Page 39
the release latch to the right to open the top front cover. 4. Pull the print cartridge up and out of the printer. 5. Locate the used transfer roller on the bottom of the inside of printer. 6. Pry the left side of the transfer roller up from its slot to loosen it. (Use any kind of small tool.) - Dell 5210n | User's Guide - Page 40
hole on the right side of the printer, and insert the metal tab on the right side of the transfer roller into the hole. 10. Lower the transfer roller gently until the left metal tab fits into the slot. You may have to push it down for a secure fit. 11. Reinstall the print cartridge into the - Dell 5210n | User's Guide - Page 41
12. Close the top front cover. 13. Close the multipurpose feeder. 14. Plug the printer power cord into a properly grounded electrical outlet. Replacing the Pick Rollers 1. Remove the standard tray. 2. Look underneath the printer for the pick roller arm and pull it down. - Dell 5210n | User's Guide - Page 42
of the tab. 4. Pull the pick roller off the arm. 5. Repeat step 3 and step 4 on the other side to remove the other pick roller. 6. Gently release the pick roller arm. 7. Discard the used pick rollers. 8. Remove the two pick rollers from the packaging. 9. Pull the pick roller arm down. 10. Locate the - Dell 5210n | User's Guide - Page 43
12. Repeat step 10 and step 11 to install the other pick roller. 13. Gently release the pick roller arm. 14. Insert the standard tray. - Dell 5210n | User's Guide - Page 44
you try a limited sample of any paper or specialty media you are considering using with the printer before purchasing large quantities. Supported Print Media The following tables provide information on standard and optional sources for both input and output trays and bins. Print Media Types Print - Dell 5210n | User's Guide - Page 45
Multipurpose feeder Optional duplex unit Optional 250-sheet drawer JIS B5 Letter Legal Executive Folio1 Statement1 Universal2 7 ¾ Envelope 9 Envelope 10 Envelope DL Envelope B5 Envelope C5 Envelope Other Envelope1 - Dell 5210n | User's Guide - Page 46
162 mm to 229 x 342 mm) 1 This size does not appear in the Paper Size menu until Tray Size Sensing is turned off. 2 This size setting formats the page for 8.5 x lb) N/A Tag 203 g/m2 (125 lb) 163 g/m2 (100 lb) Cover Laser printer 216 g/m2 (80 lb) 176 g/m2 (65 lb) 138 to 146 g/m2 138 to 146 - Dell 5210n | User's Guide - Page 47
with the printer before buying large quantities. When loading paper, note the recommended print side on the paper package, and load paper accordingly. See Loading Standard Trays and Optional Trays or Loading the Multipurpose Feeder for detailed tray-loading instructions. Paper Characteristics The - Dell 5210n | User's Guide - Page 48
paper tray Simplex (single-sided) printing Duplex (double-sided) printing In the multipurpose feeder Paper Characteristics The following paper characteristics affect print quality and reliability. We recommend that you follow these guidelines when evaluating new paper stock. The laser printing - Dell 5210n | User's Guide - Page 49
to Transparency from the printer driver to avoid damaging the printer. l In Macintosh, be sure to set the Paper Type to Transparency in the Print dialog on the Imaging choice in the Copies & Pages pop-up menu. l Use transparencies designed specifically for laser printers. Transparencies must be able - Dell 5210n | User's Guide - Page 50
for use in laser printers. l Set the Paper Size/Type in the Paper menu to MP Feeder, Manual Env, or Env Feeder depending on the source you are using. Set the paper type to Envelope, and select the correct envelope size from the operator panel, the printer driver, or the Local Printer Setup Utility - Dell 5210n | User's Guide - Page 51
menu item in the Paper menu to Card Stock from the operator panel, from the printer driver, or in the Local Printer Setup Utility. l Be aware that preprinting, perforation, and creasing can significantly affect the print quality and cause print media handling or jamming problems. l Avoid using card - Dell 5210n | User's Guide - Page 52
Avoiding Jams Use appropriate print media (paper, transparencies, labels, and card stock) to help ensure trouble-free printing. See Supported Print Media for more information. NOTE: Try a limited sample of any print media you are considering using with the printer before purchasing large quantities. - Dell 5210n | User's Guide - Page 53
the default setting. Paper Menu Use the Paper Menu to define the paper loaded in each paper tray, the default paper source, and the output bin. Default Source Menu selection: Default Source Purpose: Identifies the default paper source. Values: Tray MP Feeder Env Feeder Manual Paper Manual - Dell 5210n | User's Guide - Page 54
used to configure the multipurpose feeder as another paper tray or manual feeder. If you link the multipurpose feeder with another tray, you can have the printer pull paper from the multipurpose feeder before taking paper from another tray. Menu selection: Configure MP Purpose: Determines when the - Dell 5210n | User's Guide - Page 55
in a specific input source. Smooth Shown if Card Stock is supported in the software to indicate simplex printing. When simplex printing is selected, the printer automatically inserts blank pages to print the simplex job correctly. NOTE: Paper Loading is only available if a duplex unit is installed - Dell 5210n | User's Guide - Page 56
used to specify the height and width of the Universal Paper Size. By specifying the height and width for Universal Paper Size, the printer will use the Universal setting exactly like other paper sizes, including support for duplex and n-up. Menu selection: Units of Measure Portrait Width Portrait - Dell 5210n | User's Guide - Page 57
Bin value list. Transparency Bin Labels Bin Vinyl Labels Bin Bond Bin Envelope Bin Letterhead Bin Preprinted Bin Colored Bin Custom Bin ( represents 1 through 3) Sends print jobs to a specific output bin based on the requested paper type. Standard Bin* Bin 1 Bin 2 Bin 3 user until it - Dell 5210n | User's Guide - Page 58
to Off. Specifies the amount of time after a print job before the printer goes into Power Saver mode. (Your printer may not support the entire range of values.) The factory default Power Saver setting depends on your printer model. Print the menu settings page to determine the current Power Saver - Dell 5210n | User's Guide - Page 59
NOTE: You must have an optional duplex unit installed. On NOTE: Select Duplex from the printer driver to duplex only specific jobs. Defines the way duplexed pages would be bound, and Long Prints on one side of the paper. Prints on both sides of the paper. Assumes binding along the long edge of - Dell 5210n | User's Guide - Page 60
Pages Collation Separator Sheets Separator Source NOTE: Set the number of copies required for a specific job from the printer driver. Specifies whether to include application-generated blank Do Not pages as part of your printed output. Print* Does not print application-generated blank pages as - Dell 5210n | User's Guide - Page 61
output or save toner. -6 - +6 0* is the default setting. 0-5 0* is the default setting. Utilities Menu Use this menu selection to change printer settings, remove jobs, set up printer hardware, and troubleshoot printer problems. Menu selection: Factory Defaults Purpose: Values: Returns - Dell 5210n | User's Guide - Page 62
printer drivers or applications that use different source assignments for the paper trays. Assign MP Feeder: Off* None 0-199 Assign Tray [x]: Off* None 0-199 Assign Env Feeder: Off* None 0-199 Assign Man Paper: Off* None 0-199 Assign Man Env: Off* None 0-199 View Factory Def Restore Defaults - Dell 5210n | User's Guide - Page 63
indicates that is the required printer language. Printer does not examine the incoming data. The printer uses PCL emulation to process the job if PCL SmartSwitch is On, or uses the default printer language specified in the Setup Menu if PCL SmartSwitch is Off. Printer does not perform NPA processing - Dell 5210n | User's Guide - Page 64
the default printer language specified in the Setup Menu if PCL SmartSwitch is Off. Printer performs NPA processing. If data is not in NPA format, it is rejected as bad data. Printer does not perform NPA processing. USB Buffer Mac Binary PS NOTE: Changing this menu item automatically resets the - Dell 5210n | User's Guide - Page 65
the default printer language specified in the Setup Menu if PCL SmartSwitch is Off. Printer performs NPA processing. If data is not in NPA format, it is rejected as bad data. Printer does not perform NPA processing. NOTE: Changing this menu item automatically resets the printer. Auto* Printer - Dell 5210n | User's Guide - Page 66
on the operator panel. Activates or deactivates the AppleTalk On feature. Off Activates the AppleTalk feature. Deactivates the AppleTalk feature. Provides a list of zones from network. Default will be default zone for the network. If no default zone exists on the network, the * will be the - Dell 5210n | User's Guide - Page 67
cartridge, and install a supported one. For more information, see Replacing the Toner Cartridge. l Press the Select button to clear the message and continue printing. The printer does not automatically reprint the page that prompted the message. l Check tray length and width guides to ensure paper - Dell 5210n | User's Guide - Page 68
to clear the message and continue printing without using the specified tray. l Press the Select button to clear the message, and continue printing. l Replace the maintenance items and if necessary, reset the printer maintenance counter. For more information, see Replacing Maintenance Kit Items. - Dell 5210n | User's Guide - Page 69
.yy Paper jam 235.yy Paper jam 236.yy Paper jam 237.yy Paper jam 238.yy Paper jam 239.yy Paper jam 24x.yy Paper jam 250.yy Paper jam 260.yy Paper jam 27x.yy Paper jam 280.yy Paper jam 281.yy Paper jam 900-999 Service Activating Menu Changes Busy Calibrating l Replace the toner cartridge - Dell 5210n | User's Guide - Page 70
, see Installing a Duplex Unit. If the error recurs, turn the printer off, unplug the power cord from the wall outlet, and then remove the specified device, and call for service. l Press the Select button to clear the message and print without using the device. Check tray connection - Dell 5210n | User's Guide - Page 71
download engine code while this message is displayed. Enter the correct PIN. l Load the specified paper in the manual feed tray or multipurpose feeder. l Press the Select button the input sources. to ignore the manual feed request and print on paper already installed in one of If the printer - Dell 5210n | User's Guide - Page 72
Wait for the message to clear. l Replace the toner cartridge. l Press Select to clear the message and continue printing. Load paper in the tray to clear the message. Add paper to the tray to clear the message. Insert the tray into the printer. The printer is processing data through the specified USB - Dell 5210n | User's Guide - Page 73
Installing Drivers for Network Printing Printing a Network Setup Page Assigning a Printer IP Address Verifying the IP Settings Windows Macintosh Linux/UNIX NetWare Printing a Network Setup Page If the printer is attached to a network, print a network setup page on the printer to verify the network - Dell 5210n | User's Guide - Page 74
require the installation of a printer driver and the creation of a network printer port. Supported Printer Drivers Custom drivers are available on the Drivers and Utilities CD. Supported Network Printer Ports l Microsoft Standard TCP/IP port - Windows XP Professional x64, Windows XP, Windows Server - Dell 5210n | User's Guide - Page 75
Dell Printer Configuration Web Tool. This application is not available when the printer is connected to a computer with a USB or parallel cable. Some Windows operating systems may already include a printer driver that is compatible with the printer. NOTE: Installing a custom driver will not replace - Dell 5210n | User's Guide - Page 76
the printer to your computer, the PCL driver for your operating system was installed by default. Operating System Windows XP Professional x64 Windows XP Windows 2003 Server Windows 2000 Windows NT Windows Me Windows 98 SE Driver Type PCL PS PCL PS PCL PS PCL PS Driver Name D:\Drivers\Print - Dell 5210n | User's Guide - Page 77
NOTE: If you need to set up your printer in a mixed 32-bit and 64-bit operating system environment, consult your Network Administrator about which printer driver to use. For more information about printing in a mixed environment, visit support.dell.com. You can use Microsoft's Point and Print or - Dell 5210n | User's Guide - Page 78
provide a path to available drivers. 6. Select whether you want this printer to be the default printer for the client, and then click Finish. 7. Print a test page to verify printer installation: a. In Windows XP, click Start®Control Panel®Printers and Other Hardware®Printers and Faxes. In all others - Dell 5210n | User's Guide - Page 79
in the Summary window is not correct for the printer, delete the printer from the printer list in Print Center or Printer Setup Utility, and repeat Step 1: Install a Custom PPD File. Mac OS 9.x Step 1: Install a Custom PPD File 1. Insert the Drivers and Utilities CD. 2. Double-click Classic, and - Dell 5210n | User's Guide - Page 80
. The printer drivers package can be installed in various arrangements. You can install printer drivers on: l Each workstation you want to run printer drivers. l One host, while other workstations can NFS mount the printer drivers package files. For help, see NFS mount printer drivers. Supported - Dell 5210n | User's Guide - Page 81
ROM to /mnt/cdrom: # cd /mnt/cdrom/unix/packages 4. Install the package file: # rpm -ivh print-drivers-linux-glibc2-x86.rpm 5. Run the following setup script to complete the installation: # /usr/local/dell/setup.dellprint NOTE: Your specific printer driver may not be included in the standard package - Dell 5210n | User's Guide - Page 82
all the packages, check the directory where you installed printer drivers. By default, printer drivers installs in the following location: /usr/local/dell/unix_prt_drivers. NetWare NDPS/iPrint The printer supports Novell Distributed Print Services (NDPS/iPrint). For the latest information about - Dell 5210n | User's Guide - Page 83
list of conditions and the following disclaimer in the documentation and/or other materials provided with the distribution. 3. The end-user documentation included with the redistribution, if any, must include the following acknowledgment: "This product includes software GOODS OR SERVICES; LOSS OF - Dell 5210n | User's Guide - Page 84
software--to make sure the software is free for all its users. This license, the Library General Public License, applies to some specially designated Free Software Foundation software the freedom to distribute copies of free software (and charge for this service if you wish), that you receive source - Dell 5210n | User's Guide - Page 85
or not licensed at all. Most GNU software, including some libraries, is covered by while preserving your freedom as a user of such programs to change the to control compilation and installation of the library. Activities still operates, and performs whatever part of its purpose remains meaningful. - Dell 5210n | User's Guide - Page 86
a medium customarily used for software interchange. If distribution of object as well as a reference directing the user to the copy of this License. a work based on the Library side-by-side in a single library together with with the combined library of the fact that part of it is a work based on the - Dell 5210n | User's Guide - Page 87
new problems or Software Foundation. 14. If you wish to incorporate parts software which is copyrighted by the Free Software Foundation, write to the Free Software Foundation; we sometimes make exceptions for this. Our decision will be guided NECESSARY SERVICING, REPAIR electronic and paper mail. - Dell 5210n | User's Guide - Page 88
AND CONDITIONS FOR COPYING, DISTRIBUTION AND MODIFICATION This library is free software; you can redistribute it and/or modify it under the terms exception is that you may use, copy, link, modify and distribute under the user's own terms, binary object code versions of works based on the Library. 3. - Dell 5210n | User's Guide - Page 89
, see the instructions included with the option. Installing a 250-Sheet or 500-Sheet Drawer NOTE: You can install up to four optional paper trays, or three trays and a duplex unit. Optional drawers attach under the printer and optional duplex unit. A drawer consists of a tray and a support unit. The - Dell 5210n | User's Guide - Page 90
aligned properly. Make sure the support unit is securely in place. 3. Attach another optional drawer, a duplex unit, or the printer. You can attach a label to the trays to indicate the tray number. 4. In Windows XP, click Start® Control Panel® Printers and Other Hardware® Printers and Faxes. In all - Dell 5210n | User's Guide - Page 91
the printer. 3. In Windows XP, click Start® Control Panel® Printers and Other Hardware® Printers and Faxes. In all others, click Start® Settings® Printers. 4. Right-click the printer icon and select Properties. 5. On the Installed Options tab, select Duplex option in the Available Options list - Dell 5210n | User's Guide - Page 92
weight may cause it to disengage from the support. After you carefully unpack the output expander, install it immediately; otherwise, the edges of the mounting brackets could damage tabletops or fabrics. 1. Remove the top cover from the printer, finisher, or high-capacity output stacker. 2. Slide - Dell 5210n | User's Guide - Page 93
. 6. Rotate the tray up until the upper tabs snap into the upper slots. 7. If you are not attaching any more print media handling options, attach the top cover to the output expander. Installing an Envelope Feeder The envelope feeder attaches to the front of your printer behind the multipurpose - Dell 5210n | User's Guide - Page 94
unplug the power cord before continuing. Installing a Printer Memory Card NOTE: Printer memory cards designed for other printers may not work with the printer. Use only Dell printer memory cards to ensure compatibility. 1. Open the side door. NOTICE: Printer memory cards are easily damaged by static - Dell 5210n | User's Guide - Page 95
over the notch on the end of the card. 7. Close the side door. Removing a Printer Memory Card 1. Open the side door. NOTICE: Printer memory memory cards are easily damaged by static electricity. Touch something metal such as the printer frame before you touch a memory card. 2. Push the latches away - Dell 5210n | User's Guide - Page 96
in paper, and store it in a box. 5. Close both latches. 6. Close the side door. Installing Font ROMs NOTE: Font ROMs may not be available in all regions. Contact your Dell Sales Representative to determine Font ROM availability. Installing Font ROMs NOTE: Font ROMs designed for other printers may - Dell 5210n | User's Guide - Page 97
been installed, you may need to remove the option card before installing the Font ROM. 2. Unpack the Font ROM. NOTICE: Font ROMs are easily damaged by static electricity. Touch something metal such as the printer frame careful not to damage the connectors. 5. Close the side door. Removing Font ROMs - Dell 5210n | User's Guide - Page 98
1. Open the side door. NOTE: If an option card has been installed, you may need to remove the option card before removing the Font ROM. 2. Squeeze the Font ROM locking clips. NOTICE: Font ROMs are easily damaged by static electricity. Touch something metal such as the printer frame before you touch - Dell 5210n | User's Guide - Page 99
- Dell 5210n | User's Guide - Page 100
tips on paper jam prevention and print media storage, see Avoiding Jams or Storing Print Media. Sending a Job to Print A printer driver is software that lets your computer communicate with the printer. When you choose Print from a software application, a window representing the printer driver opens - Dell 5210n | User's Guide - Page 101
Start® Settings® Control Panel, and then go to step 4. 3. Double-click the Printers icon. A list of available printers appears. 4. Double-click the printer you selected when you sent the job. A list of print jobs appears in the printer window. 5. Select the job you want to cancel. 6. Press the - Dell 5210n | User's Guide - Page 102
, and then double-click Print Center or Printer Setup. 2. Double-click the printer you are printing to. 3. In the printer window, select the print job you want to cancel. 4. Press Delete. Printing the Menu Settings Page You can print a menu settings page to review the default printer settings and - Dell 5210n | User's Guide - Page 103
and then select your user name from the user name list. Once you select your user name, you can No one else using the printer can print the job without the PIN. Windows 1. From a word processor, driver instructions. 4. Enter a User Name and PIN. 5. Send your job to the printer. Go to the printer - Dell 5210n | User's Guide - Page 104
are automatically deleted from printer memory when the printer requires extra memory to process additional held jobs. Windows 1. From a word , then follow the driver instructions. 4. Select the type of held job you want, and then send your job to the printer. Go to the printer when you are ready - Dell 5210n | User's Guide - Page 105
(depending on the program or operating system). 3. Click the Paper tab. A paper tray list will appear. 4. Select the tray containing the specialty media. NOTE: If you have difficulty, click Help, and then follow the driver instructions. 5. Select the media type (transparencies, envelopes, and so on - Dell 5210n | User's Guide - Page 106
or when the operator panel indicator light is blinking. Doing so may cause a jam. 2. Squeeze the side guide tab, and slide the guide to the outer edge of the tray. 3. Squeeze the rear guide tab, and slide the guide to the correct position for the size media you are loading. 4. Flex the sheets - Dell 5210n | User's Guide - Page 107
. Overfilling the tray may cause jams. 6. Squeeze the side guide tab, and slide the guide toward the inside of the tray until it lightly rests against the edge of the media. 7. Insert the tray into the printer. Setting the Paper Type and Paper Size After setting the Paper Type and Paper Size to - Dell 5210n | User's Guide - Page 108
new user default, and the printer returns to Ready. Loading the Multipurpose Feeder The multipurpose feeder can hold several sizes and types of print media, such as transparencies, postcards, note cards, and envelopes. It can be used for single-page or manual printing or as an additional tray. NOTE - Dell 5210n | User's Guide - Page 109
the edges and avoid touching the print side. Fan the stack of transparencies to prevent jams. Be careful not to scratch or leave fingerprints on the transparencies. Paper Transparencies Envelopes 5. Load the media in the tray. Use the stack height label as a guide for stack height when loading print - Dell 5210n | User's Guide - Page 110
printer. Loading letterhead or preprinted paper l Do not fill paper above the load line. Overfilling the tray may cause jams. l Follow the illustrations below for loading the paper according to your print job. Print side face-up for simplex (single-sided) printing Print side face-down for duplex - Dell 5210n | User's Guide - Page 111
. However, the envelope feeder must be adjusted correctly to ensure trouble-free printing. To load the envelope feeder: 1. Adjust the envelope support for the length of envelope you are loading. l Fully closed (pushed in toward the printer) for short envelopes l Extended to the middle position for - Dell 5210n | User's Guide - Page 112
envelope weight back toward the printer. It stays in place. 3. Slide the width guide to the far right. 4. Flex a stack of envelopes back and forth with stamps, clasps, snaps, windows, coated linings, or self-stick adhesives. These envelopes may severely damage the printer. NOTE: When you load - Dell 5210n | User's Guide - Page 113
loaded, and then press the Select button . Linking Trays Tray linking enables the automatic linking feature for trays when you load the same size and type of print media in multiple sources. The printer automatically links the trays; when one tray is empty, print media feeds from the next linked - Dell 5210n | User's Guide - Page 114
NOTE: Not all output bins support every paper and envelope size. Output Bin Name Standard bin Print Media How Many Can Be Installed on the Printer? l 250 sheets (75 g/m2) of plain paper N/A - one is standard on the printer and located on top of the printer. l 300 transparencies l 200 labels l 50 - Dell 5210n | User's Guide - Page 115
button on the operator panel. 2. Press the Down arrow button until appears next to Paper Menu, and then press the Select button . 3. Press the Down arrow button until appears Press the Down arrow button The printer returns to Ready. until appears next to Link, and then press the Select button . - Dell 5210n | User's Guide - Page 116
particular installation. If this equipment does cause interference with radio communications services, which Dell Technical Support representative or an experienced radio/television technician for additional suggestions. Dell including devices, expansion cards, printers, input/output (I/O) devices, - Dell 5210n | User's Guide - Page 117
frequency energy and, if not installed and used in accordance with the manufacturer's instruction manual, may cause harmful interference with document in compliance with FCC regulations: l Model number: 5210n / 5310n l Company name: Dell Inc. One Dell Way Round Rock, Texas 78682 USA 512-338-4400 - Dell 5210n | User's Guide - Page 118
Compatibility (EMC) - Part 3: Limits - Section EN 60825-1 - "Safety of Laser Products." NOTE: EN 55022 emissions requirements regulatory label located on the back, side, or bottom panel of the ) interference, in which case the user may be required to take adequate on file at Dell Inc. Products Europe - Dell 5210n | User's Guide - Page 119
user may be required to take adequate measures. EN 55022 Compliance (Czech Republic Only) VCCI Notice (Japan Only) Most Dell regulatory labels/markings located on the bottom, side, or back panel of your device. Once you have arise. When such trouble occurs, the user may be required to take - Dell 5210n | User's Guide - Page 120
domestic environment, it may cause radio interference. Install and use the equipment according to the instruction manual. VCCI Class B ITE Regulatory Mark If monitor, printer, and so on) should have the same power supply source. The phasing conductor of the room's electrical installation should have - Dell 5210n | User's Guide - Page 121
mark on the regulatory label on the bottom, side, or back panel of your device, the following section is on de los Baños 15520 México, D.F. 5210n / 5310n 110-127 V 50/60 Hz 7.2 A / 8.0 A 50 VDC / 50 VDC 5.3 A / 6.7 A ENERGY STAR® Compliance Any Dell product bearing the ENERGY STAR® emblem on the - Dell 5210n | User's Guide - Page 122
promoting energy-efficient products. You can help reduce electricity usage and its side effects by turning off your product when it is not in use for hvordan du genbruger dette produkt, ved at besøge: www.euro.dell.com/recycling. Richtlijn WEEE, afdanken van elektrische en elektronische apparaten In - Dell 5210n | User's Guide - Page 123
in einer entsprechenden Recycling-Einrichtung entsorgt werden. Informationen zum Recyceln dieses Geräts in Ihrem Land finden Sie unter: www.euro.dell.com/recycling. Direttiva WEEE (Waste from Electrical and Electronic Equipment) Nell'Unione Europea, questa etichetta indica che il prodotto non deve - Dell 5210n | User's Guide - Page 124
på riktig måte i ditt land, kan du gå til: www.euro.dell.com/recycling. Dyrektywa WEEE dotycząca zużytego sprzętu elektrycznego i elektronicznego produkt w danym kraju można znaleźć na stronie internetowej: www.euro.dell.com/recycling. Directiva sobre desperdício de equipamento eléctrico e electró - Dell 5210n | User's Guide - Page 125
su recuperación y reciclaje. Para obtener información sobre cómo reciclar este producto de forma responsable en su país, visite: www.euro.dell.com/recycling. WEEE-direktivet (Waste from Electrical and Electronic Equipment) Inom EU indikerar den här etiketten att produkten får inte slängas med - Dell 5210n | User's Guide - Page 126
icon. You can order toner by phone or from the Web. 1. Click Start®Programs or All Programs®Dell Printers®Dell Laser Printer 5210n / 5310n®Printer Supplies Reorder Application. The Order Supplies window appears. 2. If ordering from the Web, click Visit Dell's cartridge ordering web site. 3. If - Dell 5210n | User's Guide - Page 127
Start®Programs or All Programs®Dell Printers®Dell Laser Printer 5210n / 5310n. a. Select Dell Printer Software Uninstall. b. Select the components to uninstall, and then click Next. c. Click Uninstall Now. d. Click OK when the uninstall is complete. Driver Profiler Use the Driver Profiler to create - Dell 5210n | User's Guide - Page 128
on the first screen to order additional toner cartridges. Printer Settings Change printer settings, view the operator panel remotely, and update the print server firmware. Copy Printer Settings Quickly clone the printer's settings to another printer or printers on the network just by typing each - Dell 5210n | User's Guide - Page 129
list box to be notified. Set Password Lock the operator panel with a password so that other users don't inadvertently change the printer settings you selected. NOTE: You must be a network administrator to use this feature. Online Help Click Help to visit the Dell website for printer troubleshooting - Dell 5210n | User's Guide - Page 130
on your part. Attendance messages alert you to printer problems that require your intervention. Service messages also alert you to problems that require intervention. However, the printer will stop printing, and the errors are non-recoverable. It may be possible to power the printer off and back on - Dell 5210n | User's Guide - Page 131
Trace mode before you can print your job. Turn the printer off and back on to exit Hex Trace mode. Tray linking does not work. l Make sure both the size and type of media are the same in both trays. l Make sure the paper guides in the trays are set for the correct size media. l Make sure - Dell 5210n | User's Guide - Page 132
. If the suggested corrective action does not fix the problem, call your service representative. Paper Trays l Make sure the connection between drawers (250-sheet tray or 500-sheet tray) or the connection between a drawer and a duplex unit or the printer is secure. l Make sure the print media is - Dell 5210n | User's Guide - Page 133
help you solve print quality problems. If these suggestions do not correct the problem, call for service. You may have a printer part that requires adjustment or replacement. Print is too light. l The toner may be low. To utilize the remaining toner, remove the cartridge by gripping the handles with - Dell 5210n | User's Guide - Page 134
l If you are using downloaded fonts, verify the fonts are supported by the printer, the host computer, and the software application. Part or all of the page is printed in black. Check the print cartridge to see if it is installed correctly. The job prints, but the top and side margins are incorrect - Dell 5210n | User's Guide - Page 135
Option card l The Dell Laser Printer 5210n / 5310n l An existing wireless network l The Drivers and Utilities CD that came with your printer l A computer running one of the following operating systems: ¡ Windows XP Professional x64 ¡ Windows XP ¡ Windows 2003 Server ¡ Windows 2000 Wireless Network - Dell 5210n | User's Guide - Page 136
To install the wireless card: 1. Open the side door. NOTICE: Option cards are easily damaged by static electricity. Touch something metal such as the printer frame before you touch an option card. 2. Locate the card connector on the system board. 3. Remove the screw and the cover plate, and save - Dell 5210n | User's Guide - Page 137
securely, as a loose connection can result in a poor wireless signal. 9. Rotate the antenna until the joint allows it to be pointed up. 10. Close the side door. 11. Connect the power cord, and turn on the - Dell 5210n | User's Guide - Page 138
internal wireless print server option card has been installed correctly in the printer. l All access panels and printer doors have been replaced or closed. l The toner or print cartridges are installed correctly. l Paper has been loaded into the printer. l The printer is turned on and ready to be - Dell 5210n | User's Guide - Page 139
appropriate Network Name (SSID) from the list, click Next, and go to step 2. l If the correct network name is not in the list, select I want to enter a different appropriate option, and click Next. 6. Continue with Installing the Printer on the Network. Entering Alternate Network Settings Once the - Dell 5210n | User's Guide - Page 140
as the default startup mode for of the network for which the printer will be used. NOTE: The username and password for the 802.1x - RADIUS authentication server. b. Confirm the password. c. Click OK to return to the Advanced Mode home screen, and continue with step 6 of the advanced mode instructions - Dell 5210n | User's Guide - Page 141
proceed to step 6 of the advanced mode instructions. Installing the Printer on the Network Once the print server has been configured, the Wireless Setup Utility will return to the initial Drivers and Utilities CD screen. Click Network Installation - Install the printer for use on a network. For more - Dell 5210n | User's Guide - Page 142
: l The internal wireless print server option card has been installed correctly in the printer. l The toner or print cartridges are installed correctly. l Paper has been loaded into the printer. l The printer is turned on and ready to be installed. Configuring the Print Server in Ad-Hoc Mode 1. Make - Dell 5210n | User's Guide - Page 143
Configuration on the left side of the page. 2. Click Certificate Management. 3. Complete the appropriate management option(s). 4. Return to the embedded Web page home screen and go to step 7 of the Configuring the Print Server in Ad-Hoc Mode instructions. To install a new CA Certificate 1. Under - Dell 5210n | User's Guide - Page 144
installed correctly in the printer. l All access panels and printer doors have been replaced or closed. l The toner or print cartridges are installed correctly. l Paper has been loaded into the printer. l The printer left-hand side of the window. 5. In the right-hand column, double-click the MarkNet - Dell 5210n | User's Guide - Page 145
, click Configuration on the left side of the page. 2. Click Certificate Management. 3. Complete the appropriate management option(s). 4. Return to the embedded Web page home screen, and go to step 6 of the Configuring Your Wireless Print Server instructions. To install a new CA Certificate 1. Under - Dell 5210n | User's Guide - Page 146
the installation of the printer on your network. 1. Open the Safari Web browser, and select Show All Bookmarks from the Bookmarks menu. 2. Select Rendezvous or Bonjour from the Collections column on the left-hand side of the window. 3. In the right-hand column, double-click your printer's bookmark - Dell 5210n | User's Guide - Page 147
ask for authorization to use the Dell 5210 / 5310 Wireless Option before you turn it on. Regulatory Information The Dell 5210 / 5310 Wireless Option must be installed and used in strict accordance with the manufacturer's instructions as described in the user documentation that comes with the product - Dell 5210n | User's Guide - Page 148
and used in strict accordance with the manufacturer's instructions as described in the user documentation that comes with the prod-uct. Any other installation or use will violate FCC Part 15 regulations. Modifications not expressly approved by Dell could void your authority to operate the equipment - Dell 5210n | User's Guide - Page 149
5310 Wireless Option star I överensstämmelse med de väsentliga egenskapskrav och övriga relevanta bestämmelser som framgar av direktiv 1999/5/EG. İşburada, Dell Inc bu Dell 5210 / 5310 Kablosuz Seçeneğinin 1999/5/EC sayılı Direktifin temel şartlarına ve diğer ilgili hükümlerine uygun olduğunu beyan - Dell 5210n | User's Guide - Page 150
check to see if the radio type number that is printed on the identification label of your device is listed on the radio approval list posted on the general Dell support site at http://support.dell.com. In countries other than the United States and Japan, verify that the Location set-ting from the
-
 1
1 -
 2
2 -
 3
3 -
 4
4 -
 5
5 -
 6
6 -
 7
7 -
8
-
9
-
10
-
11
-
12
-
13
-
14
-
15
-
16
-
17
-
18
-
19
-
20
-
21
-
22
-
23
-
24
-
25
-
26
-
27
-
28
-
29
-
30
-
31
-
32
-
33
-
34
-
35
-
36
-
37
-
38
-
39
-
40
-
41
-
42
-
43
-
44
-
45
-
46
-
47
-
48
-
49
-
50
-
51
-
52
-
53
-
54
-
55
-
56
-
57
-
58
-
59
-
60
-
61
-
62
-
63
-
64
-
65
-
66
-
67
-
68
-
69
-
70
-
71
-
72
-
73
-
74
-
75
-
76
-
77
-
78
-
79
-
80
-
81
-
82
-
83
-
84
-
85
-
86
-
87
-
88
-
89
-
90
-
91
-
92
-
93
-
94
-
95
-
96
-
97
-
98
-
99
-
100
-
101
-
102
-
103
-
104
-
105
-
106
-
107
-
108
-
109
-
110
-
111
-
112
-
113
-
114
-
115
-
116
-
117
-
118
-
119
-
120
-
121
-
122
-
123
-
124
-
125
-
126
-
127
-
128
-
129
-
130
-
131
-
132
-
133
-
134
-
135
-
136
-
137
-
138
-
139
-
140
-
141
-
142
-
143
-
144
-
145
-
146
-
147
-
148
-
149
-
150
 |
 |

About Your Printer
Identifying Your Printer
Understanding the Operator Panel
Using the Operator Panel Menus
Identifying Your Printer
The printer is available in two base models. The following table indicates some of the differences between the models.
Configured Models
The following illustrations show a standard network and fully configured printer. If you attach print media handling options to the printer, it may look more like
the fully configured model.
Items denoted with an asterisk (*) are options. For more information about installing input options, see
Installing and Removing Options
or the instructions
that came with the option.
To purchase any of the options below, go to
www.dell.com
or contact your Dell Sales Representative.
Standard Network
Fully Configured
5210n
5310n
Input capacity
600 sheets
(500-sheet tray + 100-sheet multipurpose feeder)
600 sheets
(500-sheet tray + 100-sheet multipurpose feeder)
Output capacity
250 sheets
250 sheets
Standard memory
64MB
128MB
Maximum memory capacity
576MB
640MB
NOTE:
The printer model number is shown on the operator panel.
Number:
Part:
1
Standard output bin (250 sheets)
2
Operator panel
3
Multipurpose feeder (100 sheets)
4
Standard tray (500 sheets)