Dell 966 All In One Photo Printer User Guide - Page 11
Manually Dialing a Fax While Listening to a Telephone Line On Hook, Sending a Delayed Fax
 |
View all Dell 966 All In One Photo Printer manuals
Add to My Manuals
Save this manual to your list of manuals |
Page 11 highlights
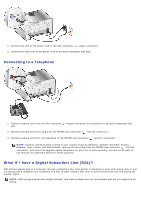
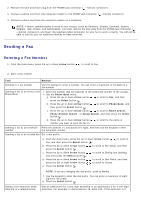
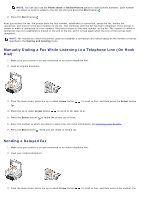
NOTE: You can also use the Phone Book or Redial History option to select phone numbers. Each number you select or enter is added to the fax list until you press the Start button . 8. Press the Start button . After you initiate the fax, the printer dials the first number, establishes a connection, sends the fax, breaks the connection, and moves to the next number on the list. This continues until the list has been completed. If the printer is unable to make a connection to a fax number, the printer moves to the next number on the list. The number to which a connection was not established is moved to the end of the list, and it is tried again when the rest of the list has been completed. NOTE: Fax numbers to which the printer could not establish a connection are retried based on the number of retries specified in the Dialing and Sending menu. Manually Dialing a Fax While Listening to a Telephone Line (On Hook Dial) 1. Make sure your printer is on and connected to an active telephone line. 2. Load an original document. 3. From the main menu, press the up or down Arrow button . to scroll to Fax, and then press the Select button 4. Press the up or down Arrow button to scroll to On Hook Dial. 5. Press the Select button to make the printer go off hook. 6. Enter the number to which you want to send a fax. For more information, see Entering a Fax Number. 7. Press the Start button when you are ready to send a fax. Sending a Delayed Fax 1. Make sure your printer is on and connected to an active telephone line. 2. Load your original document. 3. From the main menu, press the up or down Arrow button to scroll to Fax, and then enter a fax number. For
-
 1
1 -
2
-
3
-
4
-
5
-
 6
6 -
 7
7 -
 8
8 -
 9
9 -
 10
10 -
 11
11 -
 12
12 -
 13
13 -
 14
14 -
 15
15 -
 16
16 -
17
-
18
-
19
-
20
-
21
-
22
-
23
-
24
-
25
-
26
-
27
-
28
-
29
-
30
-
31
-
32
-
33
-
34
-
35
-
36
-
37
-
38
-
39
-
40
-
41
-
42
-
43
-
44
-
45
-
46
-
47
-
48
-
49
-
50
-
51
-
52
-
53
-
54
-
55
-
56
-
57
-
58
-
59
-
60
-
61
-
62
-
63
-
64
-
65
-
66
-
67
-
68
-
69
-
70
-
71
-
72
-
73
-
74
-
75
-
76
-
77
-
78
-
79
-
80
-
81
-
82
-
83
-
84
-
85
-
86
-
87
-
88
-
89
-
90
-
91
-
92
-
93
-
94
-
95
-
96
-
97
-
98
-
99
-
100
-
101
-
102
-
103
-
104
-
105
-
106
-
107
-
108
-
109
-
110
-
111
-
112
-
113
-
114
-
115
-
116
-
117
-
118
-
119
-
120
-
121
-
122
-
123
-
124
-
125
-
126
-
127
-
128
-
129
-
130
-
131
-
132
-
133
-
134
-
135
 |
 |