Dell 966 All In One Photo Printer User Guide - Page 18
Blocking Faxes
 |
View all Dell 966 All In One Photo Printer manuals
Add to My Manuals
Save this manual to your list of manuals |
Page 18 highlights
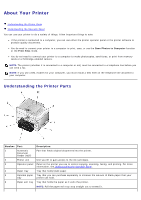
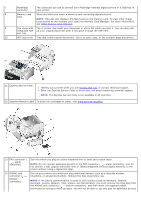
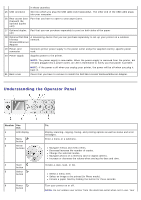
3. Press the up or down Arrow button to scroll to Add Entry, and then press the Select button . 4. Use the keypad to enter a Name and Fax Number. NOTE: The lowest possible speed dial number is automatically assigned to this contact. You cannot change the speed dial number. 5. Press the Back button . Adding an Entry to the Group Dial List 1. From the main menu, press the up or down Arrow button . to scroll to Fax, and then press the Select button 2. Press the up or down Arrow button to scroll to Phone Book, and then press the Select button . 3. Press the up or down Arrow button to scroll to Add Group, and then press the Select button . 4. Use the keypad to assign a name and fax numbers to the group. Press the down Arrow button to enter another number. You can also use the Name Search, Phone Number Search, or Redial History option to select phone numbers. Each number you select or enter is added to the group dial list. NOTE: The lowest possible group dial number is automatically assigned to this contact. You cannot change the speed dial number. 5. Press the Back button . Using a Speed or Group Dial List 1. From the main menu, press the up or down Arrow button . to scroll to Fax, and then press the Select button 2. Use the keypad to enter the two-digit speed dial number. 3. Press the Start button . NOTE: When you are entering numbers, if you only enter two numbers and an entry corresponds to this number, the printer assumes you are entering a speed dial entry. If the number you entered does not correspond to any entry in the Phone Book, the printer assumes you are entering an extension number. Blocking Faxes Create a Blocked Fax List 1. From the main menu, press the up or down Arrow button . to scroll to Fax, and then press the Select button 2. Press the up or down Arrow button to scroll to Fax Setup, and then press the Select button . 3. Press the up or down Arrow button to scroll to Fax Blocking, and then press the Select button . 4. Press the up or down Arrow button to scroll to Blocked Fax Add Entry, and then press the Select button
-
 1
1 -
2
-
3
-
4
-
5
-
6
-
7
-
8
-
9
-
10
-
11
-
12
-
 13
13 -
 14
14 -
 15
15 -
 16
16 -
 17
17 -
 18
18 -
 19
19 -
 20
20 -
 21
21 -
 22
22 -
 23
23 -
24
-
25
-
26
-
27
-
28
-
29
-
30
-
31
-
32
-
33
-
34
-
35
-
36
-
37
-
38
-
39
-
40
-
41
-
42
-
43
-
44
-
45
-
46
-
47
-
48
-
49
-
50
-
51
-
52
-
53
-
54
-
55
-
56
-
57
-
58
-
59
-
60
-
61
-
62
-
63
-
64
-
65
-
66
-
67
-
68
-
69
-
70
-
71
-
72
-
73
-
74
-
75
-
76
-
77
-
78
-
79
-
80
-
81
-
82
-
83
-
84
-
85
-
86
-
87
-
88
-
89
-
90
-
91
-
92
-
93
-
94
-
95
-
96
-
97
-
98
-
99
-
100
-
101
-
102
-
103
-
104
-
105
-
106
-
107
-
108
-
109
-
110
-
111
-
112
-
113
-
114
-
115
-
116
-
117
-
118
-
119
-
120
-
121
-
122
-
123
-
124
-
125
-
126
-
127
-
128
-
129
-
130
-
131
-
132
-
133
-
134
-
135
 |
 |