Dell 966 All In One Photo Printer User Guide - Page 46
Setup Mode
 |
View all Dell 966 All In One Photo Printer manuals
Add to My Manuals
Save this manual to your list of manuals |
Page 46 highlights
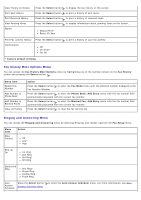
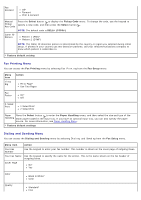
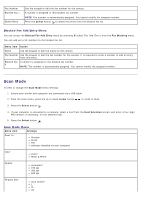
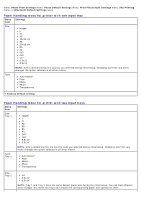
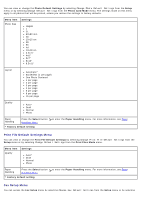
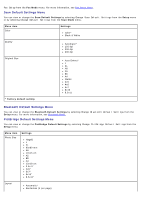
A5 B5 A4 Wallet 3x5" 4x6" 5x7" 8x10" 8.5x11" Change Default Settings Press the Select button to enter the Scan Default Settings menu. For more information, see Scan Default Settings Menu. * Factory default settings Setup Mode To access the Setup menu: 1. From the main menu, press the up or down Arrow button to scroll to Setup. 2. Press the Select button . Setup Mode Menu Menu item Action Paper Handling Press the Select button Paper Handling Menu. to enter the Paper Handling menu. For more information, see Change Printer Default Press the Select button to enter the Printer Default Settings menu. For more Settings information, see Printer Default Settings Menu. Change Copy Default Settings Press the Select button to enter the Copy Default Settings menu. For more information, see Copy Default Settings Menu. Change Photo Default Settings Press the Select button to enter the Photo Default Settings menu. For more information, see Photo Default Settings Menu. Change Print File Default Settings Press the Select button to enter the Print Files Default Settings menu. For more information, see Print File Default Settings Menu. Change Fax Default Settings Press the Select button Setup Menu. to enter the Fax Setup menu. For more information, see Fax Change Scan Default Settings Press the Select button to enter the Scan Default Settings menu. For more information, see Scan Default Settings Menu. Change Bluetooth Default Settings Press the Select button to enter the Bluetooth Default Settings menu. For more information, see Bluetooth Default Settings Menu. Change PictBridge Default Settings Press the Select button to enter the PictBridge Default Settings menu. For more information, see PictBridge Default Settings Menu. Print Settings List Press the Select button to print a list of the options that were set using the operator panel. Network Setup Press the Select button Network Setup Menu. to enter the Network Setup menu. For more information, see Paper Handling Menu You can select the size and type of the blank paper loaded in the input tray from the Paper Handling menu. If you have an optional input tray, you can also specify the paper source. You can view or change the Paper Handling menu by selecting Paper Handling from the Setup menu, Copy Mode
-
 1
1 -
2
-
3
-
4
-
5
-
6
-
7
-
8
-
9
-
10
-
11
-
12
-
13
-
14
-
15
-
16
-
17
-
18
-
19
-
20
-
21
-
22
-
23
-
24
-
25
-
26
-
27
-
28
-
29
-
30
-
31
-
32
-
33
-
34
-
35
-
36
-
37
-
38
-
39
-
40
-
 41
41 -
 42
42 -
 43
43 -
 44
44 -
 45
45 -
 46
46 -
 47
47 -
 48
48 -
 49
49 -
 50
50 -
 51
51 -
52
-
53
-
54
-
55
-
56
-
57
-
58
-
59
-
60
-
61
-
62
-
63
-
64
-
65
-
66
-
67
-
68
-
69
-
70
-
71
-
72
-
73
-
74
-
75
-
76
-
77
-
78
-
79
-
80
-
81
-
82
-
83
-
84
-
85
-
86
-
87
-
88
-
89
-
90
-
91
-
92
-
93
-
94
-
95
-
96
-
97
-
98
-
99
-
100
-
101
-
102
-
103
-
104
-
105
-
106
-
107
-
108
-
109
-
110
-
111
-
112
-
113
-
114
-
115
-
116
-
117
-
118
-
119
-
120
-
121
-
122
-
123
-
124
-
125
-
126
-
127
-
128
-
129
-
130
-
131
-
132
-
133
-
134
-
135
 |
 |
