Dell 966 All In One Photo Printer User Guide - Page 60
Configuring the Adapter Using the Wireless Setup Utility
 |
View all Dell 966 All In One Photo Printer manuals
Add to My Manuals
Save this manual to your list of manuals |
Page 60 highlights
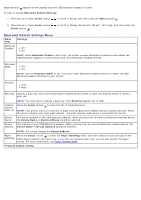
6. If you selected Peer-to-Peer Client: Enter the remote computer's name and the shared printer's name, and then click Next. Follow the instructions on your screen to complete installation. If you selected Peer-to-Peer Host: Select I want to share my printer, enter the Share Name for the printer, and then click Next. Follow the instructions on your screen to complete installation. If you selected Dell Wireless Adapter 3300: Follow the instructions on your screen to complete installation. Configuring the Adapter Using the Wireless Setup Utility Configuration Overview Configuring the card using the Wireless Setup Utility involves connecting the printer in which the card has been installed to a computer by USB cable, and launching the Documents and Utilities CD. The Wireless Setup Utility steps you through the configuration process. The wizard can automatically detect wireless network settings or allow you to manually enter the network configuration settings. Before configuring the adapter, make sure your printer has been set up correctly: The adapter has been installed correctly in the printer. The ink cartridges are installed correctly. Paper has been loaded into the printer. The USB cable is attached to the printer and the computer. The printer is turned on and ready to be installed. Using an Available Wireless Network Configuration 1. From the Wireless Networks Found In Your Area screen, select the appropriate Network Name (SSID) from the list, and then click Next. 2. On the Apply and Verify Wireless Settings screen, check each network attribute to make sure the settings are correct, and then click Next to apply the settings. NOTE: Clicking Next prompts the setup utility to verify wireless communication with the printer. The verification process can take up to 120 seconds. 3. Verify that the adapter can communicate over the network. For more information, see Verifying Network Communication. Entering a Different Wireless Network Configuration 1. From the Wireless Networks Found In Your Area screen, select I want to enter a different configuration, and then click Next. 2. If the Network Name (SSID) you want to use is available, select it from the list, and then click Next. If the Network Name (SSID) is not available a. Select I want to enter a different network name, and then click Next. b. Enter the Network Name (SSID). c. Select the appropriate Channel from the drop-down list. (Auto is the default.)
-
 1
1 -
2
-
3
-
4
-
5
-
6
-
7
-
8
-
9
-
10
-
11
-
12
-
13
-
14
-
15
-
16
-
17
-
18
-
19
-
20
-
21
-
22
-
23
-
24
-
25
-
26
-
27
-
28
-
29
-
30
-
31
-
32
-
33
-
34
-
35
-
36
-
37
-
38
-
39
-
40
-
41
-
42
-
43
-
44
-
45
-
46
-
47
-
48
-
49
-
50
-
51
-
52
-
53
-
54
-
 55
55 -
 56
56 -
 57
57 -
 58
58 -
 59
59 -
 60
60 -
 61
61 -
 62
62 -
 63
63 -
 64
64 -
 65
65 -
66
-
67
-
68
-
69
-
70
-
71
-
72
-
73
-
74
-
75
-
76
-
77
-
78
-
79
-
80
-
81
-
82
-
83
-
84
-
85
-
86
-
87
-
88
-
89
-
90
-
91
-
92
-
93
-
94
-
95
-
96
-
97
-
98
-
99
-
100
-
101
-
102
-
103
-
104
-
105
-
106
-
107
-
108
-
109
-
110
-
111
-
112
-
113
-
114
-
115
-
116
-
117
-
118
-
119
-
120
-
121
-
122
-
123
-
124
-
125
-
126
-
127
-
128
-
129
-
130
-
131
-
132
-
133
-
134
-
135
 |
 |