Dell 966 All In One Photo Printer User Guide - Page 69
Understanding the Automatic Paper Type Sensor
 |
View all Dell 966 All In One Photo Printer manuals
Add to My Manuals
Save this manual to your list of manuals |
Page 69 highlights
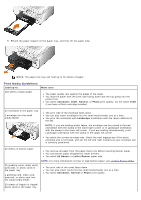
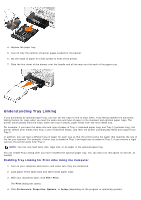
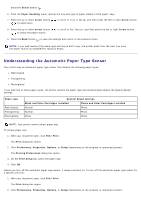
press the Select button . 6. From the Paper Handling menu, specify the size and type of paper loaded in both paper trays. 7. Press the up or down Arrow button to select Auto. to scroll to Tray Linking, and then press the left or right Arrow button 8. Press the up or down Arrow button to select the paper source. to scroll to Fax Source, and then press the left or right Arrow button 9. Press the Back button to save the settings and return to the previous menu. NOTE: If you load media of the same type and size in both trays, the printer picks from the next tray once the paper source you specified for faxing is empty. Understanding the Automatic Paper Type Sensor Your printer has an automatic paper type sensor that detects the following paper types: Plain/coated Transparency Photo/glossy If you load one of these paper types, the printer detects the paper type and automatically adjusts the Quality/Speed settings. Paper type Plain/coated Transparency Photo/glossy Quality/Speed settings Black and Color Cartridges Installed Photo and Color Cartridges Installed Normal Photo Normal Photo Photo Photo NOTE: Your printer cannot detect paper size. To choose paper size: 1. With your document open, click File® Print. The Print dialog box opens. 2. Click Preferences, Properties, Options, or Setup (depending on the program or operating system). The Printing Preferences dialog box opens. 3. On the Print Setup tab, select the paper size. 4. Click OK. Unless you turn off the automatic paper type sensor, it always remains on. To turn off the automatic paper type sensor for a specific print job: 1. With your document open, click File® Print. The Print dialog box opens. 2. Click Preferences, Properties, Options, or Setup (depending on the program or operating system).
-
 1
1 -
2
-
3
-
4
-
5
-
6
-
7
-
8
-
9
-
10
-
11
-
12
-
13
-
14
-
15
-
16
-
17
-
18
-
19
-
20
-
21
-
22
-
23
-
24
-
25
-
26
-
27
-
28
-
29
-
30
-
31
-
32
-
33
-
34
-
35
-
36
-
37
-
38
-
39
-
40
-
41
-
42
-
43
-
44
-
45
-
46
-
47
-
48
-
49
-
50
-
51
-
52
-
53
-
54
-
55
-
56
-
57
-
58
-
59
-
60
-
61
-
62
-
63
-
 64
64 -
 65
65 -
 66
66 -
 67
67 -
 68
68 -
 69
69 -
 70
70 -
 71
71 -
 72
72 -
 73
73 -
 74
74 -
75
-
76
-
77
-
78
-
79
-
80
-
81
-
82
-
83
-
84
-
85
-
86
-
87
-
88
-
89
-
90
-
91
-
92
-
93
-
94
-
95
-
96
-
97
-
98
-
99
-
100
-
101
-
102
-
103
-
104
-
105
-
106
-
107
-
108
-
109
-
110
-
111
-
112
-
113
-
114
-
115
-
116
-
117
-
118
-
119
-
120
-
121
-
122
-
123
-
124
-
125
-
126
-
127
-
128
-
129
-
130
-
131
-
132
-
133
-
134
-
135
 |
 |