Dell Alienware M11x R2 Service Manual
Dell Alienware M11x R2 Manual
 |
View all Dell Alienware M11x R2 manuals
Add to My Manuals
Save this manual to your list of manuals |
Dell Alienware M11x R2 manual content summary:
- Dell Alienware M11x R2 | Service Manual - Page 1
Alienware® M11x R2 Service Manual Before You Begin Base Cover Battery Pack Hard Drive Memory Module(s) Wireless Mini-Card(s) Hinge Cover Keyboard Palm Rest Assembly Status Light Board Power Button Board Internal Card With Bluetooth® Wireless Technology Coin-Cell Battery Display Assembly I/O Board - Dell Alienware M11x R2 | Service Manual - Page 2
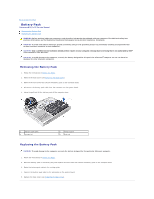
Pack Alienware® M11x R2 Service Manual Removing the Battery Pack Replacing the Battery Pack WARNING: Before working inside your computer, read the safety information that shipped with your computer. For additional safety best practices information, see the Regulatory Compliance Homepage at www.dell - Dell Alienware M11x R2 | Service Manual - Page 3
Back to Contents Page - Dell Alienware M11x R2 | Service Manual - Page 4
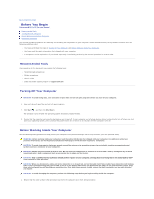
Back to Contents Page Before You Begin Alienware® M11x R2 Service Manual Recommended Tools Turning Off Your Computer Before Working Inside Your Computer Contacting Alienware This manual provides procedures for removing and installing the components in your computer. Unless otherwise noted, each - Dell Alienware M11x R2 | Service Manual - Page 5
eject any installed cards from the 3-in-1 Media Card Reader. ALIENWARE. NOTE: If you do not have an active Internet connection, you can find contact information on your purchase invoice, packing slip, bill, or Dell product catalog. Dell provides several online and telephone-based support and service - Dell Alienware M11x R2 | Service Manual - Page 6
Back to Contents Page System Setup Alienware® M11x R2 Service Manual Configuring the System Setup Configuring the System Setup The System Setup options allow you to: l Change the system configuration information after you add, change or remove any hardware in your laptop. l Set or change a user- - Dell Alienware M11x R2 | Service Manual - Page 7
: CPU bus clock is between 134 MHz and 166 MHz. SATA Operation Allows you to configure the operating mode of the integrated SATA hard drive controller. l ATA: SATA is configured for ATA mode. l AHCI: SATA is configured for AHCI mode. SATA HARD DRIVE Adapter Warnings Displays the installed SATA - Dell Alienware M11x R2 | Service Manual - Page 8
to the computer at boot. Boot Menu Use the or keys to change the boot device priority. You can choose from: l Hard Drive l USB Storage l CD/DVD/BD l Removal Devices l Network Exit Menu Exit Saving Changes Save Change Without Exit Exit Discarding Changes Load Optimal Defaults Discard - Dell Alienware M11x R2 | Service Manual - Page 9
Cover Alienware® M11x R2 Service Manual Removing the Base Cover Replacing the Base Cover WARNING: Before working inside your computer, read the safety information that shipped with your computer. For additional safety best practices information, see the Regulatory Compliance Homepage at www.dell.com - Dell Alienware M11x R2 | Service Manual - Page 10
Alienware® M11x R2 Service Manual Removing the Bluetooth Card Replacing the Bluetooth Card WARNING: Before working inside your computer, read the safety information that shipped with your computer. For additional safety best practices information, see the Regulatory Compliance Homepage at www.dell - Dell Alienware M11x R2 | Service Manual - Page 11
the Keyboard). 6. Replace the hinge cover (see Replacing the Hinge Cover). 7. Replace the memory module(s) (see Replacing the Memory Module(s)). 8. Follow the instructions from step 6 to step 8 in Replacing the Hard Drive. 9. Replace the battery pack (see Replacing the Battery Pack). 10. Replace the - Dell Alienware M11x R2 | Service Manual - Page 12
Back to Contents Page Coin-Cell Battery Alienware® M11x R2 Service Manual Removing the Coin-Cell Battery Replacing the Coin-Cell Battery WARNING: Before working inside your computer, read the safety information that shipped with your computer. For additional safety best practices information, see - Dell Alienware M11x R2 | Service Manual - Page 13
the Keyboard). 6. Replace the hinge cover (see Replacing the Hinge Cover). 7. Replace the memory module(s) (see Replacing the Memory Module(s)). 8. Follow the instructions from step 6 to step 8 in Replacing the Hard Drive. 9. Replace the battery pack (see Replacing the Battery Pack). 10. Replace the - Dell Alienware M11x R2 | Service Manual - Page 14
Back to Contents Page Display Assembly Alienware® M11x R2 Service Manual Removing the Display Assembly Replacing the Display Assembly WARNING: Before working inside your computer, read the safety information that shipped with your computer. For additional safety best practices information, see - Dell Alienware M11x R2 | Service Manual - Page 15
Replacing the Palm Rest Assembly). 8. Replace the keyboard (see Replacing the Keyboard). 9. Replace the hinge cover (see Replacing the Hinge Cover). 10. Replace the memory module(s) (see Replacing the Memory Module(s)). 11. Follow the instructions from step 6 to step 8 in Replacing the Hard Drive - Dell Alienware M11x R2 | Service Manual - Page 16
12. Replace the battery pack (see Replacing the Battery Pack). 13. Replace the base cover (see Replacing the Base Cover). CAUTION: Before turning on the computer, replace all screws and ensure that no stray screws remain inside the computer. Failure to do so may result in damage to the computer. - Dell Alienware M11x R2 | Service Manual - Page 17
Back to Contents Page Flashing the BIOS Alienware® M11x R2 Service Manual 1. Turn on the computer. 2. Go to support.dell.com/support/downloads. 3. Locate the BIOS update file for your computer: NOTE: The Service Tag for your computer is located on a label at the bottom of the computer. If you have - Dell Alienware M11x R2 | Service Manual - Page 18
Back to Contents Page Hard Drive Alienware® M11x R2 Service Manual Removing the Hard Drive Replacing the Hard Drive WARNING: If you remove the hard drive from the computer when the drive is hot, do not touch the metal housing of the hard drive. WARNING: Before working inside your computer, read the - Dell Alienware M11x R2 | Service Manual - Page 19
Press the hard-drive assembly along the pull-tab to connect the hard drive assembly to the connector on the system board. 8. Tighten the three captive screws that secure the hard-drive assembly to the computer base. 9. Replace the battery pack (see Replacing the Battery Pack). 10. Replace the base - Dell Alienware M11x R2 | Service Manual - Page 20
CAUTION: Before turning on the computer, replace all screws and ensure that no stray screws remain inside the computer. Failure to do so may result in damage to the computer. 11. Install the operating system for your computer, as needed. 12. Install the drivers and utilities for your computer, as - Dell Alienware M11x R2 | Service Manual - Page 21
Cover Alienware® M11x R2 Service Manual Removing the Hinge Cover Replacing the Hinge Cover WARNING: Before working inside your computer, read the safety information that shipped with your computer. For additional safety best practices information, see the Regulatory Compliance Homepage at www.dell - Dell Alienware M11x R2 | Service Manual - Page 22
5. Replace the base cover (see Replacing the Base Cover). CAUTION: Before turning on the computer, replace all screws and ensure that no stray screws remain inside the computer. Failure to do so may result in damage to the computer. Back to Contents Page - Dell Alienware M11x R2 | Service Manual - Page 23
Board Alienware® M11x R2 Service Manual Removing the I/O Board Replacing the I/O Board WARNING: Before working inside your computer, read the safety information that shipped with your computer. For additional safety best practices information, see the Regulatory Compliance Homepage at www.dell.com - Dell Alienware M11x R2 | Service Manual - Page 24
the keyboard (see Replacing the Keyboard). 8. Replace the hinge cover (see Replacing the Hinge Cover). 9. Replace the memory module(s) (see Replacing the Memory Module(s)). 10. Follow the instructions from step 6 to step 8 in Replacing the Hard Drive. 11. Replace the battery pack (see Replacing the - Dell Alienware M11x R2 | Service Manual - Page 25
Page Keyboard Alienware® M11x R2 Service Manual Removing the Keyboard Replacing the Keyboard WARNING: Before working inside your computer, read the safety information that shipped with your computer. For additional safety best practices information, see the Regulatory Compliance Homepage at www.dell - Dell Alienware M11x R2 | Service Manual - Page 26
from their connectors on the system board. 1 backlit keyboard cable 2 keyboard cable 13. Lift the keyboard off the palm rest assembly. Replacing the Keyboard 1. Follow the instructions in Before You Begin. 2. Slide the keyboard cable and backlit keyboard cable into their connectors on the system - Dell Alienware M11x R2 | Service Manual - Page 27
10. Follow the instructions from step 6 to step 8 in Replacing the Hard Drive. 11. Replace the battery pack (see Replacing the Battery Pack). 12. Replace the base cover (see Replacing the Base Cover). CAUTION: Before turning on the computer, replace all screws and ensure that no stray screws remain - Dell Alienware M11x R2 | Service Manual - Page 28
Back to Contents Page Status Light Board Alienware® M11x R2 Service Manual Removing the Status Light Board Replacing the Status Light Board WARNING: Before working inside your computer, read the safety information that shipped with your computer. For additional safety best practices information, - Dell Alienware M11x R2 | Service Manual - Page 29
the keyboard (see Replacing the Keyboard). 8. Replace the hinge cover (see Replacing the Hinge Cover). 9. Replace the memory module(s) (see Replacing the Memory Module(s)). 10. Follow the instructions from step 6 to step 8 in Replacing the Hard Drive. 11. Replace the battery pack (see Replacing the - Dell Alienware M11x R2 | Service Manual - Page 30
Back to Contents Page Memory Module(s) Alienware® M11x R2 Service Manual Removing the Memory Module(s) Replacing the Memory Module(s) WARNING: Before working inside your computer, read the safety information that shipped with your computer. For additional safety best practices information, see the - Dell Alienware M11x R2 | Service Manual - Page 31
module is not installed properly, the computer may not boot. 1 memory-module connector 3 notch 2 tab 4. Replace the battery pack (see Replacing the Battery Pack). 5. Replace the base cover (see Replacing updates the system configuration information. To confirm the amount of memory installed in - Dell Alienware M11x R2 | Service Manual - Page 32
(s) Alienware® M11x R2 Service Manual Removing the Mini-Card(s) Replacing the Mini-Card(s) WARNING: Before working inside your computer, read the safety information that shipped with your computer. For additional safety best practices information, see the Regulatory Compliance Homepage at www.dell - Dell Alienware M11x R2 | Service Manual - Page 33
, replace all screws and ensure that no stray screws remain inside the computer. Failure to do so may result in damage to the computer. 8. Install the drivers and utilities for your computer, as required. NOTE: If you are installing a Mini-card from a source other than Dell or Alienware, you - Dell Alienware M11x R2 | Service Manual - Page 34
Page Palm Rest Assembly Alienware® M11x R2 Service Manual Removing the Palm Rest Assembly Replacing the Palm Rest battery pack (see Removing the Battery Pack). 4. Follow the instructions from step 4 to step 6 in Removing the Hard Drive. 5. Remove the memory module(s) (see Removing the Memory Module - Dell Alienware M11x R2 | Service Manual - Page 35
to avoid damage to the palm rest assembly. 14. Lift the palm rest assembly off the computer base. Replacing the Palm Rest Assembly 1. Follow the instructions in Before You Begin. 2. Connect the Alienware logo light cable to the connector on the status light board. 3. Align the palm rest assembly on - Dell Alienware M11x R2 | Service Manual - Page 36
the computer base. 10. Follow the instructions from step 6 to step 8 in Replacing the Hard Drive. 11. Replace the memory module(s) (see Replacing the Memory Module(s)). 12. Replace the battery pack (see Replacing the Battery Pack). 13. Replace the base cover (see Replacing the Base Cover). CAUTION - Dell Alienware M11x R2 | Service Manual - Page 37
Back to Contents Page Power Button Board Alienware® M11x R2 Service Manual Removing the Power Button Board Replacing the Power Button Board WARNING: Before working inside your computer, read the safety information that shipped with your computer. For additional safety best practices information, - Dell Alienware M11x R2 | Service Manual - Page 38
the Keyboard). 6. Replace the hinge cover (see Replacing the Hinge Cover). 7. Replace the memory module(s) (see Replacing the Memory Module(s)). 8. Follow the instructions from step 6 to step 8 in Replacing the Hard Drive. 9. Replace the battery pack (see Replacing the Battery Pack). 10. Replace the - Dell Alienware M11x R2 | Service Manual - Page 39
Speakers Alienware® M11x R2 Service Manual Removing the Speakers Replacing the Speakers WARNING: Before working inside your computer, read the safety information that shipped with your computer. For additional safety best practices information, see the Regulatory Compliance Homepage at www.dell.com - Dell Alienware M11x R2 | Service Manual - Page 40
Back to Contents Page System Board Alienware® M11x R2 Service Manual Removing the System Board Replacing the System Board Entering the Service Tag in the BIOS WARNING: Before working inside your computer, read the safety information that shipped with your computer. For additional safety best - Dell Alienware M11x R2 | Service Manual - Page 41
). 10. Replace the hinge cover (see Replacing the Hinge Cover). 11. Replace the memory module(s) (see Replacing the Memory Module(s)). 12. Replace the Mini-Card(s) (see Replacing the Mini-Card(s)). 13. Follow the instructions from step 6 to step 8 in Replacing the Hard Drive. 14. Replace the battery - Dell Alienware M11x R2 | Service Manual - Page 42
Entering the Service Tag in the BIOS 1. Ensure that the AC adapter is plugged in and that the main battery is installed properly. 2. Turn on the computer. 3. Press during POST to enter the system setup program. 4. Navigate to the security tab and enter the service tag in the Set Service Tag - Dell Alienware M11x R2 | Service Manual - Page 43
Back to Contents Page Alienware® M11x R2 Service Manual NOTE: A NOTE indicates important information that helps you make better use of your computer. CAUTION: A CAUTION indicates potential damage to hardware or loss of data if instructions are not followed. WARNING: A WARNING indicates a potential
-
 1
1 -
 2
2 -
 3
3 -
 4
4 -
 5
5 -
 6
6 -
 7
7 -
8
-
9
-
10
-
11
-
12
-
13
-
14
-
15
-
16
-
17
-
18
-
19
-
20
-
21
-
22
-
23
-
24
-
25
-
26
-
27
-
28
-
29
-
30
-
31
-
32
-
33
-
34
-
35
-
36
-
37
-
38
-
39
-
40
-
41
-
42
-
43
 |
 |

Alienware
®
M11x R2 Service Manual
Notes, Cautions, and Warnings
Information in this document is subject to change without notice.
© 2010 Dell Inc. All rights reserved.
Reproduction of these materials in any manner whatsoever without the written permission of Dell Inc. is strictly forbidden.
Trademarks used in this text:
Dell
and the
DELL
logo are trademarks of Dell Inc.;
Alienware
is a trademark or registered trademark of Alienware Corporation;
Bluetooth
is a
registered trademark owned by Bluetooth SIG, Inc. and is used by Dell under license;
Microsoft, Windows,
and the
Windows
start button logo are either trademarks or registered
trademarks of Microsoft Corporation in the United States and/or other countries.
Other trademarks and trade names may be used in this document to refer to either the entities claiming the marks and names or their products. Dell Inc. disclaims any
proprietary interest in trademarks and trade names other than its own.
Regulatory model: P06T series Regulatory type: P06T001/P06T002
June 2010 Rev. A00
Before You Begin
Base Cover
Battery Pack
Hard Drive
Memory Module(s)
Wireless Mini
-
Card(s)
Hinge Cover
Keyboard
Palm Rest Assembly
Status Light Board
Power Button Board
Internal Card With Bluetooth
®
Wireless Technology
Coin
-
Cell Battery
Display Assembly
I/O Board
System Board
Speakers
System Setup
Flashing the BIOS
NOTE:
A NOTE indicates important information that helps you make better use of your computer.
CAUTION:
A CAUTION indicates potential damage to hardware or loss of data if instructions are not followed.
WARNING:
A WARNING indicates a potential for property damage, personal injury, or death.