Dell Alienware M17x R4 Owner's Manual - Page 21
Replacing the Hard Drive(s), Procedure, Postrequsites - drivers
 |
View all Dell Alienware M17x R4 manuals
Add to My Manuals
Save this manual to your list of manuals |
Page 21 highlights
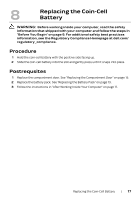
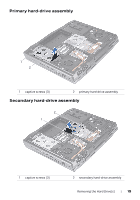
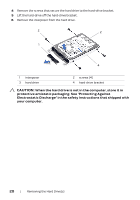
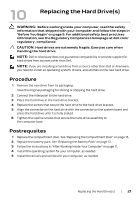
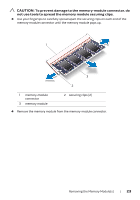
10 Replacing the Hard Drive(s) WARNING: Before working inside your computer, read the safety information that shipped with your computer and follow the steps in "Before You Begin" on page 9. For additional safety best practices information, see the Regulatory Compliance Homepage at dell.com/ regulatory_compliance. CAUTION: Hard drives are extremely fragile. Exercise care when handling the hard drive. NOTE: Dell or Alienware does not guarantee compatibility or provide support for hard drives from sources other than Dell. NOTE: If you are installing a hard drive from a source other than Dell or Alienware, you need to install an operating system, drivers, and utilities on the new hard drive. Procedure 1 Remove the new drive from its packaging. Save the original packaging for storing or shipping the hard drive. 2 Connect the interposer to the hard drive. 3 Place the hard drive in the hard-drive bracket. 4 Replace the screws that secure the hard drive to the hard-drive bracket. 5 Align the connector on the hard drive with the connector on the system board and press the hard drive until it is fully seated. 6 Tighten the captive screws that secure the hard-drive assembly to the computer base. Postrequsites 1 Replace the compartment door. See "Replacing the Compartment Door" on page 15. 2 Replace the battery pack. See "Replacing the Battery Pack" on page 13. 3 Follow the instructions in "After Working Inside Your Computer" on page 11. 4 Install the operating system for your computer, as needed. 5 Install the drivers and utilities for your computer, as needed. Replacing the Hard Drive(s) | 21
-
 1
1 -
2
-
3
-
4
-
5
-
6
-
7
-
8
-
9
-
10
-
11
-
12
-
13
-
14
-
15
-
 16
16 -
 17
17 -
 18
18 -
 19
19 -
 20
20 -
 21
21 -
 22
22 -
 23
23 -
 24
24 -
 25
25 -
 26
26 -
27
-
28
-
29
-
30
-
31
-
32
-
33
-
34
-
35
-
36
-
37
-
38
-
39
-
40
-
41
-
42
-
43
-
44
-
45
-
46
-
47
-
48
-
49
-
50
-
51
-
52
-
53
-
54
-
55
-
56
-
57
-
58
-
59
-
60
-
61
-
62
-
63
-
64
-
65
-
66
-
67
-
68
-
69
-
70
-
71
-
72
-
73
-
74
-
75
-
76
-
77
-
78
-
79
-
80
-
81
-
82
-
83
-
84
-
85
-
86
-
87
-
88
 |
 |