Dell B1160W User Manual - Page 110
Using advanced print features
 |
View all Dell B1160W manuals
Add to My Manuals
Save this manual to your list of manuals |
Page 110 highlights
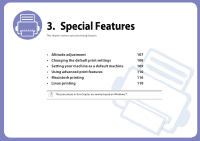
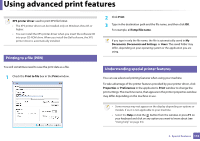
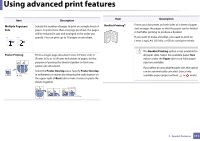
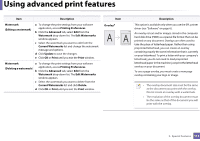
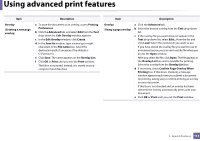
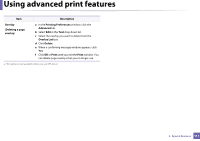
Using advanced print features XPS printer driver: used to print XPS file format. • The XPS printer driver can be installed only on Windows Vista OS or higher. • You can install the XPS printer driver when you insert the software CD into your CD-ROM drive. When you install the Dell software, the XPS printer driver is automatically installed. 1 Printing to a file (PRN) You will sometimes need to save the print data as a file. 1 Check the Print to file box in the Print window. 2 Click Print. 3 Type in the destination path and the file name, and then click OK. For example, c:\Temp\file name. If you type in only the file name, the file is automatically saved in My Documents, Documents and Settings, or Users. The saved folder may differ, depending on your operating system or the application you are using. 2 Understanding special printer features You can use advanced printing features when using your machine. To take advantage of the printer features provided by your printer driver, click Properties or Preferences in the application's Print window to change the print settings. The machine name, that appears in the printer properties window may differ depending on the machine in use. • Some menus may not appear on the display depending on options or models. If so, it is not applicable to your machine. • Select the Help or click the button from the window or press F1 on your keyboard and click on any option you want to know about (see "Using help" on page 33). 3. Special Features 110
-
 1
1 -
2
-
3
-
4
-
5
-
6
-
7
-
8
-
9
-
10
-
11
-
12
-
13
-
14
-
15
-
16
-
17
-
18
-
19
-
20
-
21
-
22
-
23
-
24
-
25
-
26
-
27
-
28
-
29
-
30
-
31
-
32
-
33
-
34
-
35
-
36
-
37
-
38
-
39
-
40
-
41
-
42
-
43
-
44
-
45
-
46
-
47
-
48
-
49
-
50
-
51
-
52
-
53
-
54
-
55
-
56
-
57
-
58
-
59
-
60
-
61
-
62
-
63
-
64
-
65
-
66
-
67
-
68
-
69
-
70
-
71
-
72
-
73
-
74
-
75
-
76
-
77
-
78
-
79
-
80
-
81
-
82
-
83
-
84
-
85
-
86
-
87
-
88
-
89
-
90
-
91
-
92
-
93
-
94
-
95
-
96
-
97
-
98
-
99
-
100
-
101
-
102
-
103
-
104
-
 105
105 -
 106
106 -
 107
107 -
 108
108 -
 109
109 -
 110
110 -
 111
111 -
 112
112 -
 113
113 -
 114
114 -
 115
115 -
116
-
117
-
118
-
119
-
120
-
121
-
122
-
123
-
124
-
125
-
126
-
127
-
128
-
129
-
130
-
131
-
132
-
133
-
134
-
135
-
136
-
137
-
138
-
139
-
140
-
141
-
142
-
143
-
144
-
145
-
146
-
147
-
148
-
149
-
150
-
151
-
152
-
153
-
154
-
155
-
156
-
157
-
158
-
159
-
160
-
161
-
162
-
163
-
164
-
165
 |
 |