Dell C1765NFW Dell Users Guide - Page 101
Setting Up From Operator Panel, Starting the Dell Printer Configuration Web Tool - toner cartridges
 |
View all Dell C1765NFW manuals
Add to My Manuals
Save this manual to your list of manuals |
Page 101 highlights
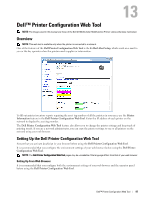
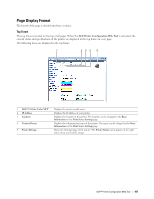
• Danish [da] • Chinese/China [zh-cn] Setting the IP Address of the printer to Non-Proxy 1 Select Options from the Tools menu. 2 Click Advanced tab. 3 Click Network on the Options dialog box. 4 Click Connection → Settings. 5 You can configure the LAN settings in one of the following ways: • Select the No Proxy check box, if you do not want to use a proxy. • Select the Auto-detect proxy settings for this network check box. • Select the Manual proxy configuration: check box, and then enter a hostname and a port number if you have a list of one or more proxy servers. If you have an IP address that does not use a proxy, enter the IP address of your printer in the No Proxy for: edit box. • Select the Automatic proxy configuration URL: check box. After setting the language and proxy, enter (the IP address of your printer) in the URL entry field of the browser to activate the Dell Printer Configuration Web Tool. Setting Up From Operator Panel You can launch the Dell Printer Configuration Web Tool only when EWS is set to Enable (the factory default) on the operator panel. Check the operator panel setting if you cannot launch the Dell Printer Configuration Web Tool. For more information, see "Understanding the Printer Menus" on page 163. Starting the Dell Printer Configuration Web Tool To launch the Dell Printer Configuration Web Tool, enter the IP address of your printer in your web browser. If you do not know the IP address of your printer, print the printer settings report or display the TCP/IP Settings page, which lists the IP address. For details about how to find your printer's IP address, see "Verifying the IP Settings" on page 55. Overview of the Menu Items Use the Dell Printer Configuration Web Tool for: Printer Status Use the Printer Status menu to get feedback on the printer status. When a toner cartridge is running low, click the order supplies link on the first screen to order an additional toner cartridge. Printer Jobs Use the Printer Jobs menu to contain information on the Job List page and Completed Jobs page. These pages show the details of the status regarding each protocol or job. Printer Settings Use the Printer Settings menu to change printer settings and view the settings in the operator panel remotely. Dell™ Printer Configuration Web Tool 99
-
 1
1 -
2
-
3
-
4
-
5
-
6
-
7
-
8
-
9
-
10
-
11
-
12
-
13
-
14
-
15
-
16
-
17
-
18
-
19
-
20
-
21
-
22
-
23
-
24
-
25
-
26
-
27
-
28
-
29
-
30
-
31
-
32
-
33
-
34
-
35
-
36
-
37
-
38
-
39
-
40
-
41
-
42
-
43
-
44
-
45
-
46
-
47
-
48
-
49
-
50
-
51
-
52
-
53
-
54
-
55
-
56
-
57
-
58
-
59
-
60
-
61
-
62
-
63
-
64
-
65
-
66
-
67
-
68
-
69
-
70
-
71
-
72
-
73
-
74
-
75
-
76
-
77
-
78
-
79
-
80
-
81
-
82
-
83
-
84
-
85
-
86
-
87
-
88
-
89
-
90
-
91
-
92
-
93
-
94
-
95
-
 96
96 -
 97
97 -
 98
98 -
 99
99 -
 100
100 -
 101
101 -
 102
102 -
 103
103 -
 104
104 -
 105
105 -
 106
106 -
107
-
108
-
109
-
110
-
111
-
112
-
113
-
114
-
115
-
116
-
117
-
118
-
119
-
120
-
121
-
122
-
123
-
124
-
125
-
126
-
127
-
128
-
129
-
130
-
131
-
132
-
133
-
134
-
135
-
136
-
137
-
138
-
139
-
140
-
141
-
142
-
143
-
144
-
145
-
146
-
147
-
148
-
149
-
150
-
151
-
152
-
153
-
154
-
155
-
156
-
157
-
158
-
159
-
160
-
161
-
162
-
163
-
164
-
165
-
166
-
167
-
168
-
169
-
170
-
171
-
172
-
173
-
174
-
175
-
176
-
177
-
178
-
179
-
180
-
181
-
182
-
183
-
184
-
185
-
186
-
187
-
188
-
189
-
190
-
191
-
192
-
193
-
194
-
195
-
196
-
197
-
198
-
199
-
200
-
201
-
202
-
203
-
204
-
205
-
206
-
207
-
208
-
209
-
210
-
211
-
212
-
213
-
214
-
215
-
216
-
217
-
218
-
219
-
220
-
221
-
222
-
223
-
224
-
225
-
226
-
227
-
228
-
229
-
230
-
231
-
232
-
233
-
234
-
235
-
236
-
237
-
238
-
239
-
240
-
241
-
242
-
243
-
244
-
245
-
246
-
247
-
248
-
249
-
250
-
251
-
252
-
253
-
254
-
255
-
256
-
257
-
258
-
259
-
260
-
261
-
262
-
263
-
264
-
265
-
266
-
267
-
268
-
269
-
270
-
271
-
272
-
273
-
274
-
275
-
276
-
277
-
278
-
279
-
280
-
281
-
282
-
283
-
284
-
285
-
286
-
287
-
288
-
289
-
290
-
291
-
292
-
293
-
294
-
295
-
296
-
297
-
298
-
299
-
300
-
301
-
302
-
303
-
304
-
305
-
306
-
307
-
308
-
309
-
310
-
311
-
312
-
313
-
314
-
315
-
316
-
317
-
318
-
319
-
320
-
321
-
322
-
323
-
324
-
325
-
326
-
327
-
328
-
329
-
330
-
331
-
332
-
333
-
334
-
335
-
336
-
337
-
338
-
339
-
340
-
341
-
342
-
343
-
344
-
345
-
346
-
347
-
348
-
349
-
350
-
351
-
352
-
353
-
354
-
355
-
356
-
357
-
358
-
359
-
360
-
361
-
362
-
363
-
364
-
365
-
366
-
367
-
368
-
369
-
370
-
371
-
372
-
373
-
374
-
375
-
376
 |
 |