Dell C1765NFW Dell Users Guide - Page 231
Printing, Tips for Successful Printing, Tips on Storing Print Media, Avoiding Paper Jams
 |
View all Dell C1765NFW manuals
Add to My Manuals
Save this manual to your list of manuals |
Page 231 highlights
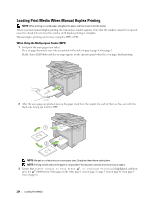
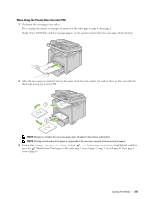
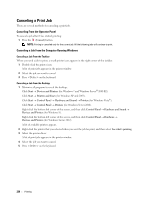
18 Printing This chapter covers tips for printing, how to print certain lists of information from your printer, and how to cancel a job. Tips for Successful Printing Tips on Storing Print Media Store your print media properly. For more information, see "Storing Print Media" on page 207. Avoiding Paper Jams NOTE: It is recommended that you try a limited sample of any print media you are considering using with the printer before purchasing large quantities. By selecting appropriate print media and loading it properly, you can avoid paper jams. See the following instructions on loading print media: • "Loading Print Media in the Multipurpose Feeder (MPF)" on page 211 • "Loading Print Media in the Priority Sheet Inserter (PSI)" on page 219 • "Avoiding Jams" on page 323 If you experience a jam, see "Jam" on page 350 for instructions. Sending a Job to Print Install the printer driver to use all the features of the printer. When you choose Print from an application, a window representing the printer driver opens. Select the appropriate settings for the specific job you are sending to print. Print settings selected from the driver have precedence over the default menu settings selected from the operator panel or Tool Box. You may need to click Preferences from the initial Print box to see all the available system settings you can change. If you are not familiar with a feature in the printer driver window, open the online Help for more information. To print a job from a typical Microsoft® Windows® application: 1 Open the file you want to print. 2 From the File menu, select Print. 3 Verify that the correct printer is selected in the dialog box. Modify the system settings as needed (such as the pages you want to print or the number of copies). 4 To adjust system settings not available from the first screen, such as Quality, Paper Size, or Image Orientation, click Preferences. The Printing Preferences dialog box appears. 5 Specify the print settings. For more information, click Help. 6 Click OK to close the Printing Preferences dialog box. 7 Click Print to send the job to the selected printer. Printing 229
-
 1
1 -
2
-
3
-
4
-
5
-
6
-
7
-
8
-
9
-
10
-
11
-
12
-
13
-
14
-
15
-
16
-
17
-
18
-
19
-
20
-
21
-
22
-
23
-
24
-
25
-
26
-
27
-
28
-
29
-
30
-
31
-
32
-
33
-
34
-
35
-
36
-
37
-
38
-
39
-
40
-
41
-
42
-
43
-
44
-
45
-
46
-
47
-
48
-
49
-
50
-
51
-
52
-
53
-
54
-
55
-
56
-
57
-
58
-
59
-
60
-
61
-
62
-
63
-
64
-
65
-
66
-
67
-
68
-
69
-
70
-
71
-
72
-
73
-
74
-
75
-
76
-
77
-
78
-
79
-
80
-
81
-
82
-
83
-
84
-
85
-
86
-
87
-
88
-
89
-
90
-
91
-
92
-
93
-
94
-
95
-
96
-
97
-
98
-
99
-
100
-
101
-
102
-
103
-
104
-
105
-
106
-
107
-
108
-
109
-
110
-
111
-
112
-
113
-
114
-
115
-
116
-
117
-
118
-
119
-
120
-
121
-
122
-
123
-
124
-
125
-
126
-
127
-
128
-
129
-
130
-
131
-
132
-
133
-
134
-
135
-
136
-
137
-
138
-
139
-
140
-
141
-
142
-
143
-
144
-
145
-
146
-
147
-
148
-
149
-
150
-
151
-
152
-
153
-
154
-
155
-
156
-
157
-
158
-
159
-
160
-
161
-
162
-
163
-
164
-
165
-
166
-
167
-
168
-
169
-
170
-
171
-
172
-
173
-
174
-
175
-
176
-
177
-
178
-
179
-
180
-
181
-
182
-
183
-
184
-
185
-
186
-
187
-
188
-
189
-
190
-
191
-
192
-
193
-
194
-
195
-
196
-
197
-
198
-
199
-
200
-
201
-
202
-
203
-
204
-
205
-
206
-
207
-
208
-
209
-
210
-
211
-
212
-
213
-
214
-
215
-
216
-
217
-
218
-
219
-
220
-
221
-
222
-
223
-
224
-
225
-
 226
226 -
 227
227 -
 228
228 -
 229
229 -
 230
230 -
 231
231 -
 232
232 -
 233
233 -
 234
234 -
 235
235 -
 236
236 -
237
-
238
-
239
-
240
-
241
-
242
-
243
-
244
-
245
-
246
-
247
-
248
-
249
-
250
-
251
-
252
-
253
-
254
-
255
-
256
-
257
-
258
-
259
-
260
-
261
-
262
-
263
-
264
-
265
-
266
-
267
-
268
-
269
-
270
-
271
-
272
-
273
-
274
-
275
-
276
-
277
-
278
-
279
-
280
-
281
-
282
-
283
-
284
-
285
-
286
-
287
-
288
-
289
-
290
-
291
-
292
-
293
-
294
-
295
-
296
-
297
-
298
-
299
-
300
-
301
-
302
-
303
-
304
-
305
-
306
-
307
-
308
-
309
-
310
-
311
-
312
-
313
-
314
-
315
-
316
-
317
-
318
-
319
-
320
-
321
-
322
-
323
-
324
-
325
-
326
-
327
-
328
-
329
-
330
-
331
-
332
-
333
-
334
-
335
-
336
-
337
-
338
-
339
-
340
-
341
-
342
-
343
-
344
-
345
-
346
-
347
-
348
-
349
-
350
-
351
-
352
-
353
-
354
-
355
-
356
-
357
-
358
-
359
-
360
-
361
-
362
-
363
-
364
-
365
-
366
-
367
-
368
-
369
-
370
-
371
-
372
-
373
-
374
-
375
-
376
 |
 |