Dell C1765NFW Dell Users Guide - Page 270
Setting the Time and Date, Changing the Clock Mode, Setting Sounds, Speaker Volume
 |
View all Dell C1765NFW manuals
Add to My Manuals
Save this manual to your list of manuals |
Page 270 highlights
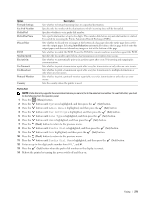
For details on how to use the numeric keypad to enter alphanumeric characters, see "Using the Numeric Keypad to Enter Characters" on page 94. 10 Press the (Set) button when the name on the display is correct. 11 To return to the previous screen, press the (Back) button. Setting the Time and Date NOTE: It may be necessary to reset the correct time and date if loss of power to the printer occurs. 1 Press the (Menu) button. 2 Press the button until System is highlighted, and then press the (Set) button. 3 Press the button until Admin Menu is highlighted, and then press the (Set) button. 4 Press the button until System Settings is highlighted, and then press the (Set) button. 5 Press the button until Date & Time is highlighted, and then press the (Set) button. 6 Ensure that Set Date is highlighted, and then press the (Set) button. 7 Enter the correct date using the numeric keypad, or press the button to select the correct date. NOTE: If you make a mistake while entering numbers, press the button to re-enter the digit. 8 Press the (Set) button when the date on the display is correct. 9 Press the button until Set Time is highlighted, and then press the (Set) button. 10 Enter the correct time using the numeric keypad, or press the button to select the correct time. 11 Press the (Set) button when the time on the display is correct. 12 To return to the previous screen, press the (Back) button. Changing the Clock Mode You can set the current time using either the 12-hour or the 24-hour format. 1 Press the (Menu) button. 2 Press the button until System is highlighted, and then press the (Set) button. 3 Press the button until Admin Menu is highlighted, and then press the (Set) button. 4 Press the button until System Settings is highlighted, and then press the (Set) button. 5 Press the button until Date & Time is highlighted, and then press the (Set) button. 6 Press the button until Date Format is highlighted, and then press the (Set) button. 7 Press the button until the desired format is highlighted, and then press the (Set) button. 8 To return to the previous screen, press the (Back) button. Setting Sounds Speaker Volume 1 Press the (Menu) button. 2 Press the button until System is highlighted, and then press the (Set) button. 3 Press the button until Admin Menu is highlighted, and then press the (Set) button. 4 Press the button until Fax Settings is highlighted, and then press the (Set) button. 5 Press the button until Line Monitor is highlighted, and then press the (Set) button. 6 Press the button until the desired volume is highlighted, and then press the (Set) button. 268 Faxing
-
 1
1 -
2
-
3
-
4
-
5
-
6
-
7
-
8
-
9
-
10
-
11
-
12
-
13
-
14
-
15
-
16
-
17
-
18
-
19
-
20
-
21
-
22
-
23
-
24
-
25
-
26
-
27
-
28
-
29
-
30
-
31
-
32
-
33
-
34
-
35
-
36
-
37
-
38
-
39
-
40
-
41
-
42
-
43
-
44
-
45
-
46
-
47
-
48
-
49
-
50
-
51
-
52
-
53
-
54
-
55
-
56
-
57
-
58
-
59
-
60
-
61
-
62
-
63
-
64
-
65
-
66
-
67
-
68
-
69
-
70
-
71
-
72
-
73
-
74
-
75
-
76
-
77
-
78
-
79
-
80
-
81
-
82
-
83
-
84
-
85
-
86
-
87
-
88
-
89
-
90
-
91
-
92
-
93
-
94
-
95
-
96
-
97
-
98
-
99
-
100
-
101
-
102
-
103
-
104
-
105
-
106
-
107
-
108
-
109
-
110
-
111
-
112
-
113
-
114
-
115
-
116
-
117
-
118
-
119
-
120
-
121
-
122
-
123
-
124
-
125
-
126
-
127
-
128
-
129
-
130
-
131
-
132
-
133
-
134
-
135
-
136
-
137
-
138
-
139
-
140
-
141
-
142
-
143
-
144
-
145
-
146
-
147
-
148
-
149
-
150
-
151
-
152
-
153
-
154
-
155
-
156
-
157
-
158
-
159
-
160
-
161
-
162
-
163
-
164
-
165
-
166
-
167
-
168
-
169
-
170
-
171
-
172
-
173
-
174
-
175
-
176
-
177
-
178
-
179
-
180
-
181
-
182
-
183
-
184
-
185
-
186
-
187
-
188
-
189
-
190
-
191
-
192
-
193
-
194
-
195
-
196
-
197
-
198
-
199
-
200
-
201
-
202
-
203
-
204
-
205
-
206
-
207
-
208
-
209
-
210
-
211
-
212
-
213
-
214
-
215
-
216
-
217
-
218
-
219
-
220
-
221
-
222
-
223
-
224
-
225
-
226
-
227
-
228
-
229
-
230
-
231
-
232
-
233
-
234
-
235
-
236
-
237
-
238
-
239
-
240
-
241
-
242
-
243
-
244
-
245
-
246
-
247
-
248
-
249
-
250
-
251
-
252
-
253
-
254
-
255
-
256
-
257
-
258
-
259
-
260
-
261
-
262
-
263
-
264
-
 265
265 -
 266
266 -
 267
267 -
 268
268 -
 269
269 -
 270
270 -
 271
271 -
 272
272 -
 273
273 -
 274
274 -
 275
275 -
276
-
277
-
278
-
279
-
280
-
281
-
282
-
283
-
284
-
285
-
286
-
287
-
288
-
289
-
290
-
291
-
292
-
293
-
294
-
295
-
296
-
297
-
298
-
299
-
300
-
301
-
302
-
303
-
304
-
305
-
306
-
307
-
308
-
309
-
310
-
311
-
312
-
313
-
314
-
315
-
316
-
317
-
318
-
319
-
320
-
321
-
322
-
323
-
324
-
325
-
326
-
327
-
328
-
329
-
330
-
331
-
332
-
333
-
334
-
335
-
336
-
337
-
338
-
339
-
340
-
341
-
342
-
343
-
344
-
345
-
346
-
347
-
348
-
349
-
350
-
351
-
352
-
353
-
354
-
355
-
356
-
357
-
358
-
359
-
360
-
361
-
362
-
363
-
364
-
365
-
366
-
367
-
368
-
369
-
370
-
371
-
372
-
373
-
374
-
375
-
376
 |
 |
